Cisco WebEx Hybrid Solutions
By connecting existing network resources and on-premises unified communications services to the Cisco WebEx cloud.
More collaboration capabilities will be provided, along with consistent, unified user and administrator experiences
These days almost organizations are choosing collaboration services from the cloud but many are unable to move all their
services to the cloud. WebEx Hybrid Services bring cloud and premises based services together as one solution to deliver
the best calling ,meeting and messaging .
There are different scenarios for hybrid calling between WebEx Cloud and CUCM on premise
1.0 Hybrid Calling for WebEx Devices (Device Connector)
Hybrid Calling for WebEx Devices provides hybrid call functionality for devices that are added to Workspaces in Control
Hub. WebEx devices are registered to the cloud, and when they are enabled with Hybrid Calling, they also connect to onpremises Unified Communication Solution.
WebEx devices in the Workspace become a part of your existing on-premises dial plan, allowing these devices to call user
extensions or the PSTN, and receive incoming calls Like devices registered directly to the on premise Cisco Unified
Communication Solution (CUCM).
WebEx App can also have a calling capability while WebEx APP connected to a cloud-registered WebEx device that is
enabled for Hybrid Calling. At this case, Users dial directly from WebEx App and have the call take place on the WebEx
device.
On-premises and cloud Requirements for Hybrid Calling for WebEx Devices.
Before configuring devices for the service, ensure to meet all the prerequisites
WebEx Devices
These devices can get on-premises and PSTN calling functionality from the Unified CM after they’re enabled for Hybrid
Calling. You could check all supported devices through below link
Cisco Unified Communication on-premises Solution
- Minimum supported version of Cisco Call Manager Cluster is v 11.5 SU3 and Later
- The Unified CM user account that represent the Workspace account must have a minimum Enhanced UCL
- Cisco Expressway Core and Edge is required for Hybrid Calling, version X8.11.4 or later required (Hybrid Calling calls are classified the same as Mobile Remote Access (MRA) calls and doesn’t consume licenses on Expressway)
WebEx Device Connector
To configure Hybrid Calling for WebEx Devices, the WebEx Device Connector Software has to be installed on Machine has
network access to the Unified CM that contains configuration that you want to synchronize to WebEx cloud-registered
devices in Workspaces.
The WebEx Device Connector is a lightweight piece of software that could be installed on supported Windows or MAC
operating systems:
Active Hybrid calling services for organization
Hybrid Calling is a service hosted by WebEx Control Hub, Administrator of WebEx Control Hub can enable this service then
add this service to WebEx cloud-registered devices.
Network requirements
Open required ports for
- Media traversal between phones, Expressways in the traversal pair, and the WebEx cloud
- Access for HTTPS or secure web sockets outbound from the system with the WebEx Device
- AXL queries from the system with the WebEx Device Connector to Unified CM
2.0 Hybrid Calling for Webex App (Unified CM)
This Hybrid Scenario known as Migration from Jabber to WebEx App, WebEx App can be registered directly to
Cisco Unified Communications Manager call control environment (on-premises enterprise).
WebEx App Users will gain all on Premises experiences like Cisco Jabber, allowing them to directly make calls
in WebEx App through your Unified CM environment without linking WebEx App with Devices registered on
Cloud.
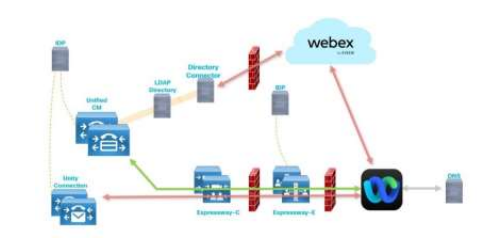
Cisco Unified CM and Mobile and Remote Access (MRA) solution will be used by WebEx App for registration to
calling Services on Cisco Call Manager on premise similar to Jabber.

WebEx App makes its primary connection to the WebEx cloud to get its service configuration (messaging, meetings,
presence, contact lists, calling behavior, and so on), but it registered directly with on premise Cisco Call manager for calling
services like Jabber.
On-premises and cloud Requirements for Hybrid Calling for WebEx App.
Cisco Unified Communication on-premises Solution
- Minimum supported version of Cisco Call Manager Cluster is v 11.5 SU3 and Later
- Cisco Expressway E and C traversal pair for Mobile and Remote Access (MRA) with version 8.11.4 and later (MRA Solution is required in case of allowing remote WebEx App Users for Hybrid Calling)
Licenses
- Cisco WebEx organization (managed in Control Hub) with a paid subscription.
- User accounts must be managed in organization but they don't require a specific license assignment to use Calling in WebEx App (Unified CM).
- For softphone functionality, each WebEx App registers to Unified CM as a softphone client like Cisco Jabber and counts as a device toward Unified CM licensing.
Recommended configuration but not mandatory
- (Single sign-on) SSO is supported with Unified CM and Expressway. For a consistent user experience with SSO, it is recommended to extend Identity Provider (IdP) integration to WebEx App so that users can sign in with the same credentials
- It is recommended to sync users from Active Directory into Control Hub through Cisco Directory Connector also synchronize user phone numbers to have same users accounts on Cisco Call Manager and Control Hub.
3.0 Hybrid Calling Through Integration between WebEx Calling and Cisco CUCM
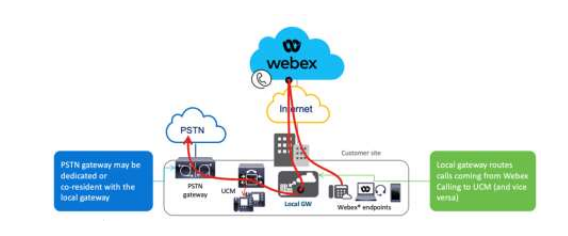
To allow direct dialing between phones registered to Unified CM and phones in WebEx Calling locations, the integration
through SIP trunk between Cisco Call manager (on-premises calling solution) and WebEx Calling (cloud calling solution) will
be required.
Also this integration is required in case of transition FROM Unified CM (on-premises calling solution) TO WebEx Calling
(cloud calling solution)
Local Gateway
The local gateway is an edge device for Public Switch Telephony Network (PSTN) interworking and on premises Unified CM
interworking with WebEx Calling. The local gateway can be deployed standalone or in deployments where integration into
Cisco Unified Communications Manager is required.
The trunk between the local gateway and WebEx Calling is always secured using SIP TLS transport and SRTP for media
between Local Gateway and the WebEx Calling Access SBC.

Hardware and Software Requirements for Local Gateway
- ISR 4321, 4331, 4351, 4431, 4451,Catalyst 8200,8300, CSR 1000v (vCUBE) – (IOS XE 16.9(4) and 16.12.2 or later)
- IOS-XE 16.10.x is not supported as Local Gateway for any platform
- ISR 1100 (IOS-XE 16.12.2)
Make sure the platform is running a supported IOS-XE release as per the
License for Local Gateways
CUBE calling licenses must be installed on the local gateway
Configuring Local Gateway on WebEx Calling
There are two options to configure the Local Gateway for your WebEx Calling trunk
- Registration-based trunk
- Certificate-based trunk
WebEx Calling requires secure signaling and media. The local gateway performs the encryption, and a TLS connection must
be established outbound to the cloud
Configuring Local Gateway on Cisco Unified CM
Integration between Cisco Call Manager and CUBE has to be SIP based , this integration could be secured or non
Call Routing Considerations
Calls from WebEx Calling to Unified CM
The WebEx Calling routing logic works like this: if the number that is dialed on a WebEx Calling endpoint cannot be routed
to any other destination within the same customer in WebEx Calling, then the call is sent to the local gateway.
Calls From Unified CM to WebEx Calling
To enable call routing from Unified CM to WebEx Calling on Unified CM a set of routes need to be provisioned to define
the set of +E.164 and enterprise numbering plan addresses in WebEx Calling
WebEx Calling Licenses
WebEx Calling provides three license types
- Professional—These licenses provide a full feature set for your entire organization.
- Basic – Provide a full-featured voice offer but are limited to a single device per user
- Workspaces - (also known as Common Area)
