Accend Networks San Francisco Bay Area Full Service IT Consulting Company

Categories
Blogs

VPC Security

Enhancing VPC Security: An Overview of AWS Network Firewall

As cloud computing keeps changing, protecting network infrastructure is key. Amazon Web Services (AWS) provides strong security tools, including AWS Network Firewall. This article looks at leveraging AWS Network Firewall to protect resources in a Virtual Private Cloud (VPC).

What is Network Firewall?

Network Firewall is a managed network firewall service for VPC. It is a stateful, network firewall and intrusion detection and prevention service for your virtual private cloud (VPC) that you create in Amazon Virtual Private Cloud (VPC).

Network Firewall lets you filter traffic at the edge of your VPC. This covers filtering traffic going to and coming from an internet gateway, NAT gateway, or through VPN or AWS Direct Connect.

Understanding AWS Network Firewall

To understand the concept of a Network Firewall, let’s first explore some of the security features available for the VPC.
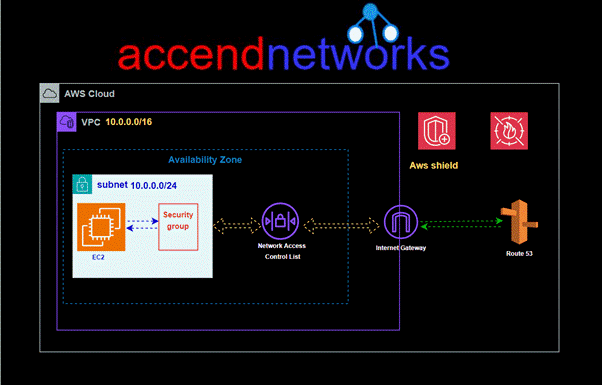
From the above architecture, we can observe that at the instance level, security groups are used to provide security for your instances and manage all incoming and outgoing traffic. At the subnet level, Network Access Control Lists (NACLs) are utilized to evaluate traffic entering and exiting the subnet.

Any traffic from the internet gateway to your instance will be evaluated by both NACLs and security group rules. Additionally. AWS Shield and AWS WAF are available for protecting web applications running within your VPC.

Single zone architecture with internet gateway and network firewall
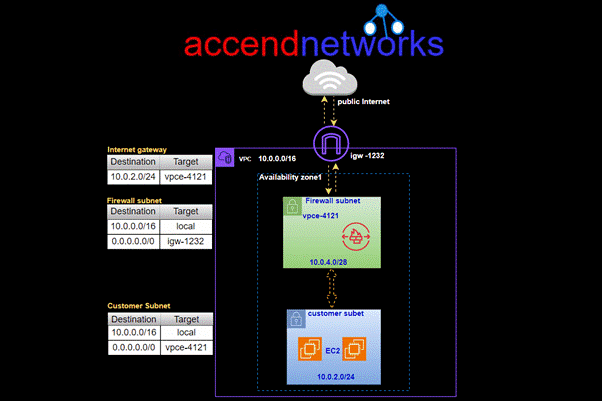
AWS network firewall will establish a subnet in your VPC’s availability zone and set up an endpoint within it. All traffic from your subnet heading to the internet will be routed through this network firewall subnet for inspection before proceeding to its destination and vice versa for incoming traffic. This is a valuable feature that enhances the security of your VPC.

Two zone architecture with network firewall and internet gateway
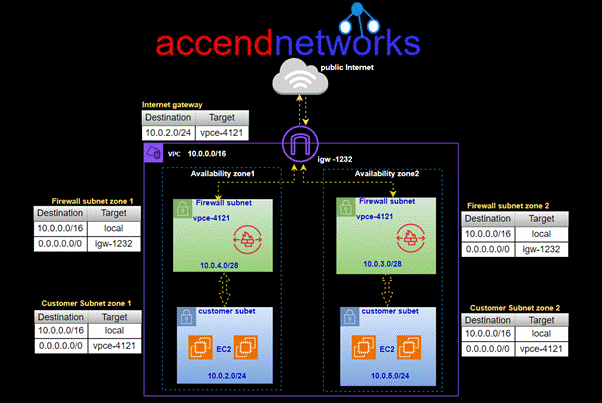
In this setup, you can have firewall subnets in each availability zone, where each network firewall will inspect traffic going to and from the customer subnet in that zone. To make sure all traffic goes through these firewall subnets, you’ll need to update your route tables.

How it Network Firewall Works
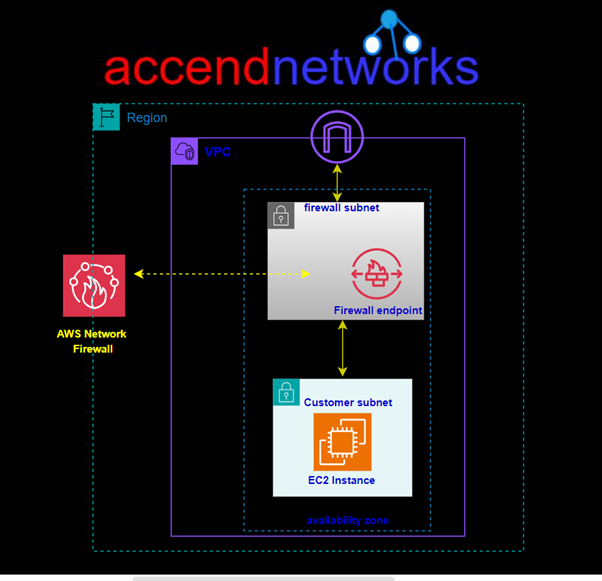
To apply traffic-filtering logic provided by Network Firewall, traffic should be routed symmetrically to the Network Firewall endpoint. Network Firewall endpoint is deployed into a dedicated subnet of a VPC (Firewall subnet). Depending on the use case and deployment model, the firewall subnet could be either public or private. For high availability and multi-AZ deployments, allocate a subnet per AZ.

Once NF is deployed, the firewall endpoint will be available in each firewall subnet. The firewall endpoint is similar to the interface endpoint and it shows up as vpce-id in the VPC route table.

Network Firewall makes firewall activity visible in real-time via CloudWatch metrics and offers increased visibility of network traffic by sending logs to S3, CloudWatch, and Kinesis datafirehorse.

NF is integrated with AWS firewall Manager, giving customers who use AWS Organizations a single place to enable and monitor firewall activity across all VPCs and AWS accounts.
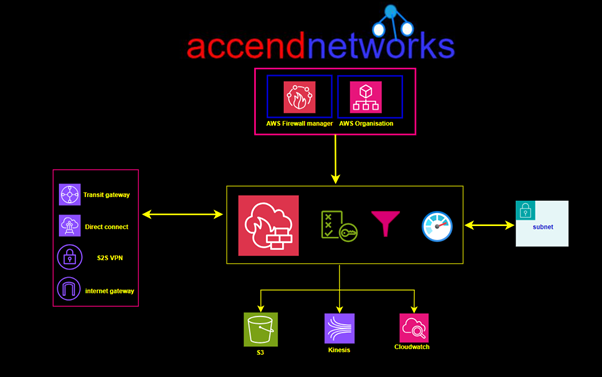
Network Firewall Components:

Firewall: A firewall connects the VPC that you want to protect to the protection behaviour that’s defined in a firewall policy.

Firewall policy: Defines the behaviour of the firewall in a collection of stateless and stateful rule groups and other settings. You can associate each firewall with only one firewall policy, but you can use a firewall policy for more than one firewall.

Rule group: A rule group is a collection of stateless or stateful rules that define how to inspect and handle network traffic.

Stateless Rules

Inspects each packet in isolation. Does not take into consideration factors such as the direction of traffic, or whether the packet is part of an existing, approved connection.

Stateful Rules

Stateful firewalls are capable of monitoring and detecting states of all traffic on a network to track and defend based on traffic patterns and flows.

This brings us to the end of this blog.

Conclusion

Protecting resources inside a VPC plays a key role in today’s cloud setups. AWS Network Firewall gives you a full set of tools to guard your network against different kinds of threats. setting AWS Network Firewall manager, will give your VPC resources strong protection.

Thanks for reading and stay tuned for more.

If you have any questions concerning this article or have an AWS project that requires our assistance, please reach out to us by leaving a comment below or email us at [email protected].

Thank you!

Categories
Blogs

Expand Your EC2 Storage

Effortlessly Expand Your EC2 Storage: Increasing EBS Volume Size

Amazon Elastic Block Store (EBS) volumes, give you a way to store data for your Amazon EC2 instances that lasts even if the cases themselves are turned off. As your applications grow and you need more space, you don’t need to worry. Amazon Web Services has made it easy to increase the size of your EBS volume without any downtime or losing your data. In this guide, we will take you through the steps to seamlessly expand your EC2 storage.

There are a few reasons why you might want to increase the size of your EBS Volume

Growing Data Requirements: As your application starts to store more and more data, the initial storage capacity might not be enough anymore.


Performance Boost: Increasing the volume size can improve the performance of certain workloads, especially when it comes to input/output operations.


Cost Efficiency: Sometimes, it’s more cost-effective to expand an existing volume rather than adding more volumes and dealing with the hassle of managing them separately.


Increasing disk size may seem complex. Do we need downtime? Should we stop the server? Do we need to detach the volume? These questions may cross your mind.


However, the reality is that we can increase disk size without detaching the volume or restarting the server. Moreover, this process doesn’t require any downtime.


We will follow the following outlined steps to achieve our objective. Ensure you have an active running EC2 instance in your AWS account or you can spin up one to follow along with this demo.

Step 1: Check the current disk status

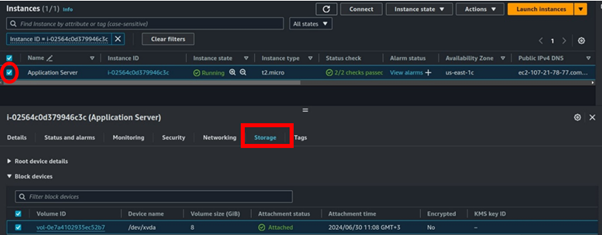
Log into the EC2 console, select your running instance then move to the storage tab, you will be able to see your volume characterized by volume ID, device name, volume size, and the attachment status.

Here I have my application server instance running with 8GB of EBS volume attached.

Check the disk status by using the below command.

df -hT

The current disk size is 8GB and 20% is used. Now, let’s proceed with the next step.

Step 2: Create Snapshot

Creating a snapshot is essential to keep a backup of our existing volume in case anything unusual happens during this activity.

Click on the EBS volume ID attached to your EC2 instance, then select your EBS volume and click on actions > Create snapshot.

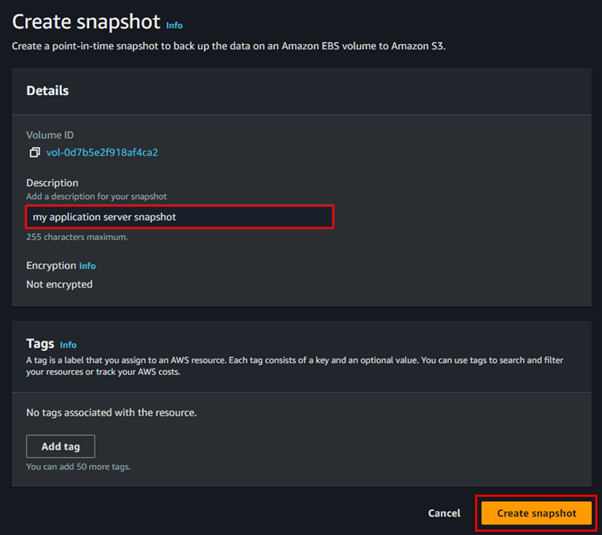
In the Create Snapshot UI, give a relevant description and tag to your snapshot then click Create Snapshot.

Go to snapshots and wait till your snapshot status shows Completed.

Step 3: Increase the EBS volume

Make sure your snapshot is created successfully before proceeding with this step.

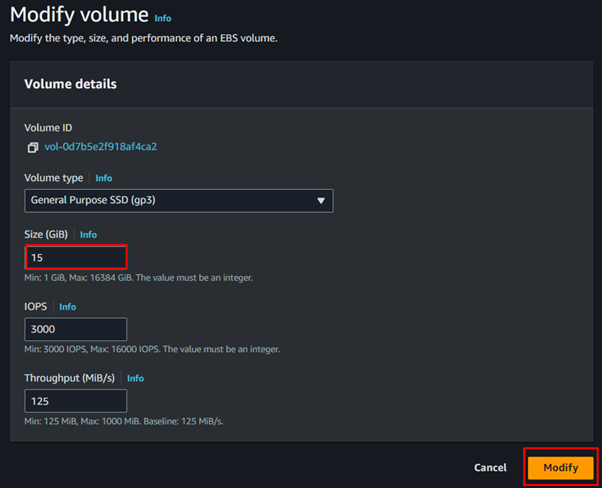
Go to the volumes section, select the volume attached to the EC2, and click on modify volume.

In the create volume UI, select volume type, and choose size as your desired business need, then click modify Increase the volume size as per your requirement and click on modify. Here I have changed the volume size from 8 to 15 GB.

You can now see that the disk volume attached to the server is updated to 15GB.


Step 4: Resize the File System

Now we need to extend our OS file system to see our increased volume.

SSH into the EC2 instance

Run the below command to check the volume size.

df -hT

We can see that the disk size is still 8GB.

Run the below command to see information about the block devices attached to our EC2 instance.

lsblk

Here xvda1 is our current volume that is attached and xvda is the increased volume.

Extend the partition xvda by 1

sudo growpart /dev/xvda 1

Extend the volume

sudo xfs_growfs -d /dev/xvda1

Check the volume size

df -hT

We can see that our volume size has now increased to 15GB

Conclusion

AWS provides a straightforward method to increase the volume size of EBS. We need to extend the OS file system to see the changes. increasing the size of your EBS volume is pretty simple and can be a game-changer for your growing apps.


This brings us to the end of this blog. Clean up.

If you have any questions concerning this article or have an AWS project that requires our assistance, please reach out to us by leaving a comment below or email us at [email protected].

Thank you!

Categories
Blogs

EC2 Instance Connect Endpoint

EC2 Instance Connect Endpoint: Secure Access to Private Subnet Instances Without Internet

Amazon Web Services offers EC2 Instance Connect Endpoint. This powerful feature enables secure SSH access to private EC2 instances with private IP addresses without the need for managing SSH keys or bastion hosts. With EC2 Instance Connect Endpoint, we can establish SSH and RDP connectivity to our EC2 instances without relying on public IP addresses. This means we can have remote connectivity to instances in private subnets without the need for public IPv4 addresses.

What is an EC2 instance connect endpoint?

EC2 Instance Connect Endpoint allows you to connect to an instance without requiring the instance to have a public IPv4 address. You can connect to any instances that support TCP.

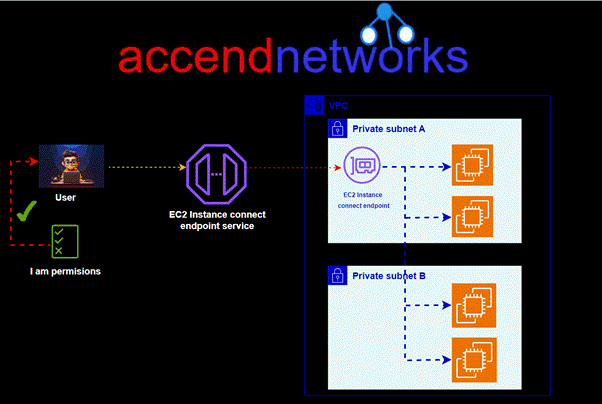
EC2 Instance Connect Endpoint combines AWS Identity and Access Management (IAM) based access controls with network-based controls such as Security Group rules. This combination allows you to restrict access to trusted principals and provides an audit trail of all connections through AWS CloudTrail.

Traditional way of accessing EC2 instance in the private subnet

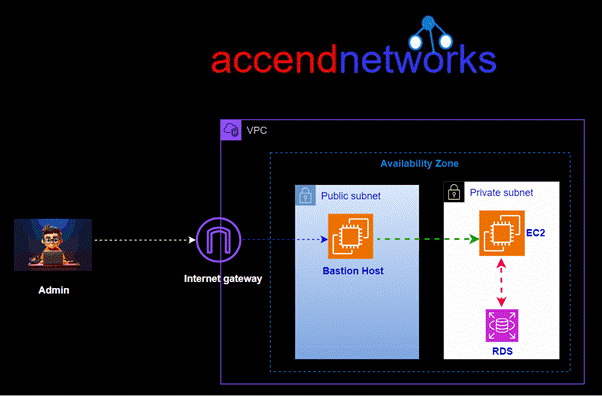
In the past, customers had to create Bastion Hosts to tunnel SSH/RDP connections to instances with private IP addresses. However, this approach required additional operational overhead for patching, managing, and auditing the Bastion Hosts, as well as incurring extra costs. EC2 Instance Connect Endpoint eliminates these costs and operational burdens associated with maintaining bastion hosts.

Additionally, the service facilitates detailed auditing and logging of connection requests, providing administrators with a comprehensive overview of who is accessing resources and when. This feature is invaluable for security and compliance monitoring, enabling a proactive approach to managing and mitigating potential security risks.

How it works

First, we create an EC2 Instance Connect Endpoint in a subnet in our VPC then, when you want to connect to an instance, you specify the ID of the instance. You can optionally provide the EC2 Instance Connect Endpoint. The endpoint acts as a private tunnel to the instance.

Once you create an EC2 Instance Connect Endpoint in a subnet, you can use the endpoint to connect to any instance in any subnet in your VPC provided our VPC is configured to allow subnets to communicate.

Let’s now dive into the hands-on, we will start by creating an EC2 instance.

Log in to the AWS console as a user with admin user privileges, or make sure you have the necessary permissions.

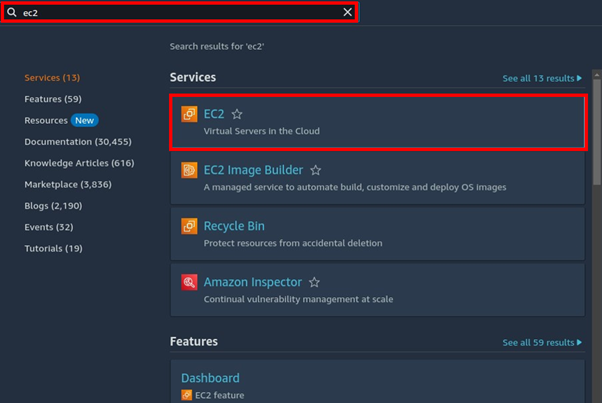
In the search bar, type EC2 then select EC2 under services to go to the EC2 console.

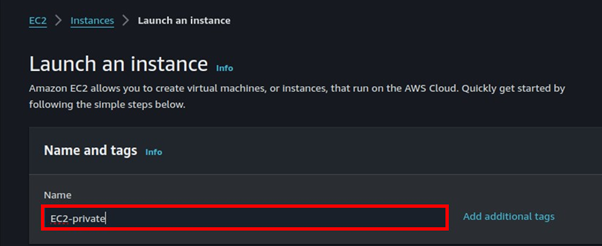
On the left side of EC2 UI, select instances then click launch instances.

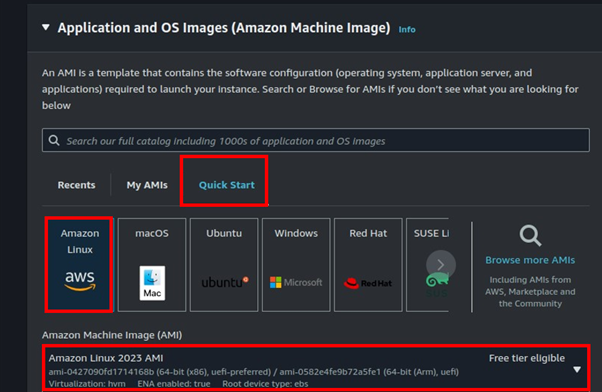
Fill in your instance details. select the QuickStart tab then select Amazon Linux AMI. Scroll down.

Select t2. Micro, free tier eligible. Under key pairs, we will not need them so select the drop-down button then select move without key pair.

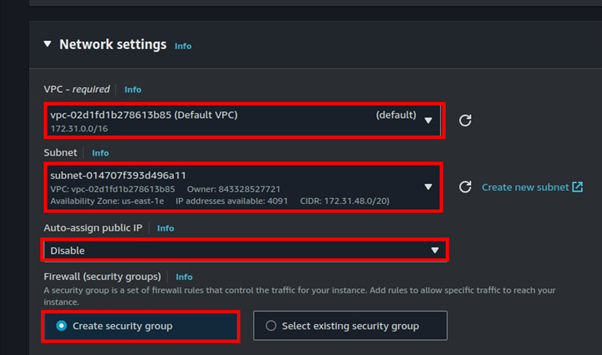
Move to the networking tab then click edit.

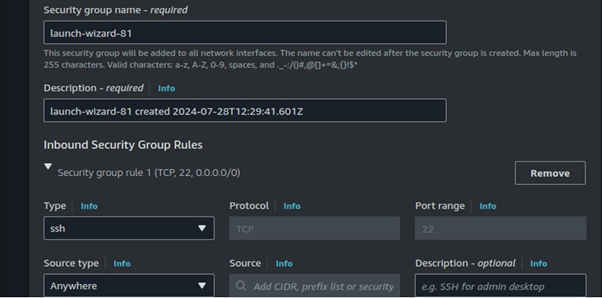
We will leverage the default VPC. Select your preferred subnet then under Auto-assign public IP, select the drop-down button and select disable. You create a security group or select one with SSH port 22 open.

Scroll down and select Create instance.

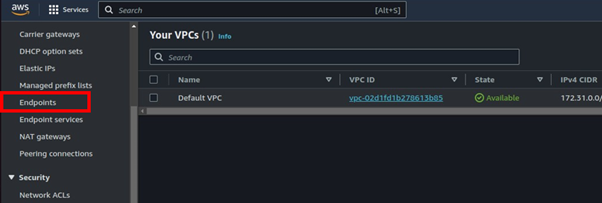
While our instance is launching let’s move to the VPC dashboard.

On the left side of the VPC UI, select endpoints.

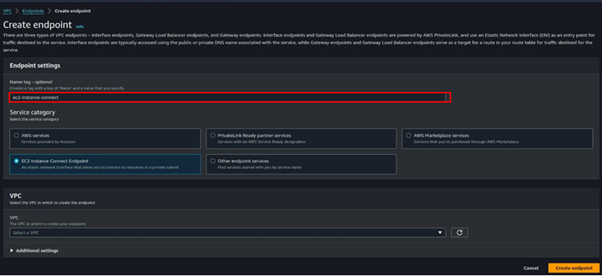
Select Create Endpoint.

Provide the name of your endpoint. Under the service category, select the radio button for the EC2 Instance connect endpoint.

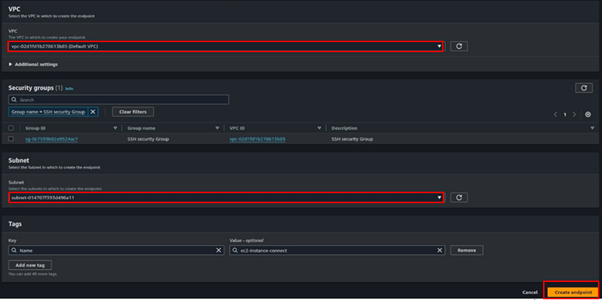
For VPC, select the drop-down button and select your VPC. Again, for subnets select the subnet where you launched the Instance. These are the only required settings. Click Create Endpoint.

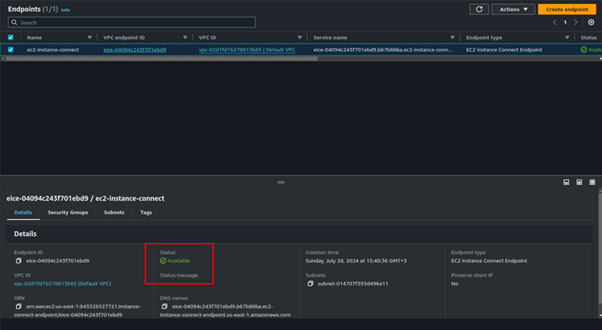
After successful creation, it will take a couple of minutes in the pending state and then become available.

After waiting for a few minutes, our endpoint is now available.

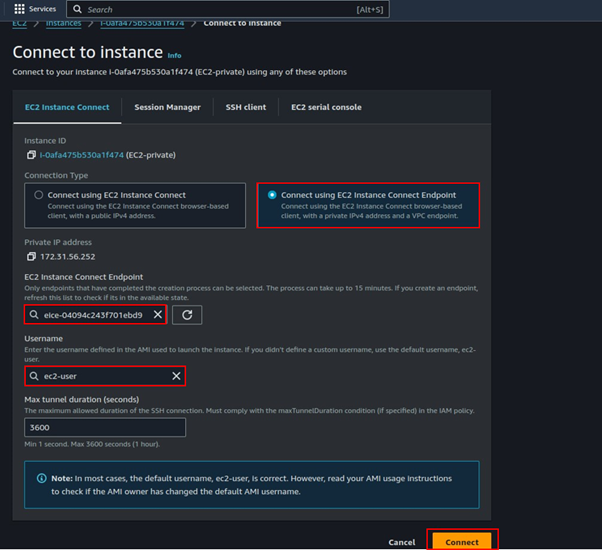
Go back to the EC2 instance dashboard, select the instance you created then select Connect. You will be brought to the connect instance dashboard.

Select the radio button on connect using EC2 Instance connect Endpoint. Fill in the required details. select the endpoint you created. The user name for amazon Linux user is ec2 -user. Click connect.

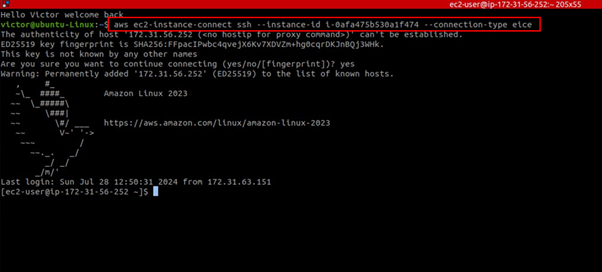
Success we are in our EC2 instance, and we can see the IP address is the private one.

We have managed to connect to an EC2 instance in the private subnet with a private IP address. Objective achieved.

We can also use the below command to connect to the instance in our terminal. Make sure you have AWS CLI installed and configured.

This brings to the end of this blog, bring everything down.

Conclusion

EC2 Instance Connect Endpoint provides a secure solution to connect to your instances via SSH or RDP in private subnets without Internet Gateways, public IPs, agents, and bastion hosts.

Thanks for reading and stay tuned for more.

If you have any questions concerning this article or have an AWS project that requires our assistance, please reach out to us by leaving a comment below or email us at [email protected].

Thank you!
Categories
Blogs

Secure Uploads and Downloads in S3

Secure File Uploads and Downloads in S3 Using Presigned URLs

Amazon Simple Storage Service (S3) is a highly scalable object storage service used for storing and retrieving large amounts of data. While S3 provides a straightforward way to manage files, ensuring secure access to these files is crucial. One effective method to securely upload and download files from S3 is by using presigned URLs. This article delves into what presigned URLs are, how they work, and a hands-on demo.

S3 Presigned URL

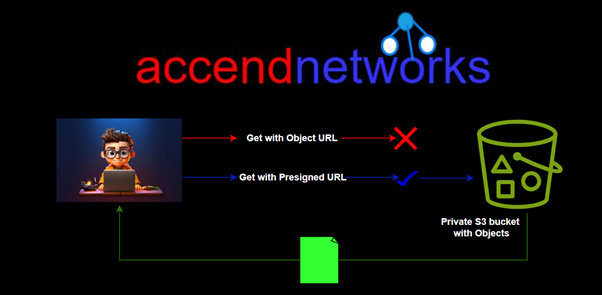
Presigned URLs are URLs that provide temporary access to objects in S3 without requiring AWS credentials directly from the user. When you create a presigned URL, you essentially generate a URL that includes a signature, allowing anyone with the URL to perform specific actions (like upload or download) on the specified S3 object within a limited time frame.


When you create an S3 bucket, it is private by default, and it is up to you to change this setting based on your needs. If you want a user to upload or download files in a private bucket without making the bucket public or requiring AWS credentials or IAM permissions, you can create a presigned URL.

Presigned URLs work even if the bucket is public, but the main purpose of presigned URLs is to help you keep objects private while allowing limited and controlled access when necessary.

Requirements for Generating Presigned URLs

A presigned URL must be generated by an AWS user or an AWS application that has access to the bucket and the object in the bucket at the time of creation. When a user makes an HTTP call with the presigned URL, AWS processes the request as if it was performed by the entity that generated the presigned URL.

Usage and Expiration

Presigned URLs can be shared with temporarily authorized users to allow them to download or upload objects. They can only be used for the method specified when generating the URL. For example, a GET-presigned URL cannot be used for a PUT operation.

There is no default limit on the number of times a presigned URL can be used until it expires.

Get presigned URLs

A GET-presigned URL can be used directly in a browser or integrated into an application or webpage to download an object from an S3 bucket. It can be generated using the AWS Management Console, AWS CLI, or AWS SDK.

In the following, I will demonstrate how to generate a GET-presigned URL using the AWS Management Console.

Generating Get presigned URL with the console

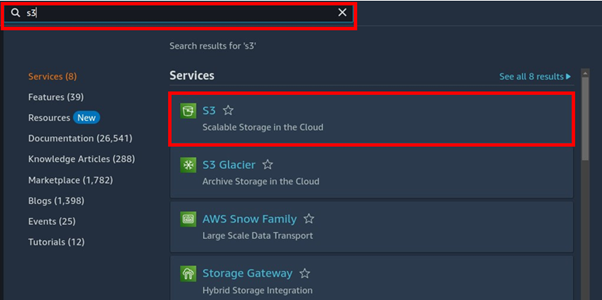
Log in to the management console, in the search box, type s3 then select s3 under services.

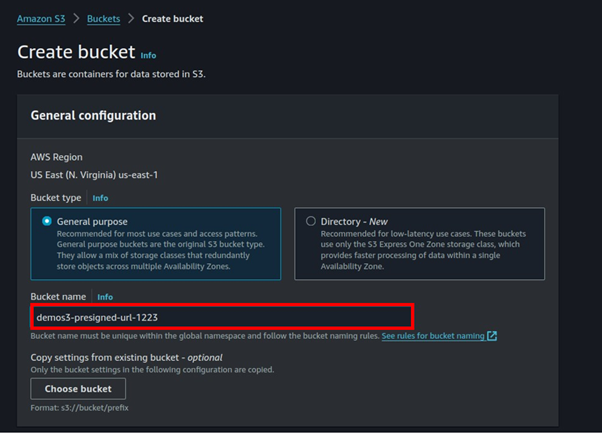
In the s3 UI select Create Bucket.

In the create bucket UI, select a unique name for your bucket then Scroll down.

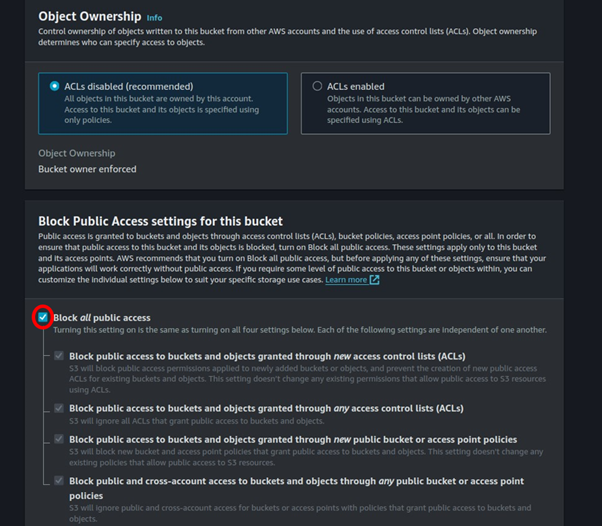
Make sure all public access is blocked.

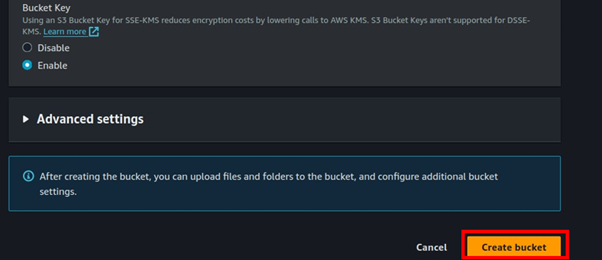
We will leave the remaining settings as default, then scroll down and click Create Bucket.

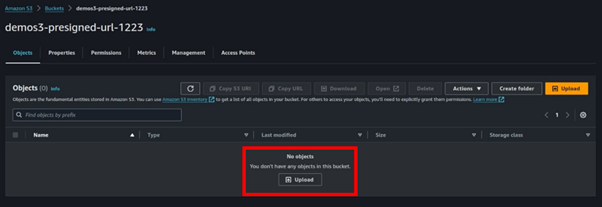
Our s3 bucket has been successfully created.

Select your bucket then select upload.

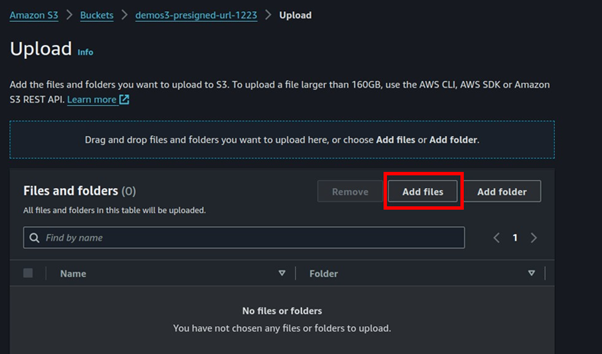
In the upload UI, select add files

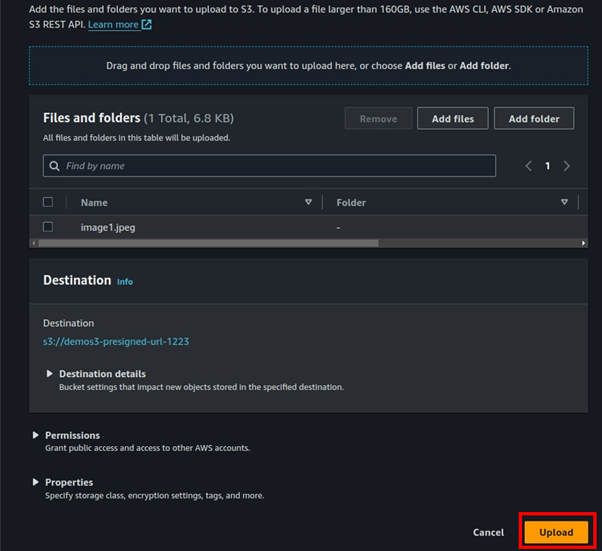
Select your file then click Upload.

Once our object has been successfully uploaded, remember our bucket is private since we blocked all public access.

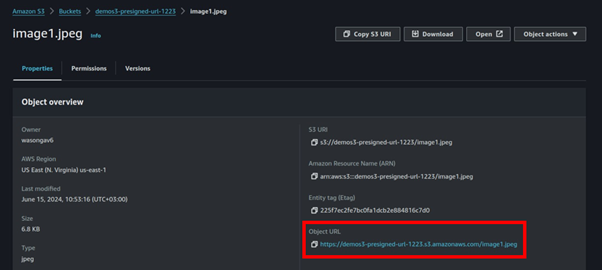
Click the object you uploaded select the object URL then paste it into your Favorite browser.

This was expected, we could not access our object since our bucket is private. We will now leverage the s3 presigned URL to securely access our object without making our bucket public.

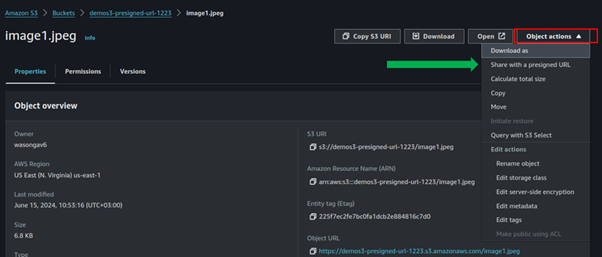
Still, in the object UI, select the drop-down object action. Then select Share with the presigned URL.

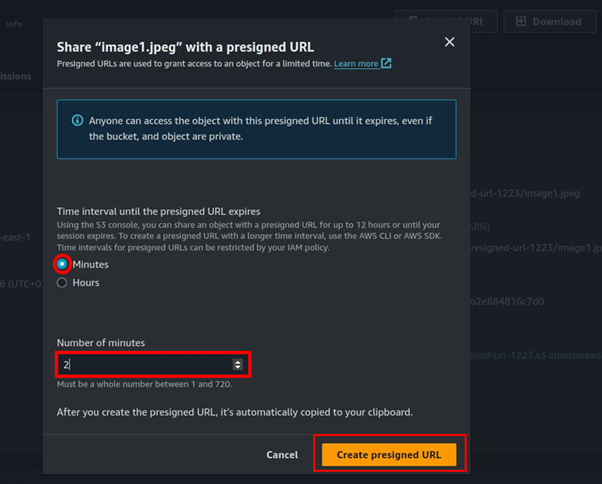
For time interval until the URL expires can be minutes to several hours, for this demo I will only give it 2 minutes. So, select minutes then for number of minutes, select two then click Create presigned URL.

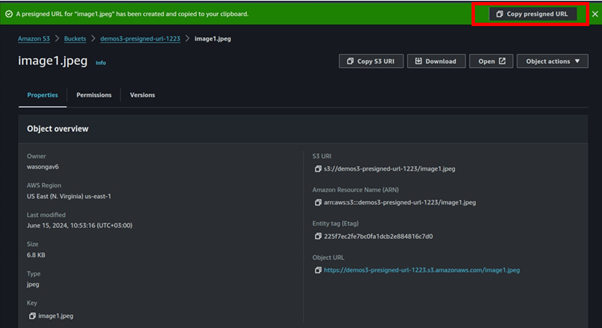
The presigned URL is successfully created, copy the presigned URL then paste it to your browser.

Success now we can access our object.

Since we only gave two minutes for this demo, attempting to access our private object using the presigned URL after it has expired will result in an access denied message as shown bellow.

S3-presigned URLs provide a secure and efficient way to grant temporary access to Amazon S3 objects without exposing AWS credentials. They are easy to implement, allowing controlled, time-limited access for specific operations. This feature enhances data sharing and access management, ensuring security and flexibility in handling S3 resources.

This brings us to the end of this blog. Clean up.

If you have any questions concerning this article or have an AWS project that requires our assistance, please reach out to us by leaving a comment below or email us at [email protected].

Thank you!

Categories
Blogs

Amazon S3

Enhancing Data Integrity in Amazon S3 with Additional Checksums

In the security world, cryptography uses something called “hashing” to confirm that a file is unchanged. Usually, when a file is hashed, the hash result is published. Next, when a user downloads the file and applies the same hash method, the hash results, or checksums (a string of output that is a set size) are compared. This means if indeed the checksum of the downloaded file and the original file are the same, the two files are identical, confirming that there have been no unexpected changes — for example, file corruption, man-in-the-middle (MITM) attacks, etc. Since hashing is a one-way process, the hashed result cannot be reversed to expose the original data. 

Verify the integrity of an object uploaded to Amazon S3

We can use Amazon S3 features to upload an object with the checksum flag “On” with the checksum algorithm that is used to validate the data during upload (or download) — in this example, as SHA-256. Optionally, you may also specify the checksum value of the object. When Amazon S3 receives an object, it calculates the checksum by leveraging the algorithm that you specified. Now, if the two checksum values do not match, Amazon S3 will generate an error.

Types of Additional Checksums

Various checksum algorithms can be used for verifying data integrity. Some common ones include:

MD5: A widely used algorithm, but less secure against collision attacks.

SHA-256: Provides a higher level of security and is more resistant to collisions.

CRC32: A cyclic redundancy check that is fast but not suitable for cryptographic purposes.

Implementing Additional Checksums

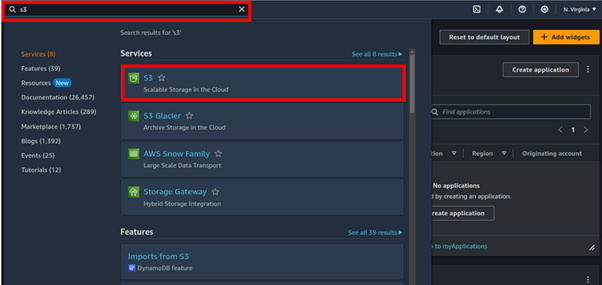
Sign in to the Amazon S3 console. From the AWS console services search bar, enter S3. Under the services search results section, select S3.

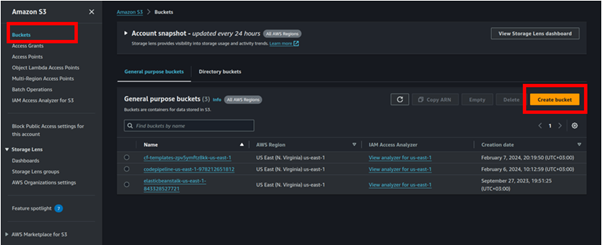
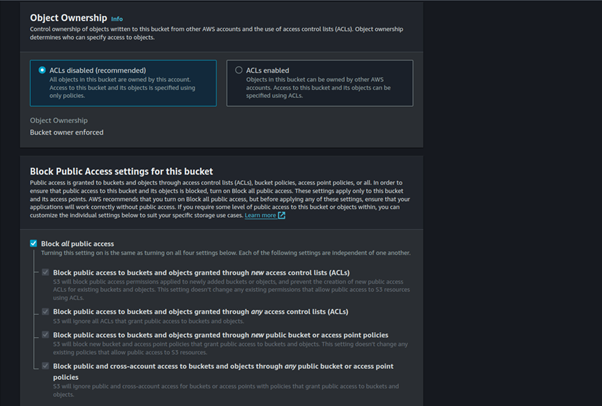
Choose Buckets from the Amazon S3 menu on the left and then choose the Create Bucket button.

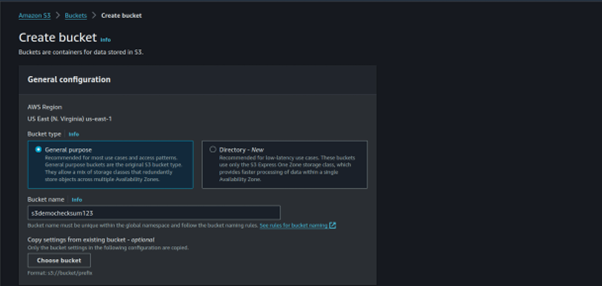
Enter a descriptive globally unique name for your bucket. The default Block Public Access setting is appropriate, so leave this section as is.

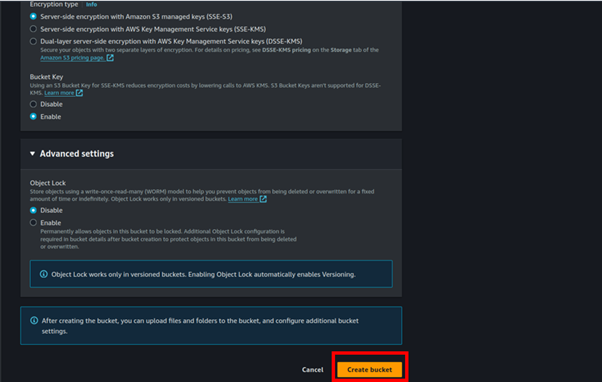
You can leave the remaining options as defaults, navigate to the bottom of the page, and choose Create Bucket.

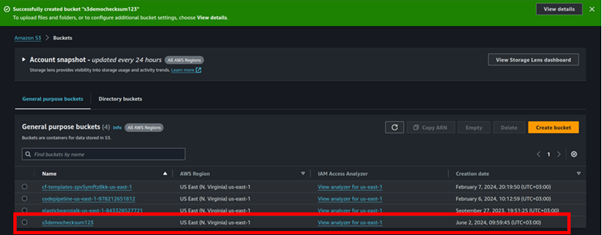
Our bucket has been successfully created.

Upload a file and specify the checksum algorithm

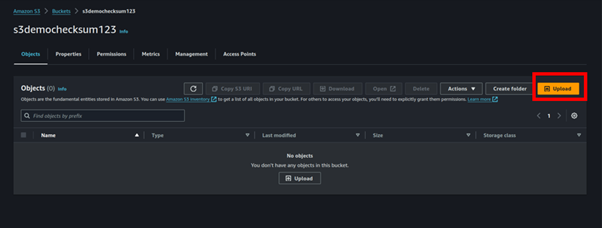
Navigate to the S3 console and select the Buckets menu option. From the list of available buckets, select the bucket name of the bucket you just created.

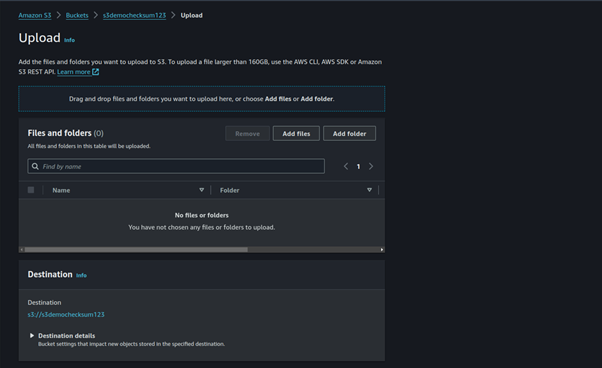
Next, select the Objects tab. Then, from within the Objects section, choose the Upload button.

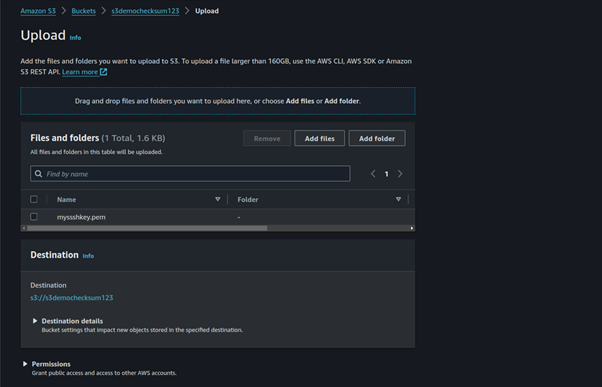
Choose the Add Files button and then select the file you would like to upload from your file browser.

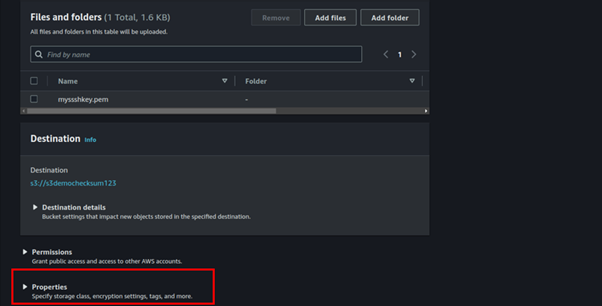
Navigate down the page to find the Properties section. Then, select Properties and expand the section.

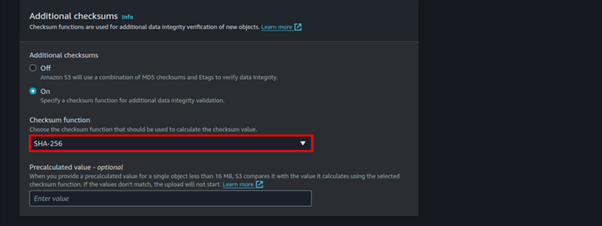
Under Additional checksums select the on option and choose SHA-256.

If your object is less than 16 MB and you have already calculated the SHA-256 checksum (base64 encoded), you can provide it in the Precalculated value input box. To use this functionality for objects larger than 16 MB, you can use the CLI or SDK. When Amazon S3 receives the object, it calculates the checksum by using the algorithm specified. If the checksum values do not match, Amazon S3 generates an error and rejects the upload, but this is optional.

Navigate down the page and choose the Upload button.

After your upload completes, choose the Close button.

Checksum Verification

Select the uploaded file by selecting the filename. This will take you to the Properties page.

Locate the checksum value: Navigate down the properties page and you will find the Additional checksums section.

This section displays the base64 encoded checksum that Amazon S3 calculated and verified at the time of upload.

Compare

To compare the object in your local computer, open a terminal window and navigate to where your file is.

Use a utility like Shasum to calculate the file. The following command performs a sha256 calculation on the same file and converts the hex output to base64: shasum -a 256 image.jpg | cut -f1 -d\ | xxd -r -p | base64

When comparing this value, it should match the value in the Amazon S3 console.

Run this code by replacing it with your image.

Congratulations! You have learned how to upload a file to Amazon S3, calculate additional checksums, and compare the checksum on Amazon S3 and your local file to verify data integrity.

This brings us to the end of this blog, thanks for reading, and stay tuned for more.

If you have any questions concerning this article or have an AWS project that requires our assistance, please reach out to us by leaving a comment below or email us at [email protected].

Thank you!