Accend Networks San Francisco Bay Area Full Service IT Consulting Company

Categories
Blogs

AWS Recycle Bin

AWS Recycle Bin: Your Key to Enhanced Data Protection and Recovery

Introduction

As more and more companies depend on the cloud infrastructure to run their businesses, at the same time they need a strong strategy to protect and recover their data, as accidental deletions or unexpected failures can lead to critical data loss, resulting in downtime and potential financial losses.  AWS well known for its wide range of services, provides various tools to keep data safe and retrievable. Among these, the AWS Recycle Bin service stands out as a powerful feature to improve data recovery options. This blog explores the AWS Recycle Bin service, what it offers, and how to use it to protect your important resources.

Getting to Know AWS Recycle Bin

The Recycle Bin service, in the context of AWS, is a concept often used to describe a safety mechanism for storing and recovering deleted resources. While AWS doesn’t offer a specific service named “Recycle Bin,” users can implement similar functionality using AWS services like AWS Lambda and Amazon S3.

In this setup, when a resource is deleted, it isn’t immediately gone forever. Instead, it’s moved to a specific storage area, often called a “Recycle Bin” or “Trash,” where it remains for a set period before being permanently deleted. This serves as a safety net, allowing users to easily recover accidentally deleted resources without needing to go through complicated backup and recovery processes.

By using AWS Lambda functions and S3 event notifications, you can automate the transfer of deleted resources to the Recycle Bin and set up policies for how long they should be retained before final deletion. This approach strengthens your data protection and management strategy within your AWS environment.

The AWS Recycle Bin is particularly useful when mistakes happen or automated systems accidentally delete resources. By enabling the Recycle Bin, you ensure that even if a resource is deleted, it can still be restored, preventing data loss and avoiding service interruptions.

Benefits of AWS Recycle Bin

Enhanced Data Protection: It allows you to recover deleted resources within a specified period, reducing the risk of permanent data loss.

Compliance and Governance: It ensures that data is not permanently lost due to accidental deletions, which is essential for maintaining audit trails and adhering to data retention policies.

Cost Management: By setting appropriate retention periods, you can manage storage costs effectively.

Let’s now get to the hands-on.

Implementation Steps

Make sure you have an EC2 instance up and running.

Get EBS Volume Information

AWS Elastic Block Store (EBS) is a scalable block storage service provided by Amazon Web Services (AWS), offering persistent storage volumes for EC2 instances. To view your block storage, in the EC2 dashboard move to the storage tab.

Take a Snapshot of the Volume

An AWS EBS snapshot is a point-in-time backup of an EBS volume stored in Amazon S3. It captures all the data on the volume at the time the snapshot is taken, including the data that is in use and any data that is pending EBS snapshots are commonly used for data backup, disaster recovery, and creating new volumes from existing data.

On the left side of EC2 UI, click Snapshots then click Create Snapshot.

In the Create snapshot UI, under resource types, select volumes. Then under volume ID, select the drop-down button and select your EBS volume.

Scroll down and click Create Snapshot.

Success.

Head to the Recycle Bin console and click the Create retention rule.

Fill in retention rule details.

Under retention settings for resource type select the drop-down button and select EBS Snapshot, then tick the box apply for all resources, then for retention period, select one day.

For the Rule lock settings, select Unlock.

Rule Created

Now go ahead and delete the snapshot

Open the recycle bin

Click on the snapshot present in the recycle bin

Objective achieved

Snapshot recovered successfully

Conclusion

The AWS Recycle Bin service offers a valuable layer of protection against accidental deletions, ensuring that critical resources like EBS snapshots and AMIs can be recovered within a defined period. Whether you’re protecting against human error or looking to strengthen your disaster recovery strategy, AWS Recycle Bin is an essential tool in your AWS toolkit.

This brings us to the end of this article.

Thanks for reading and stay tuned for more.

If you have any questions concerning this article or have an AWS project that requires our assistance, please reach out to us by leaving a comment below or email us at [email protected].


Thank you!

Categories
Blogs

AWS CodeCommit: Streamlining Source Control in the Cloud.

What is AWS CodeCommit? Streamlining Source Control in the Cloud.

aws-code-commit

In the era of cloud computing, source control is a pivotal aspect of the workflow, ensuring that code changes are managed efficiently, collaborative efforts are streamlined, and the integrity of the codebase is maintained. Amazon Web Services (AWS) offers a robust solution for source control in the cloud with AWS CodeCommit. This article delves into the features, benefits, and use cases of AWS CodeCommit. We will also go ahead and create a code commit repository and clone the repo to our local machine, add files, commit and push them to our AWS code repository.

What is AWS CodeCommit?

AWS CodeCommit is a version control service hosted by Amazon Web Services that allows developers to store and manage their source code, binaries, and other assets in the AWS cloud.  Additionally, it is designed to work seamlessly with existing Git tools, making it easy for developers to integrate it into their current workflows.

Key Features of AWS CodeCommit.

Fully Managed Service: AWS CodeCommit takes care of the backend infrastructure, so developers can focus on writing code. There are no servers to manage.

Scalability: CodeCommit can handle repositories of any size, with the ability to scale up as your project grows.

High Availability and Durability: your repositories are always accessible and your data is protected against loss.

Security: CodeCommit integrates with AWS Identity and Access Management (IAM) to provide robust access control. You can use IAM policies to define who can access your repositories and what actions they can perform.

code-commit-security

Integration with AWS Services: CodeCommit integrates seamlessly with other AWS services such as AWS CodeBuild, AWS CodeDeploy, and AWS CodePipeline. This allows you to create a complete CI/CD pipeline using AWS tools, enhancing your development and deployment workflows.

integration-aws

Standard Git Interface: CodeCommit supports the standard Git interface, so developers can use their preferred Git client, command-line tools.

Getting Started with AWS CodeCommit

Prerequisite.

Make sure you have full permission to Codecommit, or you can log in as an administrative user additionally, you should have git installed and configured on your machine.


Create a Repository

Log in to your AWS management console, in the search box, type Codecommit then select codecommit under services.

repository

In the code commit UI on the left-hand side, select repositories then click Create Repository.

create-repository

In the create repository dashboard, under repository settings, name your repo, will call mine demo-commit-repo.

Codecommit is encrypted by default using KMS, but you can also choose your custom keys. We will leave it at AWS-managed keys with KMS.

Leave all other settings as default then click Create Repository.

create-respository

Success, we are greeted with connection steps. We can see HTTPS, SSH, HTTPS(GRC).

demo-code-commit

If you don’t see SSH then it means you are connected as the root user.

We will for now use HTTPS git credentials for Codemmit to connect to our git repository.

So let us log in to the I AM console.


services

Select users. Click your username, move to the security tab then scroll all the way down to HTTPS for git credentials.


git-credentials

Click on generate and your codecommit credentials will be generated. Click the download button.

git-download

Go back to the codecommit repository select your repo then click the drop-down button of the clone URL then select clone HTTPS.

In this case, it will copy the HTTPS-type URL.

repo-copied

Use your preferred Git client to clone the repository to your local machine. This allows you to start adding code and making changes.

Go back to your terminal and type in git clone and paste in the cloned URL. When you press enter, you will be prompted for your username and password. Paste them in then press enter.

git-command

We have cloned our remote repo into our local machine.

git-command

With the repository cloned, you can push your changes to CodeCommit.

We will now copy a few files into our directory, commit these files, and push them to our remote repo.

Using linux command make sure you are in the repo directory then add copy files to your repo.

git-command

Using git add the files and then commit the changes as shown in the picture bellow.

ubuntu-command-line
ubuntu-command-line

Once the changes are commited, you can then push them to the remote repo by using the below command.

ubuntu-command-line

Now let’s go and check codecommit, and yes indeed the new files have been pushed to the codecommit repository.

code-commit-repo

If you click on the commits on the left side of the repo UI, you can see the commit history.

code-commit-repo

This brings us to the end of this blog. AWS CodeCommit offers a powerful, secure, and scalable solution for source control in the cloud.

Thanks for reading, and stay tuned for more.

If you have any questions concerning this article or have an AWS project that requires our assistance, please reach out to us by leaving a comment below or email us at [email protected].


Thank you!

Categories
Blogs

Unlocking the Power of AWS EBS Volumes: A Comprehensive Introduction

Unlocking the Power of AWS EBS Volumes: A Comprehensive Introduction.

EBS is a popular cloud-based storage service offered by Amazon Web Services (AWS).

EBS, called Elastic Block Store, is a block storage system used to store data. Designed for mission-critical systems, EBS provides easy scalability to petabytes of data.

What Is EBS?

Elastic Block Store (EBS) is a block storage service based in the AWS cloud. EBS stores huge amounts of data in blocks, which work like hard drives (called volumes). You can use it to store any type of data, including file systems, transactional data, NoSQL and relational databases, backup instances, containers, and applications.

EBS volumes are virtual disk drives that can be attached to Amazon EC2 instances, providing durable block-level storage.

What Is an EBS Volume?

It’s a Network drive attached to one EC2 instance at a time and works like a hard drive.
 An EBS Volume is a network drive (not a physical drive) you can attach to EC2 instances while they run.

This means to communicate between EC2 instance and EBS volume it will be using the network.

EBS volume because of their network drive, can be detached from one EC2 instance and attached to another one quickly.
 It allows EC2 instances to persist (continue to exist) data, even after the instance is terminated.
 EBS volumes can be mounted to one instance at a time (at the CCP level).
 EBS volumes are bound up/ linked/ tied to specific AZ’s. An EBS volume in us-east-1a cannot be attached to us-east-1b. But if we do a snapshot then we are able to move an EBS volume across different availability zones.

common use cases for EBS volumes:

Frequent updates — storage of data that needs frequent updates. For example: database applications, and instances’ system drives.

Throughput-intensive applications — that need to perform continuous disk scans.

EC2 instances — once you attach an EBS volume to an EC2 instance, the EBS volume serves the function of a physical hard drive.

Types of EBS Volumes

The performance and pricing of your EBS storage will be determined by the type of volumes you choose. Amazon EBS offers four types of volumes, which serve different functions.

Solid State Drives (SSD)-based volumes

General Purpose SSD (gp2) — the default EBS volume, configured to provide the highest possible performance for the lowest price. Recommended for low-latency interactive apps, and dev and test operations.

Provisioned IOPS SSD (io1) — configured to provide high performance for mission-critical applications. Ideal for NoSQL databases, I/O-intensive relational loads, and application workloads.

What is IOPS?

IOPS, which stands for Input/Output Operations Per Second, is a measure of the performance or speed of an EBS (Elastic Block Store) volume in Amazon Web Services (AWS). In simple terms, it represents how quickly data can be read from or written to the volume.

Think of IOPS as the number of tasks the EBS volume can handle simultaneously. The higher the IOPS, the more tasks it can handle at once, resulting in faster data transfers. It is particularly important for applications that require a lot of data access, such as databases or applications that deal with large amounts of data.

Hard Disk Drives (HDD)-based volumes

Throughput Optimized HDD (st1) — provides low-cost magnetic storage. Recommended for large, sequential workloads that define performance in throughput.

Cold HDD (sc1) — uses a burst model to adjust capacity, thus offering the cheapest magnetic storage. Ideal for cold large sequential workloads.

The Beginner’s Guide to Creating EBS Volumes Prerequisite: an AWS account.

If you don’t have an AWS account, you can follow the steps explained here.

How to Create a New (Empty) EBS Volume via the Amazon EC2 Console

Go to the Amazon EC2 console.

Locate the navigation bar, then select a Region. Region selection is critical. An EBS volume is restricted to its Availability Zone (AZ). That means you won’t be able to move the volume or attach it to an instance from another AZ. Additionally, each region is priced differently. So do this wisely, and choose in advance prior to initiating the volume.

In the console, type EC2 in the search box and select EC2 under services.

In the EC2 dashboard on the left side under Elastic block store, select volumes then click create volume.

Choose the volume type. If you know what you’re doing, and you know which volume you need, this is where you can choose the volume type of your choice. If you’re not sure what type you need, or if you’re just experimenting, go with the default option (which is set to gp2)

Under availability zone, select the dropdown and choose your availability zone, keep in mind that you can attach EBS volumes only to EC2 instances located in the same AZ. I will move with us-east-1a

EBS volumes are not encrypted automatically. If you want to do that, now is the time.

For EBS encryption, tick the box, for Encrypt this volume, then choose default CMK for EBS encryption. This type of encryption is offered at no additional cost.

For customized encryption, choose Encrypt this volume, then choose a different CMK from Master Key. Note that this is a paid service and you’ll be charged with additional costs.

Tag your volume. This is not a must, and you’ll be able to initiate your EBS volume without tagging it. We will leave this section as optional.

Choose Create Volume.

Success you now have a new empty EBS volume. You can now use it to store data or attach the volume to an EC2 instance.


Conclusion:

Amazon EBS volumes are a fundamental component of the AWS ecosystem, providing scalable and durable block storage for a wide range of applications. By understanding the features, use cases, and best practices associated with EBS volumes, users can make informed decisions to meet their specific storage needs in the AWS cloud environment.

Pull down and stay tuned for more.

If you have any questions concerning this article or have an AWS project that requires our assistance, please reach out to us by leaving a comment below or email us at. [email protected]

Thank you!

Categories
Blogs Uncategorized

Understanding AWS Security Groups and Bootstrap Scripts

Understanding AWS Security Groups and Bootstrap Scripts: Enhancing Cloud Security and Automation.

In the realm of AWS, achieving a balance between robust security and streamlined automation is essential for efficient cloud management. AWS Security Groups and Bootstrap Scripts play pivotal roles in this Endeavor. In this article, we’ll delve into these two AWS components and provide a hands-on demo to illustrate how to leverage them effectively.

AWS Security Groups:

What are AWS Security Groups?

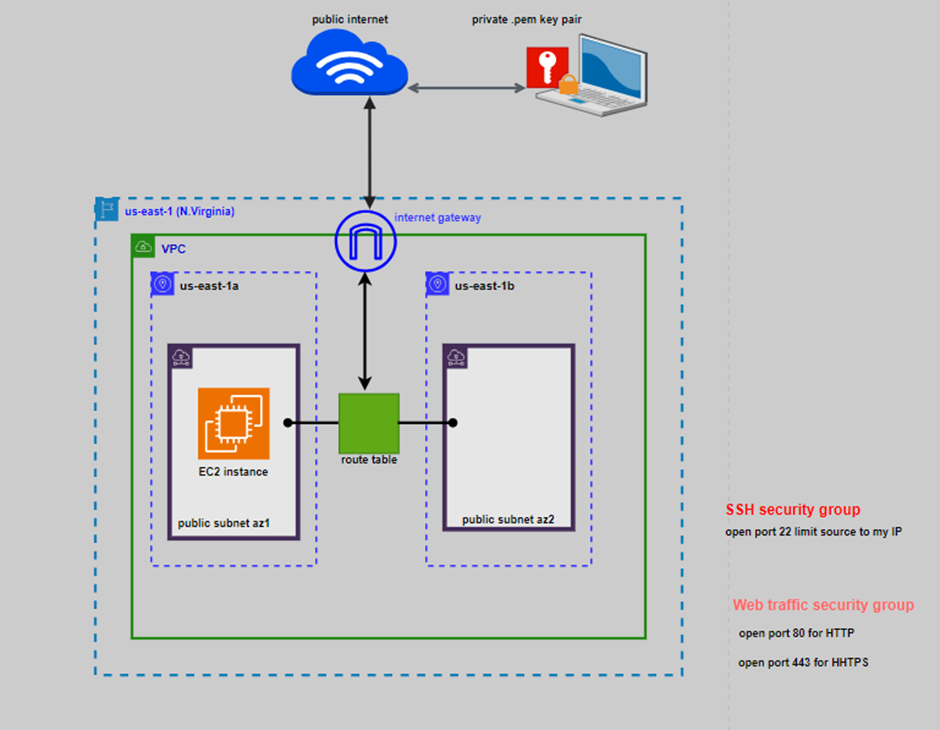
AWS Security Groups are a fundamental element of AWS’s network security model. They act as virtual firewalls for your instances to control inbound and outbound traffic. Security Groups are associated with AWS resources like EC2 instances and RDS databases and allow you to define inbound and outbound rules that control traffic to and from these resources.

Key Features of AWS Security Groups:

Stateful: Security Groups are stateful, meaning if you allow inbound traffic from a specific IP address, the corresponding outbound traffic is automatically allowed. This simplifies rule management.

Default Deny: By default, Security Groups deny all inbound traffic. You must explicitly define rules to allow traffic.

Dynamic Updates: You can modify Security Group rules anytime to adapt to changing security requirements.

Use Cases:

Web Servers: Security Groups are used to permit HTTP (port 80) and HTTPS (port 443) traffic for web servers while denying other unwanted traffic.

Database Servers: For database servers, Security Groups can be configured to only allow connections from known application servers while blocking access from the public internet.

Bastion Hosts: In a secure architecture, a bastion host’s Security Group can be set up to allow SSH (port 22) access only for specific administrators.

Demo: Creation of security group to open port 22 for SSH, port 80 for HTTP, and port 443 for HHTPS.

To create security group, click on this link and follow our previous demo on the security group.

https://accendnetworks.com/comprehensive-guide-to-creating-and-managing-security-groups-for-your-amazon-ec2-instances/

Bootstrap Scripts

What are Bootstrap Scripts?

A bootstrap script, often referred to as user data or initialization script, is a piece of code or script that is executed when an EC2 instance is launched for the first time. This script automates the setup and configuration of the instance, making it ready for use. Bootstrap scripts are highly customizable and allow you to install software, configure settings, and perform various tasks during instance initialization.

Key Features of Bootstrap Scripts:

Automation: Bootstrap scripts automate the instance setup and configuration process, reducing manual intervention and potential errors.

Flexibility: You have full control over the contents and execution of the script, making it adaptable to your specific use case.

Idempotent: Bootstrap scripts can be designed to be idempotent, meaning they can be run multiple times without causing adverse effects.

Use Cases:

Software Installation: You can use bootstrap scripts to install and configure specific software packages on an instance.

Configuration: Configure instance settings, such as setting environment variables or customizing application parameters.

Automated Tasks: Run scripts for backups, log rotation, and other routine maintenance tasks.

Combining Security Groups and Bootstrap Scripts

The synergy between Security Groups and Bootstrap Scripts offers a robust approach to enhancing both security and automation in your AWS environment.

Security Controls: Security Groups ensure that only authorized traffic is allowed to and from your EC2 instances. Bootstrap scripts can automate the process of ensuring that your instances are configured securely from the moment they launch.

Dynamic Updates: In response to changing security needs, Bootstrap Scripts can automatically update instance configurations.

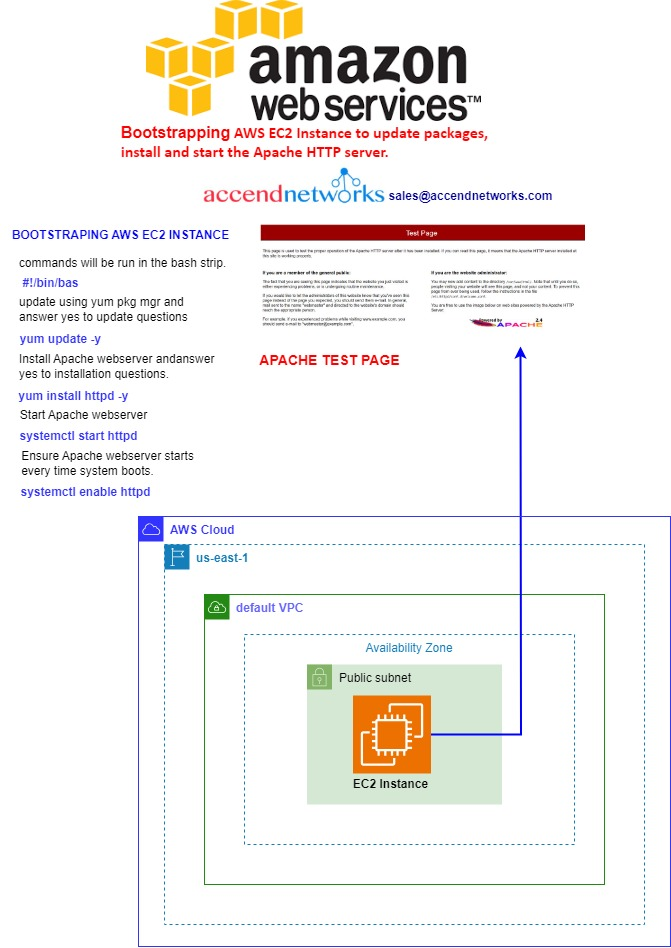
Demo: Bootstrapping AWS EC2 Instance to update packages, install and start Apache HTTP server. (HTTP is on port 80)

sign in to your AWS Management Console, type EC2 in the search box then select EC2 under services

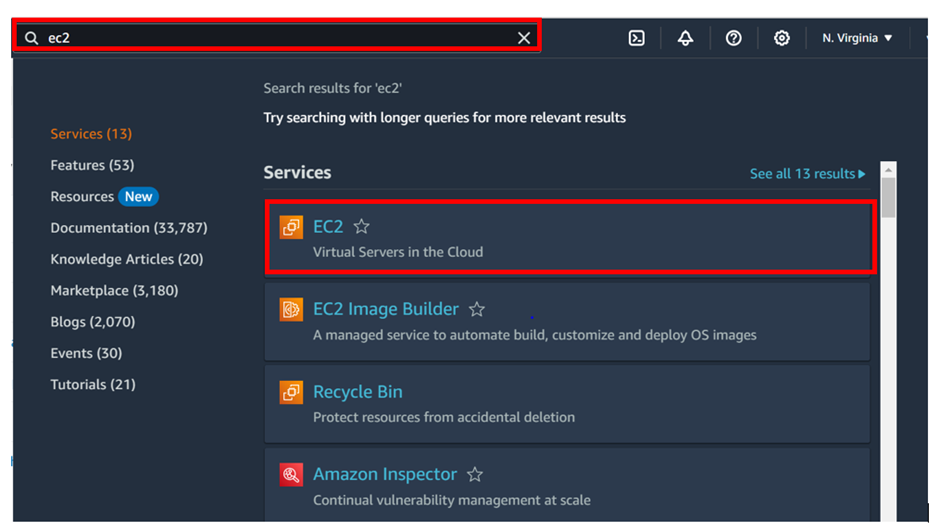
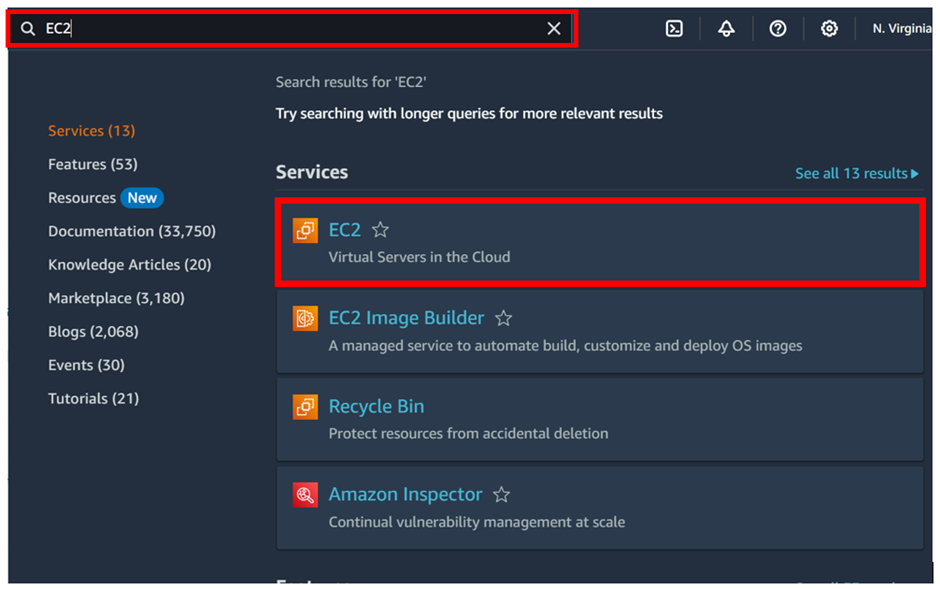
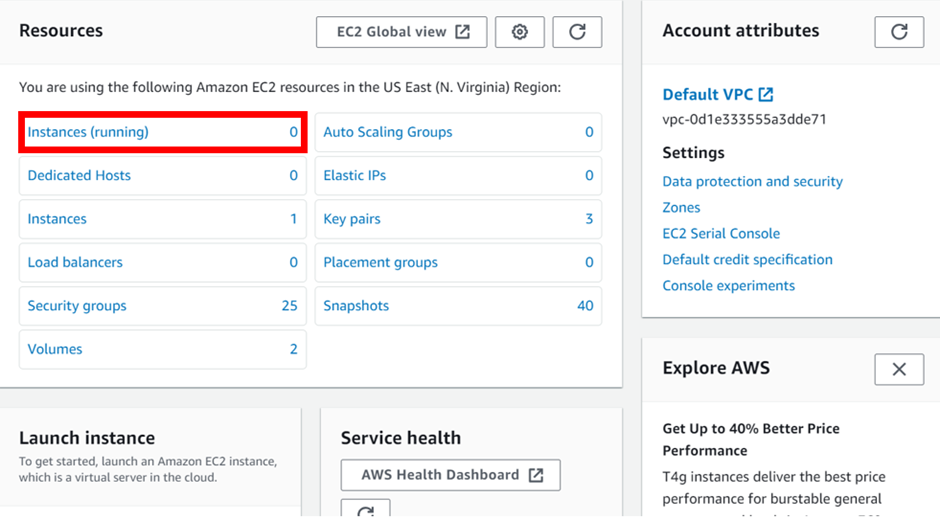
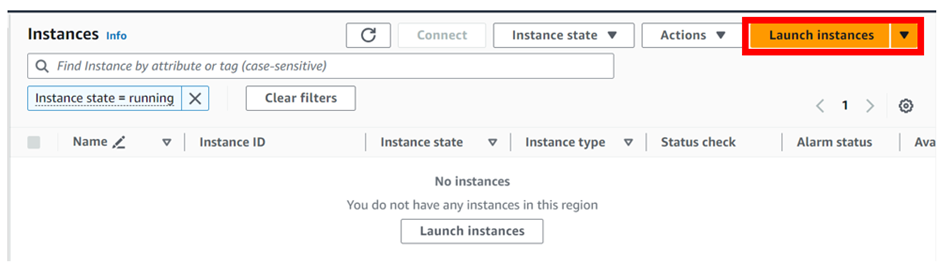
In the EC2 dashboard, select instances then click launch

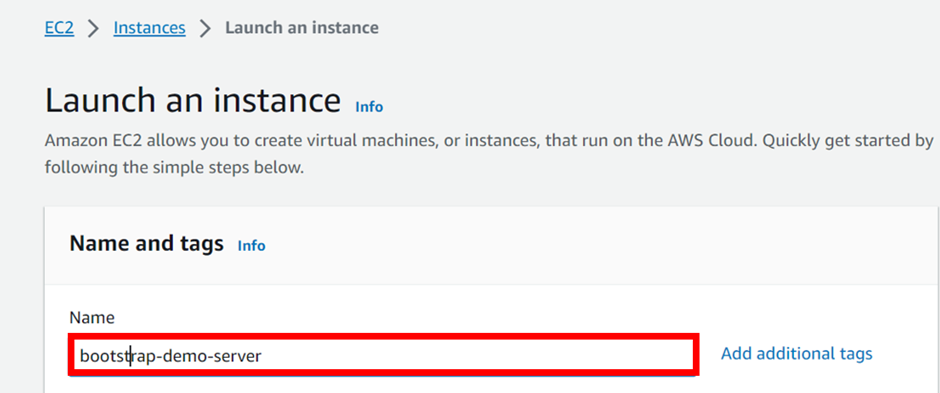
In the launch instance dashboard, under name and tags, give your instance a name. call it bootstrap-demo-server.

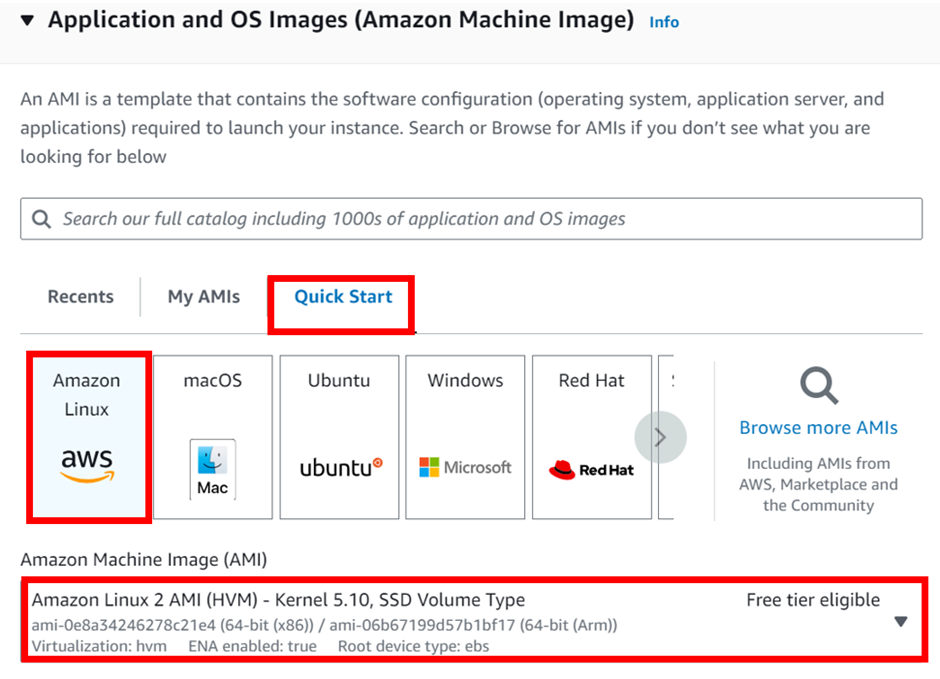
Under application and OS images, select the QuickStart tab then select Amazon Linux. Under Amazon Machine Image (AMI), select the drop-down button and select Amazon Linux 2 AMI. Scroll down.

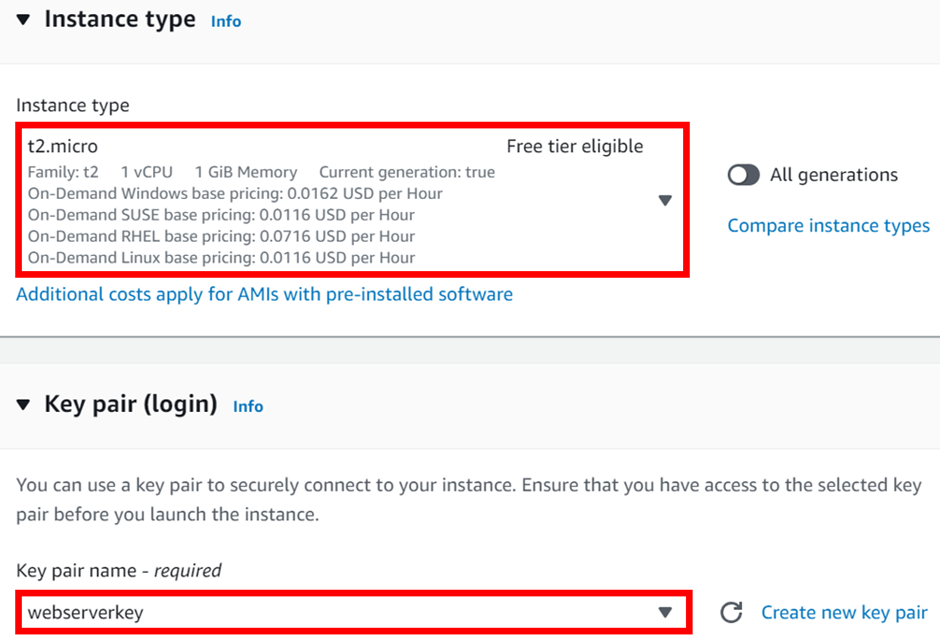
Under instance type make sure it is t2. Micro because it is the free-tier one. Under keypair login select the dropdown and select your key-pair. Scroll down.

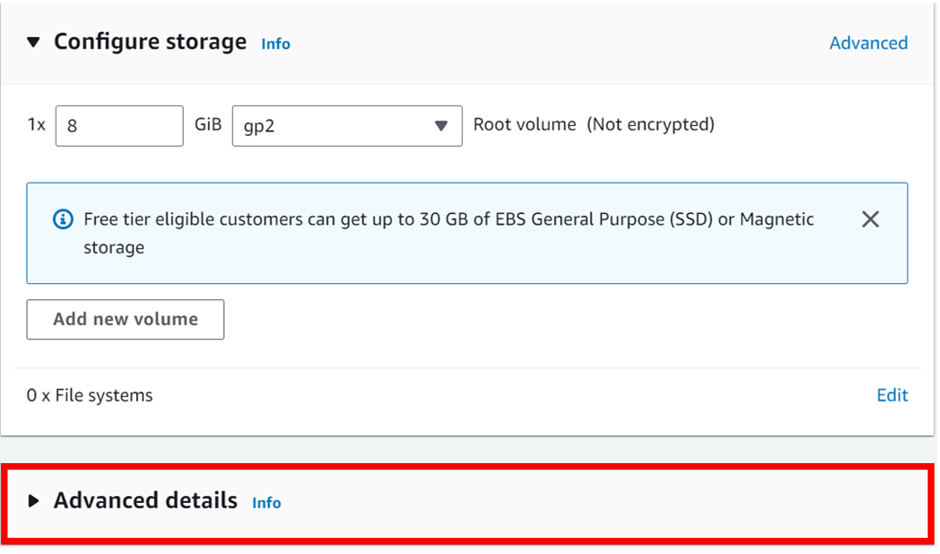
We will leave all the other options as default move all the way to the advanced details section, then click the drop-down button to expand it.

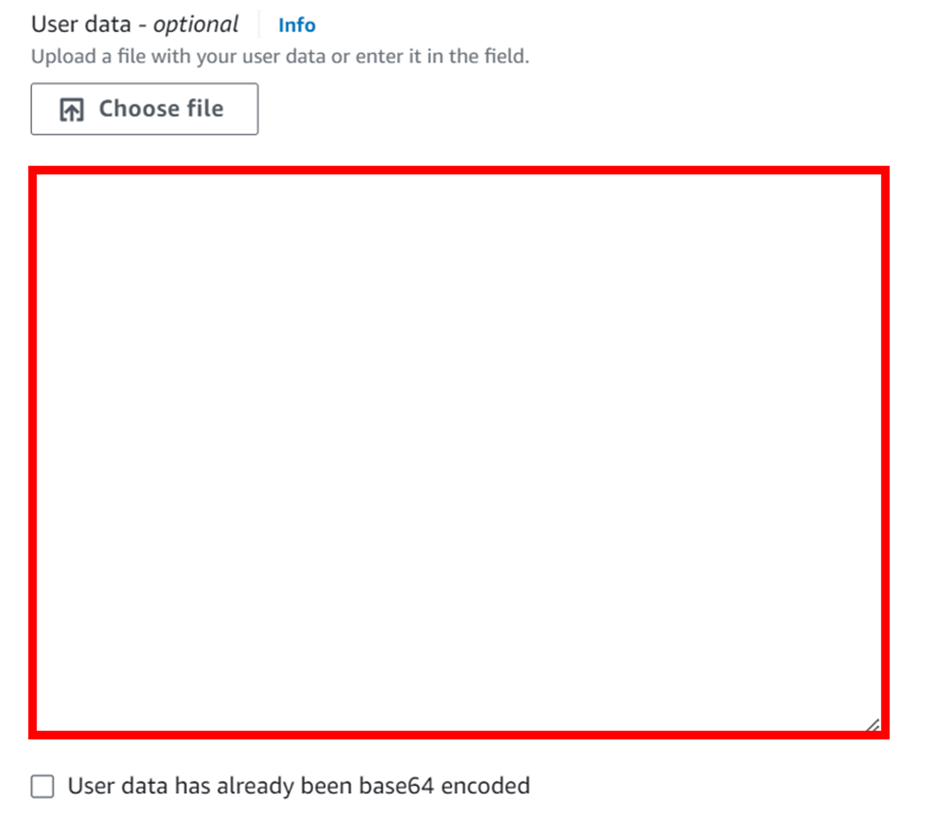
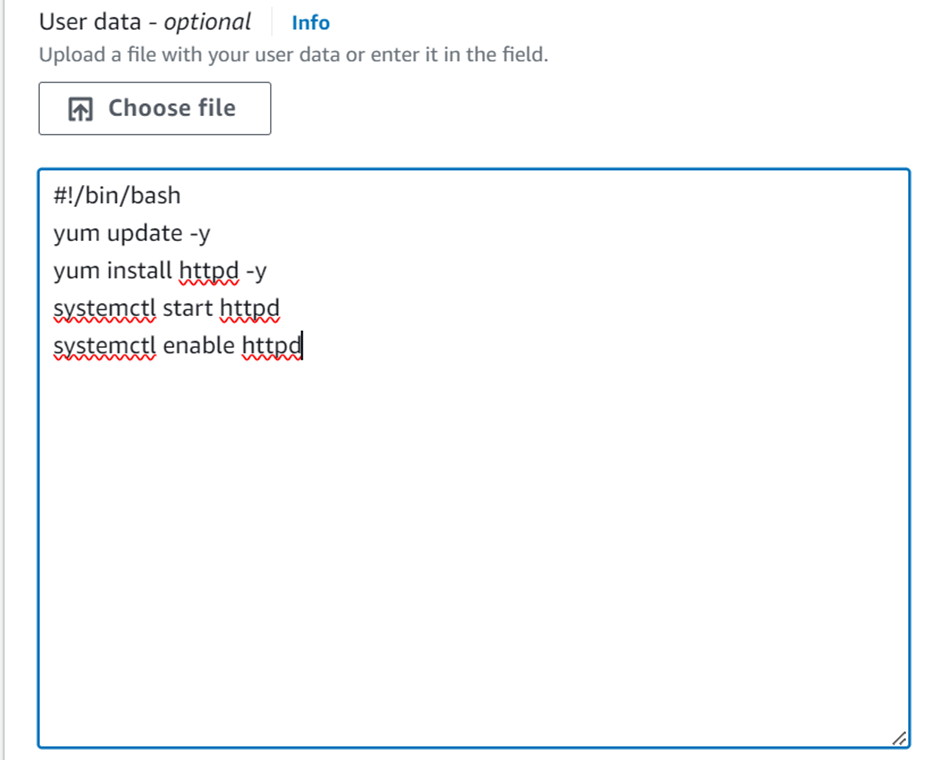
Move all the way down to the instance user data section. Copy and paste this code inside there.

  • #!/bin/bash
  • yum update -y
  •  yum install httpd -y
  •  systemctl start httpd
  •  systemctl enable httpd

Tip: Once the instance is launched and you may have to go back and modify this User Data section, stop the instance, click Actions-Instance settings-Edit user data.

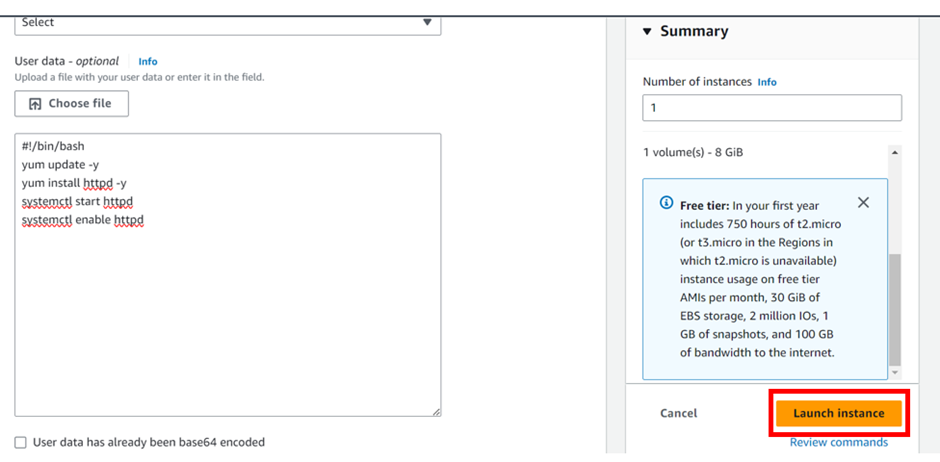
Under instance, summary, review, and click launch instance.

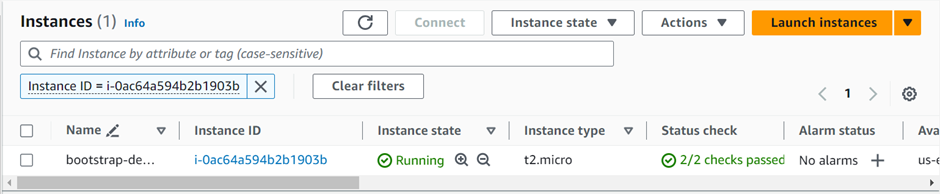
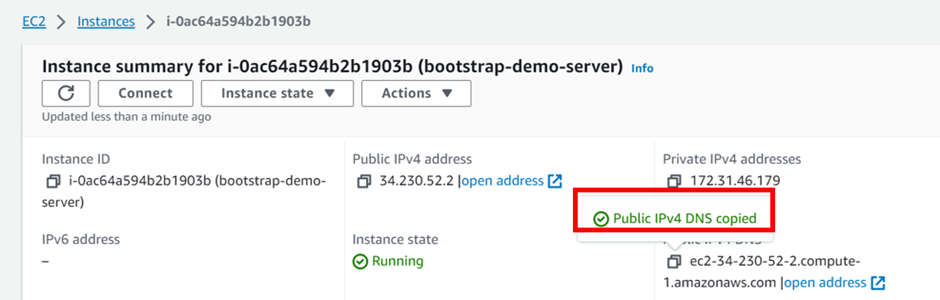
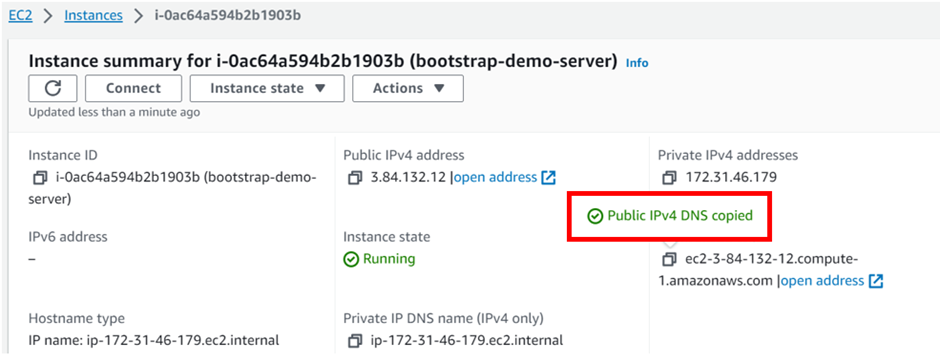
Click on the instance ID then wait for the status check to initialize. Copy the public IPv4 DNS and paste it into your browser.

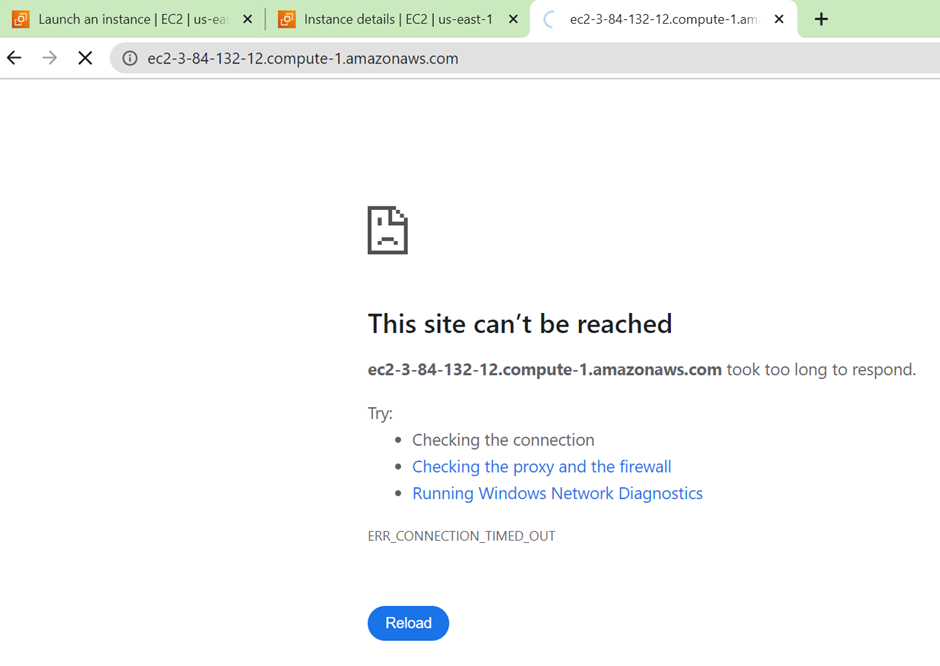
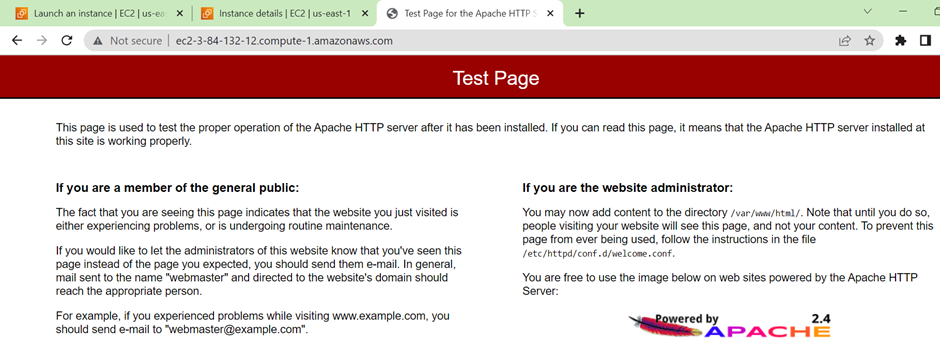
We are getting this error because HTTP port 80 is not open, we will go back to our instance modify security group, and open port 80.

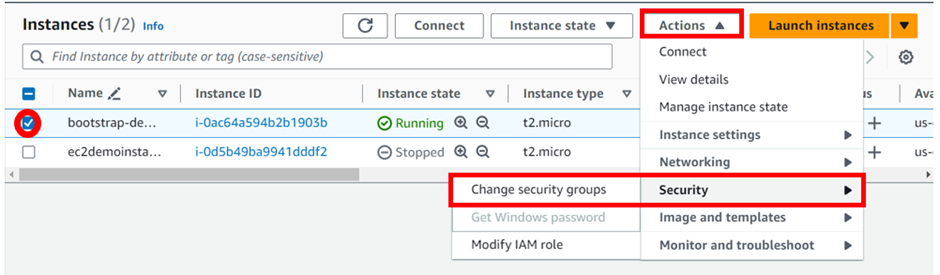
Select your instance and click the instance state dropdown move to security then click modify security group.

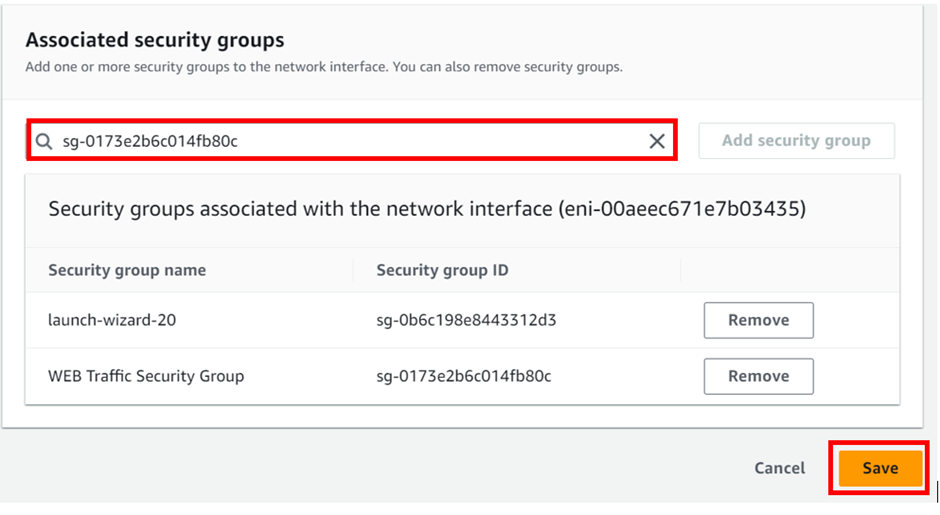
Under the associated security group, select the search box and look for the web traffic security group which opens port 80 and 443 select it, then click save.

Now come back to your instance copy its public DNS and paste it into your browser.

Congratulations, we can now access our HTTP web traffic on port 80. This clearly shows how security groups can allow or deny internet traffic.

Again, remember this instance was bootstrapped and installed Apache on launch.

Pull everything down and stay tuned for more.

If you have any questions concerning this article or have an AWS project that requires our assistance, please reach out to us by leaving a comment below or email us at [email protected]

Thank you!