VPC PART TWO: BUILDING A CUSTOM 3-TIER VPC FROM SCRATCH
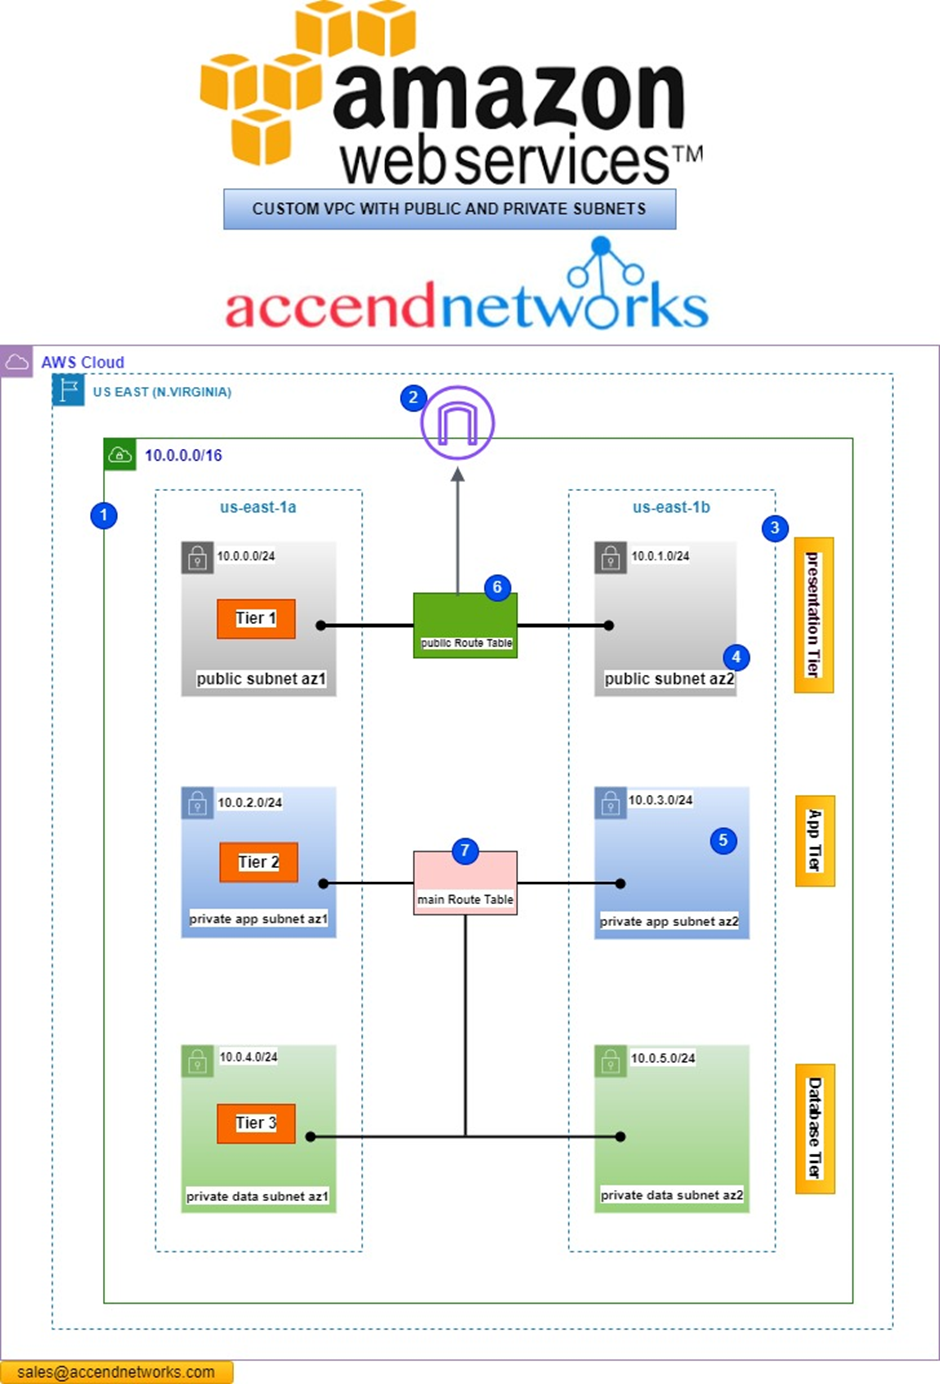
In our custom 3-tier VPC reference architecture, our infrastructure is divided into 3 tiers. The first tier which we can also call the user interface or presentation tier, has public subnets which can hold resources such as
- NAT gateways
- load balancers
- bastion hosts
On the second tier which I also call the application tier, we have our private subnets, and this is the tier that can hold resources such as EC2 Instances (webservers).
On the third tier which I also call the database tier, we have another private subnet and this is the tier that holds databases.
The subnets are duplicated across multiple availability zones for high availability and fault tolerance.
Finally, we have an internet gateway and route table to allow the resources in the VPC to have access to the internet.
To create this VPC, let’s log into the management console.
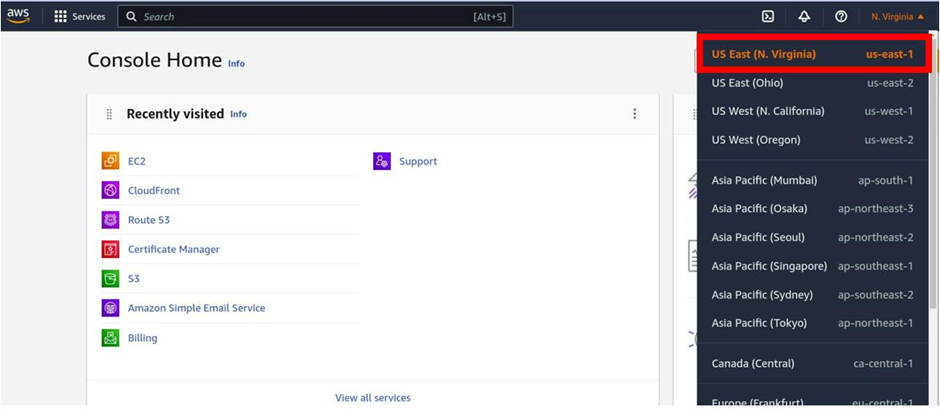
The first thing you should do is select the region where you want to create the VPC. according to our reference architecture, this VPC should be in the US East (N. Virginia) region. (us-east-1)
To change your region, select the dropdown in the top right navigation pane in the management console, and make sure you select, Us-east (Northern Virginia).
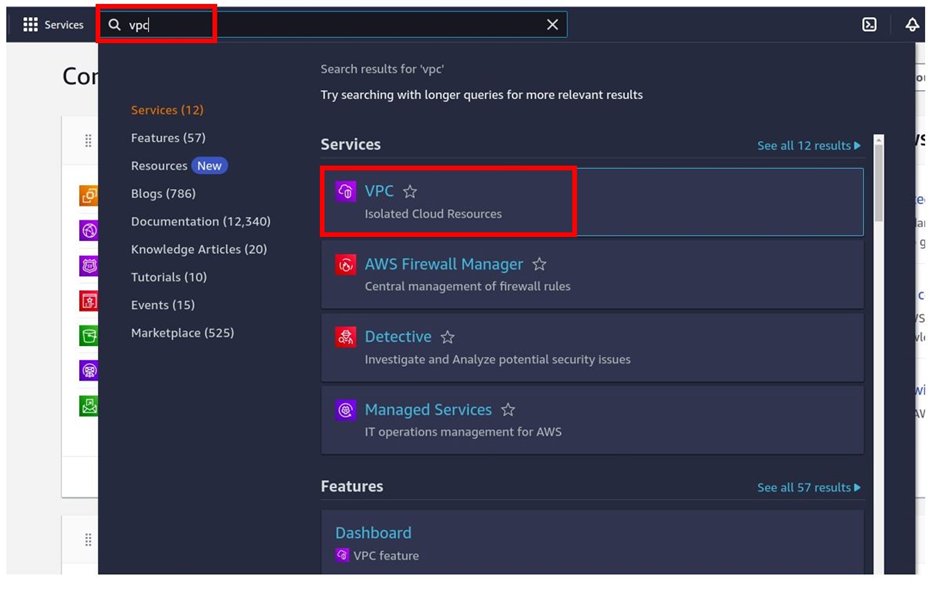
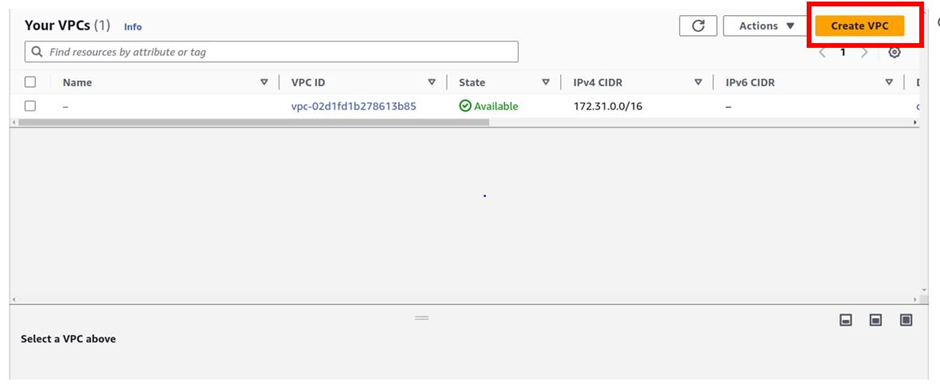
Straight away type VPC in the search box, then select VPC under services.
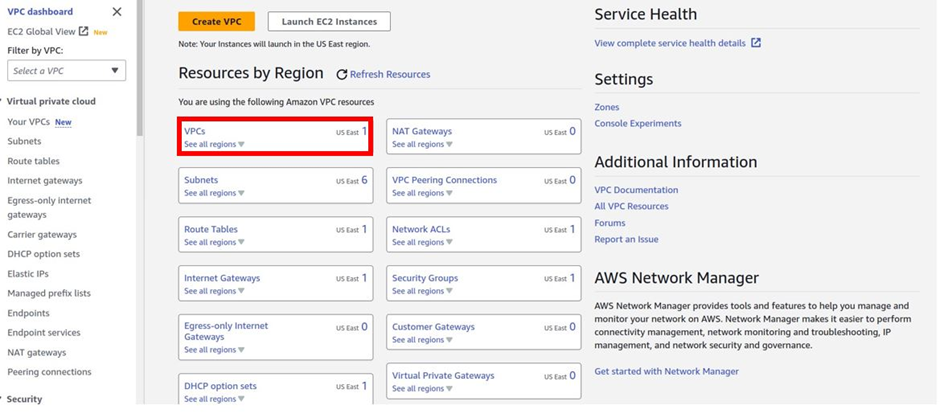
In the VPC dashboard, select VPC’s then click create VPC.
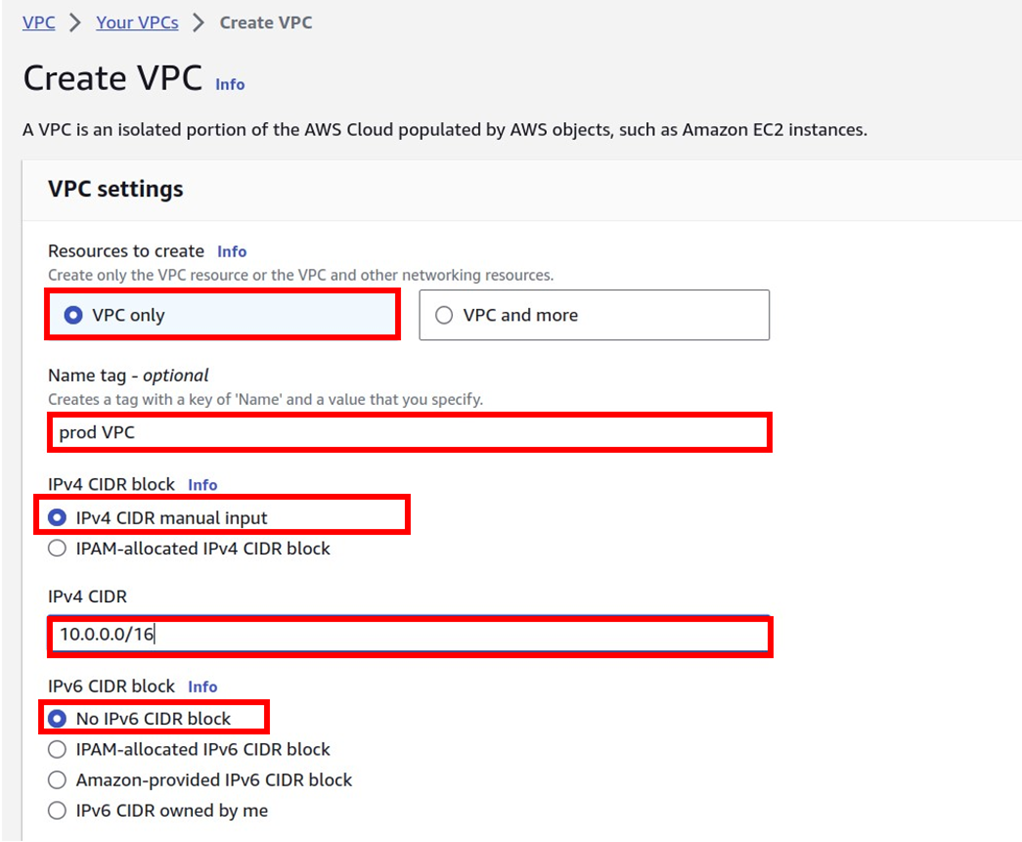
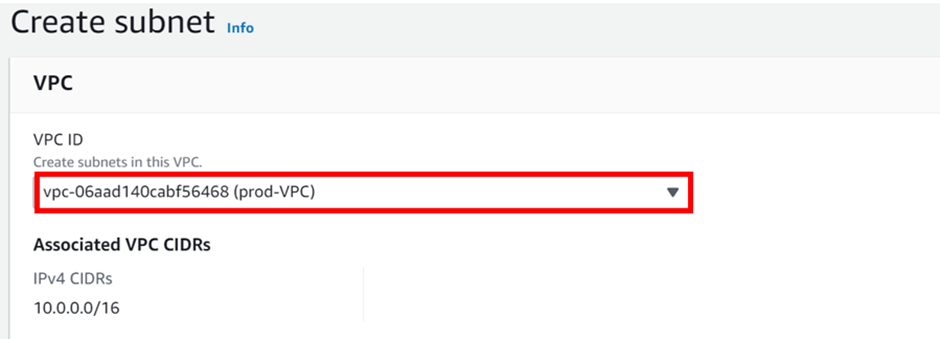
Under VPC settings, select VPC only then give your VPC a name, and call it prod-VPC.
Leave it on the IPv4 CIDIR block.
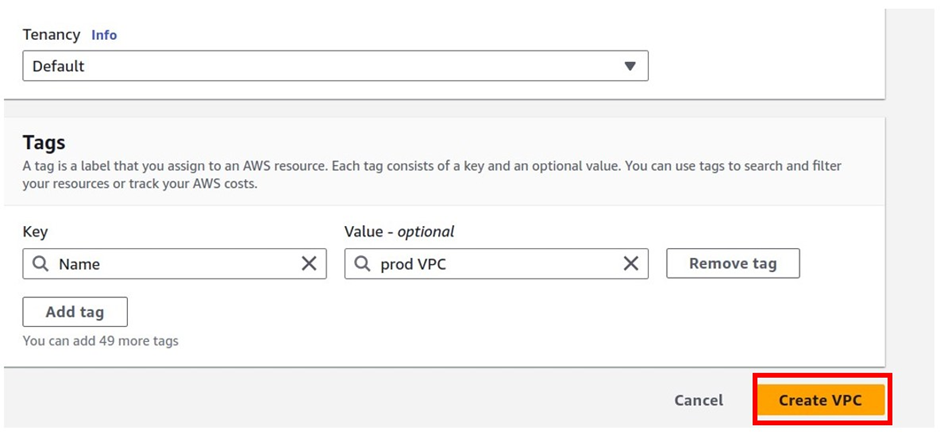
Under IPv4 CIDIR, enter Your CIDIR block. According to our reference architecture, it is 10.0.0.0/16. Then leave it at no ipv6 CIDIR block, tenancy is going to be the default, and tags are optional. Scroll down and click Create VPC.
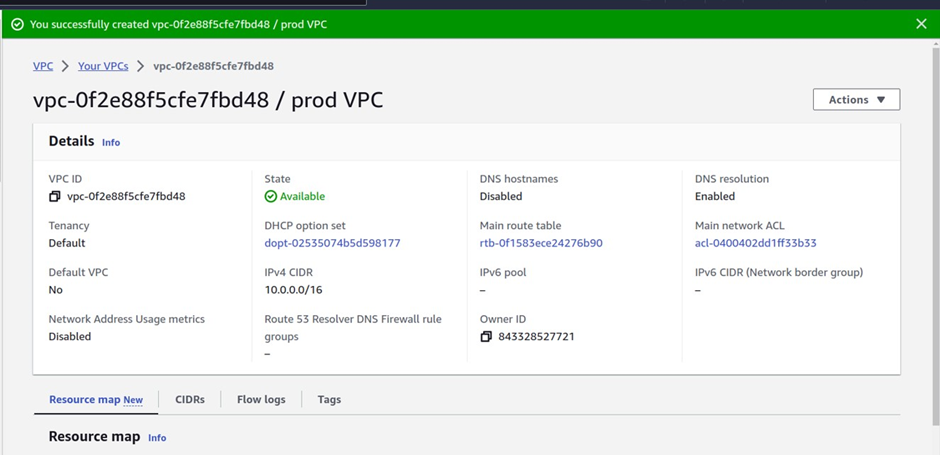
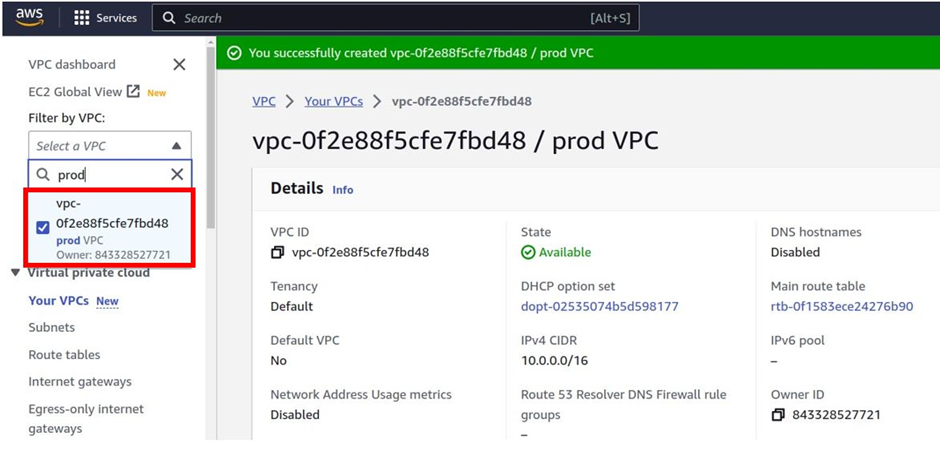
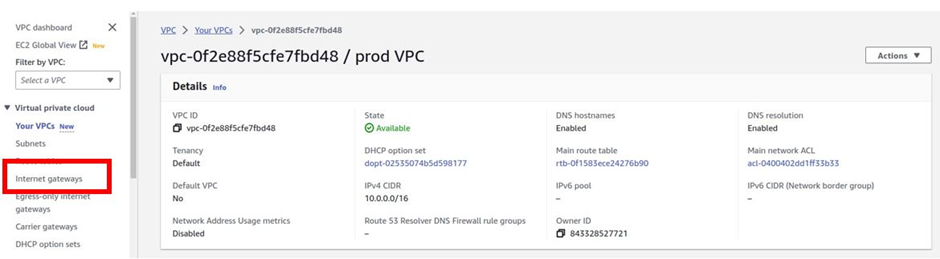
We have successfully created our VPC
NOTE: You can see all the VPC’s in your account by selecting the filter by VPC search box below.
Once you filter it by a particular VPC, it will only show you the information on that VPC.
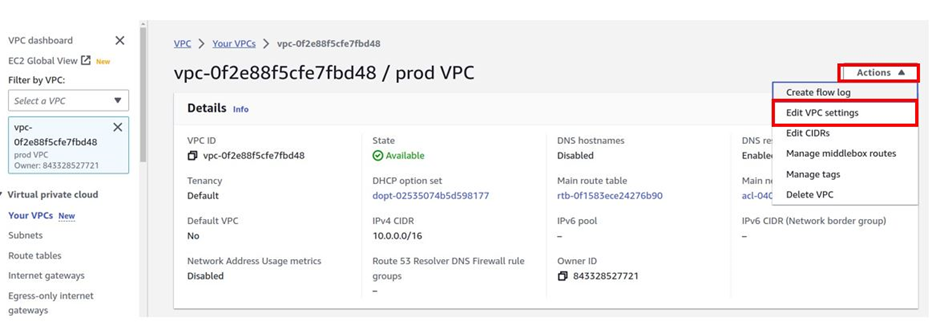
Next, we will enable the DNS hostname for our VPC.
DNS options
If you need public IPv4 DNS hostnames for the EC2 instances launched into your subnets, you must enable both of the DNS options.
Enable DNS hostnames: EC2 instances launched in the VPC receive public DNS hostnames that correspond to their public IPv4 addresses.
To enable the DNS hostname in your VPC, make sure you’ve selected the VPC you’ve just created then select the actions drop-down button, then select edit VPC settings.
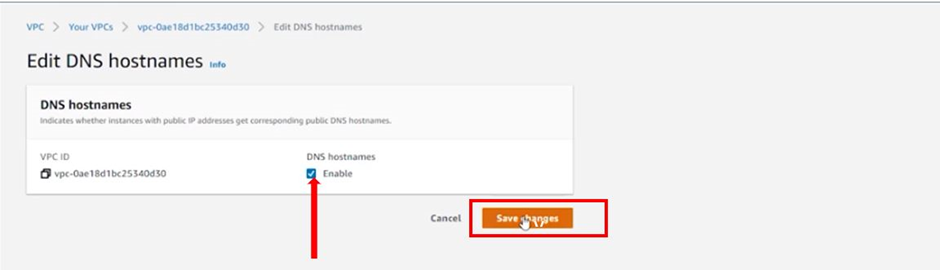
On the edit DNS hostnames dashboard, check the box on enable DNS hostname and then click save changes.
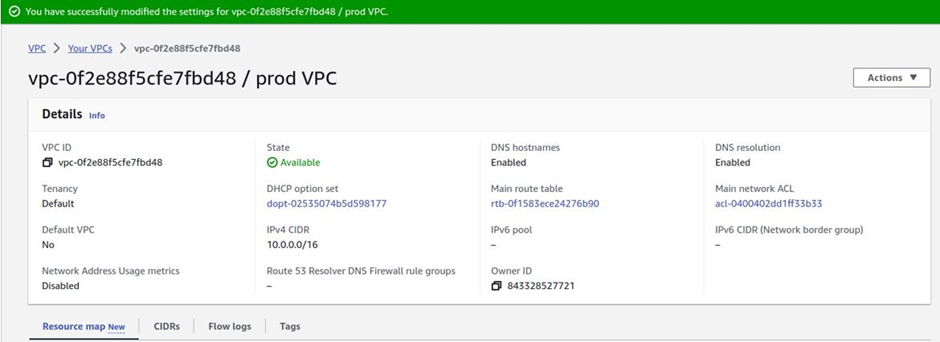
We have successfully modified VPC settings and enabled DNS hostname in our VPC.
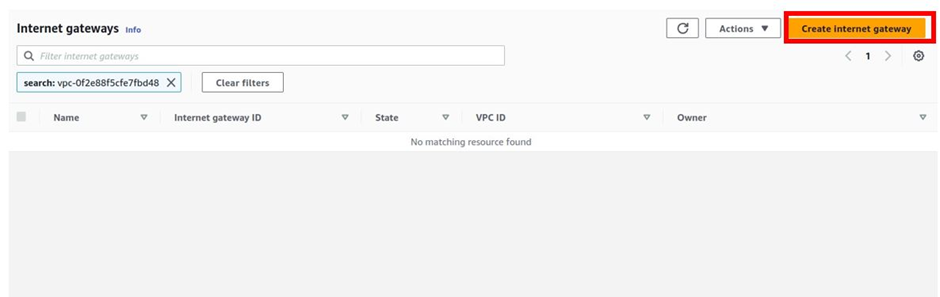
Next is to create an internet gateway to allow resources in the VPC to communicate with the public. On the left side of the VPC dashboard, select Internet Gateway, and then click Create Internet Gateway.
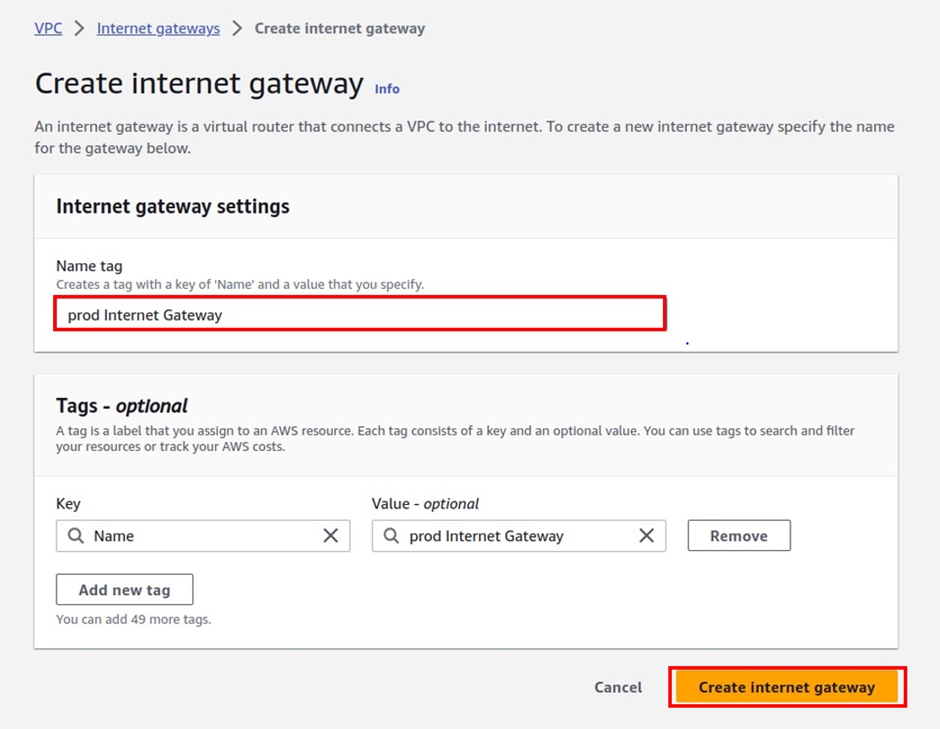
In the create Internet gateway dashboard, under the name, give your Internet gateway a name, call it prod Internet Gateway and leave tags as optional then click Create Internet Gateway.
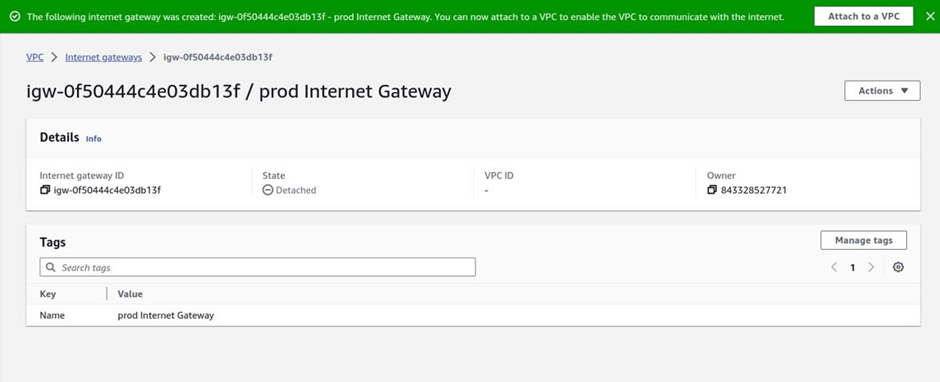
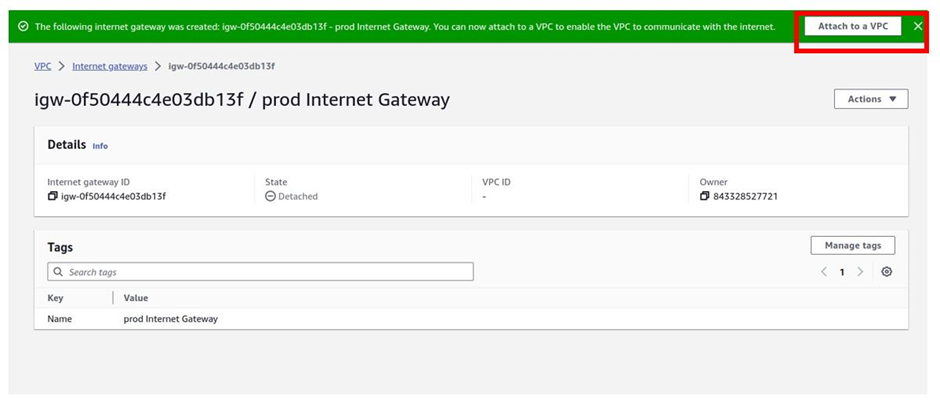
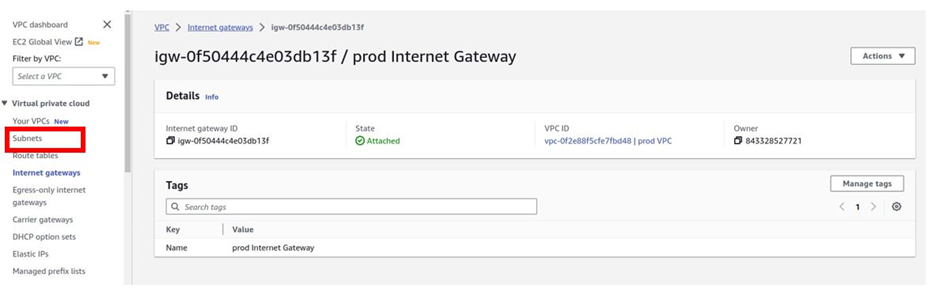
You have successfully created an internet gateway.
Next, we will attach the Internet Gateway to the VPC we just created.
To attach an internet gateway to a VPC, click the attach to a VPC
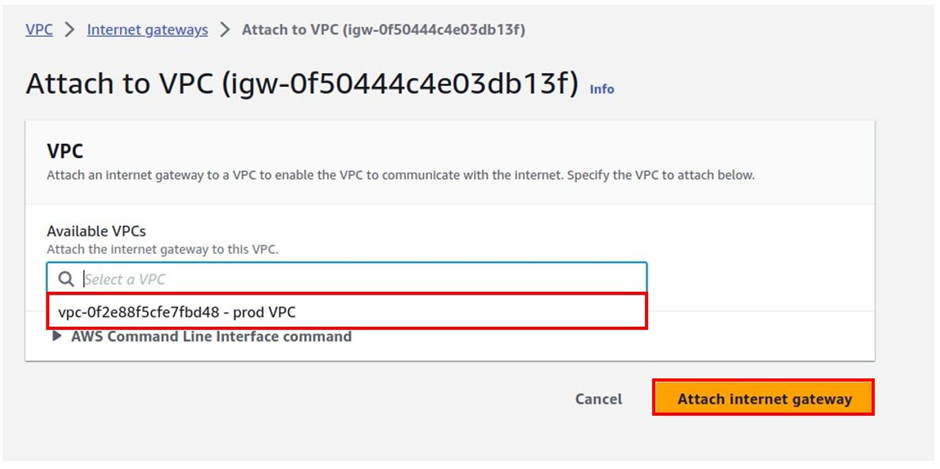
Under available VPC’s, click in the search box and select your prod-VPC. Remember only the VPC that does not have an Internet Gateway attached to it in your account will show up.
You can only attach one internet gateway, to a VPC. We just created this prod VPC and we haven’t attached any internet gateway to it; that’s why it’s the only VPC that is showing there. Select it and then click Attach Internet gateway.
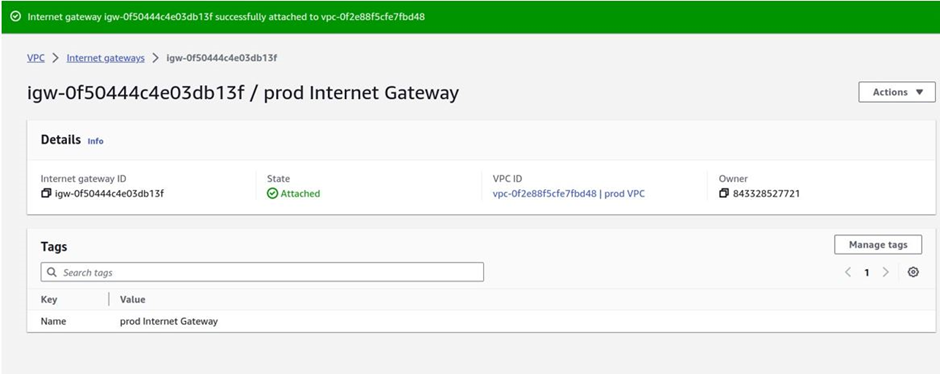
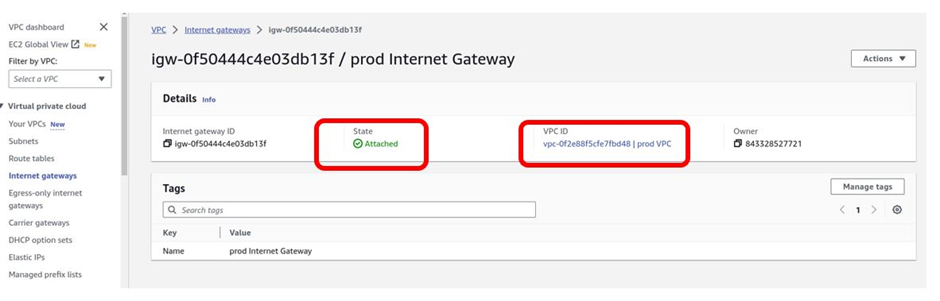
We have successfully attached an internet gateway to our prod VPC.
If you look at the Internet gateway, the state is attached, and the VPC it is attached to is the prod VPC.
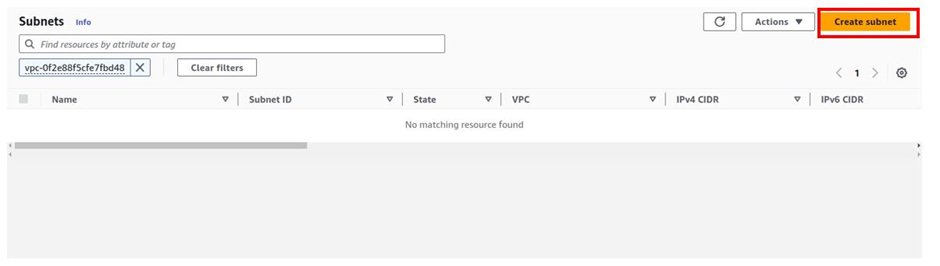
Next, we will create our public subnets in the first and the second availability zones, as shown according to our reference architecture. On the VPC dashboard on the left side of the navigation pane, select subnets.
I am still filtering my VPC, by the prod VPC, that’s why we are not seeing subnets in there because we have not created any subnet in that VPC.
We will create our first and second public subnets in this VPC. Click Create Subnet.
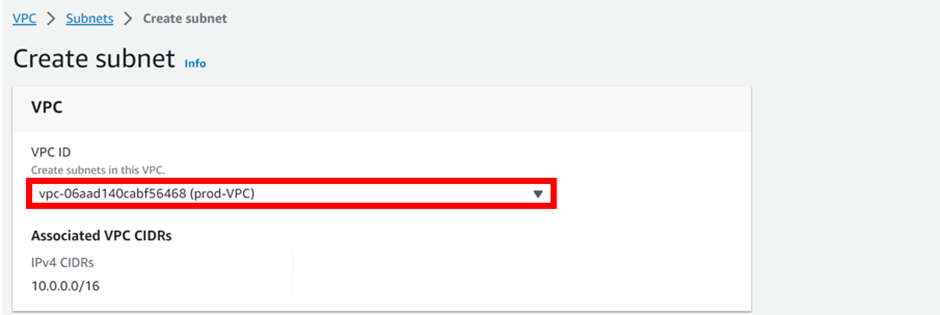
In the create subnet dashboard, select the VPC you want to create your subnet. Select the drop-down and select prod-VPC. Scroll down.
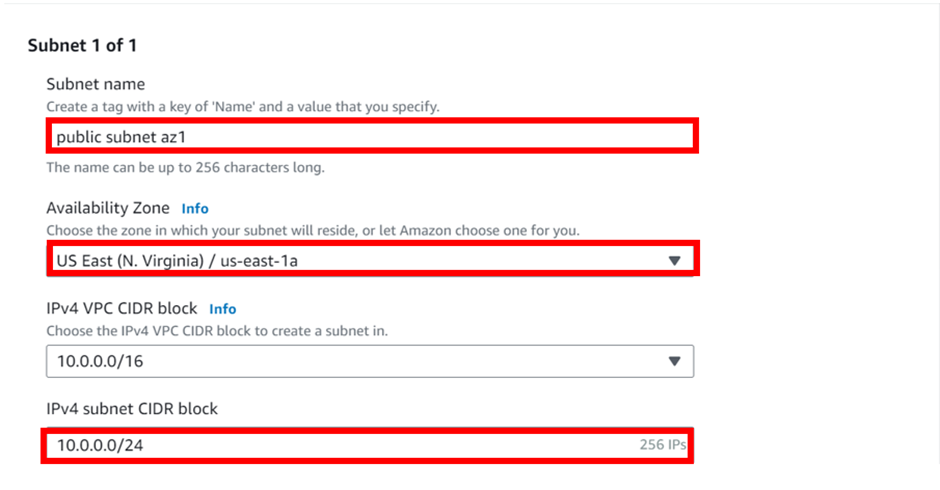
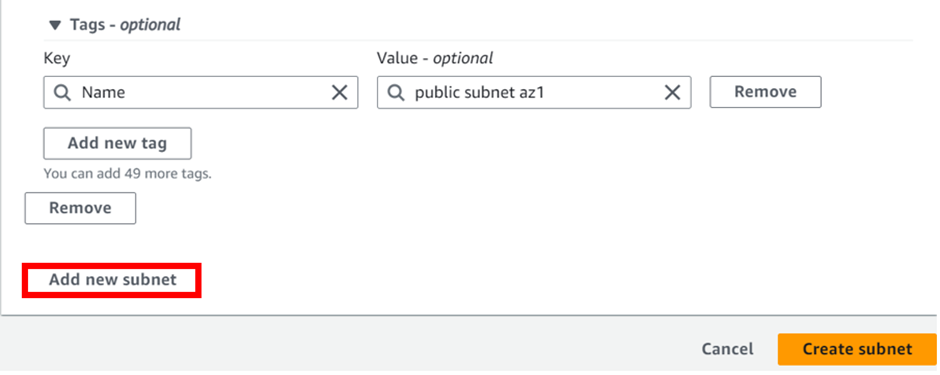
In the subnet settings sections, enter the details of your subnets, under name, call it public subnet az1, under Availability zone select the drop-down button and select us-east-1a, for IPv4 subnet CIDR block, enter 10.0.0.0/24. Then scroll down and click add new subnet, this will be the second public subnet.
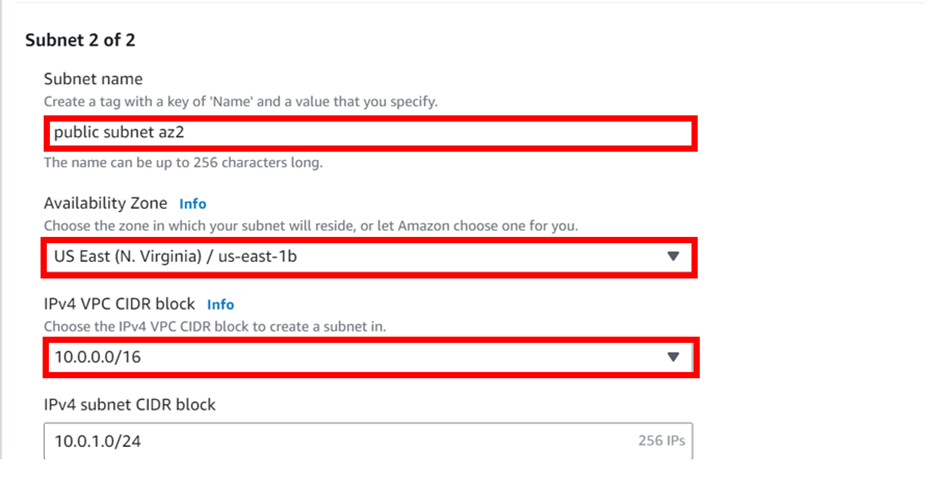
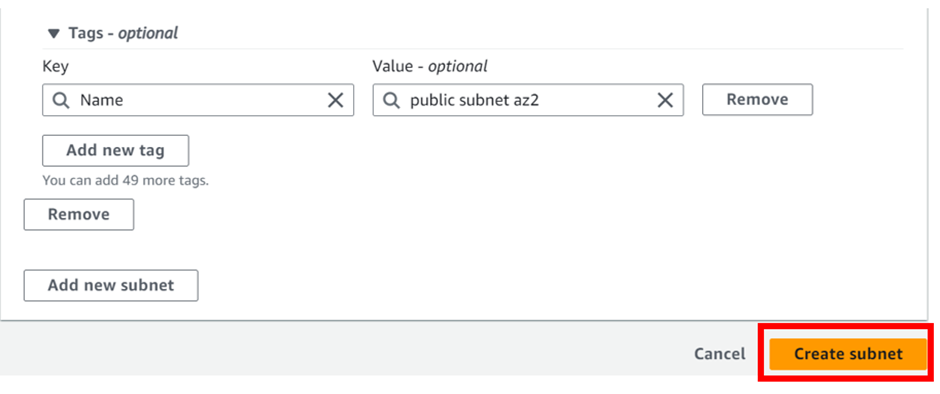
Use the same procedure and enter the details of the second subnet as shown below. Remember the second subnet should be in us-east-1b AZ leave tags as optional and click create subnet.
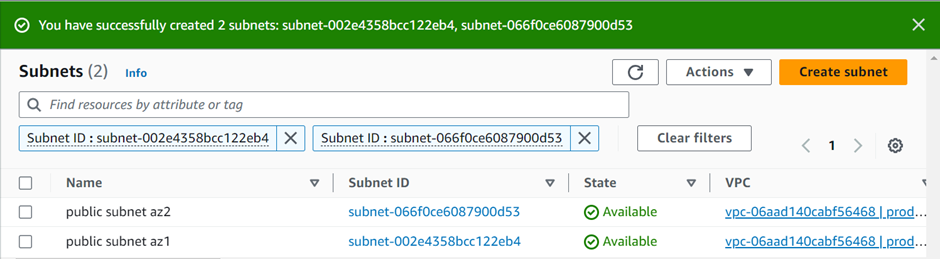
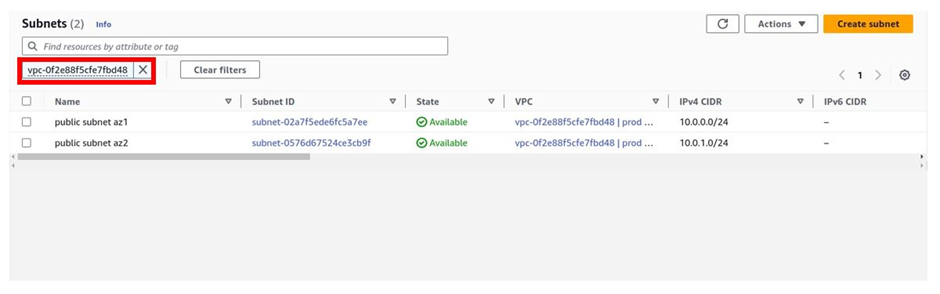
Success, we have created our two public subnets.
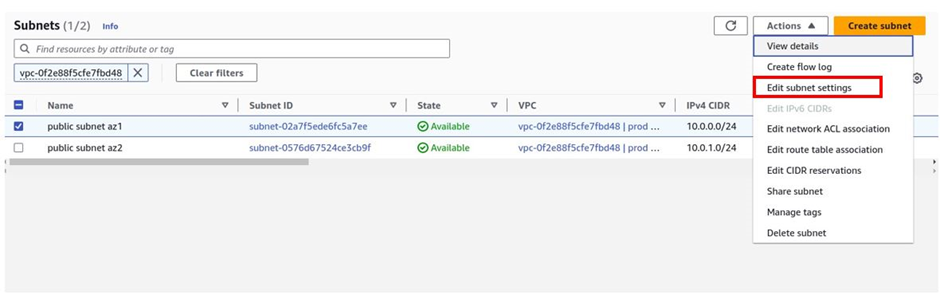
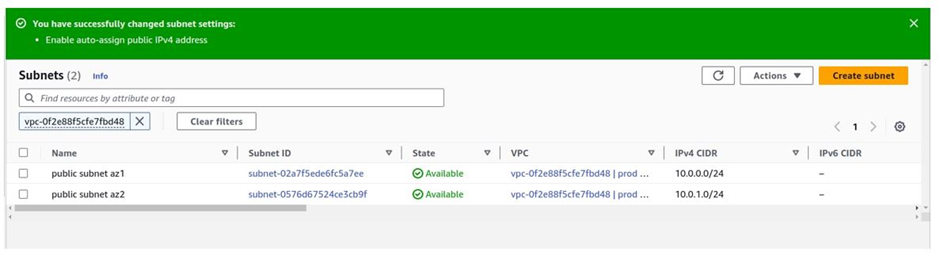
Next, we will enable auto-assign IP settings. Select the first one and then select actions. Then click edit subnet settings.
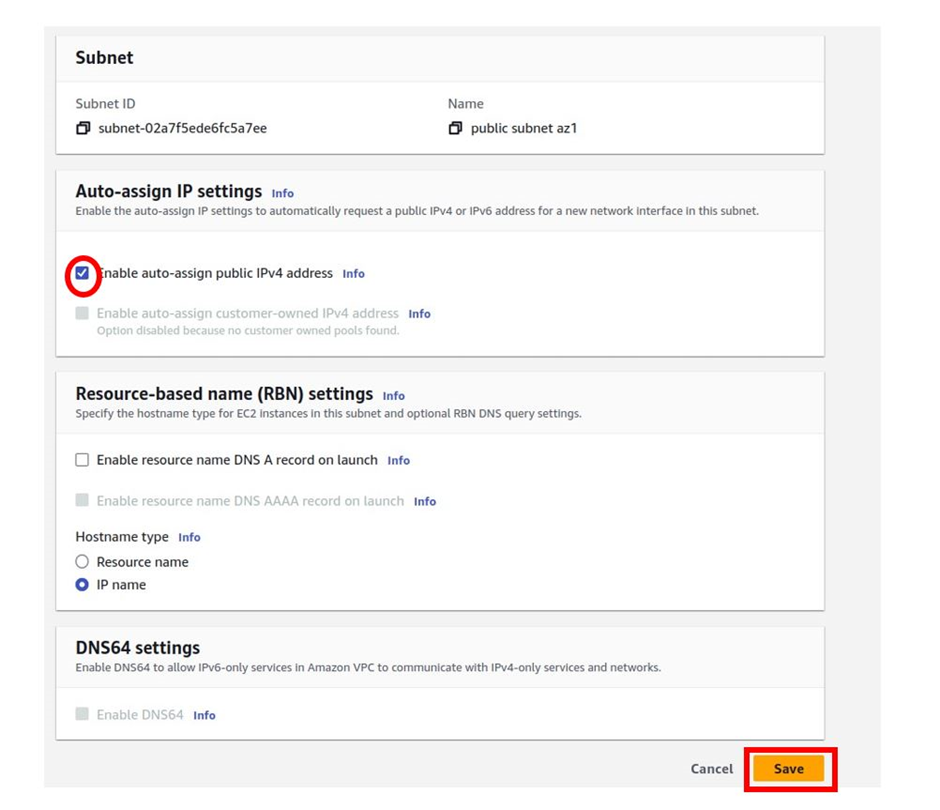
Then in the edit subnet settings dashboard under the auto-assign IP settings section, check the box next to enable auto-assign public IPv4 address and then click save.
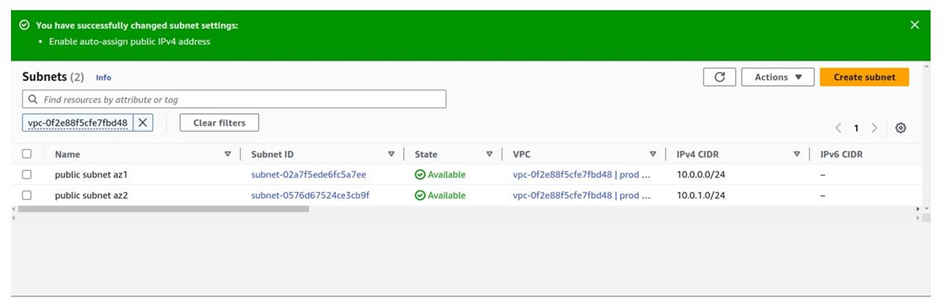
We have successfully changed the subnet settings.
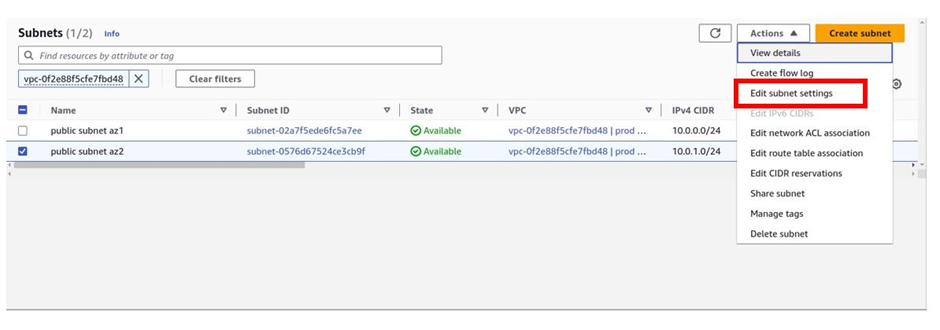
Repeat the same procedure for the subnet in the second vailability zone. Click the action drop-down, and select Edit subnet settings.
Then in the edit subnet settings dashboard, under the auto-assign public IP settings section, check the box next to enable auto-assign IPv4 address then click save.
You have successfully changed the subnet settings.
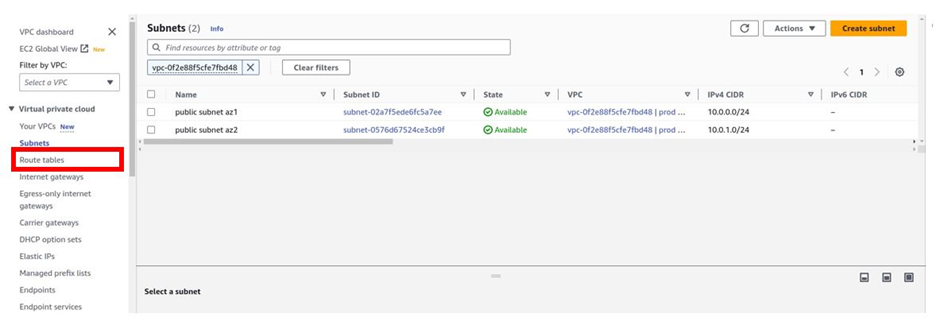
Following our reference architecture, we will create a route table. On the left side of the navigation pane on the VPC dashboard, select the route table as shown.
It filters my VPC by the prod VPC, and in the prod VPC, there is only one route table and it is called the main Route table and it is private by default. This route table was created when you created the VPC.
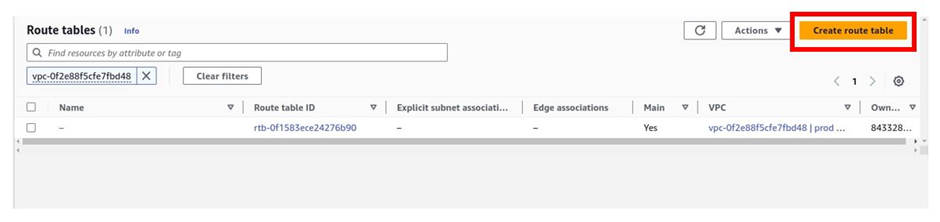
To create the public route table, click Create route table.
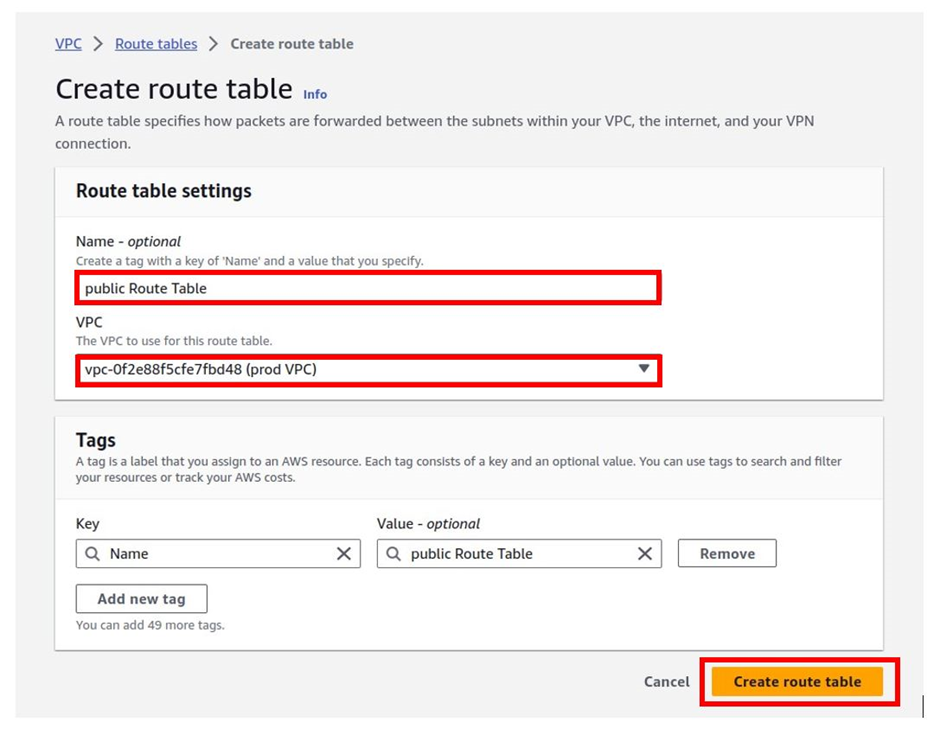
In the Create Route Table dashboard, under name call your Route table public Route Table. Under VPC, select the drop-down button, and select your prod-VPC then click Create Route Table.
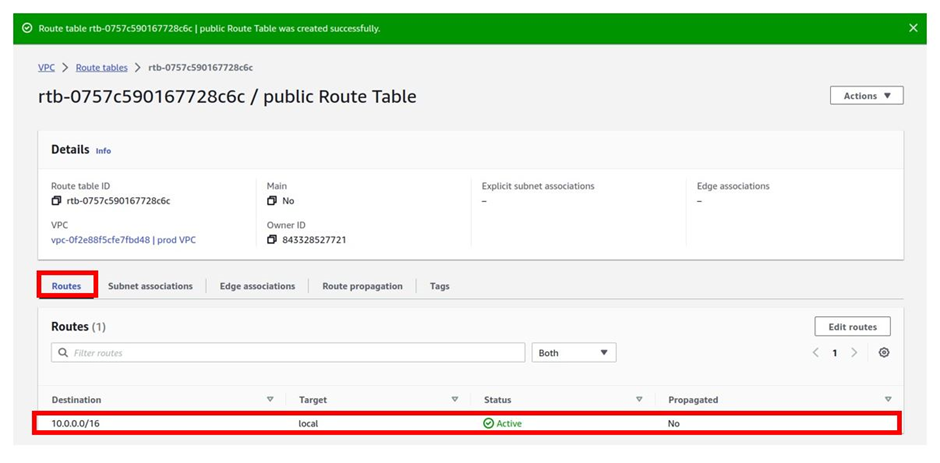
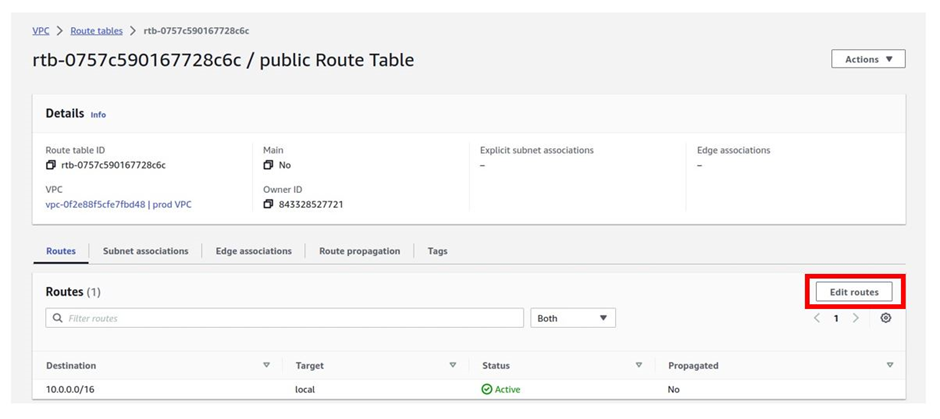
Route table successfully created. If you go to the routes tab, it shows local, which means it is only routing traffic locally within the VPC. This is because we have not associated this route table with any route.
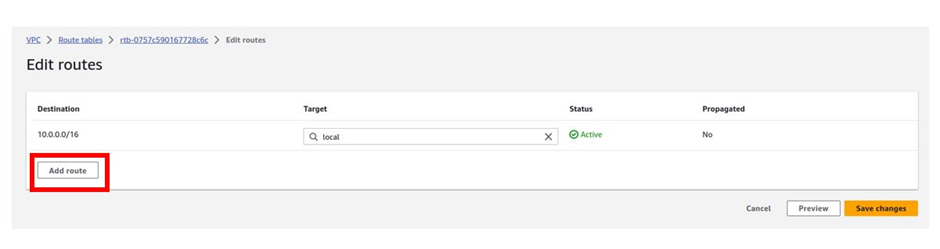
Let’s add a public route to this route table. To add a route to the route table, make sure you are in the routes tab, and then click edit routes then click add route.
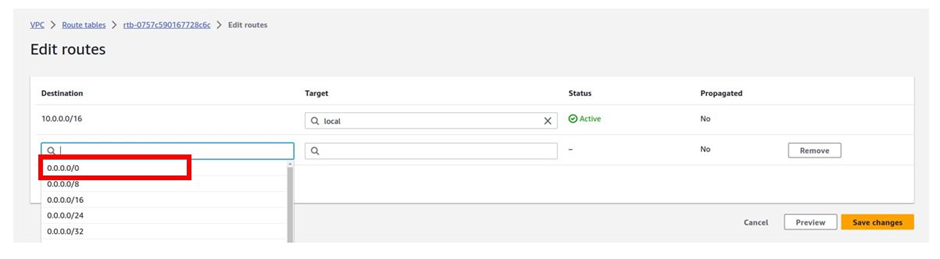
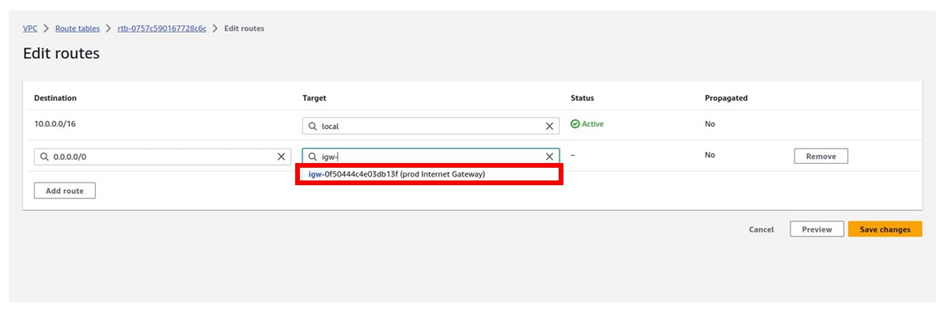
To add a route that routes traffic to the internet to this route table, under destination, click in the search box and type 0.0.0.0/0 then select it.
Then under target click in the search box a gain and here select your internet gateway.
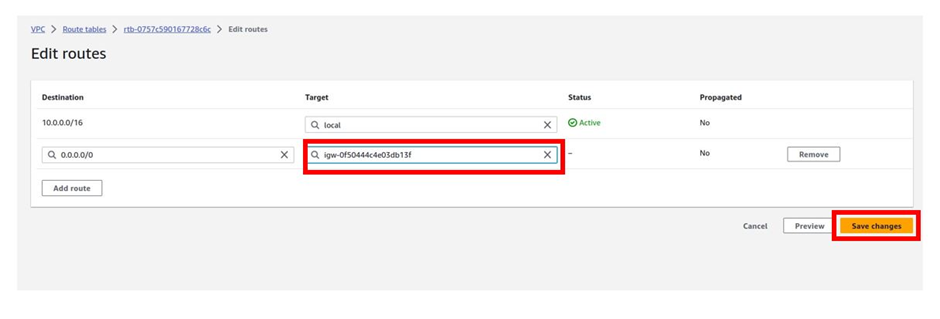
Once you’ve selected the internet gateway, the internet gateway you have in your VPC will show up, and as you can see it’s the prod internet gateway. Select it and then click Save Changes.
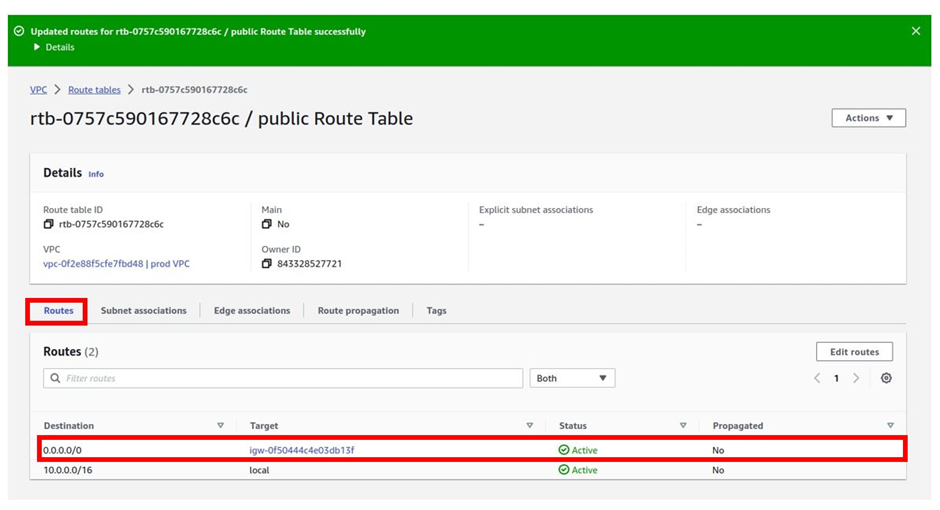
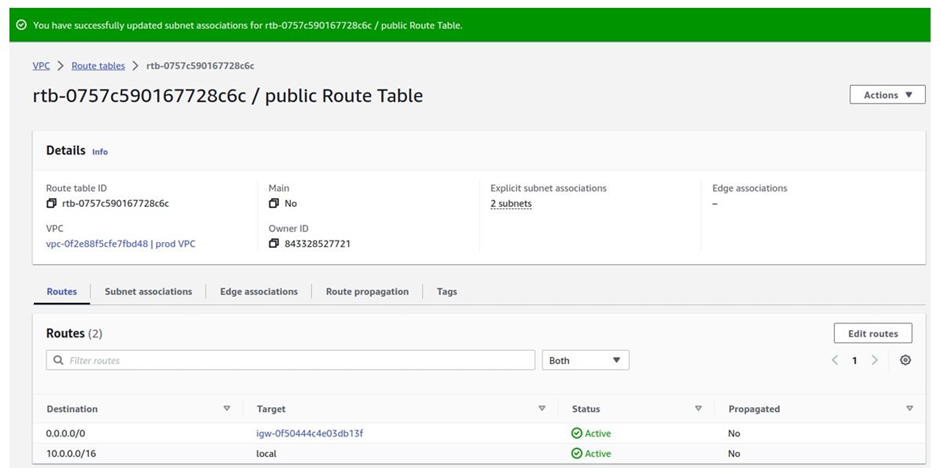
The public route has been updated successfully. If you move to the routes tab, you will see the route.
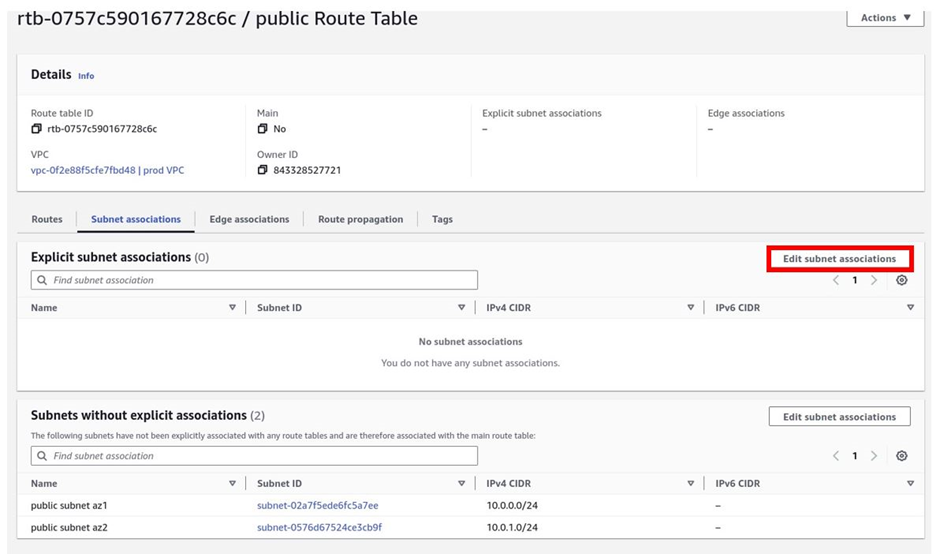
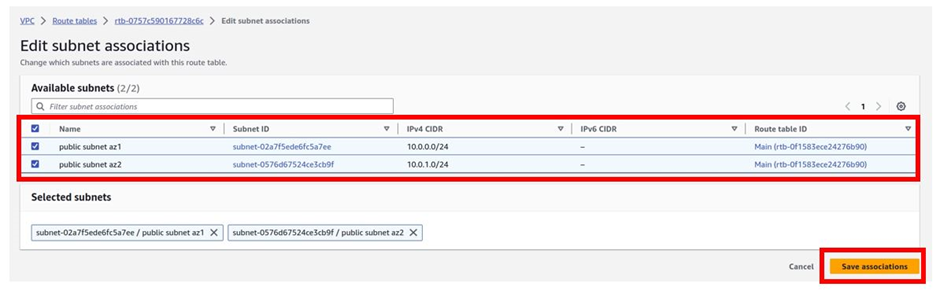
Next, is to associate our two public subnets with the public route table. Move as follows, make sure you are still in the public route table, then move to the subnet associations tab. Once in the subnet association tab, click edit subnet associations.
You will be brought to the subnet association dashboard, here select the two subnets, public subnets az1 and az2 then click save associations.
Finish creating your VPC. Proceed to create the four remaining private subnets.
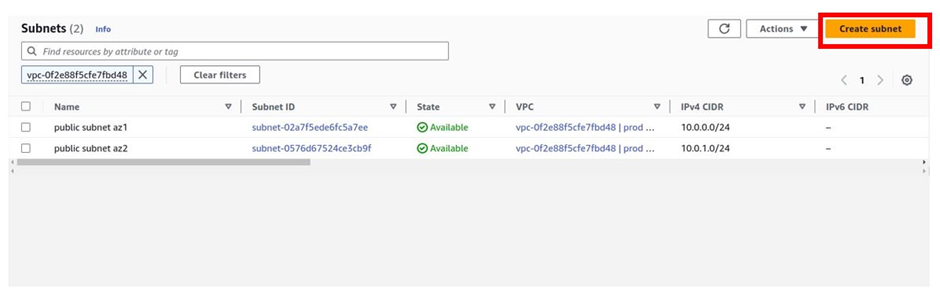
To create the private subnets, on the left side of the VPC dashboard, select subnets.
It filters by my VPC, and currently, I have two subnets.
We will strictly follow our reference architecture. Click Create Subnet.
In the create subnet dashboard, under VPC, select the drop-down button and select your prod-VPC. Scroll down.
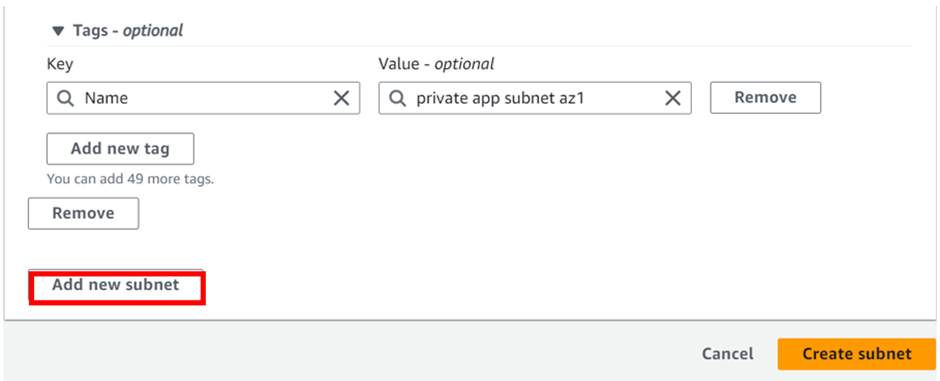
Under the subnet name, enter private app subnet az1, under the availability zone, select the drop-down button and select us-east-1a, under IPv4 subnet CIDR block enter 10.0.2.0/24. Then scroll down at the bottom and click Add New Subnet.
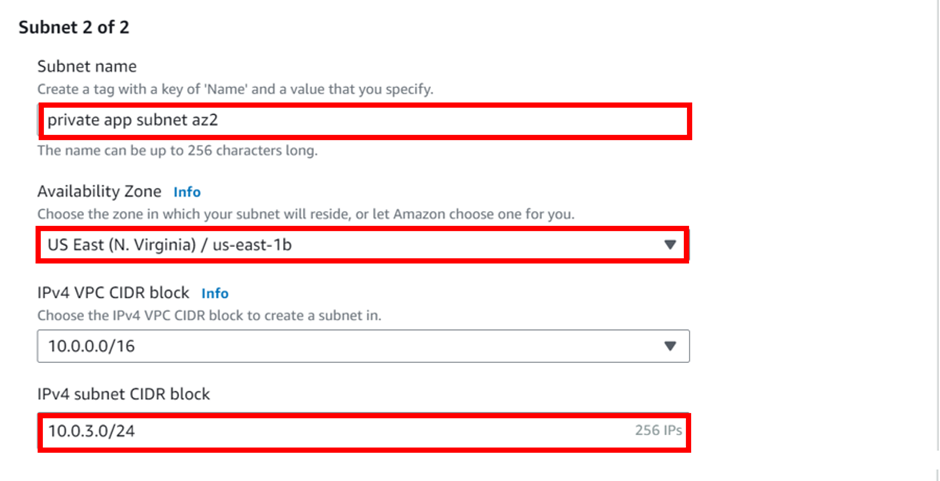
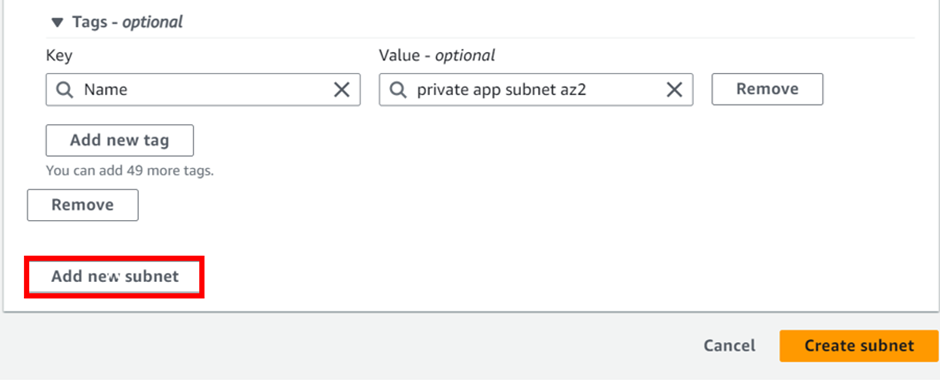
This will be our second private subnet, enter the details as shown below, the details are a reflection of the reference architecture. Again move to the bottom and click add new subnet for the third private subnet.
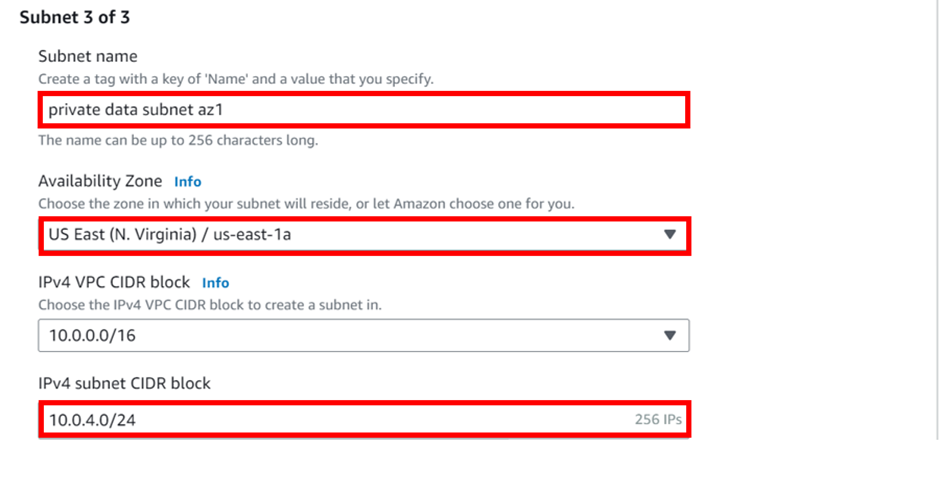
Repeat the same procedure and enter the subnet details as shown below. Then scroll down and click Add new subnet for the fourth private subnet.
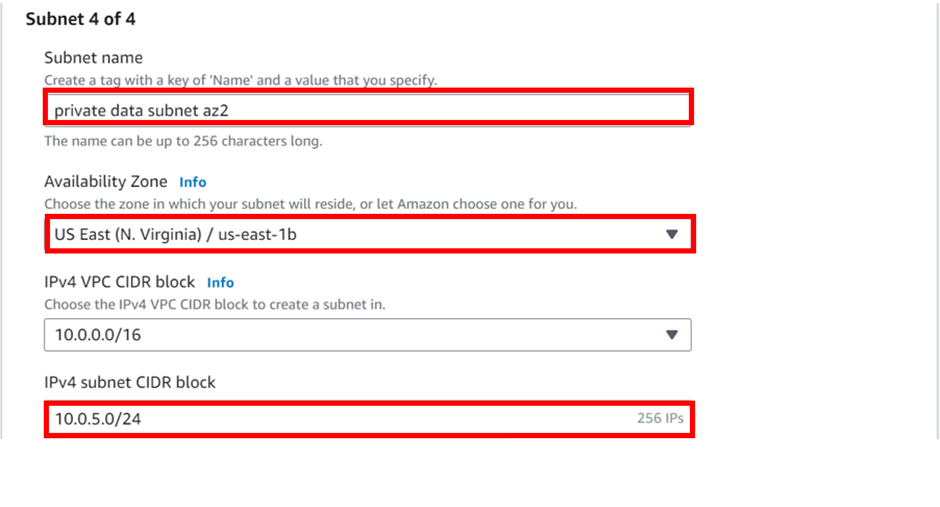
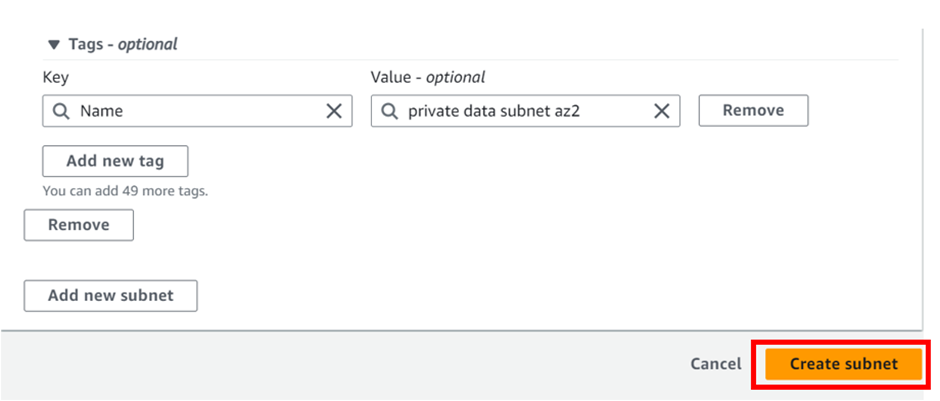
Enter the fourth subnet details as shown below, and make-sure the availability zones and CIDR block in the reference architecture are strictly followed. Click Create Subnets.
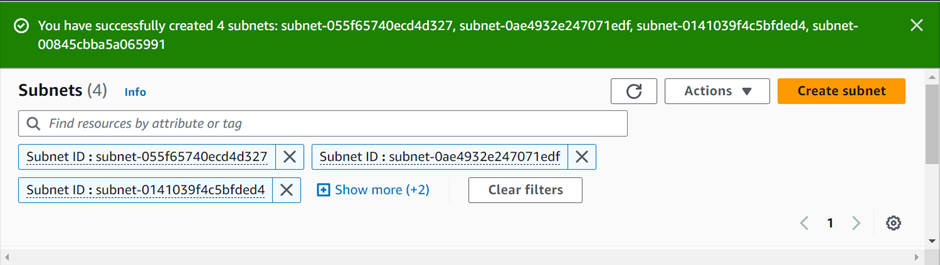
We have successfully created the four private subnets.
We created the four private subnets and did not explicitly associate them with any route table, hence they will be implicitly associated with the main route table.
This brings us to the end of this exercise. Pull down and stay tuned for more.
If you have any questions concerning this article or have an AWS project that requires our assistance, please reach out to us by leaving a comment below or email us at sales@accendnetworks.com.
Thank you!


Can you be more specific about the content of your article? After reading it, I still have some doubts. Hope you can help me. https://www.binance.com/register?ref=QCGZMHR6
Your point of view caught my eye and was very interesting. Thanks. I have a question for you. https://www.binance.bh/register?ref=IXBIAFVY
Your article helped me a lot, is there any more related content? Thanks!
Can you be more specific about the content of your article? After reading it, I still have some doubts. Hope you can help me.
Your article helped me a lot, is there any more related content? Thanks! https://accounts.binance.com/register-person?ref=QCGZMHR6
Your point of view caught my eye and was very interesting. Thanks. I have a question for you. https://www.binance.com/sl/register?ref=GQ1JXNRE
I don’t think the title of your article matches the content lol. Just kidding, mainly because I had some doubts after reading the article. https://www.binance.com/ru/register?ref=O9XES6KU
Can you be more specific about the content of your article? After reading it, I still have some doubts. Hope you can help me.
I don’t think the title of your article matches the content lol. Just kidding, mainly because I had some doubts after reading the article.
Your point of view caught my eye and was very interesting. Thanks. I have a question for you. b^onus de registro na binance
Thanks for sharing. I read many of your blog posts, cool, your blog is very good.
Thank you for your sharing. I am worried that I lack creative ideas. It is your article that makes me full of hope. Thank you. But, I have a question, can you help me? https://www.binance.info/sv/join?ref=YY80CKRN
I don’t think the title of your article matches the content lol. Just kidding, mainly because I had some doubts after reading the article.
I don’t think the title of your article matches the content lol. Just kidding, mainly because I had some doubts after reading the article.
Your article helped me a lot, is there any more related content? Thanks!
Thanks for sharing. I read many of your blog posts, cool, your blog is very good.
Thanks for sharing. I read many of your blog posts, cool, your blog is very good.
Your point of view caught my eye and was very interesting. Thanks. I have a question for you.
I don’t think the title of your article matches the content lol. Just kidding, mainly because I had some doubts after reading the article.
Your point of view caught my eye and was very interesting. Thanks. I have a question for you.
Your point of view caught my eye and was very interesting. Thanks. I have a question for you.
Thank you for your sharing. I am worried that I lack creative ideas. It is your article that makes me full of hope. Thank you. But, I have a question, can you help me?