Accend Networks San Francisco Bay Area Full Service IT Consulting Company

Categories
Blogs

Electric Vehicle (EV) Charger – Hardwire Options Quick Tip – Part II of II Series

Electric Vehicle (EV) Charger - Hardwire Options Quick Tip - Part II of II Series

Hey everybody, thanks for joining today. Today we’ll cover EV charger hardwire quick tip. This is part one of a part two series.

Let’s get started.

For EV charging, there are two options. There’s a 40 amp, which is the default; it allows you to charge up to 38 mph. There’s a 48 amp hardwire option that allows you to charge up to 50 mph. It does require a dedicated circuit, and we’ll be focusing more on this option: the EV charger 48 amp hardwire options.

Here’s a checklist of what you’ll need: a circuit panel (make sure you have some available slots), a 60 amp circuit breaker, and some cables. For circuit panels, how do you quickly check if you have space available? Where my arrow is pointing, if you have some unused space, it is most likely your circuit panel will support that. If not, you can quickly convert your existing breaker to a tandem circuit breaker. You need a 60 amp, two-pole circuit breaker. Here’s an image of what that looks like. Do check and make sure that it is compatible with your circuit panel.

And you’ll need some cables. You need two number six THHN wires for the high conductor (you’ll need a black and a red) and one number 10 THHN wire for the green grounding cable. Uh, circuit rating cable for reference, this one is for EVQO. Do check the manual that is specific to your charger.

Here we want to look at row number one where the hardwire is at. Yes, and what setting in the DIP switch needs to be at to achieve a 48 amp output? It does tell you that you need a 60 amp dedicated circuit. And the image at the bottom is what the DIP switch looks like. You need to change that to number three.

Thank you for watching this video. Do make sure you check out part two of this series. Feel free to reach out if you have any questions.

Thank you!

Categories
Blogs

Electric Vehicle (EV) Charger – Hardwire Options Quick Tip – Part I of II Series

Electric Vehicle (EV) Charger - Hardwire Options Quick Tip - Part I of II Series

Hey everybody, thanks for joining today. Today we’ll cover EV charger hardwire quick tip. This is part one of a part two series.

Let’s get started.

For EV charging, there are two options. There’s a 40 amp, which is the default; it allows you to charge up to 38 mph. There’s a 48 amp hardwire option that allows you to charge up to 50 mph. It does require a dedicated circuit, and we’ll be focusing more on this option: the EV charger 48 amp hardwire options.

Here’s a checklist of what you’ll need: a circuit panel (make sure you have some available slots), a 60 amp circuit breaker, and some cables. For circuit panels, how do you quickly check if you have space available? Where my arrow is pointing, if you have some unused space, it is most likely your circuit panel will support that. If not, you can quickly convert your existing breaker to a tandem circuit breaker. You need a 60 amp, two-pole circuit breaker. Here’s an image of what that looks like. Do check and make sure that it is compatible with your circuit panel.

And you’ll need some cables. You need two number six THHN wires for the high conductor (you’ll need a black and a red) and one number 10 THHN wire for the green grounding cable. Uh, circuit rating cable for reference, this one is for EVQO. Do check the manual that is specific to your charger.

Here we want to look at row number one where the hardwire is at. Yes, and what setting in the DIP switch needs to be at to achieve a 48 amp output? It does tell you that you need a 60 amp dedicated circuit. And the image at the bottom is what the DIP switch looks like. You need to change that to number three.

Thank you for watching this video. Do make sure you check out part two of this series. Feel free to reach out if you have any questions.

Thank you!

Categories
Blogs

Adding IPSec VPN as SD-WAN Member on FortiGate with Performance SLA for Health Checks

Adding IPSec VPN as a Software SD-WAN Member on FortiGate (Pre-7.0) with Performance SLA for Health Checks

Introduction

Welcome! In this tutorial, we’ll walk through how to add an IPSec VPN tunnel as a Software SD-WAN member on a FortiGate firewall (pre-7.0 firmware), and how to configure a Performance SLA for tunnel health checks.

About the Author

I’m Paula Wong, CEO and Founder of Accend Networks, a full-service IT solutions provider specializing in cybersecurity, networking, and cloud services – from power to protection.

Certifications:

C|EH Master, CCIE #13062, PCNSE, C-10/C-7 #1086962, Oracle OCI, AWS Certified Cloud Practitioner

With over 30 years of industry experience, including hands-on roles in Fortune 500 environments, I help clients streamline secure and scalable network infrastructure.

Step 1: Remove Active References to the IPSec Tunnel

Before you can use an existing VPN tunnel as an SD-WAN member, you must remove any active configuration references to it.

  • In this example, we’re using a VPN tunnel named Iperf
  • If your tunnel shows “4” in the references column, click that number to see where it’s in use.
  • Remove those references so the tunnel can be added to an SD-WAN zone.

Step 2: Create an SD-WAN Zone and Add the VPN Tunnel

Once the tunnel is cleared of active bindings:

  • Go to Network > SD-WAN Zones
  • Create a new SD-WAN zone (e.g., IPSec_Zone)
  • Add the Iperf tunnel (or your tunnel name) as a member

Step 3: Configure Performance SLA for Health Checks

Now we configure a Performance SLA to monitor the health of the IPSec tunnel.

  • Go to Network > Performance SLA

  • Add a new SLA and point the server IP to the remote end of the VPN tunnel

  • Protocol options can include Ping, HTTP, DNS, or custom probes

Note: The WAN link field is optional, but specifying it can improve traffic steering.

Step 4: Create an SD-WAN Rule

Finally, create a rule to define how traffic uses the tunnel based on SLA:

  • Set source and destination

  • Define SLA targets (e.g., latency, jitter, packet loss)

  • Apply load balancing logic (e.g., use WAN1 as primary, WAN2 as backup)

When the SLA thresholds are violated, FortiGate will dynamically reroute traffic based on your configuration.

Summary

That’s it! You’ve now:

  1. Cleared references from an existing IPSec tunnel
  2. Added it as a member to your SD-WAN zone
  3. Configured a Performance SLA for health monitoring

Created traffic rules for dynamic failover and load balancing

Contact

Need help with FortiGate SD-WAN, IPSec, or Performance SLA design?

Reach out:

Categories
Blogs

Amazon ECR

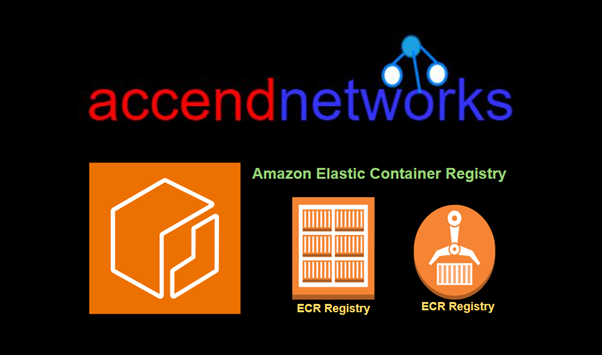
Amazon ECR: Managing Docker Images with Elastic Container Registry

Amazon Elastic Container Registry (ECR) is a fully managed container image registry service designed to store, manage, and deploy Docker container images securely. ECR integrates seamlessly with Amazon ECS, EKS, and other AWS services, enabling efficient containerized application deployment and simplifying DevOps workflows. This blog provides an overview of Amazon ECR and how to set it up though the AWS console.

What is Amazon ECR

Amazon Elastic Container Registry (Amazon ECR) is a secure, scalable, and reliable AWS-managed container image registry service that supports private repositories with resource-based permissions using AWS IAM.

Private and Public Repositories

ECR supports two repository types, making it flexible for both internal usage and public sharing.

  • Private Repositories: Suitable for storing proprietary images that are accessible only within your organization. Access is controlled through AWS IAM, ensuring your container images remain secure.
  • Public Repositories: ECR’s Public Gallery allows you to host images publicly, making them available for community use. This is useful for open-source projects or sharing container images with a broad audience.

Using private and public repositories enables a hybrid approach to managing your image distribution, where sensitive applications can remain secure within private repositories while open-source or shareable images can be accessed publicly.

Why Use Amazon ECR?

Amazon ECR offers robust capabilities and benefits that make it a preferred choice for Docker image management:

  • Security and Compliance: With encryption in transit, image scanning, and integrated AWS IAM policies, Amazon ECR ensures high security for your Docker images.
  • Scalability: ECR scales automatically, handling large volumes of Docker images without requiring manual configuration or intervention.
  • Integration with AWS Services: ECR seamlessly integrates with Amazon ECS, EKS, CodePipeline, and CodeBuild, enabling automated deployments and CI/CD workflows.
  • Simplified Workflow: ECR eliminates the need to set up and manage your container image registry, reducing operational overhead.

Getting Started with Amazon ECR

Step 1: Setting Up an Amazon ECR Repository

To begin using Amazon ECR, you need to create a repository where your Docker images will be stored.

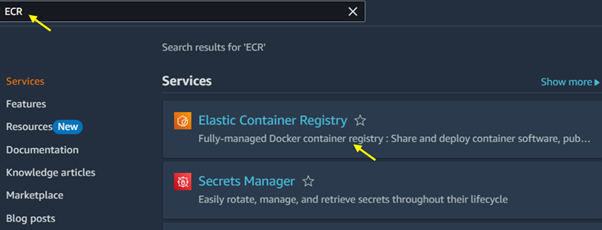
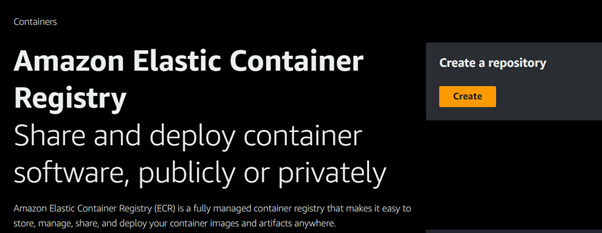
Open the Amazon ECR Console: Go to the Amazon ECR Console. Then type ECR in the search bar and select ECR under services.

Click on Create Repository.

Configure Settings: Provide a name for your repository and configure settings like image scanning and encryption.

Repository Policies: Set access permissions for your repository. By default, repositories are private, but you can adjust policies for specific users, roles, or accounts.

For Image tag mutability, select immutable. When tag mutability is turned on, tags are prevented from being overwritten.

Step 2: Authenticating Docker to ECR

After creating a repository, you must authenticate Docker to interact with Amazon ECR. AWS provides a simple command to obtain and configure Docker login credentials.

Run Authentication Command:

Copy code

aws ecr get-login-password –region <region> | docker login –username AWS –password-stdin <aws_account_id>.dkr.ecr.<region>.amazonaws.com

Replace <region> and <aws_account_id> with your AWS region and account ID.

Verify Authentication: You should see a “Login Succeeded” message, confirming Docker’s successful authentication with Amazon ECR.

Security and Access Management

ECR is highly secure, leveraging AWS Identity and Access Management (IAM) to control access. Users and roles can be granted specific permissions, ensuring secure access to repositories and images.

  • IAM Policies: Using IAM policies, you can control who has access to view, upload, or delete images.

This control allows fine-grained security, ensuring your images are accessible only to those with explicit permission.

Automating Docker Deployments with Amazon ECR

Integrating Amazon ECR with other AWS services lets you automate container image deployments, providing agility in CI/CD pipelines. Here’s a high-level overview of how ECR can streamline the deployment process.

CI/CD Integration with CodePipeline and CodeBuild: Amazon ECR integrates with CodePipeline and CodeBuild to automate Docker image builds, tests, and deployments.

ECS and EKS Deployments: ECR is the primary image registry for Amazon ECS and Amazon EKS, allowing you to quickly deploy containerized applications.

Scheduled Image Scanning: Regularly scan your images for vulnerabilities with Amazon ECR’s built-in scanning feature, which provides insight into image security.

Best Practices for Managing Docker Images in Amazon ECR

Enable Image Scanning: Regular scanning helps identify vulnerabilities in your Docker images, adding an extra layer of security.

Use Lifecycle Policies: Lifecycle policies allow you to define rules for image retention, which helps optimize storage costs by automatically deleting older, unused images.

Implement Access Control: Use IAM policies to manage permissions, ensuring only authorized users can push or pull images from the repository.

Use Version Tagging: Consistent version tagging helps in identifying and managing different versions of an image efficiently, especially in multi-environment deployments.

Conclusion

Amazon ECR offers a scalable, secure, and fully managed solution for managing Docker images. It streamlines the containerization process, allowing teams to focus on building and deploying applications without worrying about registry management.

Thanks for reading and stay tuned for more.

If you have any questions concerning this article or have an AWS project that requires our assistance, please reach out to us by leaving a comment below or email us at sales@accendnetworks.com.


Thank you!

Categories
Blogs

Amazon Cognito

Amazon Cognito: Empowering User Identity for Your Web and Mobile Applications

In today’s online world, managing user identities securely is very important for any website or mobile app. Amazon Cognito, which is part of Amazon Web Services (AWS), is a strong tool for handling and securing user logins. This blog will explore how Amazon Cognito empowers user identity, enhances security, and simplifies integration, allowing developers to focus on building robust applications.

What is Amazon Cognito?

Amazon Cognito is a fully managed service that provides user identity and access management for web and mobile applications. It enables developers to create secure, scalable authentication flows and manage user profiles. By using Amazon Cognito, you can add sign-up and sign-in features, multi-factor authentication (MFA), and even social sign-in options (like Google and Facebook) to your apps without worrying about the complexities of identity management.

User Pools and Identity Pools in Amazon Cognito

Amazon Cognito offers two main components for managing user identities: User Pools and Identity Pools.

User Pools: This component manages users’ credentials and profiles. User pools help developers create user sign-up and sign-in functionality with customizable authentication flows, such as multi-factor authentication and account recovery.

Identity Pools: Identity pools allow users to obtain temporary AWS credentials, giving them access to other AWS services. This feature is handy for building secure, serverless applications and is an effective way to manage permissions without requiring complex backend configurations.

Why Use Amazon Cognito for Web and Mobile Authentication?

Security is at the forefront of Amazon Cognito, offering features like multi-factor authentication, secure password policies, and adaptive authentication. This lets you enforce specific security protocols for enhanced user protection while minimizing the risk of unauthorized access. The service also supports OpenID Connect, OAuth 2.0, and SAML, allowing seamless integration with other identity providers for secure, federated authentication.

Customization: With Amazon Cognito, you can customize sign-up and sign-in processes to suit your brand and application needs. This includes customizing email templates, user verification steps, and even the login UI.

Scalability is inherent in Amazon Cognito’s infrastructure, which is built on the AWS cloud. This makes it suitable for applications of all sizes, whether you’re managing a few thousand users or millions.

Implementing Role-Based Access with Amazon Cognito

Amazon Cognito supports role-based access control (RBAC), which enables developers to assign specific permissions to different user groups. For example, you could assign different access roles to administrators, premium users, and regular users, each with distinct access to parts of your application.

RBAC is managed by combining IAM roles with identity pools in Amazon Cognito, where users in different groups can be mapped to IAM roles with varying permissions. This setup helps create a secure, customizable experience for your users without hardcoding permissions.

Using Multi-Factor Authentication (MFA) for Enhanced Security

Multi-factor authentication is a powerful security feature provided by Amazon Cognito. By enabling MFA, you add an extra layer of protection to your application.

Amazon Cognito and Social Identity Providers

One of the major benefits of Amazon Cognito is its seamless integration with social identity providers like Google, Facebook, Apple, and Amazon. This allows your users to log in using their existing social media accounts, making the login process easier and more convenient. For many users, social logins are preferred as they eliminate the need to remember multiple passwords, enhancing user engagement and retention.

Custom Authentication Flows with Amazon Cognito

For applications that require more control, Amazon Cognito supports custom authentication flows. This feature enables you to define unique authentication steps, including conditional verifications, complex challenge responses, and custom error handling.

How Amazon Cognito Supports Serverless Applications

Serverless applications benefit from Identity Pools in Amazon Cognito, which provides temporary AWS credentials that users can use to access other AWS services. This is an efficient way to manage access without requiring a dedicated backend for session management, allowing you to build robust, secure applications while reducing infrastructure costs.

Conclusion

Amazon Cognito is a powerful tool that simplifies identity management. It provides everything from secure logins to multi-factor authentication and social sign-in options.

Thanks for reading and stay tuned for more.

If you have any questions concerning this article or have an AWS project that requires our assistance, please reach out to us by leaving a comment below or email us at sales@accendnetworks.com.


Thank you!