Cisco Umbrella Monitoring and Logging Best Practices
How to: Validate Cisco Umbrella Configuration
Cisco Umbrella offers a range of URLs to validate and ensure the successful configuration of Umbrella on your network. These URLs enable you to perform various tests to confirm the functionality of Umbrella’s DNS resolution, security settings, content filtering, and Intelligent Proxy feature. Below the table is an extra category of test page for the Intelligent Proxy.
Umbrella/OpenDNS Test URLs
Correctly Configured Result
Incorrectly Configured Result
The first stage in using Umbrella is to point your DNS addresses to our anycast IP addresses (208.67.222.222 and 208.67.220.220).
Once you’ve done that, to test whether you are using Umbrella/OpenDNS for DNS resolution, go to:
http://welcome.opendns.com
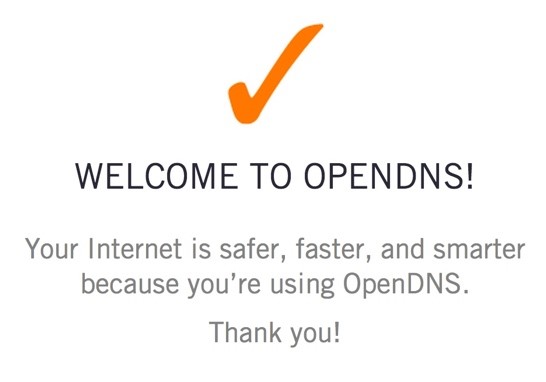 If you’ve correctly configured your DNS settings on your router, computer or mobile device to use Umbrella, this is the result you should see.
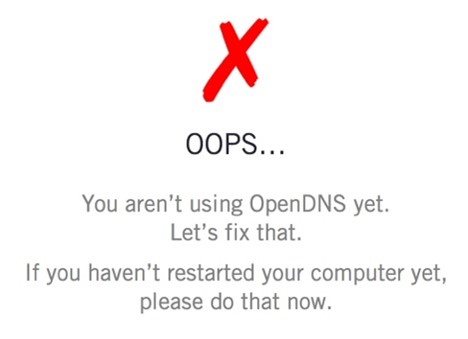
Check the settings on your device again to ensure it’s correctly configured.
To test the Security Settings of your configuration, we recommend using one of the following test sites,depending on what you want to test.
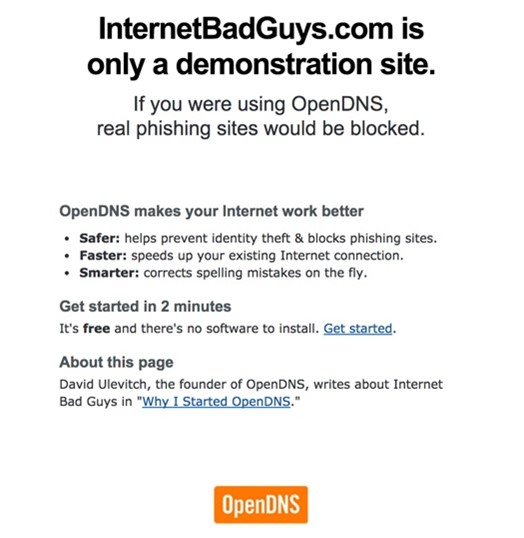
All of the test sites below are blocked with the default Umbrella Security Settings.
To test blocking the Security setting for Phishing:
http://www.internetbadguys.com
To test blocking the Security Setting for Malware:
http://www.examplemalwaredomain.com
or
To test blocking the Security Setting for Command and Control Callback:
An Umbrella block page should appear if you are correctly configured. With Security Settings, each of the block pages will vary based on your settings and could include custom block pages.
If this page appears, check your settings, including the order of policies and which identity you are appearing as in the logs.
To test Content Settings for your configuration, we recommend using the following test site to test blocking pornography sites. However, not every individual Content Settings has an Umbrella block page for it.
Instead, if you have created your own block page (or added one to a policy) and applied it to the policy with a blocked Content Setting, you should see that block page appear.
To test blocking for pornographic websites:
An Umbrella block page should appear if you are correctly configured. With Content Settings, each of the block pages will vary based on your settings and could include custom block pages.
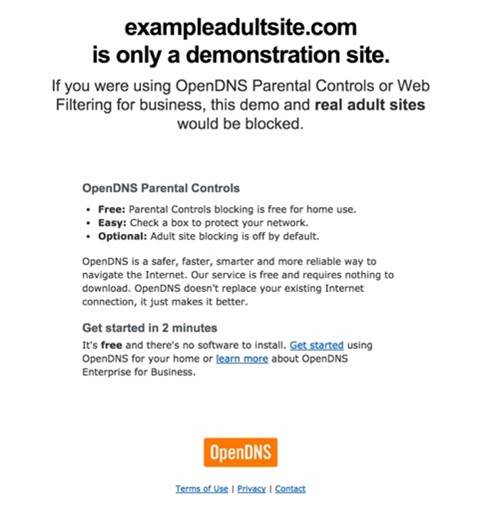
If this page appears, check your settings, including the order of policies and which identity you are appearing as in the logs.
If these tests return results other than those described in the table, further troubleshooting may be required. To begin, we suggest to contact your ISP to ask them if they allow 3rd-party DNS services, such as Umbrella’s global DNS or Google DNS.
Additional Test: Intelligent Proxy
To validate the Intelligent Proxy feature:
- Enable the Intelligent Proxy policy for an identity, such as your laptop or mobile device.
- Visit http://proxy.opendnstest.com/ and follow the instructions to test image blocking and website blocking using the Intelligent Proxy.
- Ensure that the identity you’re using has the Intelligent Proxy enabled in the applicable policy.
If any test results differ from the expected outcomes, further troubleshooting may be necessary. Consider reaching out to your ISP to confirm compatibility with third-party DNS services like Umbrella’s global DNS or Google DNS.
By following these steps, you can effectively validate your Cisco Umbrella configuration and ensure optimal performance of your network security measures.
How to Monitor Umbrella Service Health and System Status
Monitoring Cisco Umbrella’s health and status is key for network security. Bookmark system status pages and subscribe to the Cisco Umbrella Service Status page for notifications. Stay informed with service updates, notifications, and announcements. Regularly check the “Message Center” on the Umbrella Dashboard for alerts.
- Bookmark System Status Pages:
- Bookmark http://208.69.38.170/ and https://146.112.59.2/#/ to access the Umbrella System Status pages even when local DNS is unavailable.
- Subscribe to Service Status Updates:
- Subscribe to the Cisco Umbrella Service Status page at https://146.112.59.2/#/ to receive notifications regarding Service Degradations, Outages, Maintenance, and Events.
- Stay Informed with Service Updates:
- Follow the Service Updates subpages of https://support.umbrella.com/hc/en-us/categories/204185887-Service-Updates for the latest information.
- Check Service Notifications:
- Visit https://support.umbrella.com/hc/en-us/sections/206593887-Service-Notifications for detailed Service Notifications.
- Stay Updated with Announcements:
- Check https://support.umbrella.com/hc/en-us/sections/206896108-Announcements for important announcements related to Umbrella services.
- Review Service Updates:
- Visit https://support.umbrella.com/hc/en-us/categories/204185887-Service-Updates to stay updated with the latest Service Updates.
- Monitor Cisco Umbrella Dashboard:
- Periodically check the Cisco Umbrella Dashboard’s “Message Center” for product alerts and notifications.
Following these steps will help you stay informed about the health and status of your Cisco Umbrella service, ensuring timely action and awareness of any potential issues.
Network Registration:
Ensure all IP addresses and CIDR ranges associated with your organization are registered with Umbrella. For more information, refer to https://docs.umbrella.com/product/umbrella/protect-your-network/.
Logging:
Umbrella retains detailed logs for 30 days before converting them into aggregated report data. To preserve detailed data beyond 30 days, configure an Amazon S3 bucket for data export at “Settings -> Log Management”.
How to Contact and Work with the Umbrella Support Team:
- Submit a Support Request:
- After logging into the Umbrella dashboard, submit a request to the Umbrella support team via the webform at: https://support.umbrella.com/hc/en-us/requests/new
- Provide complete details about any problems or questions you have.
- Telephone Support:
- If you have purchased telephone support from Cisco Umbrella will see a telephone icon at the top right-hand corner of the Umbrella dashboard screen.
- Clicking on the telephone icon will display the telephone number for Support.
- Provide Detailed Information:
- When contacting support, provide as much detail as possible about your issue or question.
- Use the Diagnostic Tool:
- Use the Umbrella Diagnostic Tool to gather valuable information for troubleshooting: https://support.umbrella.com/hc/en-us/articles/234692027-Umbrella-Diagnostic-Tool
By following these steps, you can effectively contact and work with the Umbrella support team to resolve any issues or questions you may have regarding the Umbrella service.
Feel free to reach out to us if you have any questions at info@accendnetworks.com and we’ll be glad to assist you.
Happy DNS Security!