Accend Networks San Francisco Bay Area Full Service IT Consulting Company

Categories
Blogs

Rotating SSH Keys

Rotating SSH Keys: Adding or Removing a Public Key on Your AWS EC2 Instance

Managing SSH keys is a crucial aspect of maintaining the security and accessibility of your AWS EC2 instances. Whether adding a new user, granting temporary access, or revoking permissions, understanding how to add or remove public keys is essential. This guide will walk you through the process of adding and removing a public keys on your AWS EC2 instance.

When you launch an instance, you can specify a key pair.

If you specify a key pair at launch, when your instance boots for the first time, the public key material is placed on your Linux instance in an entry within ~/.ssh/authorized_keys.

You can change the key pair that is used to access the default system account of your instance by adding a new public key on the instance, or by replacing the public key (deleting the existing public key and adding a new one) on the instance. You can also remove all public keys from an instance.

Reasons for Changing a Public Key

Several reasons might lead to changing the public key of our EC2 instance.

Compromised Key: If someone has a copy of the private key (.pem file) and you want to prevent them from connecting to your instance (for example, if they’ve left your organization), you can delete the public key on the instance and replace it with a new one.

Adding a New User: When a new team member needs access to the instance, you must add their public key.

Key Rotation Policy: As part of your security best practices, regularly rotating keys helps mitigate the risk of key compromise.

Revoking Access: When a user no longer requires access, removing their public key ensures they cannot connect to the instance.

Temporary Access: Granting temporary access to a user for a specific task or duration, after which the key is removed.

Lost Key: If you’ve lost access to your private key, you’ll need to add a new key pair to regain access.

If a user in your organization requires access to the system user using a separate key pair, you can add the public key to your instance.

To achieve this goal, Let’s proceed as follows.

Launch an EC2 instance.

Log in to the AWS management console as an admin user. Search for EC2 in the search bar then select EC2.

Click instances in the left UI of the EC2 dashboard then click Launch instance.

Fill in the instance details, select the Ubuntu image, and move within the free tier with t2. Micro.

Select your key pairs then scroll down.

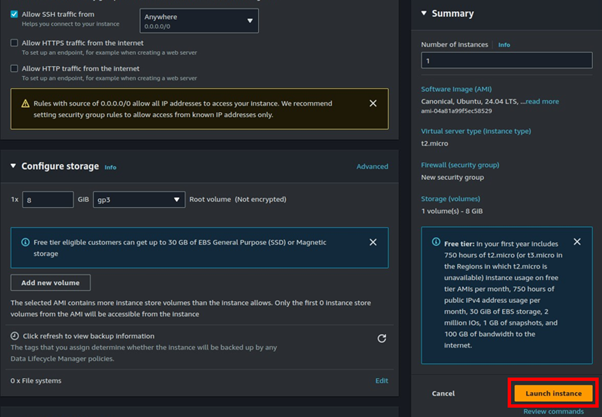
Leave networking as default and select Create New Security Group, with port 22 open for SSH.

Leave other settings as default, scroll down, review then click launch instance.

Click the launched instance ID, then copy the instance public IP then let’s proceed to SSH into our instance.

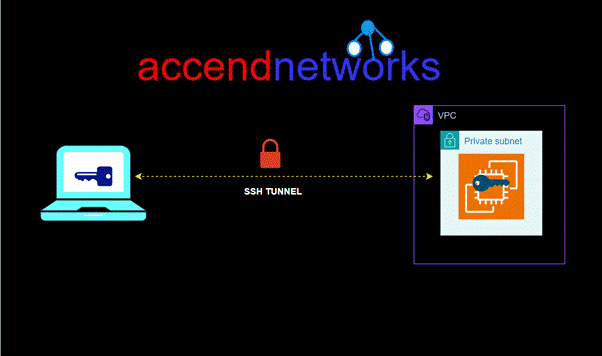
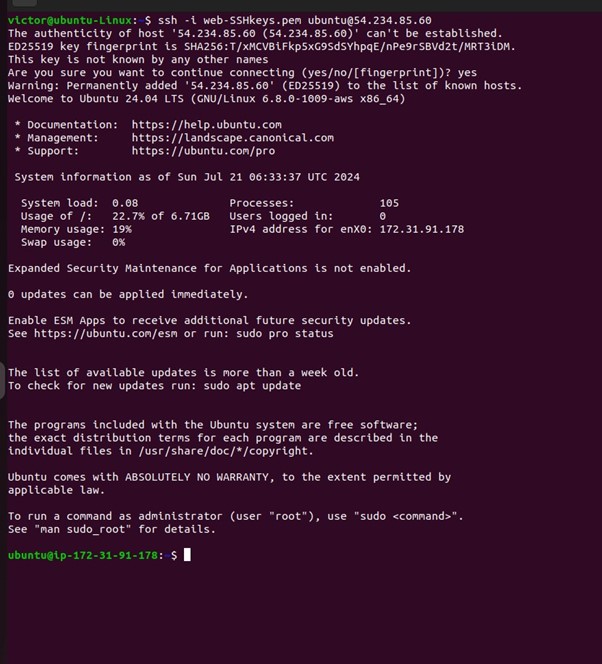
Type in the following command to ssh into your server.

ssh -i <keyname.pem>  user@publicIP

Successfully logged into our server.

Let’s move to the .ssh directory where the authorized_key file is located.

List the contents, of the .ssh directory and then cat the contents of the authorized_keys. You will see your public key.

To add or remove the public key, this is the file we have to edit.

I have the following keys, in my AWS account.

Retrieve the public key material using the bellow command.

Using a text editor of your choice, open the .ssh/authorized_keys file on the instance. Delete the old public key information, add the new one then save the file.

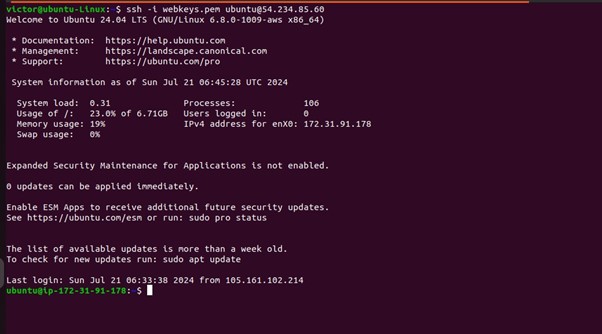
Let’s disconnect from our instance, and test if we can connect back using the new private key file.

Success, we have now logged back to our EC2 instance using the new key pair.

Clean up.

Conclusion

Managing SSH keys on your AWS EC2 instances is a straightforward yet vital task to ensure secure access. By following the steps outlined above, you can easily add or remove public keys, thus maintaining control over who can access your servers.

Thanks for reading and stay tuned for more.

If you have any questions concerning this article or have an AWS project that requires our assistance, please reach out to us by leaving a comment below or email us at sales@accendnetworks.com.


Thank you!

Categories
Blogs

Securing S3 Buckets

Securing Your S3 Buckets: Preventing Unauthorized Access with CloudFront OAI

In today’s cloud computing world, keeping data safe is crucial. AWS does a great job storing data in its data centers, but it’s up to us to set up who can access it.

Many companies use Amazon S3 buckets. These offer a way to store lots of data through Amazon Web Services (AWS). But making sure your S3 buckets are secure is important. Even a minor error can allow unauthorized access to your private information.

This blog post explores how to prevent unauthorized access to your S3 buckets using CloudFront Origin Access Identity (OAI).

Understanding the Issue

By default, S3 buckets are private. However, when hosting a static frontend website, it’s common to grant public access to your bucket and enable the static web hosting property. Even with security policies applied to your bucket objects, a small mistake or incorrect configuration can lead to unauthorized access to sensitive data.

This is where CloudFront Origin Access Identity (OAI) comes to the rescue!

CloudFront Origin Access Identity

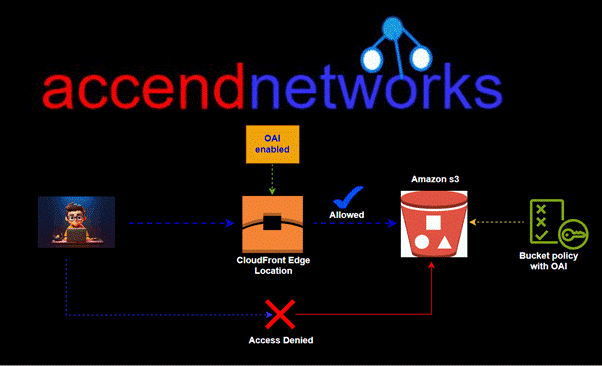
AWS CloudFront is a content delivery network (CDN) service that can be used to distribute content globally while providing a security layer. CloudFront OAI is a feature that helps secure your S3 buckets by allowing you to restrict access to your data to only CloudFront distributes.

CloudFront OAI does this by updating the bucket policy to only allow access from CloudFront.

Let’s look into how we can configure CloudFront on top of our S3 bucket.

Setup S3 bucket

Create an S3 bucket with block all public access enabled. Additionally, by default bucket ACLs, are disabled. Upload all your front-end static content into your bucket.

Note: If you already have a static frontend hosted on S3, make sure to disable the static website hosting property since we will leverage CloudFront. Additionally, remove any existing bucket policies, and disable public access to your bucket I already have a bucket with my web files uploaded. If I try accessing my objects directly, am getting access denied. Now let’s see on how to leverage CloudFront to securely access our objects.

Log into the AWS management console then in the search bar search for CloudFront then select it.

On the left side of CloudFront UI, select distributions, then click create distributions.

For the Origin domain, choose your S3 bucket, name will be updated automatically.

Let’s configure the origin access control settings.

Select legacy access settings then select the drop-down button to select Origin Access Identity, if you don’t have one click Create. Then click the radio button for Yes update bucket policy. This will automatically update your bucket policy.


Leave the remaining settings as default.

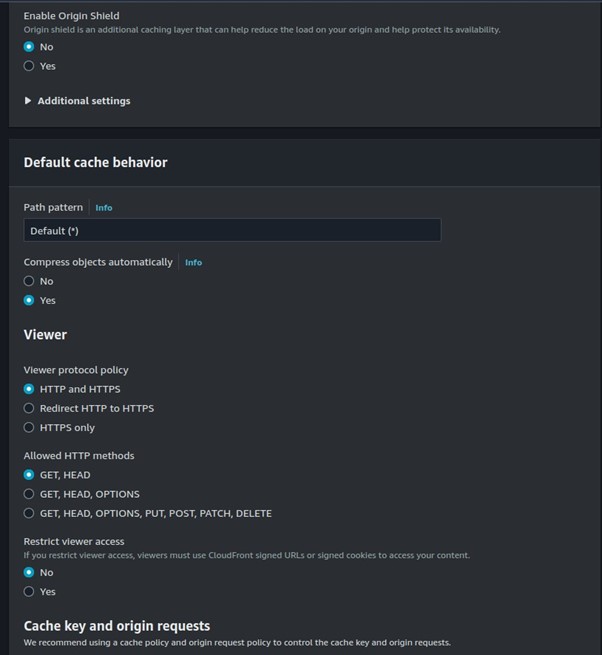
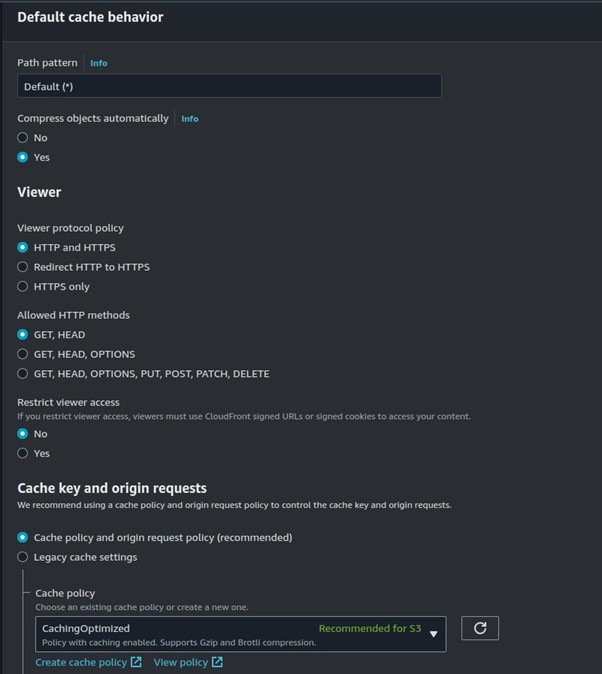
Keep the default cache behaviour settings.

Functional associations will be kept as default.
Under Web Application Firewall (WAF), enable WAF for additional security if needed; otherwise, select do not enable security protections.

Under settings, add index.html for the default root object and click create distribution.

Our CloudFront distribution policy has been successfully created as we can see.

Additionally, we can see our bucket policy updated to only allow access from CloudFront.

Retrieve your CloudFront distribution domain name and verify your website’s availability.

You can also assess the security of your index.html object by accessing its object URL. We can see access denied.

This indicates that your bucket is exposed only to your created CloudFront distribution and cannot be accessed directly, which ensures any unauthorized or direct access to your S3 bucket is denied.

This brings us to the end of this demo. Always make sure you clean resources to avoid surprise bills.

Conclusion

To wrap up, now know how to use Amazon S3 to host static websites set up CloudFront to deliver content, and keep sensitive data safe in your S3 bucket with CloudFront Origin Access Identity (OAI). When you put these methods into action, you can stop direct access to your content and make content delivery much faster. This way, you keep your data secure and give your users a smooth and quick experience.

Thanks for reading and stay tuned for more.

If you have any questions concerning this article or have an AWS project that requires our assistance, please reach out to us by leaving a comment below or email us at sales@accendnetworks.com.


Thank you!

Categories
Blogs

Enhancing AWS Security

Enhancing AWS Security: Implementing Root Account Login Alerts

When it comes to cloud computing, security is a big deal. Luckily, Amazon Web Services (AWS) has got your back with some awesome tools and services to help keep your infrastructure safe. But it’s still up to you to monitor and protect your AWS accounts. One of the most important things you need to take care of is controlling access to your account’s Root user.

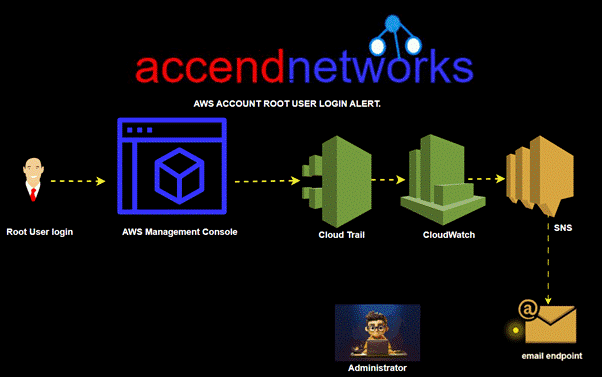
In this article, I’m going to walk you through a step-by-step guide on how to configure AWS services to send you alerts whenever someone logs in with your Root user. By following these instructions, you can beef up your AWS security.

Account Root User

The root user is the account’s primary user with full administrative privileges, similar to the root user in Linux systems.
Root user credentials are the email address and password used during account creation. The root user has full control over the account and a user cannot limit most of the permissions associated with the root user. For that reason, we don’t always use the root user.

The Root user is like the master key to your AWS kingdom. It has full access to everything in your AWS environment, which means it’s a prime target for bad actors.

Now what do we do instead?

Leverage the I AM (Identity and Access Management) to create users for our daily

tasks and activities.

Admin User: Use IAM to create a user with administrative privileges for daily

administrative tasks instead of using the root user.

Other Users: Utilize IAM to generate individual users responsible for daily tasks.

Each IAM user can be assigned specific permissions, ensuring they only

have access to the resources they need.

Step 1: Create a CloudTrail with CloudWatch login enabled.

Let’s Create a Trail in the CloudTrail console.

In the search box, type CloudTrail, then select CloudTrail. On the left side of CloudTrail UI, select trails, then click Create Trail.

Fill in the required details under the general information.

Under the CloudWatch Logs, enable the CloudWatch logs by ticking the check box. Fill in the required details.

Click Next and keep the things as default on the next page.

Click Next Review and Click Create trail.

The Trail is created. Copy the log group name for later use.

Step 2: Create an SNS topic and create a subscription on it

Now, jump to the SNS service.

Under the Topics, click Create Topic.

Fill in the details as shown below.

Keep the remaining as default and click Create topic. At the bottom, Under the subscription, click Create subscription.

Provide the required details, for protocol, select the drop-down button and select email, endpoint key in your email account then Click Create subscription.

You will receive an email at the mentioned email address to confirm the subscription. Make sure you confirm your subscription.

Step 3: Create a Metric filter on the CloudWatch

Now, jump to the CloudWatch. Click on the Log Groups and search for the log group name you have copied in the previous step.

Click the log group name. Click on the Metric filters. Click Create metric filter.

In the Filter pattern, put the following pattern:

{ $.userIdentity.type = “Root” && $.userIdentity.invokedBy NOT EXISTS && $.eventType != “AwsServiceEvent” }

Click Next

Provide a Filter name. Fill in the Metric details.

Click Next and Click Create metric filter.

You can find the created metric filter.

Step 4: Create a CloudWatch Alarm.

Tick the check box at the upper right corner of the metric and click Create alarm.

You will be redirected to the CloudWatch alarm dashboard.
Change the Condition to Greater/Equal and define the threshold value as 1. Click Next.

Under the Configure actions, select the SNS topic you have created in the previous step. Click Next.

Provide a name to the alarm. Click Next.

Review and click Create alarm.

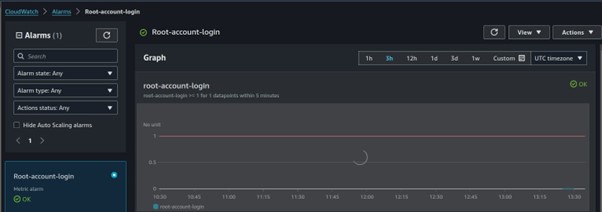
That’s it! The alarm is created and the condition is ok.

Let’s use this command to set the condition of the alarm to in-alarm

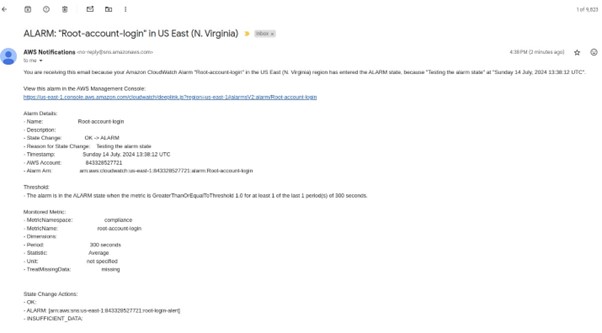
Our alarm has gone to alarm state and checking our email account, we can find an email notification.

Conclusion:

Setting up alerts for Root account logins adds an important layer of security to your AWS environment. This allows you to respond quickly to potential threats.

With these alerts in place, you can rest assured that you have an additional layer of protection safeguarding your AWS environment Monitoring Root account activity not only helps prevent unauthorized access but also promotes best practices by encouraging the use of IAM users for everyday operations.

If you have any questions concerning this article or have an AWS project that requires our assistance, please reach out to us by leaving a comment below or email us at sales@accendnetworks.com.


Thank you!

Categories
Blogs

Azure Roles and RBAC Privilege Identity Management

Using Azure Roles and RBAC Privilege Identity Management (PIM)

In today’s digital landscape, managing access to resources securely and efficiently is paramount. Microsoft Azure offers a robust solution in the form of Azure Roles and Role-Based Access Control (RBAC) Privilege Identity Management (PIM). This article delves into how these tools can optimize your identity access management, enhance security, and offer cost-effective benefits for your organization.

Introduction to Azure Roles and RBAC

Azure Roles and RBAC are essential components in managing permissions and access control within the Azure environment. Azure Roles define a set of permissions that users or groups can have within your Azure subscription. RBAC allows you to assign these roles to users, groups, and applications at various scopes.

Key Benefits of Using Azure Roles and RBAC

Enhanced Security: By implementing Azure Roles and RBAC, you can ensure that users have only the permissions they need to perform their tasks. This principle of least privilege minimizes the risk of unauthorized access and potential security breaches.

Granular Access Control: RBAC enables you to assign specific permissions at different levels, such as subscription, resource group, or resource level. This granularity ensures that access control is tailored to your organization’s needs.

Improved Compliance: Azure RBAC helps in maintaining compliance with industry standards and regulations by providing detailed audit logs and reports on who accessed what resources and when.

Simplified Management: With Azure Roles and RBAC, managing permissions becomes streamlined. Changes can be easily implemented, reducing the administrative overhead.

Introduction to Privilege Identity Management (PIM)

Privilege Identity Management (PIM) in Azure AD enhances the capabilities of RBAC by adding a layer of security for privileged roles. PIM allows you to manage, control, and monitor access to critical resources, ensuring that privileged access is granted only when necessary.

Advantages of Using PIM

Just-in-Time Access: PIM enables just-in-time (JIT) access, allowing users to activate their roles only when needed. This reduces the window of opportunity for potential attacks.

Approval Workflows: With PIM, you can set up approval workflows for activating privileged roles. This ensures that access is granted only after proper verification and authorization.

Access Reviews: Regular access reviews can be conducted to ensure that the right people have the right access. This helps in maintaining up-to-date and accurate access controls.

Audit Logs: PIM provides detailed audit logs and alerts, helping you track and monitor all privileged access activities.

Implementing Azure Roles and RBAC with PIM: A Step-by-Step Guide

Step 1: Define Azure Roles

  • Identify the roles required within your organization.
  • Create custom roles if necessary.

Step 2: Assign Roles Using RBAC

  • Navigate to the Azure portal.
  • Select the appropriate scope (e.g., subscription, resource group).
  • Assign roles to users, groups, or applications.

Step 3: Configure PIM

  • Enable PIM in the Azure AD portal.
  • Define which roles will be managed by PIM.
  • Set up JIT access and approval workflows.

Step 4: Perform Access Reviews

  • Schedule regular access reviews.
  • Review and adjust roles as needed.

Step 5: Monitor and Audit

  • Regularly monitor audit logs.
  • Set up alerts for any unusual activities.

Optimizing Cost with Azure Roles and RBAC

Using Azure Roles and RBAC effectively can lead to significant cost savings for your organization. By ensuring that users only have the permissions they need, you can reduce the risk of costly security incidents. Additionally, streamlined management and automation reduce administrative overhead, leading to lower operational costs.

Client Benefits

Implementing Azure Roles and RBAC with PIM offers numerous benefits for clients:

  • Enhanced Security: Protect sensitive data and resources with granular access control and JIT access.
  • Compliance: Maintain compliance with industry standards through detailed audit logs and access reviews.
  • Efficiency: Streamline access management processes, reducing administrative overhead and operational costs.
  • Scalability: Easily scale access control as your organization grows, ensuring consistent security and compliance.

Conclusion

Azure Roles RBAC and Privilege Identity Management provide a comprehensive solution for managing access to resources in the Azure environment. By implementing these tools, organizations can enhance security, ensure compliance, and optimize cost management. For more information and to implement these solutions in your organization, contact us info@accendnetworks .com for expert identity access management services.

Contact Us: To learn more about how Azure Roles and RBAC Privilege Identity Management can benefit your organization, email us at info@accendnetworks.com. Our team of experts at “Company name” is ready to assist you in enhancing your security and optimizing your access management.

Categories
Blogs

Cisco Secure Email

Cisco Secure Email
  1. Email Notifications
    Get email notifications on critical security issues; system outages and important product updates, normal console or connector updates, information Cisco training sessions, and QBR.Go to my Account on upper right hand corner under my account and it should have notification email

    Click on Announcement Preferences and select the boxes that you would like to receive notification.

  2. Go Dashboard -> Events

    Select “Detected Threats” for Event Type and it will auto populate all threats detected in the environment.

    Example:

    Select to be notified “immediate (digest)” and choose “Save Filter As” and save the report as “Detected Threat” and you will be notified via email of any threats detected.