Accend Networks San Francisco Bay Area Full Service IT Consulting Company

Categories
Blogs

Understanding AWS Placement Groups

Understanding AWS Placement Groups: Maximizing Performance and Reliability in EC2 Deployments

AWS Placement Groups are a handy capability of Amazon Web Services (AWS) which allows users to enhance network optimization and fault tolerance of their EC2 instances. If you are running performance-intensive applications or controlling large distributed operating system domains, placement groups let you leverage how the EC2 instances are spread through the AWS deployment, allowing a better focus on networking, latency, and faults recovery.

What is a Placement Group?

A placement group is a way to control how your EC2 instances are placed on the underlying hardware in the AWS cloud. By influencing the physical location and network proximity of your instances,

All nodes within the placement group can talk to all other nodes within the placement group at a full line rate of 10 Gbps single traffic flow within the enclosure without any over-subscription-related delay.

Best Use Cases:

High-performance computing (HPC): Applications that require low latency, such as real-time data analytics or financial services.

Distributed machine learning: applications that need fast, low-latency communication between instances.

Benefits:

Low latency: The physical proximity of instances ensures minimal delay in communication.

High throughput: Instances can utilize high bandwidth for inter-instance data transfer.

Types of Placement Groups?

Cluster Placement Group

Packs instances close together inside an Availability Zone. This strategy enables workloads to achieve the low-latency network performance necessary for tightly coupled node-to-node communication that is typical of HPC applications.

A cluster placement group is a logical grouping of instances within a single Availability Zone. A cluster placement group can span peered VPCs in the same region. Instances in the same cluster placement group enjoy a higher per-flow throughput limit of up to 10 Gbps for TCP/IP traffic and are placed in the same high-bisection bandwidth segment of the network.

Cluster Placement Groups are great for applications that require low latency or high throughput. They work best when most of the network traffic occurs between the instances in the group, making them ideal for workloads that depend on quick data exchange. If your application falls into this category, using a Cluster Placement Group can help improve performance significantly!

Partition Placement Group

Spread your instances across logical partitions such that groups of the cases in one partition do not share the underlying hardware with groups of instances in different partitions. This strategy is typically used by large distributed and replicated workloads, such as Hadoop, Cassandra, and Kafka.

Partition placement groups help reduce the likelihood of correlated hardware failures for your application. When partition placement groups are used, Amazon EC2 divides each group into logical segments called partitions.

Amazon EC2 ensures that each partition within a placement group has its own racks. Each rack has its own network and power source. No two partitions within a placement group share the same racks, allowing you to isolate the impact of a hardware failure within your application.

Each partition comprises multiple instances. The instances in a partition do not share racks with the instances in the other partitions, allowing you to contain the impact of a single hardware failure to only the associated partition.

Partition placement groups can be used to deploy large distributed and replicated workloads, such as HDFS, HBase, and Cassandra, across distinct racks.

Spread Placement Group

Strictly places a small group of instances across distinct underlying hardware to reduce correlated failures.

A spread placement group is a group of instances that are each placed on distinct racks, with each rack having its own network and power source.

Spread placement groups are recommended for applications that have a small number of critical instances that should be kept separate from each other. Launching instances in a spread placement group reduces the risk of simultaneous failures that might occur when instances share the same racks.

Placement Group Rules and Limitations

General Rules and Limitations

  • The name that you specify for a placement group must be unique within your AWS account for the Region.
  • An instance can be launched in one placement group at a time; it cannot span multiple placement groups.
  • You can’t merge placement groups.
  • Instances with a tenancy of a host cannot be launched in placement groups.
  • On-demand capacity Reservation and zonal Reserved Instances provide a capacity reservation for EC2 instances in a specific Availability Zone. The capacity reservation can be used by instances in a placement group. However, it is not possible to explicitly reserve capacity for a placement group.

Conclusion

AWS Placement Groups are a useful way to make your EC2 performance better, depending on what your application needs for networking and availability. By picking the right type of placement group, you can find the best mix of performance, cost, and reliability for your tasks.

Thanks for reading and stay tuned for more.

If you have any questions concerning this article or have an AWS project that requires our assistance, please reach out to us by leaving a comment below or email us at sales@accendnetworks.com.


Thank you!

Categories
Blogs

Exploring AWS Data Migration Services

Exploring AWS Data Migration Services: Unlocking Seamless Cloud Transitions

Migrating data to the cloud is a critical part of any modern business transformation. Whether moving small datasets, large-scale workloads, or entire databases. Moving substantial amounts of data ranging from terabytes to petabytes presents unique challenges. AWS provides many data migration tools to help organizations transition smoothly and securely. In this blog, we’ll explore the most common AWS Data migration options, and help you decide which one is best suited for your choice.

OFFLINE DATA TRANSFER

The AWS Snow Family: simplifies moving data into and out of AWS using physical devices, bypassing the need for high-bandwidth networks. This makes them ideal for organizations facing bandwidth limitations or working in remote environments.

AWS Snowcone: The smallest member of the Snow Family, Snowcone, is a lightweight edge computing and data transfer device.

Features

  • Compact, rugged device ideal for harsh environments.
  • Used to collect, process, and move data to AWS by shipping the device back to AWS.
  • Pre-installed DataSync agent: This allows for seamless synchronization between Snowcone and AWS cloud services, making it easier to transfer data both offline and online.
  • 8 TB of usable storage.

Best Use Cases

Edge data collection: Gathering data from remote locations like oil rigs, ships, or military bases.

Lightweight compute tasks: Running simple analytics, machine learning models, or edge processing before sending data to the cloud.

AWS Snowball

Overview: A petabyte-scale data transport and edge computing device.

Available in two versions

Snowball Edge Storage Optimized: Designed for massive data transfers, offers up to 80 TB of storage.

Snowball Edge Compute Optimized: Provides additional computing power for edge workloads and supports EC2 instances, allowing data to be processed before migration.

Best Use Cases

Data center migration: When decommissioning a data center and moving large amounts of data to AWS.

Edge computing tasks: Processing data from IoT devices or running complex algorithms at the edge before cloud migration.

AWS Snowmobile

A massive exabyte-scale migration solution, designed for customers moving extraordinarily large datasets. The Snowmobile is a secure 40-foot shipping container.

Features

  • Can handle up to 100 PB per Snowmobile, making it ideal for hyperscale migrations.
  • Data is transferred in a highly secure container that is protected both physically and digitally.
  • Security features: Encryption with multiple layers of protection, including GPS tracking, 24/7 video surveillance, and an armed escort during transit.

Best Use Cases

Exabyte-scale migrations: Ideal for organizations with huge archives of video content, scientific research data, or financial records.

Disaster recovery: Quickly evacuating vast amounts of critical data during emergencies.

Hybrid and Edge Gateway
AWS Storage gateway

AWS Storage Gateway provides a hybrid cloud storage solution that integrates your on-premises environments with AWS cloud storage. It simplifies the transition to the cloud while enabling seamless data access.

Types of Storage Gateway:

File Gateway: Provides file-based access to objects in Amazon S3 using standard NFS and SMB protocols. Ideal for migrating file systems to the cloud.

Tape Gateway: Emulates physical tape libraries, archiving data to Amazon S3 and Glacier for long-term storage and disaster recovery.

Volume Gateway: Presents cloud-backed storage volumes to your on-premises applications. Supports EBS Snapshots, which store point-in-time backups in AWS.

Best Use Cases:

Seamless cloud integration: Extending on-premises storage workloads to AWS without disrupting existing workflows.

Archiving and backup: Cost-efficient tape replacement for data archiving and disaster recovery in Amazon S3 and Glacier.

Additional AWS Data Migration Services

Beyond physical devices, AWS offers several other tools for seamless and efficient data migration, each designed for different needs:

AWS Data Exchange: Simplifies finding, subscribing to, and using third-party data within the AWS cloud. Ideal for organizations that need external data for analytics or machine learning models.

Best Use Cases

Third-party data access: Easily acquire and use data for market research, financial analytics, or AI model training.

Conclusion

Migrating large volumes of data to the AWS cloud is a complex but manageable task with the right approach. By carefully selecting the appropriate tools and strategies, you can achieve a very smooth transition and successful outcome.

Thanks for reading and stay tuned for more.

If you have any questions concerning this article or have an AWS project that requires our assistance, please reach out to us by leaving a comment below or email us at sales@accendnetworks.com.


Thank you!

Categories
Blogs

Cutting AWS Costs

Cutting AWS Costs: Strategies for Effective Cloud Cost Management

As companies move more work to the cloud, keeping cloud costs in check becomes essential. AWS gives users lots of options, room to grow, and many different services, but without a good plan to manage costs, bills can get out of hand fast. This guide will show you important ways and AWS tools to handle and cutting AWS costs.

  1. Understand AWS Pricing Models
    To start cutting down on cloud expenses, you need to get a handle on how AWS charges for its services. AWS provides various pricing options that can save you money when you use them right:

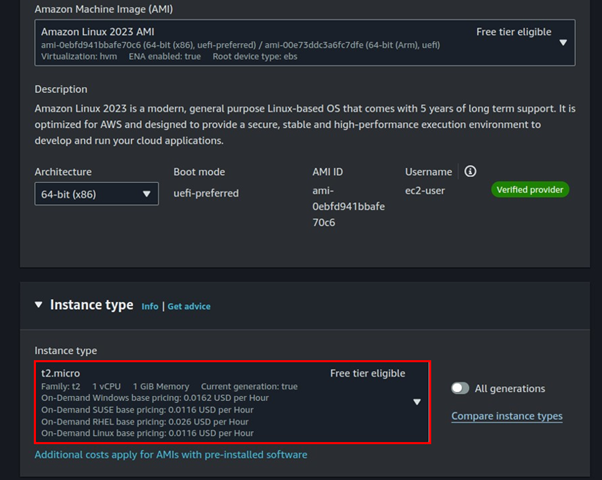
    On-Demand Pricing: Pay for computing or storage by the second or hour without any long-term commitment. This is best suited for short-term workloads or unpredictable demand.

    Reserved Instances (RI): By committing to using an instance for one to three years, you can save up to 72% compared to On-Demand pricing. This is ideal for steady-state workloads.

    Spot Instances: AWS allows you to bid for unused EC2 capacity at a much lower rate, sometimes up to 90% off. Spot instances are ideal for flexible, fault-tolerant workloads.

    Savings Plans: This flexible pricing model applies to all AWS services and allows users to commit to a consistent usage level for one or three years, reducing costs across services like EC2, Lambda, and Fargate.

  2. Right-Sizing Your Resources
    This refers to the practice of matching cloud resources (compute, memory, storage) to actual workloads.

    Monitor Resource Utilization: Leverage AWS CloudWatch to monitor CPU, memory, and storage utilization.

    Auto Scaling: Enable Auto Scaling for EC2 instances, ensuring that you’re only running instances that are necessary based on traffic and workload demand.

    Use Cost Explorer’s Rightsizing Recommendations: AWS Cost Explorer provides rightsizing recommendations by analyzing your usage patterns. It suggests optimal instance types that balance performance and cost.

  3. Optimize Storage Costs
    AWS offers multiple storage solutions, and choosing the right one can greatly impact costs.

    S3 Intelligent-Tiering: S3 Intelligent-Tiering automatically moves data between different storage tiers based on usage patterns, allowing you to save on storage costs.

    Glacier and Glacier Deep Archive: These are extremely low-cost options for long-term data archival, ideal for data that is infrequently accessed.

    EBS Volume Right-Sizing: AWS Elastic Block Store (EBS) offers multiple volume types such as General Purpose (gp2, gp3) and Provisioned IOPS (io1, io2). Choosing the right volume type and size for your workload can prevent over-provisioning.

    Lifecycle Policies: Use S3 Lifecycle policies to automatically transition data to cheaper storage classes (such as Glacier) as it becomes less frequently accessed.

    By managing your data lifecycle and selecting the appropriate storage class, you can save a considerable amount of money on AWS storage services.

  4. Use AWS Cost Management Tools

    AWS provides several native tools to help monitor, allocate, and optimize cloud costs.

    AWS Cost Explorer: This tool helps track usage and spending trends over time. It provides rightsizing recommendations, forecasting, and reserved instance usage analysis.

    AWS Budgets: AWS Budgets allows you to set custom cost and usage limits and receive alerts when you’re about to exceed them.

    AWS Trusted Advisor: Trusted Advisor provides real-time recommendations to optimize your AWS environment, including suggestions for cost optimization, security improvements, and performance enhancements.

    AWS Cost Anomaly Detection: This AI-driven tool automatically identifies unexpected or unusual spending patterns in your AWS account, allowing you to address them quickly.

    These tools empower you to stay on top of your AWS costs, helping to catch overspending early and optimize your resource allocation.

  5. Optimize Data Transfer Costs

    Data transfer costs can add up quickly, especially in distributed environments with multiple AWS regions.

    Use Amazon CloudFront: CloudFront is AWS’s global content delivery network (CDN), and it can significantly reduce data transfer costs by caching content closer to users.

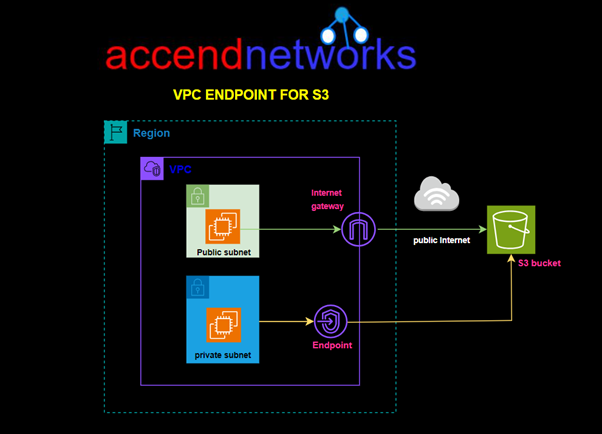
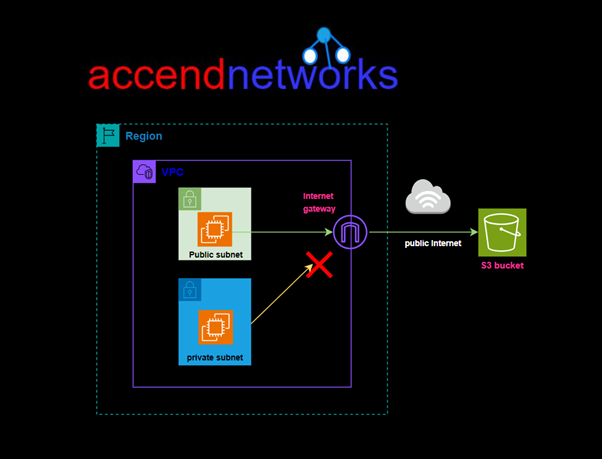
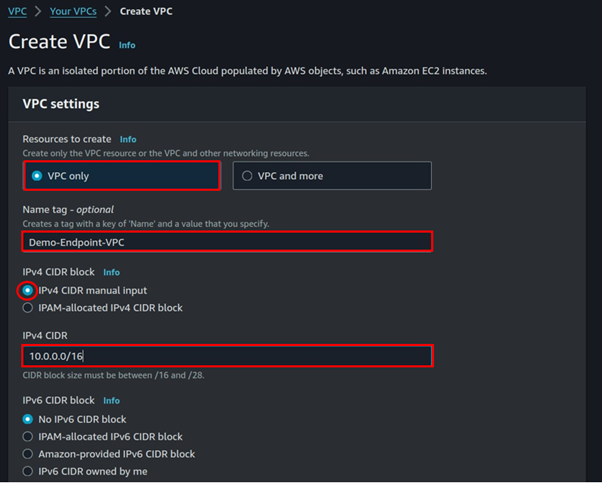
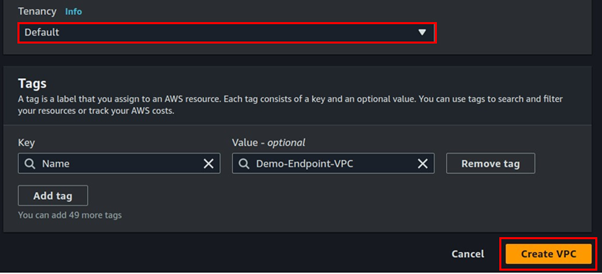
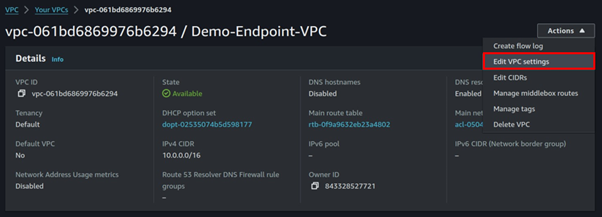
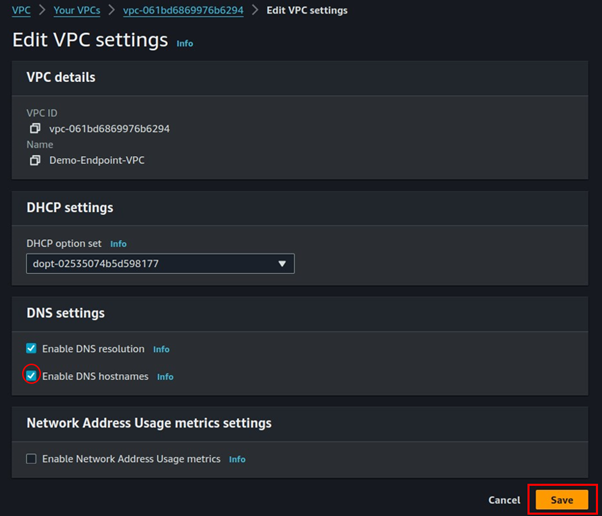
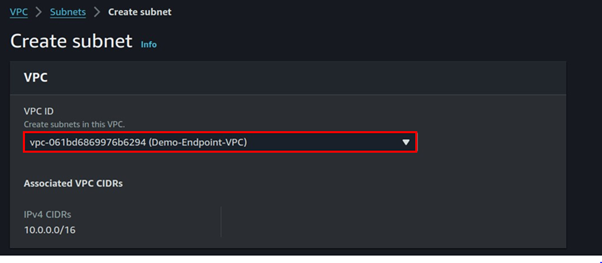
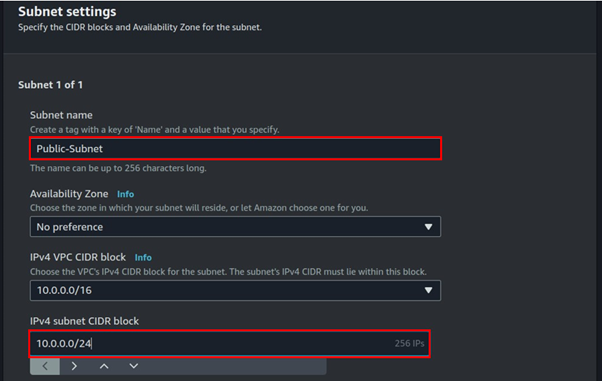
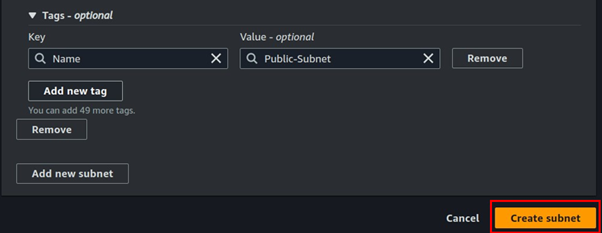
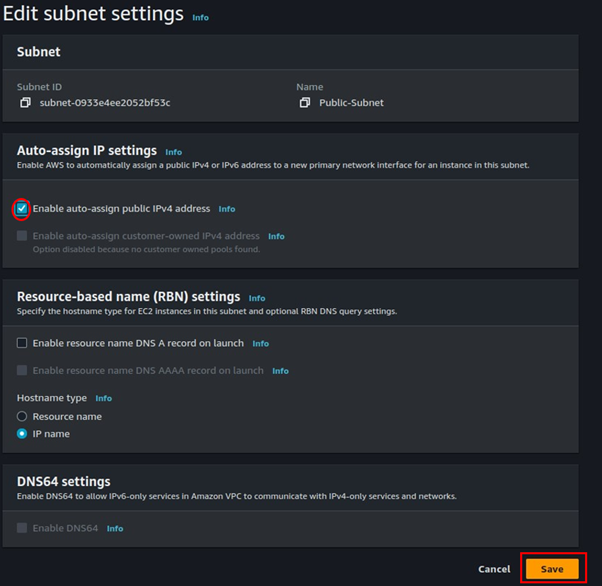
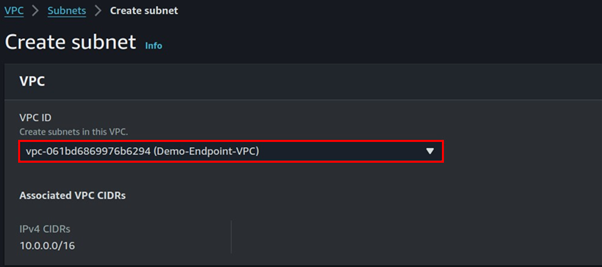
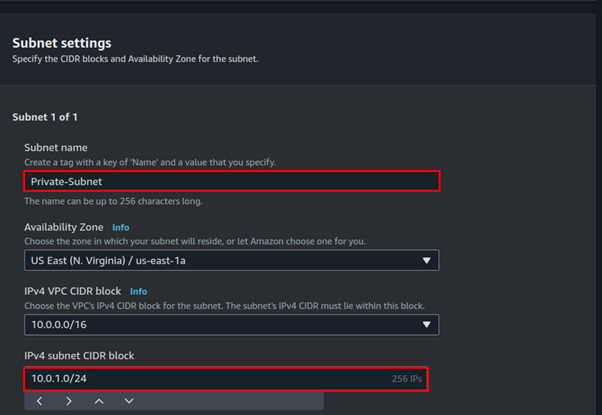
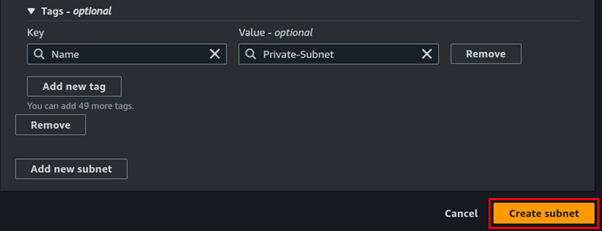
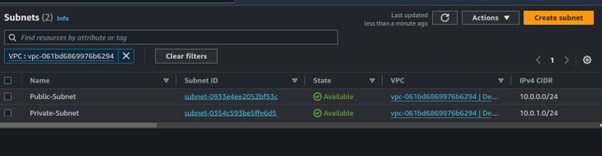
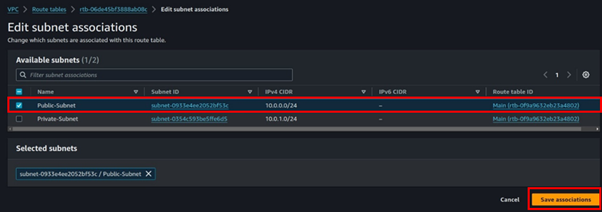
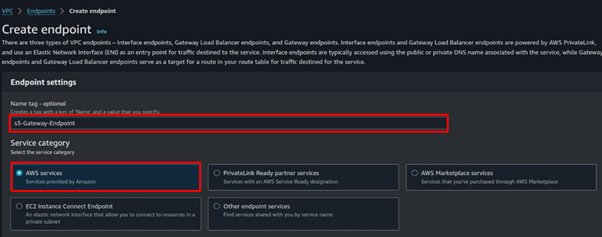
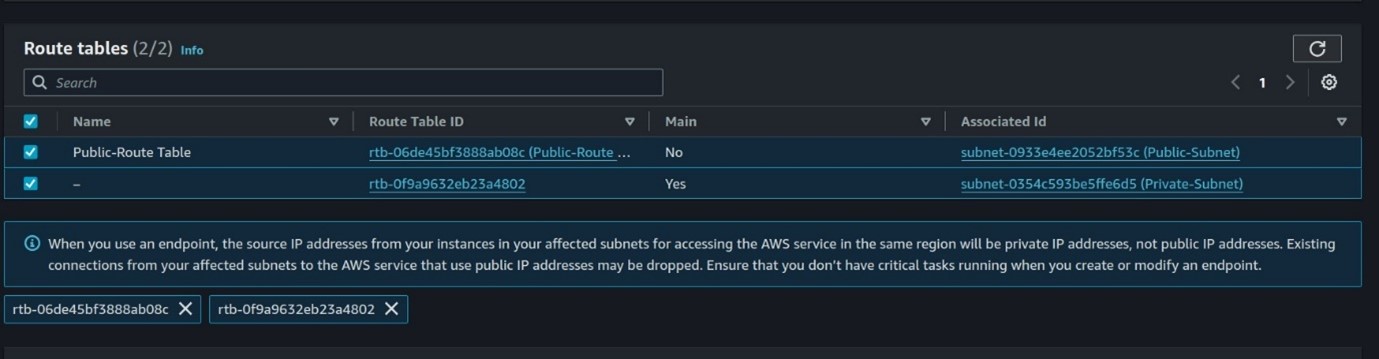
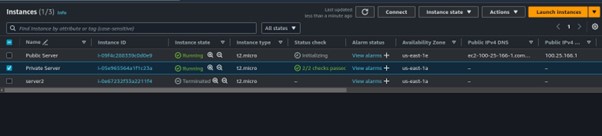
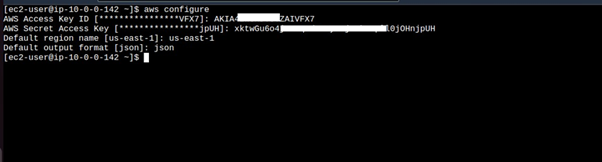
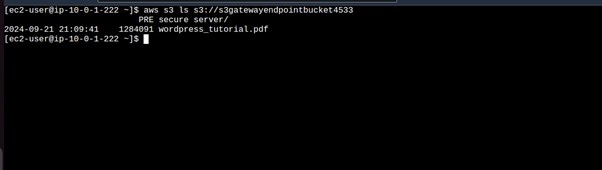
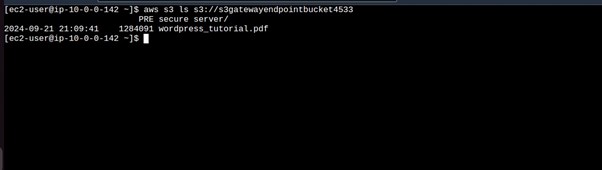
    Leverage VPC Endpoints: VPC endpoints allow you to privately connect your VPC to AWS services without using the public internet, reducing data transfer costs.

  6. Architect for Cost Efficiency

    Designing your architecture with cost in mind is one of the most effective ways to optimize AWS cloud costs:

    Serverless Architectures: Utilize serverless services like AWS Lambda, which only charges for the compute time used, this eliminates idle server costs.

    Containerization: Use AWS Fargate or Amazon ECS to run containers without managing underlying servers, optimizing infrastructure costs by scaling containers automatically.

Conclusion

By following these best practices, you can reduce your AWS bill significantly. By understanding pricing models, right-sizing resources, leveraging cost-saving services like Spot Instances, using AWS management tools, and continuously monitoring your environment, your organization can stay cost-efficient without sacrificing performance or scalability.

Thanks for reading and stay tuned for more.

If you have any questions concerning this article or have an AWS project that requires our assistance, please reach out to us by leaving a comment below or email us at sales@accendnetworks.com.


Thank you!

Categories
Blogs

Understanding AMI in AWS

Understanding AMI in AWS: A definitive guide to cloud resilience

Amazon Machine Image (AMI) and Snapshots play crucial roles in the storage, replication, and deployment of EC2 instances. This guide not only demystifies the significance of AMIs but also unveils effective AWS backup strategies, including the vital process of taking AMI backups.

What is an Amazon Machine Image (AMI)?

An Amazon Machine Image (AMI) is an image that provides the software that is required to set up and boot an Amazon EC2 instance. Each AMI also contains a block device mapping that specifies the block devices to attach to the instances that you launch.

An Amazon Machine Image (AMI) is a template that contains the information required to launch an EC2 instance, it is the encapsulation of server configuration. Each AMI also contains a block device mapping that specifies the block devices to attach to the instances that you launch.

You can launch multiple instances from a single AMI when you require multiple instances with the same configuration. You can use different AMIs to launch instances when you require instances with different configurations, as shown in the following diagram.

You can launch multiple instances from a single AMI when you require multiple instances with the same configuration. You can use different AMIs to launch instances when you require instances with different configurations, as shown in the following diagram.

Key Components of an AMI:

Root Volume: Contains the operating system and software configurations that make up the instance.

Launch Permissions: Determine who can use the AMI to launch instances.

Block Device Mapping: Specifies the storage devices attached to the instance when it’s launched.

AMIs can be public or private:

Public AMIs: Provided by AWS or third-party vendors, offering pre-configured OS setups and applications.

Private AMIs: Custom-built by users to suit specific use cases, ensuring that their application and infrastructure requirements are pre-installed on the EC2 instance.

Types of AMIs:

EBS-backed AMI: Uses an Elastic Block Store (EBS) volume as the root device, allowing data to persist even after the instance is terminated.

Instance store-backed AMI: Uses ephemeral storage, meaning data will be lost once the instance is stopped or terminated.

Why Use an AMI?

Faster Instance Launch: AMIs allow you to quickly launch EC2 instances with the exact configuration you need.

Scalability: AMIs enable consistent replication of instances across multiple environments (e.g., dev, test, production).

Backup and Recovery: Custom AMIs can serve as a backup of system configurations, allowing for easy recovery in case of failure.

Creating an AMI

Let’s now move on to the hands-on section, where we’ll configure an existing EC2 instance, install a web server, and set up our HTML files. After that, we’ll create an image from the configured EC2 instance, terminate the current configuration server, and launch a production instance using the image we created. Here’s how we’ll proceed:

Step 1: Configuring the instance as desired

Log in to the AWS Management Console with a user account that has admin privileges, and launch an EC2 instance.

I’ve already launched an Ubuntu machine, so next, I’ll configure Apache webserver and host my web files on the instance.

SSH into your machine using the SSH command shown below.

Update your server repository.

Install and enable Apache.

Check the status of the Apache web server.

Now navigate to the HTML directory using the below command.

Use the vi editor to edit and add your web files to the HTML directory, run sudo vi index.html

Exit and save the vi editor.

We’ve successfully configured our EC2 instance to host the web application. Now, let’s test it by copying the instance’s IP address and pasting it into your web browser.

Our instance is up and running, successfully hosting and serving and serving our web application.

Step 2: Creating an image of the instance

Select the running EC2 Instance, select the actions drop-down button, and navigate to Image and Templates then click Create Image.

Provide details for your Image

Select tag Image and snapshots together then scroll down and click Create Image.

Once the Image is available and ready for use, you can now proceed and delete your setup server.

Step 3: Launch new EC2 instance from the created Image.

We will now use the created Image to launch a new EC2 instance, we will not do any configuration since the application has our app already configured.

Let’s proceed and launch our EC2 instance, click launch Instance from the EC2 dashboard.

Under Applications and OS, select my AMI, then select owned by me.

Select t2. Micro, then scroll down.

Select your key pairs.

Configure your security groups

Review and click Create Instance.

Step 4: Test our application.

Once our application is up and running, grab the public IP and paste it into your browser.

We have created an EC2 instance from an AMI with an already configured application. Application achieved.

Clean up. This brings us to the end of this article.

Conclusion

Amazon Machine Images (AMIs) are fundamental tools in managing EC2 instances. Understanding how to effectively use AMIs can help optimize your AWS environment, improving disaster recovery, scaling capabilities, and data security.

Thanks for reading and stay tuned for more.

If you have any questions concerning this article or have an AWS project that requires our assistance, please reach out to us by leaving a comment below or email us at sales@accendnetworks.com.


Thank you!

Categories
Blogs

AWS Elastic Network Interface

Understanding AWS Elastic Network Interface (ENI)

In the AWS environment, ENIs offer many features and benefits. They enable you to assign multiple private IP addresses to your instances. Additionally, ENIs can be attached or detached from instances on the fly, providing flexibility in managing your infrastructure. This article dives deep into ENIs—what they are and how they work—and provides a hands-on demo on how to create and attach an ENI.

What is an Elastic Network Interface (ENI)?

An Elastic Network Interface (ENI) is a virtual network card that you can attach to instances that you launch in the same Availability Zone. You can create, attach, detach, and manage ENIs independently of EC2 instances.

When you move a network interface from one instance to another, network traffic is redirected from the original example to the new instance.

Key ENI attributes:

Primary Private IP Address: Each ENI must have a primary private IP, which cannot be removed.

Secondary Private IP Addresses: Optionally, ENIs can have multiple secondary private IPs for handling different workloads.

Elastic IP Addresses: You can associate an Elastic IP (EIP) with the ENI’s primary or secondary private IP, allowing external access.

MAC Address: Each ENI comes with its own unique MAC address.

Security Groups: ENIs can have one or more security groups that define inbound and outbound traffic rules.

Attachment to Subnet: ENIs must belong to a specific subnet within a VPC.

Let us look at the types of ENI Configurations

Primary ENI (Default): Each EC2 instance has a primary ENI by default, which is created when the instance is launched. This primary ENI is tied to the instance for its entire lifecycle and cannot be detached.

Secondary ENI (Additional): Secondary ENIs can be created and attached to instances. These are useful when an EC2 instance requires multiple network interfaces. For instance, a web server that must handle traffic from multiple subnets.

Detached ENI: An ENI can be detached from one instance and reattached to another. This capability allows you to transfer the network configuration of one EC2 instance to another without network downtime, an advantage in failover scenarios.

Here are some of the benefits of using Elastic Network Interfaces

High availability: ENIs are highly available. If one ENI fails, another ENI will automatically take its place.

Scalability: ENIs are scalable. You can easily add or remove ENIs from your EC2 instances as needed.

Flexibility: ENIs can be used to connect to a variety of AWS services and networks.

Let’s dive into the Demo.

Step 1: Launch Two EC2 Instances:

For this demo, make sure you have two EC2 instances up and running. I have two instances running server1 and server2.

Step 2: Check Network Interfaces:

Go to Instances under the EC2 dashboard.

Select each instance, and go to the Networking tab.

Scroll down to check the Network Interfaces section to see the attached ENIs. For server1 we can see the ENI. Each instance has an ENI with a primary private IPv4.

Repeating the same for server 2 we can see the ENI.

For the above ENIs, we can observe no Elastic IPs attached, which demonstrates you can attach an Elastic IP address to the ENIs.

You can also view the ENIs by selecting Network Interfaces on the left side of the EC2 dashboard.

Step 3 we will now create a new ENI:

Click Create network interface.

Set Description

Select a Subnet (same AZ as instances, e.g., us-east-1a).

Enable Auto-assign private IPv4.

Attach a Security group then click Create network interface.

Step 4: Attaching new ENI to an Instance:

Select the newly created ENI.

Click ActionsAttach.

Choose VPC and instance to attach it to from the drop-down buttons. (e.g., the first instance).

Confirm attachment.

Check the instance’s Networking tab to see the new ENI. We can see the demo ENI under Network Interfaces.

Step 5: Network Failover demostration:

Detach the new ENI from the first instance.

Click ActionsDetach (use force detach if necessary).

Attach the ENI to the second instance. Click actions then select Attach.

Check the second instance’s Networking tab to see the new ENI.

Step 6: Terminate Instances and Observe ENIs

Terminate both instances.

Check Network Interfaces.

The ENIs created with the instances will be deleted.

The manually created ENI will remain as can be shown.

Manually delete the newly created ENI to clean up.

Key Points:

ENI: Virtual network card providing network connectivity.

Flexibility: Attach/detach ENIs between instances for failover.

High Availability: Move ENIs between instances for minimal downtime.

Persistence: Manually created ENIs persist after instance termination.

Conclusion

Understanding how ENIs function and how to implement them is crucial for optimizing AWS network configurations. ENIs can improve the fault tolerance of your network setup. For instance, if you attach an ENI to a backup EC2 instance, the backup instance can take over immediately in case the primary instance fails.

Thanks for reading and stay tuned for more.

If you have any questions concerning this article or have an AWS project that requires our assistance, please reach out to us by leaving a comment below or email us at sales@accendnetworks.com.


Thank you!