Accend Networks San Francisco Bay Area Full Service IT Consulting Company

Categories
Blogs

Using an Alias for Your AWS Account ID

Using an Alias for Your AWS Account ID

AWS (Amazon Web Services) account IDs are unique identifiers that serve as key elements when managing resources, executing services, or configuring security measures. But remembering a 12-digit number can be tough. As a result, AWS allows users to create nicknames (aliases) for their account ID, offering an easier way to reference an account. This guide explores the benefits and steps for setting up an alias for your AWS account ID.

Why Use an Alias for Your AWS Account ID?

Readability and Memorability: A 12-digit number can be hard to recall. An alias, on the other hand, is a user-friendly label that can be descriptive and easy to recognize.

Enhanced Collaboration: If you’re working in a team, sharing an alias (like “development-team-account” or “finance-dept”) makes it easier for others to understand whose account it is.

Organizational Clarity: In a large-scale AWS environment with multiple accounts under an organization, using aliases can simplify identifying accounts, especially in multi-account setups.

Security by Hiding Details: While the account ID is not sensitive by itself, using an alias may help obscure the raw ID when sharing AWS resources or working with third-party tools. Where AWS Account Aliases Are Useful

AWS account aliases are primarily used in these scenarios:

IAM Sign-in URLs: The default sign-in URL for IAM users is based on the AWS account ID. By creating an alias, you can replace the numeric ID with the alias for easier access

Setting Up an AWS Account Alias

Log into your AWS Management Console as an I am user with admin privileges or you must have the following, I am roles assigned to you.

  • iam:ListAccountAliases
  • iam: CreateAccountAlias

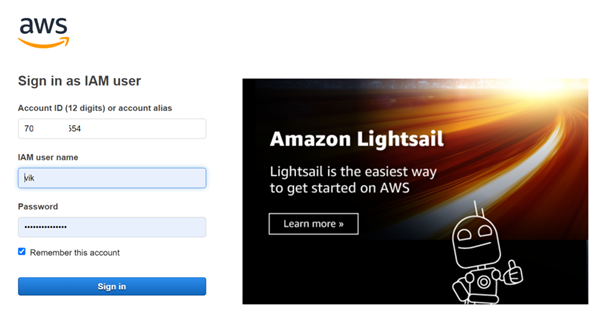
As we can see when you sign in as an I Am user, you must provide your AWS account ID which can be a daunting task to remember. This is where the account alias comes in handy.

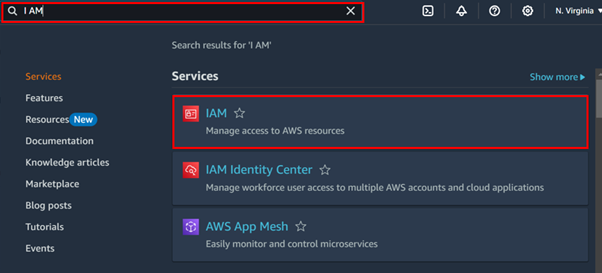
Once logged in to your AWS account, type I AM in the search bar then select I AM under services.

In the I AM console on the left side of the navigation pane, select dashboard.

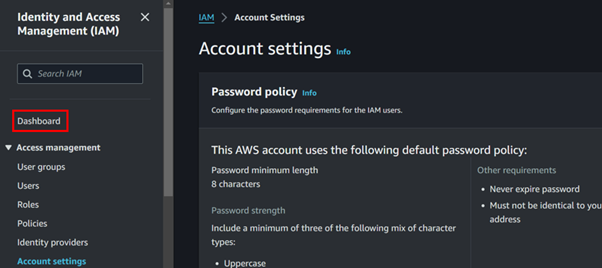
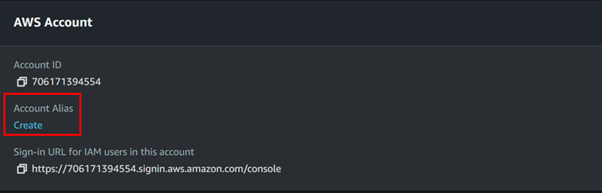
Scroll down to the AWS account section, where you will find the account Alias, then click Create.

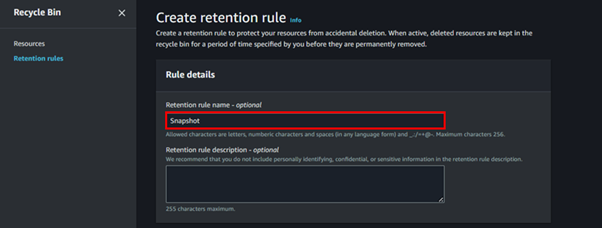
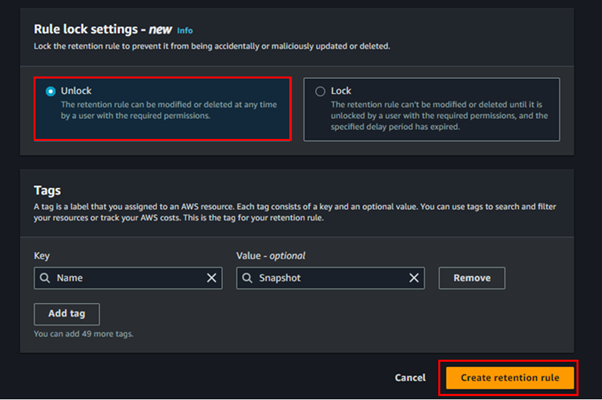
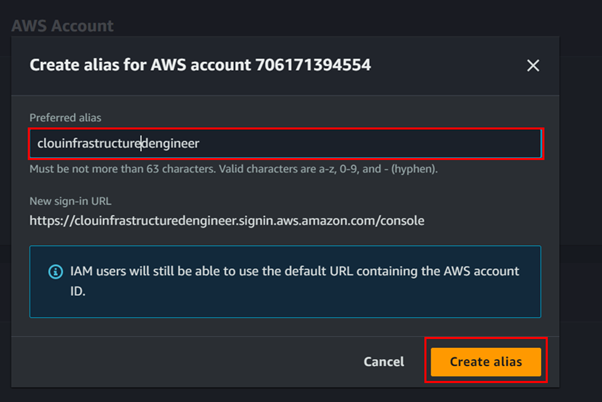
Fill in your account alias keeping in mind it must always be unique then click Create.

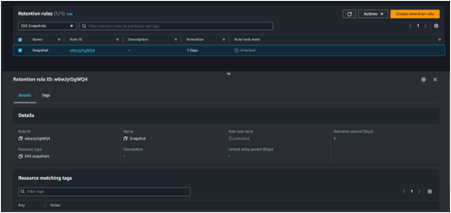
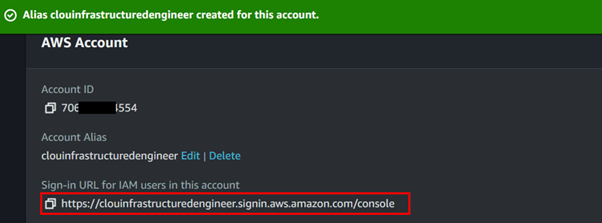
Successfully created the account alias, and as can be seen, our sign-in URL is now using our account alias, copy the URL to your clipboard then open a new browser and paste it in there.

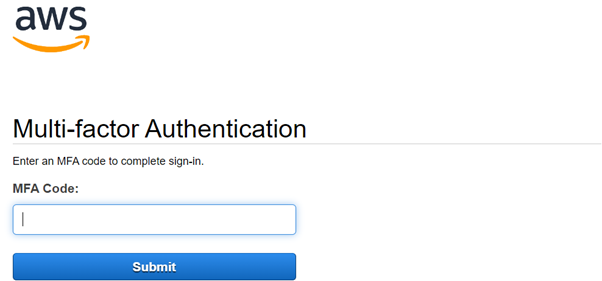
As can now be seen, in the account ID section is our account alias, fill in your required details.

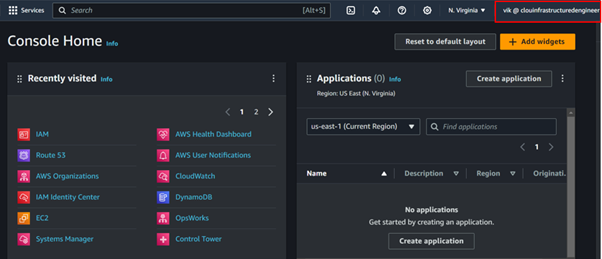
We have successfully logged in to our AWS account using the account alias and if you check at the top-hand right corner, we can see our AWS account ID is not being displayed but our account alias.

Security Considerations

While using an alias for your AWS account ID is beneficial, keep in mind:

Not a Security Measure: An alias doesn’t provide additional security. It’s purely for convenience. Always ensure that your account is secured using strong IAM policies, MFA (Multi-Factor Authentication), and least-privileged access.

Unique Across AWS: Aliases are globally unique, which could result in name conflicts if your preferred alias is already in use.

Best Practices for AWS Account Aliases

Choose a Descriptive Alias: Your alias should make sense within your organization. Use department names, environments (e.g., development, production), or geographical regions to make the account easily identifiable.

Keep Aliases Short: Longer aliases can make the IAM URL cumbersome. A good balance is a short but meaningful name.

Conclusion

With just a few clicks, you can set an easily recognizable alias that replaces the default 12-digit numeric account ID in several key places.

That’s it, thanks for reading, and stay tuned for more.

If you have any questions concerning this article or have an AWS project that requires our assistance, please reach out to us by leaving a comment below or email us at sales@accendnetworks.com.


Thank you!

Categories
Blogs

Exploring AWS Data Migration Services

Exploring AWS Data Migration Services: Unlocking Seamless Cloud Transitions

Migrating data to the cloud is a critical part of any modern business transformation. Whether moving small datasets, large-scale workloads, or entire databases. Moving substantial amounts of data ranging from terabytes to petabytes presents unique challenges. AWS provides many data migration tools to help organizations transition smoothly and securely. In this blog, we’ll explore the most common AWS Data migration options, and help you decide which one is best suited for your choice.

OFFLINE DATA TRANSFER

The AWS Snow Family: simplifies moving data into and out of AWS using physical devices, bypassing the need for high-bandwidth networks. This makes them ideal for organizations facing bandwidth limitations or working in remote environments.

AWS Snowcone: The smallest member of the Snow Family, Snowcone, is a lightweight edge computing and data transfer device.

Features

  • Compact, rugged device ideal for harsh environments.
  • Used to collect, process, and move data to AWS by shipping the device back to AWS.
  • Pre-installed DataSync agent: This allows for seamless synchronization between Snowcone and AWS cloud services, making it easier to transfer data both offline and online.
  • 8 TB of usable storage.

Best Use Cases

Edge data collection: Gathering data from remote locations like oil rigs, ships, or military bases.

Lightweight compute tasks: Running simple analytics, machine learning models, or edge processing before sending data to the cloud.

AWS Snowball

Overview: A petabyte-scale data transport and edge computing device.

Available in two versions

Snowball Edge Storage Optimized: Designed for massive data transfers, offers up to 80 TB of storage.

Snowball Edge Compute Optimized: Provides additional computing power for edge workloads and supports EC2 instances, allowing data to be processed before migration.

Best Use Cases

Data center migration: When decommissioning a data center and moving large amounts of data to AWS.

Edge computing tasks: Processing data from IoT devices or running complex algorithms at the edge before cloud migration.

AWS Snowmobile

A massive exabyte-scale migration solution, designed for customers moving extraordinarily large datasets. The Snowmobile is a secure 40-foot shipping container.

Features

  • Can handle up to 100 PB per Snowmobile, making it ideal for hyperscale migrations.
  • Data is transferred in a highly secure container that is protected both physically and digitally.
  • Security features: Encryption with multiple layers of protection, including GPS tracking, 24/7 video surveillance, and an armed escort during transit.

Best Use Cases

Exabyte-scale migrations: Ideal for organizations with huge archives of video content, scientific research data, or financial records.

Disaster recovery: Quickly evacuating vast amounts of critical data during emergencies.

Hybrid and Edge Gateway
AWS Storage gateway

AWS Storage Gateway provides a hybrid cloud storage solution that integrates your on-premises environments with AWS cloud storage. It simplifies the transition to the cloud while enabling seamless data access.

Types of Storage Gateway:

File Gateway: Provides file-based access to objects in Amazon S3 using standard NFS and SMB protocols. Ideal for migrating file systems to the cloud.

Tape Gateway: Emulates physical tape libraries, archiving data to Amazon S3 and Glacier for long-term storage and disaster recovery.

Volume Gateway: Presents cloud-backed storage volumes to your on-premises applications. Supports EBS Snapshots, which store point-in-time backups in AWS.

Best Use Cases:

Seamless cloud integration: Extending on-premises storage workloads to AWS without disrupting existing workflows.

Archiving and backup: Cost-efficient tape replacement for data archiving and disaster recovery in Amazon S3 and Glacier.

Additional AWS Data Migration Services

Beyond physical devices, AWS offers several other tools for seamless and efficient data migration, each designed for different needs:

AWS Data Exchange: Simplifies finding, subscribing to, and using third-party data within the AWS cloud. Ideal for organizations that need external data for analytics or machine learning models.

Best Use Cases

Third-party data access: Easily acquire and use data for market research, financial analytics, or AI model training.

Conclusion

Migrating large volumes of data to the AWS cloud is a complex but manageable task with the right approach. By carefully selecting the appropriate tools and strategies, you can achieve a very smooth transition and successful outcome.

Thanks for reading and stay tuned for more.

If you have any questions concerning this article or have an AWS project that requires our assistance, please reach out to us by leaving a comment below or email us at sales@accendnetworks.com.


Thank you!

Categories
Blogs

Cutting AWS Costs

Cutting AWS Costs: Strategies for Effective Cloud Cost Management

As companies move more work to the cloud, keeping cloud costs in check becomes essential. AWS gives users lots of options, room to grow, and many different services, but without a good plan to manage costs, bills can get out of hand fast. This guide will show you important ways and AWS tools to handle and cutting AWS costs.

  1. Understand AWS Pricing Models
    To start cutting down on cloud expenses, you need to get a handle on how AWS charges for its services. AWS provides various pricing options that can save you money when you use them right:

    On-Demand Pricing: Pay for computing or storage by the second or hour without any long-term commitment. This is best suited for short-term workloads or unpredictable demand.

    Reserved Instances (RI): By committing to using an instance for one to three years, you can save up to 72% compared to On-Demand pricing. This is ideal for steady-state workloads.

    Spot Instances: AWS allows you to bid for unused EC2 capacity at a much lower rate, sometimes up to 90% off. Spot instances are ideal for flexible, fault-tolerant workloads.

    Savings Plans: This flexible pricing model applies to all AWS services and allows users to commit to a consistent usage level for one or three years, reducing costs across services like EC2, Lambda, and Fargate.

  2. Right-Sizing Your Resources
    This refers to the practice of matching cloud resources (compute, memory, storage) to actual workloads.

    Monitor Resource Utilization: Leverage AWS CloudWatch to monitor CPU, memory, and storage utilization.

    Auto Scaling: Enable Auto Scaling for EC2 instances, ensuring that you’re only running instances that are necessary based on traffic and workload demand.

    Use Cost Explorer’s Rightsizing Recommendations: AWS Cost Explorer provides rightsizing recommendations by analyzing your usage patterns. It suggests optimal instance types that balance performance and cost.

  3. Optimize Storage Costs
    AWS offers multiple storage solutions, and choosing the right one can greatly impact costs.

    S3 Intelligent-Tiering: S3 Intelligent-Tiering automatically moves data between different storage tiers based on usage patterns, allowing you to save on storage costs.

    Glacier and Glacier Deep Archive: These are extremely low-cost options for long-term data archival, ideal for data that is infrequently accessed.

    EBS Volume Right-Sizing: AWS Elastic Block Store (EBS) offers multiple volume types such as General Purpose (gp2, gp3) and Provisioned IOPS (io1, io2). Choosing the right volume type and size for your workload can prevent over-provisioning.

    Lifecycle Policies: Use S3 Lifecycle policies to automatically transition data to cheaper storage classes (such as Glacier) as it becomes less frequently accessed.

    By managing your data lifecycle and selecting the appropriate storage class, you can save a considerable amount of money on AWS storage services.

  4. Use AWS Cost Management Tools

    AWS provides several native tools to help monitor, allocate, and optimize cloud costs.

    AWS Cost Explorer: This tool helps track usage and spending trends over time. It provides rightsizing recommendations, forecasting, and reserved instance usage analysis.

    AWS Budgets: AWS Budgets allows you to set custom cost and usage limits and receive alerts when you’re about to exceed them.

    AWS Trusted Advisor: Trusted Advisor provides real-time recommendations to optimize your AWS environment, including suggestions for cost optimization, security improvements, and performance enhancements.

    AWS Cost Anomaly Detection: This AI-driven tool automatically identifies unexpected or unusual spending patterns in your AWS account, allowing you to address them quickly.

    These tools empower you to stay on top of your AWS costs, helping to catch overspending early and optimize your resource allocation.

  5. Optimize Data Transfer Costs

    Data transfer costs can add up quickly, especially in distributed environments with multiple AWS regions.

    Use Amazon CloudFront: CloudFront is AWS’s global content delivery network (CDN), and it can significantly reduce data transfer costs by caching content closer to users.

    Leverage VPC Endpoints: VPC endpoints allow you to privately connect your VPC to AWS services without using the public internet, reducing data transfer costs.

  6. Architect for Cost Efficiency

    Designing your architecture with cost in mind is one of the most effective ways to optimize AWS cloud costs:

    Serverless Architectures: Utilize serverless services like AWS Lambda, which only charges for the compute time used, this eliminates idle server costs.

    Containerization: Use AWS Fargate or Amazon ECS to run containers without managing underlying servers, optimizing infrastructure costs by scaling containers automatically.

Conclusion

By following these best practices, you can reduce your AWS bill significantly. By understanding pricing models, right-sizing resources, leveraging cost-saving services like Spot Instances, using AWS management tools, and continuously monitoring your environment, your organization can stay cost-efficient without sacrificing performance or scalability.

Thanks for reading and stay tuned for more.

If you have any questions concerning this article or have an AWS project that requires our assistance, please reach out to us by leaving a comment below or email us at sales@accendnetworks.com.


Thank you!

Categories
Blogs

Understanding AMI in AWS

Understanding AMI in AWS: A definitive guide to cloud resilience

Amazon Machine Image (AMI) and Snapshots play crucial roles in the storage, replication, and deployment of EC2 instances. This guide not only demystifies the significance of AMIs but also unveils effective AWS backup strategies, including the vital process of taking AMI backups.

What is an Amazon Machine Image (AMI)?

An Amazon Machine Image (AMI) is an image that provides the software that is required to set up and boot an Amazon EC2 instance. Each AMI also contains a block device mapping that specifies the block devices to attach to the instances that you launch.

An Amazon Machine Image (AMI) is a template that contains the information required to launch an EC2 instance, it is the encapsulation of server configuration. Each AMI also contains a block device mapping that specifies the block devices to attach to the instances that you launch.

You can launch multiple instances from a single AMI when you require multiple instances with the same configuration. You can use different AMIs to launch instances when you require instances with different configurations, as shown in the following diagram.

You can launch multiple instances from a single AMI when you require multiple instances with the same configuration. You can use different AMIs to launch instances when you require instances with different configurations, as shown in the following diagram.

Key Components of an AMI:

Root Volume: Contains the operating system and software configurations that make up the instance.

Launch Permissions: Determine who can use the AMI to launch instances.

Block Device Mapping: Specifies the storage devices attached to the instance when it’s launched.

AMIs can be public or private:

Public AMIs: Provided by AWS or third-party vendors, offering pre-configured OS setups and applications.

Private AMIs: Custom-built by users to suit specific use cases, ensuring that their application and infrastructure requirements are pre-installed on the EC2 instance.

Types of AMIs:

EBS-backed AMI: Uses an Elastic Block Store (EBS) volume as the root device, allowing data to persist even after the instance is terminated.

Instance store-backed AMI: Uses ephemeral storage, meaning data will be lost once the instance is stopped or terminated.

Why Use an AMI?

Faster Instance Launch: AMIs allow you to quickly launch EC2 instances with the exact configuration you need.

Scalability: AMIs enable consistent replication of instances across multiple environments (e.g., dev, test, production).

Backup and Recovery: Custom AMIs can serve as a backup of system configurations, allowing for easy recovery in case of failure.

Creating an AMI

Let’s now move on to the hands-on section, where we’ll configure an existing EC2 instance, install a web server, and set up our HTML files. After that, we’ll create an image from the configured EC2 instance, terminate the current configuration server, and launch a production instance using the image we created. Here’s how we’ll proceed:

Step 1: Configuring the instance as desired

Log in to the AWS Management Console with a user account that has admin privileges, and launch an EC2 instance.

I’ve already launched an Ubuntu machine, so next, I’ll configure Apache webserver and host my web files on the instance.

SSH into your machine using the SSH command shown below.

Update your server repository.

Install and enable Apache.

Check the status of the Apache web server.

Now navigate to the HTML directory using the below command.

Use the vi editor to edit and add your web files to the HTML directory, run sudo vi index.html

Exit and save the vi editor.

We’ve successfully configured our EC2 instance to host the web application. Now, let’s test it by copying the instance’s IP address and pasting it into your web browser.

Our instance is up and running, successfully hosting and serving and serving our web application.

Step 2: Creating an image of the instance

Select the running EC2 Instance, select the actions drop-down button, and navigate to Image and Templates then click Create Image.

Provide details for your Image

Select tag Image and snapshots together then scroll down and click Create Image.

Once the Image is available and ready for use, you can now proceed and delete your setup server.

Step 3: Launch new EC2 instance from the created Image.

We will now use the created Image to launch a new EC2 instance, we will not do any configuration since the application has our app already configured.

Let’s proceed and launch our EC2 instance, click launch Instance from the EC2 dashboard.

Under Applications and OS, select my AMI, then select owned by me.

Select t2. Micro, then scroll down.

Select your key pairs.

Configure your security groups

Review and click Create Instance.

Step 4: Test our application.

Once our application is up and running, grab the public IP and paste it into your browser.

We have created an EC2 instance from an AMI with an already configured application. Application achieved.

Clean up. This brings us to the end of this article.

Conclusion

Amazon Machine Images (AMIs) are fundamental tools in managing EC2 instances. Understanding how to effectively use AMIs can help optimize your AWS environment, improving disaster recovery, scaling capabilities, and data security.

Thanks for reading and stay tuned for more.

If you have any questions concerning this article or have an AWS project that requires our assistance, please reach out to us by leaving a comment below or email us at sales@accendnetworks.com.


Thank you!

Categories
Blogs

AWS Recycle Bin

AWS Recycle Bin: Your Key to Enhanced Data Protection and Recovery

Introduction

As more and more companies depend on the cloud infrastructure to run their businesses, at the same time they need a strong strategy to protect and recover their data, as accidental deletions or unexpected failures can lead to critical data loss, resulting in downtime and potential financial losses.  AWS well known for its wide range of services, provides various tools to keep data safe and retrievable. Among these, the AWS Recycle Bin service stands out as a powerful feature to improve data recovery options. This blog explores the AWS Recycle Bin service, what it offers, and how to use it to protect your important resources.

Getting to Know AWS Recycle Bin

The Recycle Bin service, in the context of AWS, is a concept often used to describe a safety mechanism for storing and recovering deleted resources. While AWS doesn’t offer a specific service named “Recycle Bin,” users can implement similar functionality using AWS services like AWS Lambda and Amazon S3.

In this setup, when a resource is deleted, it isn’t immediately gone forever. Instead, it’s moved to a specific storage area, often called a “Recycle Bin” or “Trash,” where it remains for a set period before being permanently deleted. This serves as a safety net, allowing users to easily recover accidentally deleted resources without needing to go through complicated backup and recovery processes.

By using AWS Lambda functions and S3 event notifications, you can automate the transfer of deleted resources to the Recycle Bin and set up policies for how long they should be retained before final deletion. This approach strengthens your data protection and management strategy within your AWS environment.

The AWS Recycle Bin is particularly useful when mistakes happen or automated systems accidentally delete resources. By enabling the Recycle Bin, you ensure that even if a resource is deleted, it can still be restored, preventing data loss and avoiding service interruptions.

Benefits of AWS Recycle Bin

Enhanced Data Protection: It allows you to recover deleted resources within a specified period, reducing the risk of permanent data loss.

Compliance and Governance: It ensures that data is not permanently lost due to accidental deletions, which is essential for maintaining audit trails and adhering to data retention policies.

Cost Management: By setting appropriate retention periods, you can manage storage costs effectively.

Let’s now get to the hands-on.

Implementation Steps

Make sure you have an EC2 instance up and running.

Get EBS Volume Information

AWS Elastic Block Store (EBS) is a scalable block storage service provided by Amazon Web Services (AWS), offering persistent storage volumes for EC2 instances. To view your block storage, in the EC2 dashboard move to the storage tab.

Take a Snapshot of the Volume

An AWS EBS snapshot is a point-in-time backup of an EBS volume stored in Amazon S3. It captures all the data on the volume at the time the snapshot is taken, including the data that is in use and any data that is pending EBS snapshots are commonly used for data backup, disaster recovery, and creating new volumes from existing data.

On the left side of EC2 UI, click Snapshots then click Create Snapshot.

In the Create snapshot UI, under resource types, select volumes. Then under volume ID, select the drop-down button and select your EBS volume.

Scroll down and click Create Snapshot.

Success.

Head to the Recycle Bin console and click the Create retention rule.

Fill in retention rule details.

Under retention settings for resource type select the drop-down button and select EBS Snapshot, then tick the box apply for all resources, then for retention period, select one day.

For the Rule lock settings, select Unlock.

Rule Created

Now go ahead and delete the snapshot

Open the recycle bin

Click on the snapshot present in the recycle bin

Objective achieved

Snapshot recovered successfully

Conclusion

The AWS Recycle Bin service offers a valuable layer of protection against accidental deletions, ensuring that critical resources like EBS snapshots and AMIs can be recovered within a defined period. Whether you’re protecting against human error or looking to strengthen your disaster recovery strategy, AWS Recycle Bin is an essential tool in your AWS toolkit.

This brings us to the end of this article.

Thanks for reading and stay tuned for more.

If you have any questions concerning this article or have an AWS project that requires our assistance, please reach out to us by leaving a comment below or email us at sales@accendnetworks.com.


Thank you!