Accend Networks San Francisco Bay Area Full Service IT Consulting Company

Categories
Blogs

AWS Serverless Application

AWS Serverless Application Repository an Overview

Serverless application repository allows developers to discover, deploy, and share serverless applications quickly. This repository contains a wide range of prebuilt applications and re-usable code packages making it easier to start with serverless architecture.  In this blog post, we’ll explore the AWS Serverless Application Repository in detail uncovering its key features, stay tuned.

What is an AWS Serverless Application Repository?

This is a serverless application repository managed by AWS. The AWS Serverless Application Repository makes it easy for developers and enterprises to quickly find, deploy, and publish serverless applications in the AWS Cloud. AWS is only responsible for the infrastructure security serving AWS services on the AWS Cloud.

AWS SAM accomplishes serverless development through configuration files, pattern models, and command-line tools.

How Does AWS Serverless Application Repository Work?

AWS serverless application Repository accelerates serverless application deployment by providing an easy-to-search repository of serverless applications that can be readily distributed to both application publishers and application consumers.

As an application consumer, you can find and deploy pre-built applications to meet a specific need, allowing you to swiftly put together serverless architecture in newer, more powerful ways.

Similarly, as an application provider or publisher, you would not want your consumers to rebuild your program from scratch. With SAR, this is not an issue.

Serverless Application Repository provides a platform that enables you to connect with consumers and developers all over the world.

Let’s define these key terms

Publishing Applications – Configure and upload applications to make them available to other developers, and publish new versions of applications.

Deploying Applications – Browse for applications and view information about them, including source code and readme files. Also install, configure, and deploy applications of your choosing.

How to access and navigate the AWS Serverless Application Repository?

Sign in to the AWS Management Console, and navigate to the Serverless Application Repository:

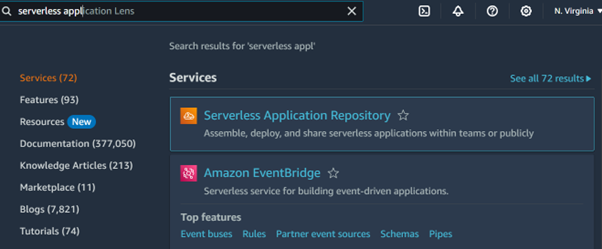
In the search bar type serverless then select serverless application repository under services.

Steps to find and deploy serverless applications from the repository?

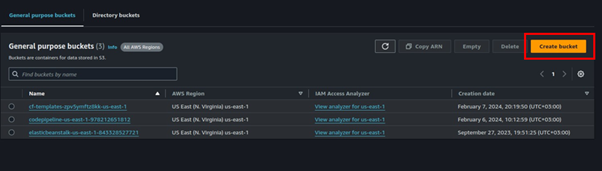
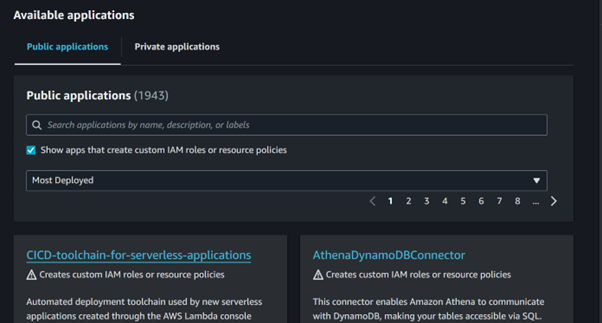
Step 1: Browse the Repository

On the left side of the repository UI, select available applications, which will bring you to a wide range of serverless applications. Here you can browse through very many categories, like security, data processing, machine learning, and more.

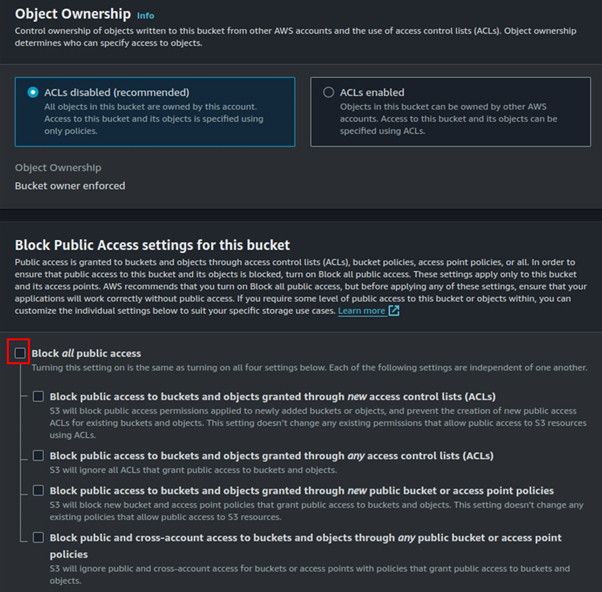
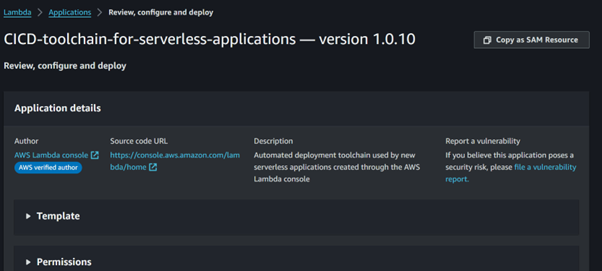
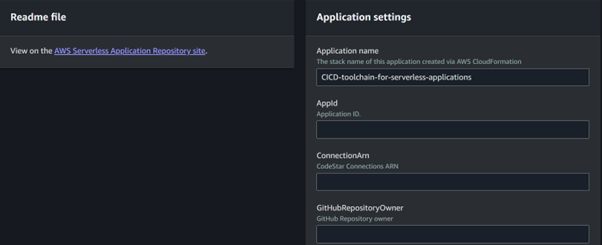
Step 2: Configure the application

Lastly, if you are already familiar with the application, you can configure it and launch it immediately.

Click on the application.

It will then take you to a new console where you review, configure, and deploy.

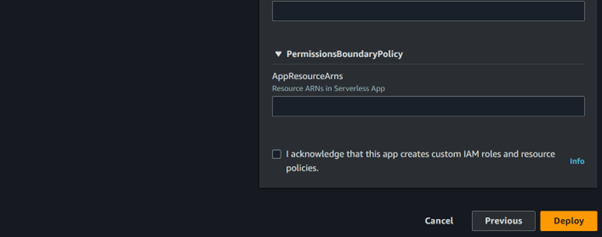
When you are done with your configuration, you can now deploy and that’s it.

How to publish your own serverless applications to the repository?

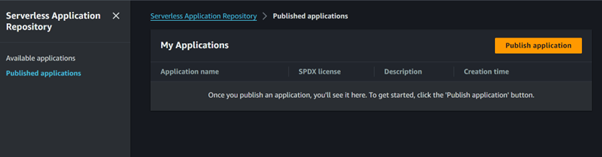
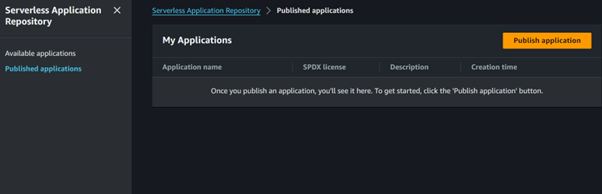
In the left UI of the serverless application repository, select published applications then select publish application.

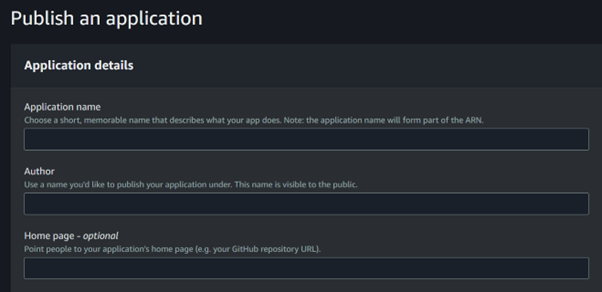
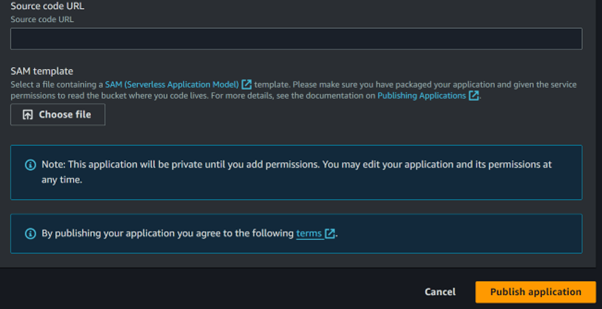
This will bring you to the publish application UI. Here, you have to provide some details for your AWS Serverless application repository then you can publish your application.

Components of Serverless Application Repository

Application Policy: For your SAR application to be used, you must grant policies. By setting policies, you may create private apps that only your team can access, as well as public apps that can be shared with particular or all AWS accounts.

AWS Region: Whenever you set an application to public and publish it in the AWS Serverless Application Repository, the service publishes it in all AWS Regions.

SAM Template: This file defines all of the resources that will be generated when you deploy your application. SAM is an extension of CloudFormation that simplifies the process of establishing AWS services including Lambda Functions, API Gateway, Dynamo tables, and more.

Features of AWS Serverless Application Repository

AWS CodePipeline can connect GitHub with the Serverless Application Repository.

AWS provides all apps under the MIT open-source license, whereas publicly available applications by other users fall under the Open-Source Initiative (OSI).

AWS Serverless Application Repository includes applications for Alexa Skills, IoT, and real-time media processing from several publishers worldwide.

Applications can be shared across AWS Organizations. Users cannot exchange applications with other organizations.

Benefits of AWS Serverless Application Repository

Extension of AWS CloudFormation: AWS Serverless Application Repository is a service that works alongside AWS CloudFormation. It can use all of the AWS cloud creation resources.

Deep integration with development tools: AWS Serverless Application Repository often combines with other AWS services in the construction of serverless applications

Single-Deployment Configuration: AWS SAM runs on a single CloudFormation stack, unifying all required resources and components.

Conclusion

AWS serverless application repository is a valuable resource for developers looking to accelerate their serverless projects. Offering a range of pre-built applications and reusable components, it makes very simple the deployment process and fosters innovation.

Thanks for reading and stay tuned for more.

If you have any questions concerning this article or have an AWS project that requires our assistance, please reach out to us by leaving a comment below or email us at sales@accendnetworks.com.


Thank you!

Categories
Blogs

VPC Security

Enhancing VPC Security: An Overview of AWS Network Firewall

As cloud computing keeps changing, protecting network infrastructure is key. Amazon Web Services (AWS) provides strong security tools, including AWS Network Firewall. This article looks at leveraging AWS Network Firewall to protect resources in a Virtual Private Cloud (VPC).

What is Network Firewall?

Network Firewall is a managed network firewall service for VPC. It is a stateful, network firewall and intrusion detection and prevention service for your virtual private cloud (VPC) that you create in Amazon Virtual Private Cloud (VPC).

Network Firewall lets you filter traffic at the edge of your VPC. This covers filtering traffic going to and coming from an internet gateway, NAT gateway, or through VPN or AWS Direct Connect.

Understanding AWS Network Firewall

To understand the concept of a Network Firewall, let’s first explore some of the security features available for the VPC.

From the above architecture, we can observe that at the instance level, security groups are used to provide security for your instances and manage all incoming and outgoing traffic. At the subnet level, Network Access Control Lists (NACLs) are utilized to evaluate traffic entering and exiting the subnet.

Any traffic from the internet gateway to your instance will be evaluated by both NACLs and security group rules. Additionally. AWS Shield and AWS WAF are available for protecting web applications running within your VPC.

Single zone architecture with internet gateway and network firewall

AWS network firewall will establish a subnet in your VPC’s availability zone and set up an endpoint within it. All traffic from your subnet heading to the internet will be routed through this network firewall subnet for inspection before proceeding to its destination and vice versa for incoming traffic. This is a valuable feature that enhances the security of your VPC.

Two zone architecture with network firewall and internet gateway

In this setup, you can have firewall subnets in each availability zone, where each network firewall will inspect traffic going to and from the customer subnet in that zone. To make sure all traffic goes through these firewall subnets, you’ll need to update your route tables.

How it Network Firewall Works

To apply traffic-filtering logic provided by Network Firewall, traffic should be routed symmetrically to the Network Firewall endpoint. Network Firewall endpoint is deployed into a dedicated subnet of a VPC (Firewall subnet). Depending on the use case and deployment model, the firewall subnet could be either public or private. For high availability and multi-AZ deployments, allocate a subnet per AZ.

Once NF is deployed, the firewall endpoint will be available in each firewall subnet. The firewall endpoint is similar to the interface endpoint and it shows up as vpce-id in the VPC route table.

Network Firewall makes firewall activity visible in real-time via CloudWatch metrics and offers increased visibility of network traffic by sending logs to S3, CloudWatch, and Kinesis datafirehorse.

NF is integrated with AWS firewall Manager, giving customers who use AWS Organizations a single place to enable and monitor firewall activity across all VPCs and AWS accounts.

Network Firewall Components:

Firewall: A firewall connects the VPC that you want to protect to the protection behaviour that’s defined in a firewall policy.

Firewall policy: Defines the behaviour of the firewall in a collection of stateless and stateful rule groups and other settings. You can associate each firewall with only one firewall policy, but you can use a firewall policy for more than one firewall.

Rule group: A rule group is a collection of stateless or stateful rules that define how to inspect and handle network traffic.

Stateless Rules

Inspects each packet in isolation. Does not take into consideration factors such as the direction of traffic, or whether the packet is part of an existing, approved connection.

Stateful Rules

Stateful firewalls are capable of monitoring and detecting states of all traffic on a network to track and defend based on traffic patterns and flows.

This brings us to the end of this blog.

Conclusion

Protecting resources inside a VPC plays a key role in today’s cloud setups. AWS Network Firewall gives you a full set of tools to guard your network against different kinds of threats. setting AWS Network Firewall manager, will give your VPC resources strong protection.

Thanks for reading and stay tuned for more.

If you have any questions concerning this article or have an AWS project that requires our assistance, please reach out to us by leaving a comment below or email us at sales@accendnetworks.com.


Thank you!

Categories
Blogs

Deep Dive into CloudFront

Deep Dive into CloudFront: Understanding Internal Caching Mechanisms and Implementing Websites on S3 with Region Failover Part One

Amazon CloudFront, a Content Delivery Network (CDN) provided by AWS, is key in ensuring that content is delivered swiftly to users across the globe. When paired with S3, it’s perfect for hosting fast, secure, and reliable static websites. In this article, we will explore CloudFront’s internal caching mechanisms and discuss how to implement an S3-hosted website with region failover capabilities.

What is CloudFront

CloudFront is a CDN service (Content delivery network). CloudFront caches content such as HTML, CSS, and dynamic content to a worldwide data center called Edge Location or Regional Edge location. it is used to boost your website performance by availing content closer to users all over the world.

How it works?

CloudFront caches the contents in all the edge locations around the world. Caching refers to storing frequently accessed data in high-speed hardware, allowing for faster retrieval. This hardware is known as a cache. However, caches have limited memory capacity, and it is not possible to store everything in them due to their relatively expensive hardware. We use caching strategically to maximize performance.

Cache Hierarchy in CloudFront

Regional Edge Caches: Before content reaches the edge locations, it may pass through regional edge caches. These are a middle layer that provides additional caching, helping to reduce the load on the origin server and improve cache hit ratios.

Cache Hit: This refers to a situation where the requested data is already present in the cache. It improves performance by avoiding the need to fetch the data from the source such as a disk or server. Cache hits are desirable because they accelerate the retrieval process and contribute to overall system efficiency.

Cache Miss: This occurs when the requested data is not found in the cache. When a cache miss happens, the system needs to fetch the data from the source, which can involve a longer retrieval time and higher latency compared to a cache hit. The data is then stored in the cache for future access, improving subsequent performance if the same data is requested again. Cache misses are inevitable and can happen due to various reasons, such as accessing new data or when the data in the cache has expired.

How CloudFront utilizes caching to reduce the latency and increase the performance

When a user requests a website, the DNS service resolves to the DNS of the CloudFront distribution, which then redirects the user to the nearest edge location. The user receives the response from that particular edge location. However, there are instances when the requested data is not present in the edge location, resulting in a cache miss. In such cases, the request is sent from the regional edge location, and the user receives the data from there if it is available, indicating a cache hit. However, this process can take some time.

In situations where the data is not present in the regional edge location either, retrieving the data becomes a lengthier process. In such cases, the data needs to be fetched from the origin server, which, in our case, is the S3 bucket. This additional step of fetching the data from the origin server can introduce latency and increase the overall response time for the user.

CloudFront origin failover

For high-availability applications where downtime is not an option, CloudFront origin failover ensures that your content remains accessible even if the primary origin server becomes unavailable. By setting up multiple origins (like two S3 buckets in different regions) and configuring CloudFront to switch to a backup origin when the primary one fails, we can maintain uninterrupted service for users, enhancing our website’s reliability and resilience.

For CloudFront origin to be achieved, we create an origin group with two origins: a primary and a secondary. If the primary origin is unavailable or returns specific HTTP response status codes that indicate a failure, CloudFront automatically switches to the secondary origin.

To set up origin failover, you must have a distribution with at least two origins. Next, you create an origin group for your distribution that includes two origins, setting one as the primary. Finally, you create or update a cache behavior to use the origin group. We will demonstrate this with a hands-on in the second part of this blog.

Thanks for reading and stay tuned for more.

If you have any questions concerning this article or have an AWS project that requires our assistance, please reach out to us by leaving a comment below or email us at sales@accendnetworks.com.


Thank you!

Categories
Blogs

Expand Your EC2 Storage

Effortlessly Expand Your EC2 Storage: Increasing EBS Volume Size

Amazon Elastic Block Store (EBS) volumes, give you a way to store data for your Amazon EC2 instances that lasts even if the cases themselves are turned off. As your applications grow and you need more space, you don’t need to worry. Amazon Web Services has made it easy to increase the size of your EBS volume without any downtime or losing your data. In this guide, we will take you through the steps to seamlessly expand your EC2 storage.

There are a few reasons why you might want to increase the size of your EBS Volume

Growing Data Requirements: As your application starts to store more and more data, the initial storage capacity might not be enough anymore.


Performance Boost: Increasing the volume size can improve the performance of certain workloads, especially when it comes to input/output operations.


Cost Efficiency: Sometimes, it’s more cost-effective to expand an existing volume rather than adding more volumes and dealing with the hassle of managing them separately.


Increasing disk size may seem complex. Do we need downtime? Should we stop the server? Do we need to detach the volume? These questions may cross your mind.


However, the reality is that we can increase disk size without detaching the volume or restarting the server. Moreover, this process doesn’t require any downtime.


We will follow the following outlined steps to achieve our objective. Ensure you have an active running EC2 instance in your AWS account or you can spin up one to follow along with this demo.

Step 1: Check the current disk status

Log into the EC2 console, select your running instance then move to the storage tab, you will be able to see your volume characterized by volume ID, device name, volume size, and the attachment status.

Here I have my application server instance running with 8GB of EBS volume attached.

Check the disk status by using the below command.

df -hT

The current disk size is 8GB and 20% is used. Now, let’s proceed with the next step.

Step 2: Create Snapshot

Creating a snapshot is essential to keep a backup of our existing volume in case anything unusual happens during this activity.

Click on the EBS volume ID attached to your EC2 instance, then select your EBS volume and click on actions > Create snapshot.

In the Create Snapshot UI, give a relevant description and tag to your snapshot then click Create Snapshot.

Go to snapshots and wait till your snapshot status shows Completed.

Step 3: Increase the EBS volume

Make sure your snapshot is created successfully before proceeding with this step.

Go to the volumes section, select the volume attached to the EC2, and click on modify volume.

In the create volume UI, select volume type, and choose size as your desired business need, then click modify Increase the volume size as per your requirement and click on modify. Here I have changed the volume size from 8 to 15 GB.

You can now see that the disk volume attached to the server is updated to 15GB.


Step 4: Resize the File System

Now we need to extend our OS file system to see our increased volume.

SSH into the EC2 instance

Run the below command to check the volume size.

df -hT

We can see that the disk size is still 8GB.

Run the below command to see information about the block devices attached to our EC2 instance.

lsblk

Here xvda1 is our current volume that is attached and xvda is the increased volume.

Extend the partition xvda by 1

sudo growpart /dev/xvda 1

Extend the volume

sudo xfs_growfs -d /dev/xvda1

Check the volume size

df -hT

We can see that our volume size has now increased to 15GB

Conclusion

AWS provides a straightforward method to increase the volume size of EBS. We need to extend the OS file system to see the changes. increasing the size of your EBS volume is pretty simple and can be a game-changer for your growing apps.


This brings us to the end of this blog. Clean up.

If you have any questions concerning this article or have an AWS project that requires our assistance, please reach out to us by leaving a comment below or email us at sales@accendnetworks.com.


Thank you!

Categories
Blogs

EC2 Instance Connect Endpoint

EC2 Instance Connect Endpoint: Secure Access to Private Subnet Instances Without Internet

Amazon Web Services offers EC2 Instance Connect Endpoint. This powerful feature enables secure SSH access to private EC2 instances with private IP addresses without the need for managing SSH keys or bastion hosts. With EC2 Instance Connect Endpoint, we can establish SSH and RDP connectivity to our EC2 instances without relying on public IP addresses. This means we can have remote connectivity to instances in private subnets without the need for public IPv4 addresses.

What is an EC2 instance connect endpoint?

EC2 Instance Connect Endpoint allows you to connect to an instance without requiring the instance to have a public IPv4 address. You can connect to any instances that support TCP.

EC2 Instance Connect Endpoint combines AWS Identity and Access Management (IAM) based access controls with network-based controls such as Security Group rules. This combination allows you to restrict access to trusted principals and provides an audit trail of all connections through AWS CloudTrail.

Traditional way of accessing EC2 instance in the private subnet

In the past, customers had to create Bastion Hosts to tunnel SSH/RDP connections to instances with private IP addresses. However, this approach required additional operational overhead for patching, managing, and auditing the Bastion Hosts, as well as incurring extra costs. EC2 Instance Connect Endpoint eliminates these costs and operational burdens associated with maintaining bastion hosts.

Additionally, the service facilitates detailed auditing and logging of connection requests, providing administrators with a comprehensive overview of who is accessing resources and when. This feature is invaluable for security and compliance monitoring, enabling a proactive approach to managing and mitigating potential security risks.

How it works

First, we create an EC2 Instance Connect Endpoint in a subnet in our VPC then, when you want to connect to an instance, you specify the ID of the instance. You can optionally provide the EC2 Instance Connect Endpoint. The endpoint acts as a private tunnel to the instance.

Once you create an EC2 Instance Connect Endpoint in a subnet, you can use the endpoint to connect to any instance in any subnet in your VPC provided our VPC is configured to allow subnets to communicate.

Let’s now dive into the hands-on, we will start by creating an EC2 instance.

Log in to the AWS console as a user with admin user privileges, or make sure you have the necessary permissions.

In the search bar, type EC2 then select EC2 under services to go to the EC2 console.

On the left side of EC2 UI, select instances then click launch instances.

Fill in your instance details. select the QuickStart tab then select Amazon Linux AMI. Scroll down.

Select t2. Micro, free tier eligible. Under key pairs, we will not need them so select the drop-down button then select move without key pair.

Move to the networking tab then click edit.

We will leverage the default VPC. Select your preferred subnet then under Auto-assign public IP, select the drop-down button and select disable. You create a security group or select one with SSH port 22 open.

Scroll down and select Create instance.

While our instance is launching let’s move to the VPC dashboard.

On the left side of the VPC UI, select endpoints.

Select Create Endpoint.

Provide the name of your endpoint. Under the service category, select the radio button for the EC2 Instance connect endpoint.

For VPC, select the drop-down button and select your VPC. Again, for subnets select the subnet where you launched the Instance. These are the only required settings. Click Create Endpoint.

After successful creation, it will take a couple of minutes in the pending state and then become available.

After waiting for a few minutes, our endpoint is now available.

Go back to the EC2 instance dashboard, select the instance you created then select Connect. You will be brought to the connect instance dashboard.

Select the radio button on connect using EC2 Instance connect Endpoint. Fill in the required details. select the endpoint you created. The user name for amazon Linux user is ec2 -user. Click connect.

Success we are in our EC2 instance, and we can see the IP address is the private one.

We have managed to connect to an EC2 instance in the private subnet with a private IP address. Objective achieved.

We can also use the below command to connect to the instance in our terminal. Make sure you have AWS CLI installed and configured.

This brings to the end of this blog, bring everything down.

Conclusion

EC2 Instance Connect Endpoint provides a secure solution to connect to your instances via SSH or RDP in private subnets without Internet Gateways, public IPs, agents, and bastion hosts.

Thanks for reading and stay tuned for more.

If you have any questions concerning this article or have an AWS project that requires our assistance, please reach out to us by leaving a comment below or email us at sales@accendnetworks.com.


Thank you!