Accend Networks San Francisco Bay Area Full Service IT Consulting Company

Categories
Blogs

Comprehensive Guide to AWS Code Build

Comprehensive Guide to AWS Code Build: Features, Setup, and Best Practices
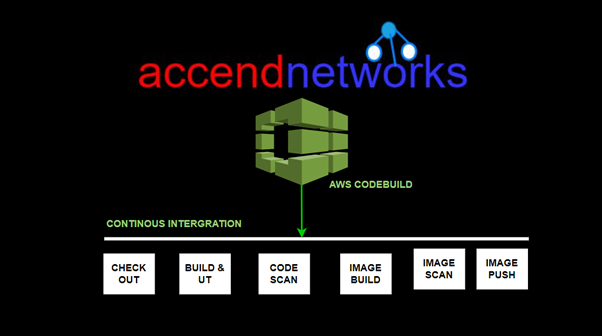
AWS Code Build setup

In modern software development, automating the process of building, testing, and deploying applications is key to streamlining workflows. AWS CodeBuild, part of AWS’s continuous integration and delivery (CI/CD) suite, plays a significant role in automating the build process. It compiles source code, runs tests, and produces deployable software packages in a highly scalable, managed environment so read on as we provide comprehensive guide to AWS Code Build in this blog.

What is AWS CodeBuild?

AWS CodeBuild is a fully managed build service that compiles source code, runs tests, and produces software packages that are ready to deploy. With CodeBuild, you don’t need to worry about provisioning and managing your build infrastructure. You simply provide your build project’s source code and build settings, and CodeBuild handles the rest.

For example, if you have a web application that you want to deploy, you can use CodeBuild to compile your source code, run unit tests, and produce a deployable package. You can also use CodeBuild to build Docker images, run static code analysis, and more. CodeBuild integrates with other AWS services like Code Pipeline, so you can easily automate your entire software release process.

Build Projects and Builds

A build project defines how AWS CodeBuild runs a build. It includes information such as where to get the source code, the build environment to use, the build commands to run, and where to store the build output. A build refers to the process of transforming the source code into executable code by following the instructions defined in the build project.

Key Features of AWS CodeBuild

Automated Builds: Compiles source code and packages it for deployment automatically.

CI/CD Integration: Works seamlessly with AWS CodePipeline to automate your entire CI/CD workflow.

Scalability: Automatically scales to meet the demands of your project, ensuring there are no build queues.

Pay-As-You-Go Pricing: You are only charged for the compute time you use during the build process.

How does AWS CodeBuild Work?

AWS CodeBuild uses a three-step process to build, test, and package source code:

Fetch the source code: CodeBuild can fetch the source code from a variety of sources, including GitHubBitbucket, or even Amazon S3.

Run the build: CodeBuild executes the build commands specified in the Buildspec.yaml file. These commands can include compilation, unit testing, and packaging steps.

Store build artifacts: Once the build is complete, CodeBuild stores the build artifacts in an Amazon S3 bucket or another specified location. The artifacts can be used for deployment or further processing.

What is the Buildspec.yaml file for Codebuild?

The Buildspec.yaml file is a configuration file used by AWS CodeBuild to define how to build and deploy your application or software project. It is written in YAML format and contains a series of build commands, environment variables, settings, and artifacts that CodeBuild will use during the build process.

Steps to consider when planning a build with AWS CodeBuild

Source Control: Choose your source control system (e.g., GitHub, Bitbucket) and decide how changes in this repository will trigger builds.

Build Specification: Define a buildspec.yml file for CodeBuild, specifying the build commands, environment variables, and output artifacts.

Environment: Select the appropriate build environment. AWS CodeBuild provides prepackaged build environments for popular programming languages and allows you to customize environments to suit your needs.

Artifacts Storage: Decide where the build artifacts will be stored, typically in Amazon S3, for subsequent deployment or further processing.

Build Triggers and Rules: Configure build triggers in CodePipeline to automate the build process in response to code changes or on a schedule.

VPC: Integrating AWS CodeBuild with Amazon Virtual Private Cloud (VPC) allows you to build and test your applications within a private network, which can access resources within your VPC without exposing them to the public internet.

Conclusion:

AWS CodeBuild is an excellent solution for developers and DevOps teams looking to automate the build process in a scalable, cost-effective manner. Whether you’re managing a small project or handling complex builds across multiple environments, AWS CodeBuild ensures that your software is always built and tested with the latest code changes.

Thanks for reading and stay tuned for more.

If you have any questions concerning this article or have an AWS project that requires our assistance, please reach out to us by leaving a comment below or email us at sales@accendnetworks.com.


Thank you!

Categories
Blogs

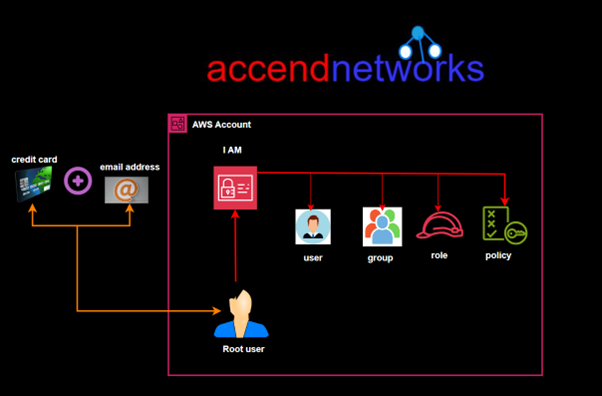
Mastering IAM Policies

Mastering IAM Policies: A Guide to Cloud Security and Access Management

AWS Identity and Access Management (IAM) is at the core of securing your AWS resources by providing fine-grained control over access permissions. IAM policies are essential in defining what actions are allowed or denied on AWS resources. There are two main types of IAM policies: managed policies and inline policies. In this article, we’ll break down these policies.

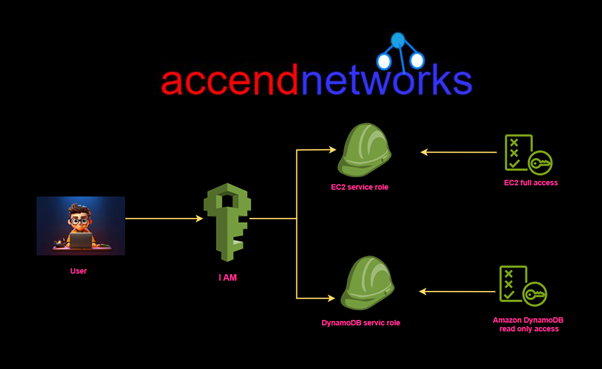
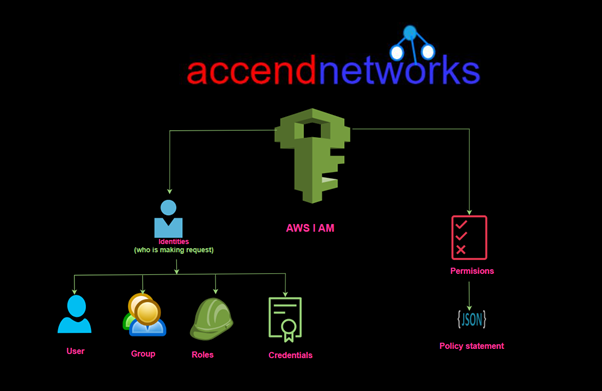
When thinking about IAM, there are two broad categories to consider, Identities and permissions.

IAM policy configuration example

Identities refer to the various mechanisms that AWS provides to identify who is requesting a particular AWS action, authenticate that person or entity, and organize similar entities into groups, all are essential to mastering IAM policies.

Permissions refer to what a particular identity is allowed to do in the AWS account.

Best Practices for IAM Policies: IAM Users

IAM policy configuration example

IAM users are individual entities within your AWS account representing people or applications interacting with AWS services. Each IAM user has a unique identity and can be assigned specific permissions that dictate what AWS resources they can access and what actions they can perform. IAM users can authenticate using an AWS Management Console login, access keys for programmatic access (CLI or API), or both. Users are often created for individuals in an organization who need access to AWS resources and are assigned policies that define their permissions.

IAM Groups

IAM policy configuration example

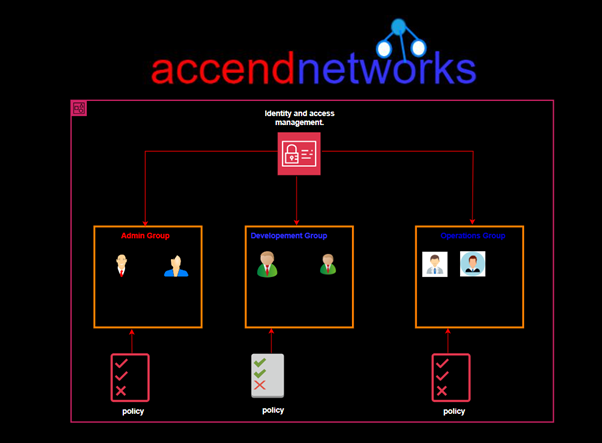
IAM groups are collections of IAM users that share the same set of permissions. Instead of managing permissions for each user, you can attach policies to a group, and all users within that group will inherit those permissions. This makes it easier to manage users with similar access needs, such as developers, administrators, or auditors.

IAM Roles

IAM policy configuration example

IAM roles used to grant temporary access to AWS resources without requiring long-term credentials like passwords or access keys. Instead, roles are assumed by trusted entities such as IAM users, applications, or AWS services (e.g., EC2, Lambda) when they need to perform certain actions. Roles have permissions associated with them through policies, and when an entity assumes a role, it temporarily gains those permissions.

What are IAM Policies?

cloud security with IAM policies

An IAM policy is a JSON document that defines what actions are allowed or denied on specific AWS services and resources. It contains statements with actions, resources, and conditions under which access is granted or denied.

Actions: These define what the policy allows or denies.

Resources: These are the AWS resources on which actions are performed, such as an S3 bucket or an EC2 instance.

Conditions: Optional filters that refine when the policy applies, such as applying only to a specific IP address.

Managed Policies

cloud security with IAM policies

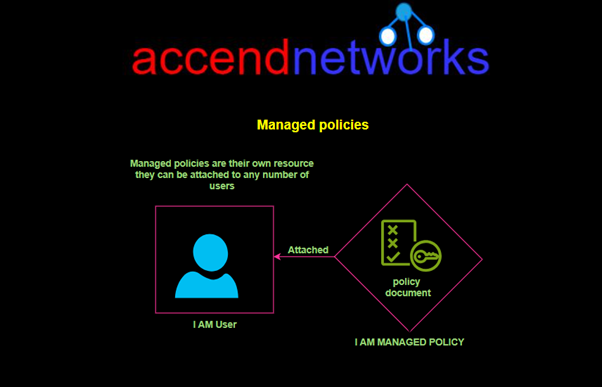
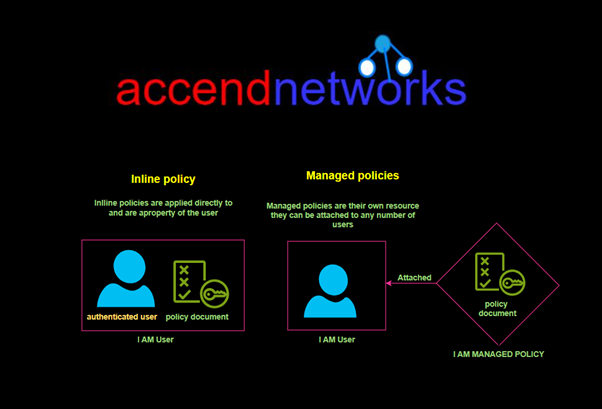
Managed policies are standalone policies that can be attached to multiple users, roles, or groups. They are easier to maintain because any changes to a managed policy apply across all entities attached to it. Managed policies come in two types:

  1. AWS Managed Policies: Predefined policies created and maintained by AWS. These cover common use cases, like AdministratorAccess which grants full access to all AWS resources, or ReadOnlyAccess which allows viewing but not modifying resources.
  2. Customer Managed Policies: Policies created and managed by AWS users. These are useful when predefined AWS-managed policies don’t meet specific business needs, allowing you to create custom policies tailored to your organization’s security requirements.

Inline Policies

cloud security with IAM policies

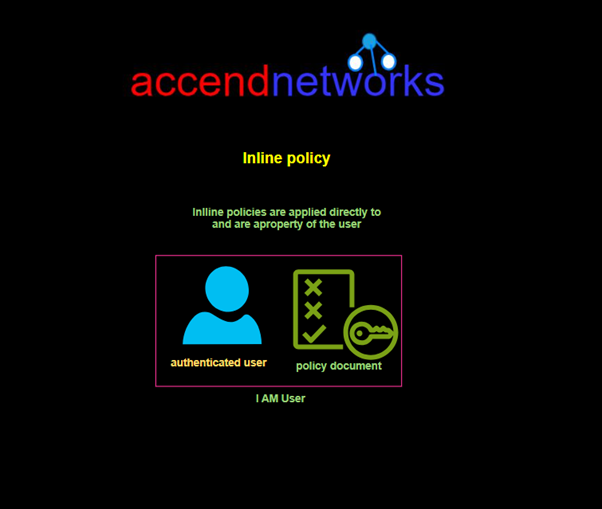
Inline policies are policies directly embedded within an IAM user, group, or role. Unlike managed policies, inline policies exist solely within the entity they are attached to and cannot be reused. Inline policies are best when you need strict control over specific permissions, such as granting temporary or highly tailored access to a particular user.

Comparison of Managed Policies vs. Inline Policies

Managed policies can be attached to multiple users, roles, or groups, making them reusable across various entities. In contrast, inline policies are attached to a specific user, role, or group and cannot be reused.

When it comes to maintenance, managed policies are easier to update because any changes apply to all the entities they are attached to. On the other hand, inline policies need to be handled individually for each user, role, or group they are attached.

The typical use case for managed policies is to provide general-purpose permissions that can be reused across multiple accounts, while inline policies are ideal for fine-grained control over specific entities.

Conclusion:

AWS IAM policies provide the fine-grained access control needed to manage who can access your resources and what actions they can perform. Managed policies are reusable, making them easier to manage across multiple entities, while inline policies provide more granular control for individual users or roles. Understanding when to use each type is key to maintaining security and flexibility in your AWS environment.

Thanks for reading and stay tuned for more. Make sure you clean up.

If you have any questions concerning this article or have an AWS project that requires our assistance, please reach out to us by leaving a comment below or email us at sales@accendnetworks.com.


Thank you!
Categories
Blogs

Exploring Managed and Inline Policies for Cloud Security

Exploring Managed and Inline Policies for Cloud Security: Hands-On Demo

IAM managed policy example

AWS Identity and Access Management (IAM) is a powerful tool that helps control access to AWS resources. By managing who can access what, IAM ensures the security and flexibility of your AWS environment. In this blog, we will be exploring Managed and Inline Policies for Cloud Security and provide a hands-on lab to demonstrate how to create an IAM user and attach an inline policy to the user.

We will start by creating an IAM user through the AWS Management Console and attaching a managed policy that allows the user to change only their password. After creating the user, we will log in with their credentials and attempt to describe EC2 instances, which will result in access being denied due to insufficient permissions.

Next, we will create an inline policy specifically for the user, permitting them to describe EC2 instances. This will provide the user with the necessary access to view instance details while maintaining fine-grained control over their permissions.

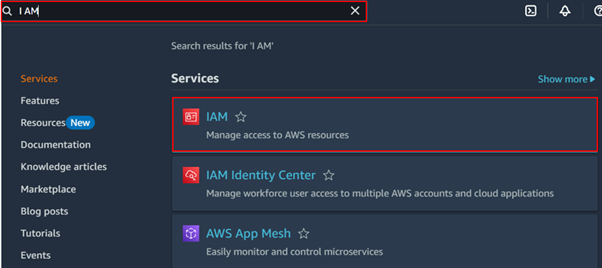
To begin, log into the AWS Management Console using an IAM user with administrative privileges. In the AWS Console, navigate to the search bar, type IAM, and select IAM from the list of services. This will take you to the IAM dashboard, where we can manage users, roles, and policies.

IAM managed policy example

In the left side UI of the I AM console, select users then click Create User.

IAM managed policy example

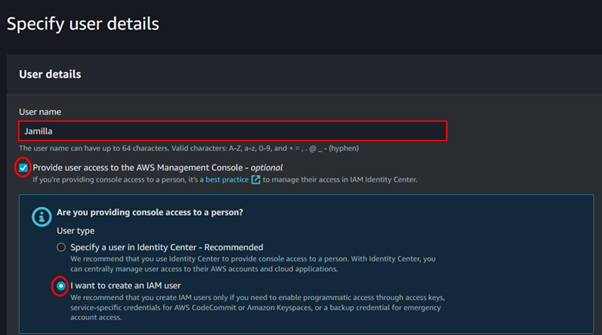
Fill in the user’s details, including a preferred name. Afterward, check the box labeled Provide user access to the AWS Management Console to allow the user to log in. Next, select the radio button that says I want to create an IAM user.

IAM managed policy example

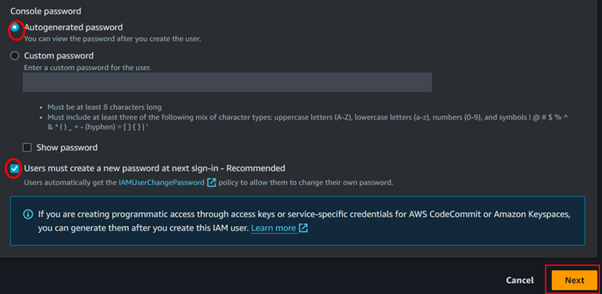
Under the Console password section, select Autogenerate password, and then check the box labeled Users must create a new password at the next sign-in (this is recommended for security purposes). Once done, click Next to proceed.

cloud security policy configuration

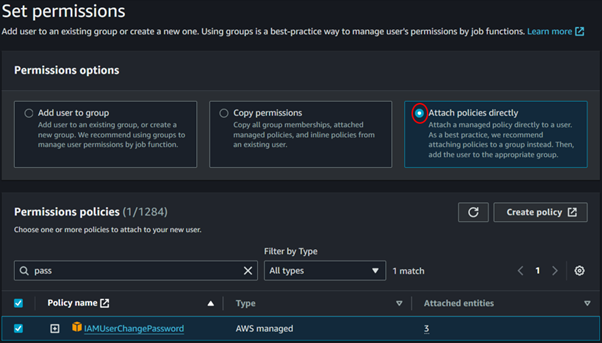
In the Set Permissions section, select Attach policies directly. In the managed policy search bar, type IamUserChangePasswordand select the policy that appears. This will be the only policy assigned to the user, allowing them to change their password. After selecting the policy, click Next to continue.  

cloud security policy configuration

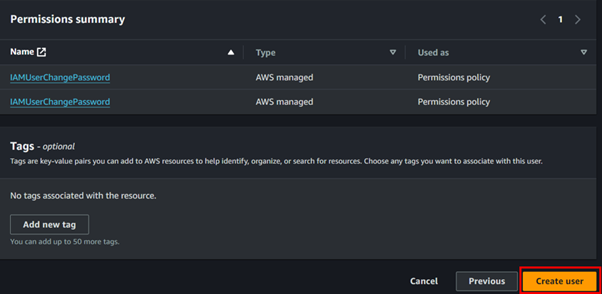
Review the permissions summary then click Create user.

cloud security policy configuration

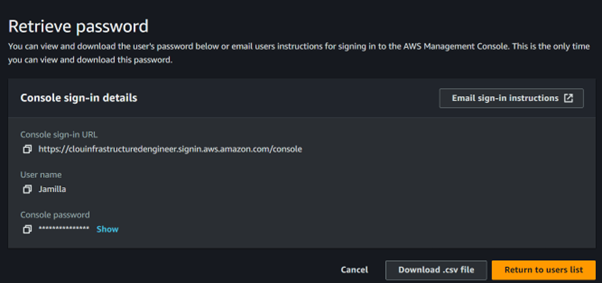
Retrieve the newly created user’s details, including their login credentials. Use these credentials to log in to the AWS Management Console as the new user.

cloud security policy configuration

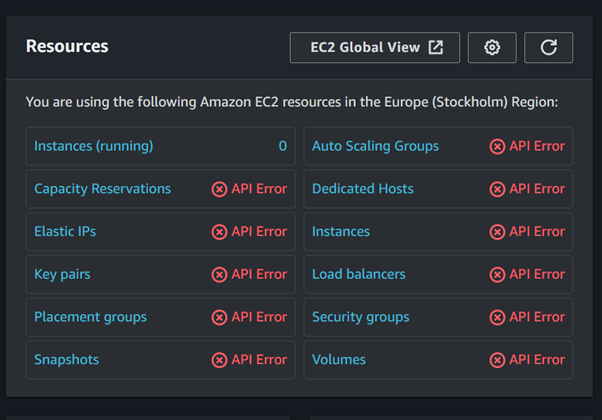
Once logged into the console, navigate to the EC2 dashboard. You’ll notice that the user receives API errors, indicating they lack the necessary permissions to access or view EC2 resources. This is because no permissions have been granted to the user for EC2-related actions.

cloud security policy configuration

When attempting to view EC2 instances, you will see a red flag stating, you are not authorized. This means the user does not have the required permissions to access or view EC2 instances, confirming that the necessary permissions have not yet been assigned. To resolve this, we’ll need to attach a policy granting EC2 permissions.

cloud security policy configuration

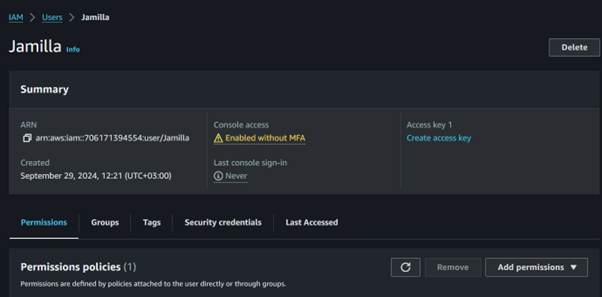
Log back in as the admin user and navigate to the IAM dashboard. From there, locate and select the user you created earlier. Once on the user’s detail page, click on the Permissions tab to review and manage the permissions assigned to that user.

cloud security policy configuration

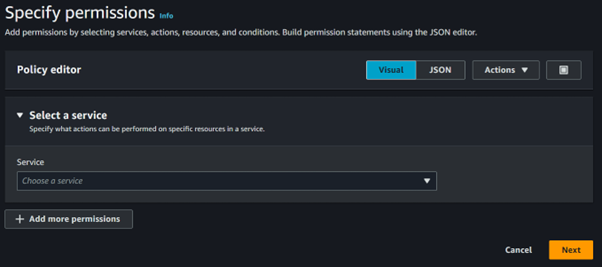
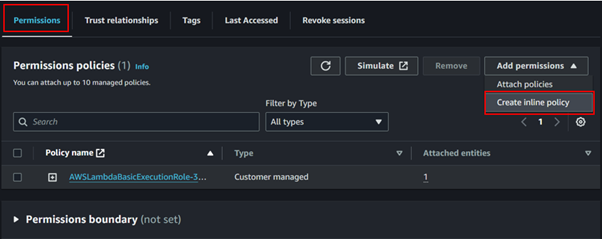
Select the Add permissions drop-down button, then choose Create inline policy from the options. This will allow you to create a new inline policy specifically for the user.

cloud security policy configuration

In the Services section, click the drop-down button and select EC2 from the list. This specifies that the policy will apply to actions related to EC2.

cloud security policy configuration

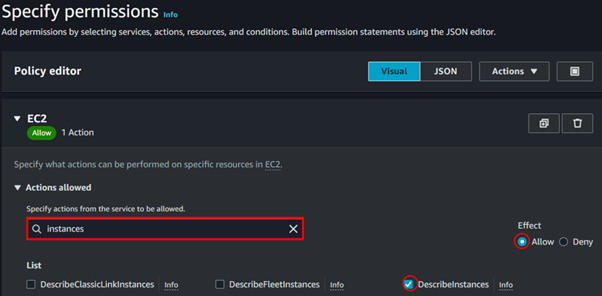
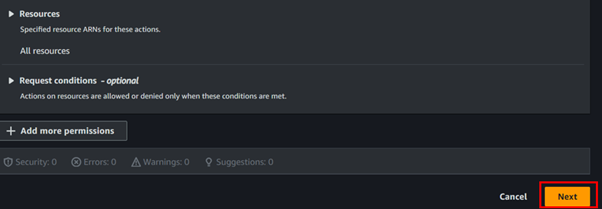
Under Actions allowed, type instances in the search bar, then select Describe Instances from the list of available actions. After making your selection, make sure under effect, allow is checked then scroll down and click Next to proceed.

cloud security policy configuration

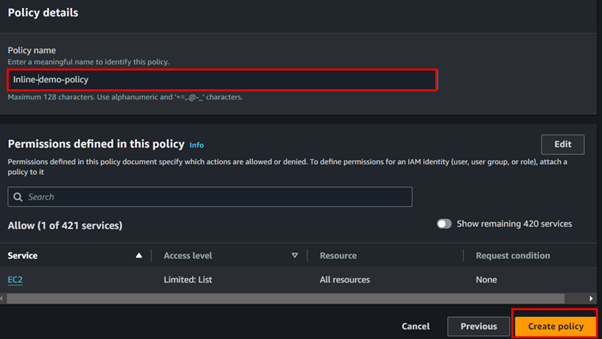
In the Policy Details section, enter your preferred name for the policy. Make sure the name is descriptive enough to reflect the policy’s purpose. After entering the name, click Create Policy to complete the creation process.

cloud security policy configuration

The policy has been successfully created. Under the Policy Name section, you can see the names of the policies, and under the Type column, you can distinguish between AWS Managed and Customer Inline policies. Additionally, in the Attached Viasection, you’ll see whether the policies are Attached Directly or in line, indicating how they are associated with the user.

cloud security policy configuration

Log in as the newly created user, and attempt to describe EC2 instances. At this point, you should notice that the user can successfully describe the instances. This access was granted by attaching an inline policy to the user, specifically allowing them to perform this action.

This process demonstrates the flexibility of AWS in managing user permissions, helping you maintain security and efficiency in your cloud environment. Additionally, inline policies provide a way to grant access to individual users based on their needs.

Thanks for reading and stay tuned for more. Make sure you clean up.

If you have any questions concerning this article or have an AWS project that requires our assistance, please reach out to us by leaving a comment below or email us at sales@accendnetworks.com.


Thank you!
Categories
Blogs

Optimizing Cloud Expenses

Optimizing Cloud Expenses: Best Practices to Reduce Costs

cloud cost optimization chart

In today’s cloud-driven landscape, understanding AWS cost monitoring is crucial for businesses looking to optimize their cloud investments. AWS cost reports and AWS usage reports play a vital role in providing detailed insights into your cloud spending. Regular AWS audits ensure transparency, allowing companies to uncover inefficiencies and implement effective AWS cost-monitoring strategies. By using AWS cost and usage reports for budgeting, businesses can better forecast expenses and control their AWS billing and optimizing cloud expenses.

Leveraging AWS Usage Reports

While AWS cost reports give you an overview of spending, AWS usage reports focus on the quantity and type of resources being used. These reports are essential for understanding how your resources are being consumed and whether you are using them efficiently.

With AWS usage reports, you can:

  • Track which services and resources are being used the most.
  • Identify underutilized resources that could be downsized or eliminated to save costs.
  • Understand the impact of scaling operations up or down on your overall budget.

Using these reports for budgeting can help businesses predict future spending and optimize current usage. This makes using AWS cost and usage reports for budgeting a powerful tool for managing your cloud cost management.

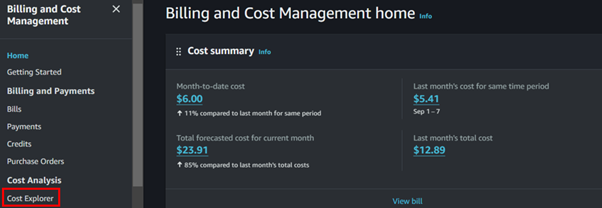
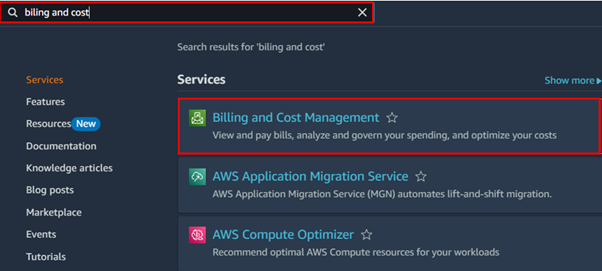
To view your AWS cost and usage reports, log in to the AWS Management Console and ensure you have the necessary permissions to access billing and cost management features.

reducing cloud expenses with best practices

On the left side of the AWS billing and cost management UI, select AWS Cost Explorer.

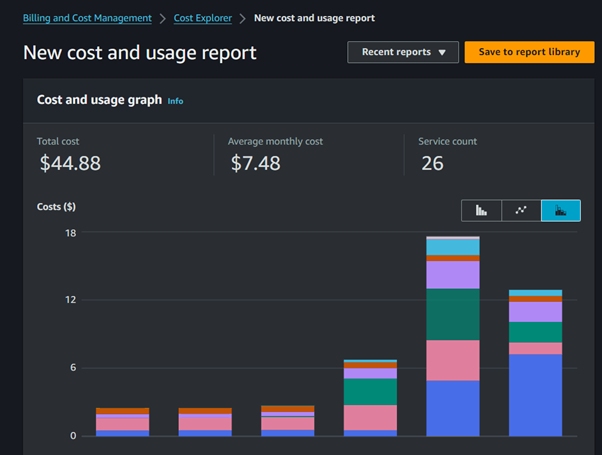
In the AWS cost and explorer dashboard, you will find your AWS cost and usage report.

cloud cost optimization chart

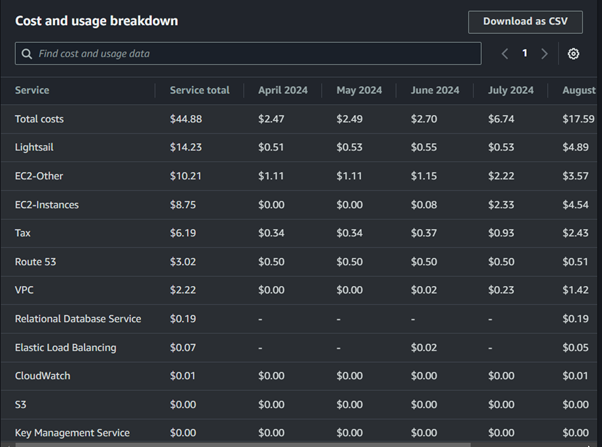
When you scroll down, you can be able to see your AWS cost usage breakdown. Where you can download the CSV report and get to know more details about your AWS spending.

reducing cloud expenses with best practices

Below is a look at a CSV report from my downloads.

reducing cloud expenses with best practices

The Role of AWS Audits

To ensure accurate AWS billing and spending management, it is critical to conduct regular AWS audits. These audits help identify any inconsistencies or potential areas for cost savings. By auditing your AWS cost and usage reports, you can ensure that your actual resource usage aligns with your budget and business objectives.

Conducting regular AWS audits includes:

  • Verifying that all resources are being used as intended.
  • Ensuring that no unnecessary resources are being provisioned.
  • Identifying potential areas for cost optimization.

Knowing how to audit AWS cost and usage reports is a crucial part of maintaining cloud cost control and optimizing cloud expenses. Regular audits also ensure compliance with internal financial policies and provide a level of accountability in cloud resource management.

Best Practices for AWS Cost Audits

Set a regular audit schedule: Conduct audits on a weekly or monthly basis to catch any overspending or inefficiencies early.

Use automation tools: AWS provides automated tools like AWS Cost Explorer and AWS Budgets, which make it easier to track and audit spending.

Compare costs with usage: Ensure that your spending is aligned with actual usage. If you are paying for resources that are not being utilized fully, it may be time to scale down.

Engage stakeholders: Keep relevant team members involved in the audit process to ensure that business needs align with cloud resources and  expense optimization.

How to Use AWS Cost and Usage Reports for Budgeting

One of the most powerful aspects of AWS cost and usage reports is their ability to inform future budgeting decisions. By analyzing historical usage patterns, businesses can make more accurate predictions about future costs, improving overall financial planning.

When using AWS cost and usage reports for budgeting, you can:

  • Set cost thresholds to reduce cloud costs.
  • Create a detailed forecast of your cloud spending for the next quarter or year.
  • Adjust resource allocation dynamically based on actual usage trends.

Conclusion

Mastering AWS cost monitoring is essential for businesses looking to optimize their cloud spending and ensure efficient resource utilization. By leveraging AWS cost and usage reports, and conducting regular AWS audits, organizations can implement effective AWS cost monitoring strategies that reduce unnecessary costs and enhance budgeting accuracy. Integrating these tools into your AWS cost management plan not only provides transparency but also ensures that your cloud operations remain financially sustainable.

Thanks for reading and stay tuned for more.

If you have any questions concerning this article or have an AWS project that requires our assistance, please reach out to us by leaving a comment below or email us at sales@accendnetworks.com.


Thank you!
Categories
Blogs

Leveraging AWS Lambda for Efficient Stale

Automating Your Infrastructure: Leveraging AWS Lambda for Efficient Stale EBS Snapshot Cleanup

EBS snapshots are backups of your EBS volumes and can also be used to create new EBS volumes or Amazon Machine Images (AMIs). However, they can become orphaned when instances are terminated or volumes are deleted. These unused snapshots take up space and incur unnecessary costs.

Before proceeding, ensure that you have an EC2 instance up and running as a prerequisite.

AWS Lambda creation

We will configure a Lambda function that automatically deletes stale EBS snapshots when triggered.

To get started, log in to the AWS Management Console and navigate to the AWS Lambda dashboard. Simply type “Lambda” in the search bar and select Lambda under the services section. Let’s proceed to create our Lambda function.

In the Lambda dashboard, click on Create Function.

For creation method, select the radio button for Author from scratch, which will create a new Lambda function from scratch.

Next, configure the basic information by giving your Lambda function a meaningful name.

Then, select the runtime environment. Since we are using Python, choose Python 3.12.

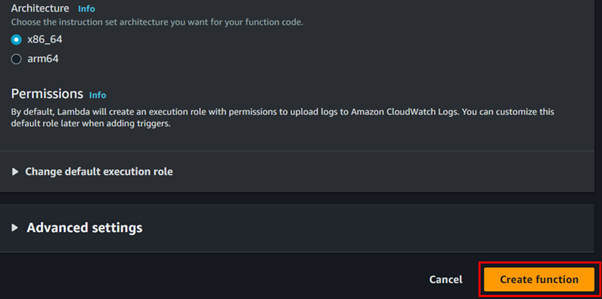
These are the only settings required to create your Lambda function. Click on Create Lambda Function.

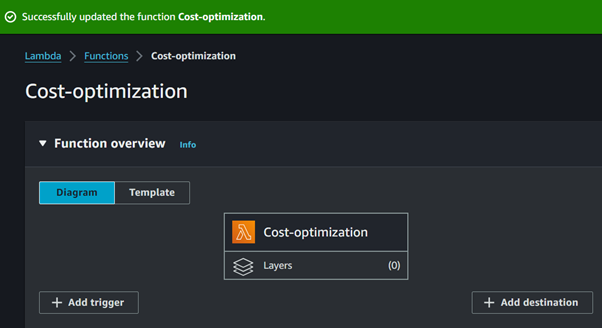
Our function has been successfully created.

By default, the Lambda timeout is set to 3 seconds, which is the maximum amount of time the function can run before being terminated. We will adjust this timeout to 10 seconds.

To make this adjustment, navigate to the Configuration tab, then click on General Configuration. From there, locate and click the Edit button.

In the edit basic settings dashboard, name your basic settings then scroll down.

Under the Timeout section, adjust the value to 10 seconds, then click Save.

Writing the Lambda Function

import boto3

def lambda_handler(event, context):
    ec2 = boto3.client(‘ec2’)

    # Get all EBS snapshots
    response = ec2.describe_snapshots(OwnerIds=[‘self’])

    # Get all active EC2 instance IDs
    instances_response = ec2.describe_instances(Filters=[{‘Name’: ‘instance-state-name’, ‘Values’: [‘running’]}])
    active_instance_ids = set()

    for reservation in instances_response[‘Reservations’]:
        for instance in reservation[‘Instances’]:
            active_instance_ids.add(instance[‘InstanceId’])

    # Iterate through each snapshot and delete if it’s not attached to any volume or the volume is not attached to a running instance
    for snapshot in response[‘Snapshots’]:
        snapshot_id = snapshot[‘SnapshotId’]
        volume_id = snapshot.get(‘VolumeId’)

        if not volume_id:
            # Delete the snapshot if it’s not attached to any volume
            ec2.delete_snapshot(SnapshotId=snapshot_id)
            print(f”Deleted EBS snapshot {snapshot_id} as it was not attached to any volume.”)
        else:
            # Check if the volume still exists
            try:
                volume_response = ec2.describe_volumes(VolumeIds=[volume_id])
                if not volume_response[‘Volumes’][0][‘Attachments’]:
                    ec2.delete_snapshot(SnapshotId=snapshot_id)
                    print(f”Deleted EBS snapshot {snapshot_id} as it was taken from a volume not attached to any running instance.”)
            except ec2.exceptions.ClientError as e:
                if e.response[‘Error’][‘Code’] == ‘InvalidVolume.NotFound’:
                    # The volume associated with the snapshot is not found (it might have been deleted)
                    ec2.delete_snapshot(SnapshotId=snapshot_id)
                    print(f”Deleted EBS snapshot {snapshot_id} as its associated volume was not found.”)

Our Lambda function, powered by Boto3, automates the identification and deletion of stale EBS snapshots.

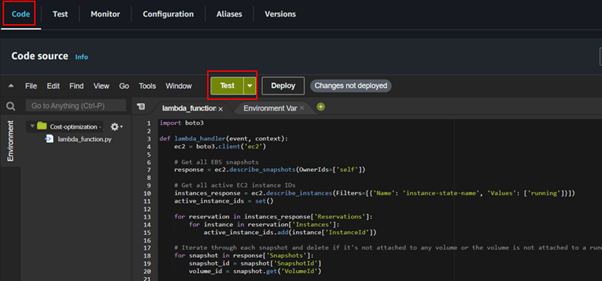
Navigate to the code section then paste in the code.

After pasting the code click on test.

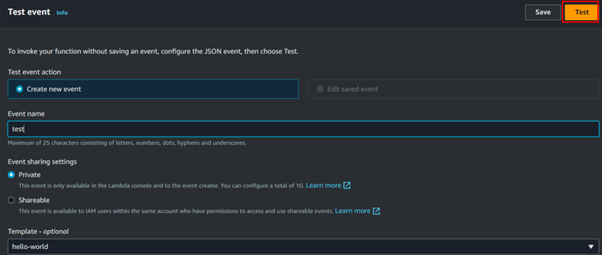
In the test dashboard, fill in the event name, you can save it or just click on test.

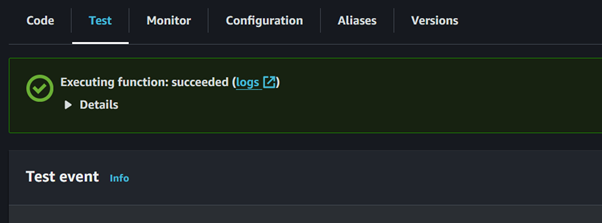
Our test execution is successful.

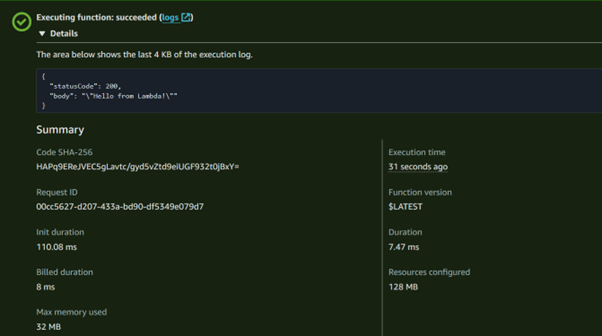
If you expand the view to check the execution details, you should see a status code of 200, indicating that the function executed successfully.

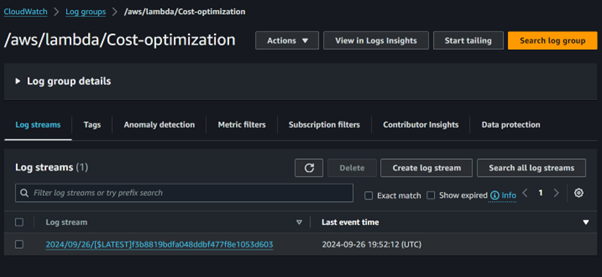
You can also view the log streams to debug any errors that may arise, allowing you to troubleshoot.

IAM Role

In our project, the Lambda function is central to optimizing AWS costs by identifying and deleting stale EBS snapshots. To accomplish this, it requires specific permissions, including the ability to describe and delete snapshots, as well as to describe volumes and instances.

To ensure our Lambda function has the necessary permissions to interact with EBS and EC2, proceed as follows.

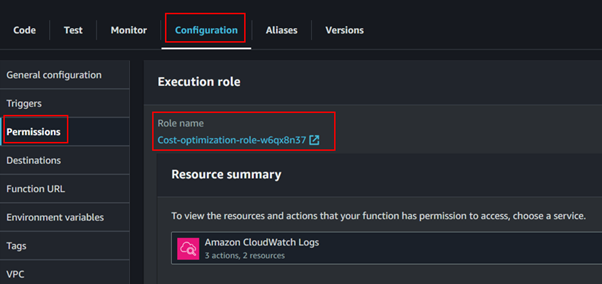
In the Lambda function details page, click on the Configuration tab, scroll down to the Permissions section, and expand it then click on the execution role link to open the IAM role configuration in a new tab.

In the new tab that opens, you’ll be directed to the IAM Console with the details of the IAM role associated with your Lambda function.

Scroll down to the Permissions section of the IAM role details page, and then click on the Add inline policy button to create a new inline policy.

Choose EC2 as the service to filter permissions. Then, search for Snapshot and add the following options: DescribeSnapshots and DeleteSnapshots.

Also, add these permissions as well Describe Instances and Describe Volume.

Under the Resources section, select “All” to apply the permissions broadly. Then, click the “Next” button to proceed.

Give the name of the policy then click the Create Policy button.

Our policy has been successfully created.

After updating our lambda function permissions, click deploy. After deployment, our lambda function will be ready for invocation, we can either invoke the lambda function directly through the AWS CLI by an API call or indirectly through other AWS services.

After deployment let’s now head to the EC2 console and create a snapshot. Navigate to the EC2 console and locate snapshot in the left UI of EC2 dashboard then click create snapshot.

For resource type, select volume. Choose the EBS volume for which you want to create a snapshot from the dropdown menu.

Optionally, add a description for the snapshot to provide more context.

Double-check the details you’ve entered to ensure accuracy.

Once you’re satisfied, click on the Create Snapshot button to initiate the snapshot creation process.

Taking a look at the EC2 dashboard, we can see we have one volume and one snapshot.

Go a head and delete your snapshot then take a look at the EBS volumes and snapshots, we can see we have one snapshot, we will trigger our lambda function to delete this snapshot.

We can use the Eventbridge scheduler to trigger our lambda function, which automates this process, but for this demo, I will run a CLI command to invoke our lambda function directly. Now going back to the EC2 dashboard and checking our snapshot we can see we have zero snapshots.

This brings us to the end of this blog clean-up.

Thanks for reading and stay tuned for more.

If you have any questions concerning this article or have an AWS project that requires our assistance, please reach out to us by leaving a comment below or email us at sales@accendnetworks.com.


Thank you!