Accend Networks San Francisco Bay Area Full Service IT Consulting Company

Categories
Blogs

Leveraging AWS Lambda for Efficient Stale

Automating Your Infrastructure: Leveraging AWS Lambda for Efficient Stale EBS Snapshot Cleanup

EBS snapshots are backups of your EBS volumes and can also be used to create new EBS volumes or Amazon Machine Images (AMIs). However, they can become orphaned when instances are terminated or volumes are deleted. These unused snapshots take up space and incur unnecessary costs.

Before proceeding, ensure that you have an EC2 instance up and running as a prerequisite.

AWS Lambda creation

We will configure a Lambda function that automatically deletes stale EBS snapshots when triggered.

To get started, log in to the AWS Management Console and navigate to the AWS Lambda dashboard. Simply type “Lambda” in the search bar and select Lambda under the services section. Let’s proceed to create our Lambda function.

In the Lambda dashboard, click on Create Function.

For creation method, select the radio button for Author from scratch, which will create a new Lambda function from scratch.

Next, configure the basic information by giving your Lambda function a meaningful name.

Then, select the runtime environment. Since we are using Python, choose Python 3.12.

These are the only settings required to create your Lambda function. Click on Create Lambda Function.

Our function has been successfully created.

By default, the Lambda timeout is set to 3 seconds, which is the maximum amount of time the function can run before being terminated. We will adjust this timeout to 10 seconds.

To make this adjustment, navigate to the Configuration tab, then click on General Configuration. From there, locate and click the Edit button.

In the edit basic settings dashboard, name your basic settings then scroll down.

Under the Timeout section, adjust the value to 10 seconds, then click Save.

Writing the Lambda Function

import boto3

def lambda_handler(event, context):
    ec2 = boto3.client(‘ec2’)

    # Get all EBS snapshots
    response = ec2.describe_snapshots(OwnerIds=[‘self’])

    # Get all active EC2 instance IDs
    instances_response = ec2.describe_instances(Filters=[{‘Name’: ‘instance-state-name’, ‘Values’: [‘running’]}])
    active_instance_ids = set()

    for reservation in instances_response[‘Reservations’]:
        for instance in reservation[‘Instances’]:
            active_instance_ids.add(instance[‘InstanceId’])

    # Iterate through each snapshot and delete if it’s not attached to any volume or the volume is not attached to a running instance
    for snapshot in response[‘Snapshots’]:
        snapshot_id = snapshot[‘SnapshotId’]
        volume_id = snapshot.get(‘VolumeId’)

        if not volume_id:
            # Delete the snapshot if it’s not attached to any volume
            ec2.delete_snapshot(SnapshotId=snapshot_id)
            print(f”Deleted EBS snapshot {snapshot_id} as it was not attached to any volume.”)
        else:
            # Check if the volume still exists
            try:
                volume_response = ec2.describe_volumes(VolumeIds=[volume_id])
                if not volume_response[‘Volumes’][0][‘Attachments’]:
                    ec2.delete_snapshot(SnapshotId=snapshot_id)
                    print(f”Deleted EBS snapshot {snapshot_id} as it was taken from a volume not attached to any running instance.”)
            except ec2.exceptions.ClientError as e:
                if e.response[‘Error’][‘Code’] == ‘InvalidVolume.NotFound’:
                    # The volume associated with the snapshot is not found (it might have been deleted)
                    ec2.delete_snapshot(SnapshotId=snapshot_id)
                    print(f”Deleted EBS snapshot {snapshot_id} as its associated volume was not found.”)

Our Lambda function, powered by Boto3, automates the identification and deletion of stale EBS snapshots.

Navigate to the code section then paste in the code.

After pasting the code click on test.

In the test dashboard, fill in the event name, you can save it or just click on test.

Our test execution is successful.

If you expand the view to check the execution details, you should see a status code of 200, indicating that the function executed successfully.

You can also view the log streams to debug any errors that may arise, allowing you to troubleshoot.

IAM Role

In our project, the Lambda function is central to optimizing AWS costs by identifying and deleting stale EBS snapshots. To accomplish this, it requires specific permissions, including the ability to describe and delete snapshots, as well as to describe volumes and instances.

To ensure our Lambda function has the necessary permissions to interact with EBS and EC2, proceed as follows.

In the Lambda function details page, click on the Configuration tab, scroll down to the Permissions section, and expand it then click on the execution role link to open the IAM role configuration in a new tab.

In the new tab that opens, you’ll be directed to the IAM Console with the details of the IAM role associated with your Lambda function.

Scroll down to the Permissions section of the IAM role details page, and then click on the Add inline policy button to create a new inline policy.

Choose EC2 as the service to filter permissions. Then, search for Snapshot and add the following options: DescribeSnapshots and DeleteSnapshots.

Also, add these permissions as well Describe Instances and Describe Volume.

Under the Resources section, select “All” to apply the permissions broadly. Then, click the “Next” button to proceed.

Give the name of the policy then click the Create Policy button.

Our policy has been successfully created.

After updating our lambda function permissions, click deploy. After deployment, our lambda function will be ready for invocation, we can either invoke the lambda function directly through the AWS CLI by an API call or indirectly through other AWS services.

After deployment let’s now head to the EC2 console and create a snapshot. Navigate to the EC2 console and locate snapshot in the left UI of EC2 dashboard then click create snapshot.

For resource type, select volume. Choose the EBS volume for which you want to create a snapshot from the dropdown menu.

Optionally, add a description for the snapshot to provide more context.

Double-check the details you’ve entered to ensure accuracy.

Once you’re satisfied, click on the Create Snapshot button to initiate the snapshot creation process.

Taking a look at the EC2 dashboard, we can see we have one volume and one snapshot.

Go a head and delete your snapshot then take a look at the EBS volumes and snapshots, we can see we have one snapshot, we will trigger our lambda function to delete this snapshot.

We can use the Eventbridge scheduler to trigger our lambda function, which automates this process, but for this demo, I will run a CLI command to invoke our lambda function directly. Now going back to the EC2 dashboard and checking our snapshot we can see we have zero snapshots.

This brings us to the end of this blog clean-up.

Thanks for reading and stay tuned for more.

If you have any questions concerning this article or have an AWS project that requires our assistance, please reach out to us by leaving a comment below or email us at sales@accendnetworks.com.


Thank you!

Categories
Blogs

Minimizing Cross-Region Data Transfer Expenses in AWS

Minimizing Cross-Region Data Transfer Expenses in AWS: Cost-Saving Strategies

AWS cross-region data transfer costs

Introduction

As companies increasingly adopt cloud services, one major cost that can be overwhelming is cross-region data transfer costs. When transferring data across AWS regions, such as from us-east-1 to us-west-2, fees can build up quickly. It is important to learn the mechanics of AWS data transfer costs and implementing strategies for data transfer optimization is essential to managing your cloud budget effectively and minimizng cross-region data transfer expenses in AWS.

In this blog, we will explore the cost-effective methods for AWS cross-region data movement, along with best practices to reduce AWS cross-region data transfer costs.

A quick review of Accessing services within the same AWS Region

If an internet gateway is used to access the public endpoint of the AWS services in the same Region there are no data transfer charges. If a NAT gateway is used to access the same services, there is a data processing charge (per gigabyte (GB)) for data that passes through the gateway.

AWS cross-region data transfer costs

Accessing Services Across AWS Regions

If your workload accesses services in different Regions, there is a charge for data transfer across regions. The charge depends on the source and destination Region.

AWS data transfer optimization strategies

What Is Cross-Region Data Transfer Costs?

Cross-region data transfer is transferring data to or from any AWS region. When you transfer data from one region to another, AWS charges you based on the amount of data being transferred. These costs are usually calculated per GB and vary depending on how far apart the regions are.

For example:

  • Transferring data between us-east-1 and eu-west-1 incurs data transfer egress fees from the us-east-1 region.
  • The farther apart the regions are, the more expensive the data transfer might be.

Key Factors Affecting Cross-Region AWS Data Transfer Costs

Geographical Distance: Cross-region data transfer between regions that are far apart (like us-east-1 and ap-southeast-1) can be significantly more expensive than transfers between closer regions (like us-east-1 and us-west-2).

Data Volume: The more data you transfer, the more it costs. AWS prices are based on the amount of data in GB, so as the data increases, so do the costs.

Transfer Direction: AWS charges for data leaving a region (egress) but not for inbound data transfer into the destination region.

Best Practices to Reduce AWS Cross-Region Data Transfer Costs

Use AWS Direct Connect: AWS Direct Connect offers a private network link between your local data center and AWS, which results in faster data transfer speeds than those over the public internet. This can be particularly helpful for large-scale cross-region data transfers.

AWS data transfer optimization strategies

A Direct Connect gateway can be used to share a Direct Connect across multiple Regions.

AWS data transfer optimization strategies

Leverage Content Delivery Networks (CDNs): Services like Amazon CloudFront can cache data in multiple AWS edge locations, reducing the need for repeated cross-region transfers by serving cached content to users closest to their geographical location.

AWS Global Accelerator: If you need low-latency, high-availability solutions across regions, consider AWS Global Accelerator. It optimizes network routes and reduces the amount of cross-region traffic by routing user requests to the optimal endpoint.

Replication Strategies: Optimize your cross-region replication by choosing the appropriate AWS service:

  • Amazon S3 Cross-Region Replication (CRR) allows you to replicate objects between buckets in different regions, ensuring you only transfer what’s needed.
  • Amazon DynamoDB Global Tables replicate your data automatically across regions, eliminating the need for manual cross-region synchronization.

Consolidate Regions: Reducing the number of regions used in your application architecture can significantly reduce AWS data transfer costs. Focus on running your application in fewer regions while still maintaining performance and high availability.

Monitor Data Transfer: Use tools like AWS Cost Explorer and Amazon CloudWatch to analyze and track data transfer patterns between regions. These tools help identify and optimize unnecessary cross-region data transfers.

Conclusion

Effectively managing cross-region data transfer costs in AWS is very important for businesses that use cloud services across the world. By using these best practices to reduce AWS cross-region data transfer costs and leveraging AWS’s built-in tools and services, you can save money without affecting performance and availability. Start optimizing your AWS data transfer costs by strategically choosing data replication methods, consolidating workloads, and utilizing services like AWS Direct Connect and Amazon CloudFront.

Thanks for reading and stay tuned for more.

If you have any questions concerning this article or have an AWS project that requires our assistance, please reach out to us by leaving a comment below or email us at sales@accendnetworks.com.


Thank you!

Categories
Blogs

Effortless Task Scheduling with Amazon Event Bridge Scheduler

Effortless Task Scheduling with Amazon Event Bridge Scheduler: Features and Use Cases

In today’s cloud-centric world, automating tasks is key to optimizing operations and reducing costs. Amazon EventBridge Scheduler is a powerful service that helps you schedule tasks across AWS services. In this blog, we will explore the features, capabilities and advantages of Amazon EventBridge Scheduler. Stay tuned.

What is Amazon EventBridge Scheduler?

Amazon EventBridge Scheduler is a serverless scheduling service that lets you create, manage, and invoke tasks based on a defined schedule. It’s built on the EventBridge framework, which helps you develop event-driven architectures. With EventBridge Scheduler, you can automate routine tasks and workflows by defining schedules that trigger specific actions in your AWS environment. It is designed to handle both one-time and recurring tasks on a massive scale.

Amazon EventBridge Scheduler allows you to create one-time or recurring schedules that can trigger over 200 AWS services, utilizing over 6,000 APIs.

What Problem Does EventBridge Scheduler Solve?

EventBridge Scheduler offers a more streamlined, flexible, and cost-efficient way of managing scheduled tasks rather than third-party tools.

Real-world use Case scenarios for EventBridge Scheduler

  1. Task Reminders for Users
    Imagine a task management system where users want reminders for upcoming tasks. With EventBridge Scheduler, you can automate reminders at intervals like one week, two days, and on the due date. This could trigger emails via Amazon SNS, saving you from manually managing each reminder
  2. Managing Thousands of EC2 Instances
    A large organization, such as a supermarket chain with global operations, may have tens of thousands of EC2 instances spread across different time zones. EventBridge Scheduler can ensure instances are started before business hours and stopped afterward, optimizing costs while respecting time zone differences.
  1. SaaS Subscription Management
    SaaS providers can also leverage EventBridge Scheduler to manage subscription-based services. For example, you could schedule tasks to revoke access when a customer’s subscription ends or trigger reminder emails before their license expires.

In all these scenarios, EventBridge Scheduler not only simplifies task scheduling but also minimizes application complexity and reduces operational costs.

With a minimum granularity of one minute, you can efficiently schedule tasks at scale without managing infrastructure.

Key Features of EventBridge Scheduler:

Precise Scheduling: You can schedule tasks with a minimum granularity of one minute, offering flexibility for frequent or specific time-based tasks.

At-Least-Once Event Delivery: EventBridge Scheduler ensures reliable task execution by delivering events at least once to the target service.

Customizable Configuration: You can set specific delivery parameters, such as the delivery window, retries, event retention, and Dead Letter Queue (DLQ):

  • Time Window: Events can be spread over a window to minimize load on downstream services.
  • Event Retention: Set how long an unprocessed event is kept. If the target service doesn’t respond, the event may be dropped or sent to a DLQ.
  • Retries with Exponential Backoff: Retry failed tasks with increasing time delays to improve success chances.
  • Dead Letter Queue (DLQ): Failed events are sent to an Amazon SQS queue for further analysis.

Default Settings: By default, EventBridge Scheduler tries to send the event for up to 24 hours, retrying up to 185 times. If no DLQ is configured, failed events are dropped after this period.

Encryption: All events are encrypted with AWS-managed keys by default, though you can also use your own AWS KMS encryption keys for added security.

EventBridge Rules vs. Scheduler: While you can also schedule tasks using EventBridge rules, EventBridge Scheduler is more optimized for handling functions at scale, providing more advanced scheduling and delivery options.

Event-Driven Architecture: As part of the EventBridge ecosystem, the scheduler can trigger events that other AWS services can respond to, facilitating the development of event-driven applications.

Conclusion

In summary, Amazon EventBridge Scheduler is an essential tool for organizations looking to automate tasks efficiently and at scale. By offering advanced features like retries with exponential backoff, event retention, and dead letter queues, along with built-in encryption, it simplifies the management of scheduled tasks while reducing application complexity and costs.

Thanks for reading and stay tuned for more.

If you have any questions concerning this article or have an AWS project that requires our assistance, please reach out to us by leaving a comment below or email us at sales@accendnetworks.com.


Thank you!

Categories
Blogs

AWS Placement

AWS Placement Group Hands-On Demo

AWS Placement Groups are a useful tool for improving EC2 instance performance, especially when you need fast communication (low latency) or the ability to handle a lot of data (high throughput). They help you arrange your instances in a way that makes them work better and more reliably. In this demo, we’ll show you how to create and use a Placement Group step-by-step.

What is a Placement Group?

Optimizes low latency and high throughput for EC2 instances by grouping them in the same Availability Zone.

Types of Placement Groups

Cluster Placement Group: Packs instances close together inside an Availability Zone. This strategy enables workloads to achieve the low-latency network performance necessary for tightly coupled node-to-node communication that is typical of HPC applications.

Partition Placement Group: Spread your instances across logical partitions such that groups of the cases in one partition do not share the underlying hardware with groups of instances in different partitions. This strategy is typically used by large distributed and replicated workloads, such as Hadoop, Cassandra, and Kafka.

Spread Placement Group: Strictly places a small group of instances across distinct underlying hardware to reduce correlated failures.

A spread placement group is a group of instances that are each placed on distinct racks, with each rack having its own network and power source.

Why use Placement Group?

Placement groups help us to launch a bunch of EC2 instances close to each other.

This can work well for applications exchanging a lot of data and can provide high performance with collocation.

All nodes within the placement group can talk to all other nodes within the placement group at the full line rate of 10 Gbps single traffic flow without any slowing due to over-subscription.

Let’s dive into the hands-on lab.

Step 1: Sign in to AWS Management Console

Login to your AWS account from the AWS console, in the search bar, type EC2 then select EC2 Under services.

Step 2: Create EC2 Placement Groups as desired.

Navigate to the left side of EC2 then select placement group.

Click Create Placement Group

On the Create Placement Group dashboard, enter the name and select a placement strategy to determine how the instances are to be placed on the underlying hardware.

  1. a) For the Cluster placement group, in the placement strategy dropdown, select the cluster option.

b) For Spread Placement Group, in the placement strategy dropdown, select the option as spread and select Spread Level as either Host or Rack.

c) For Partition Placement Group, in the placement strategy dropdown, select the option as Partition and in the Number of Partitions dropdown select several partitions that you want to create in this placement group.

I settled on a Cluster placement Group, and my placement Group has been successfully created.

Step 3: Create EC2 instance and assign placement group to it.

We will now go ahead and launch an EC2 Instance and add the Instance to our placement Group.

Select instances in the EC2 dashboard then click Launch Instance, In the launch Instance dashboard, provide your Instance details.

Select your preferred OS and Machine Image.

Move with the free tier eligible Instance, then select your key pairs.

Leave networking as default, and select your security groups.

Leave storage as default, scroll down.

In the advanced section, expand and then scroll all the way down,

In the advanced section, expand and then scroll down, 

In the placement group section, select the placement group you have just created.

Since t2. Micro is not supported for the Cluster placement group; I will not click Launch.

That’s it, from this demo, I hope you now Know how to create a placement group.

Make sure to delete the placement group, as it is always a good practice to clean up resources.

Since t2. Micro is not supported for the Cluster placement group; I will not click Launch.

That’s it, from this demo, I hope you now Know how to create a placement group.

Make sure to delete the placement group, as it is always a good practice to clean up resources.

If you have any questions concerning this article or have an AWS project that requires our assistance, please reach out to us by leaving a comment below or email us at sales@accendnetworks.com.


Thank you!

Categories
Blogs

Setting Up a VPC Endpoint

Hands-on Demo: Setting Up a VPC Endpoint to Securely Access Amazon S3 bucket

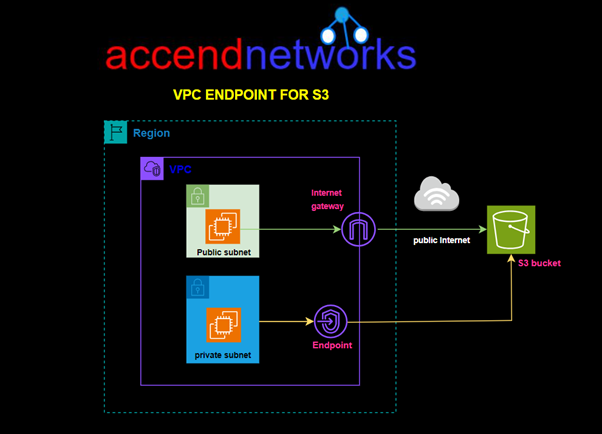
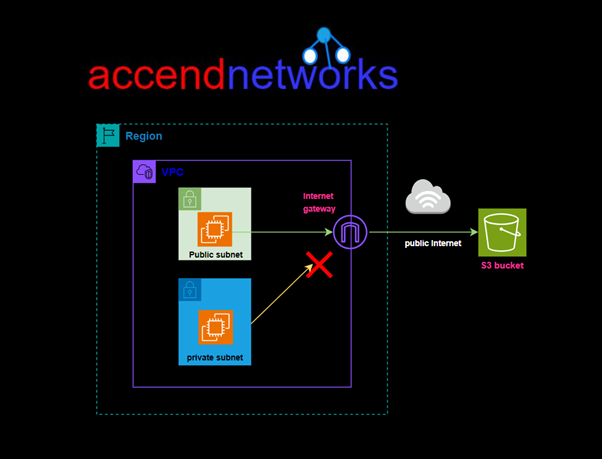
Amazon Virtual Private Cloud (VPC) endpoints let you securely connect your VPC to AWS services, like S3, without using the public internet. This means you don’t need an internet gateway, NAT device, VPN, or Direct Connect to access these services. In this blog, I will walk you through how to set up a VPC endpoint to connect to Amazon S3 securely from within your VPC.

Why VPC Endpoint for S3

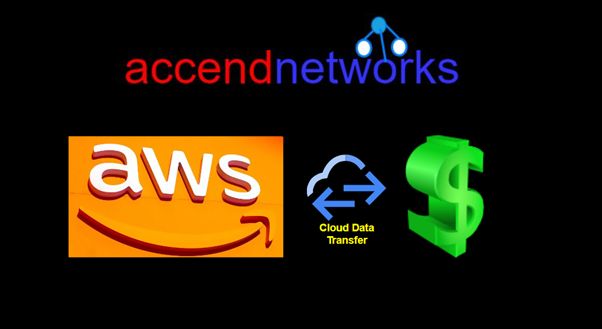
VPC Endpoint for S3 provides us a secure link to access resources stored on S3 without routing through the internet. AWS doesn’t charge anything for using this service.

In this hands-on lab, we will create a custom VPC with a public and private subnet, we will then Launch a private EC2 Instance in the private subnet and a public EC2 Instance in the public subnet. We will then create an S3 Gateway endpoint and test connection from the public and private EC2 Instances.

Step 1: Create VPC with public and private subnet

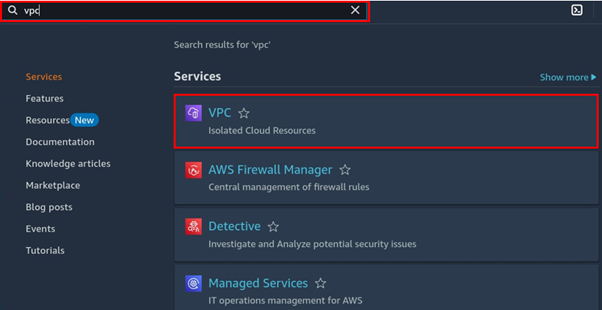
Log into the AWS Console and navigate to the VPC dashboard.

Click Create VPC

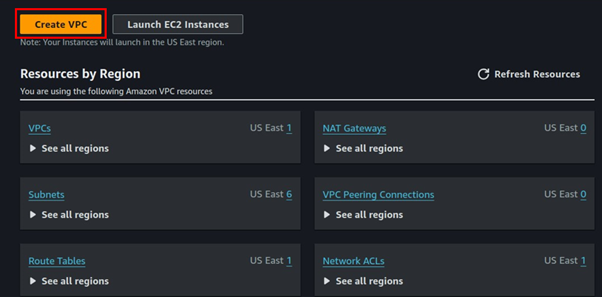
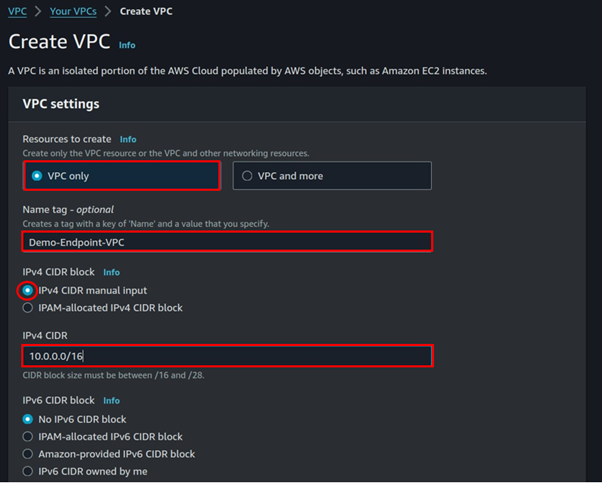
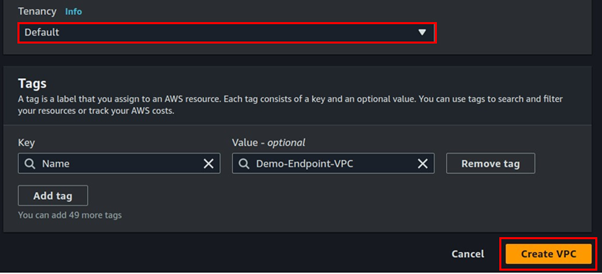
Fill in VPC details, select VPC only, then enter VPC CIDR under IPv4 CIDR, leave it at default tenancy then click Create VPC.

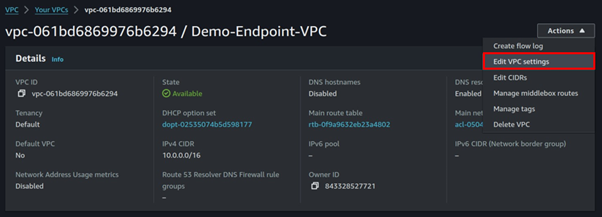
Select the created VPC, and click the actions drop-down button to go to VPC settings.

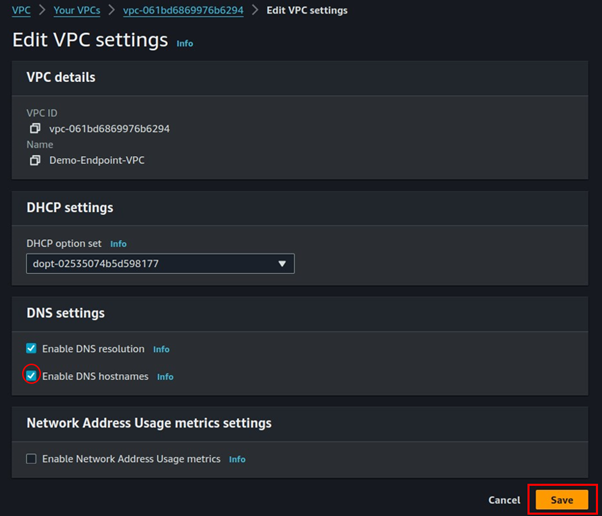
Under DNS settings, check the box on Enable DNS hostnames then click save.

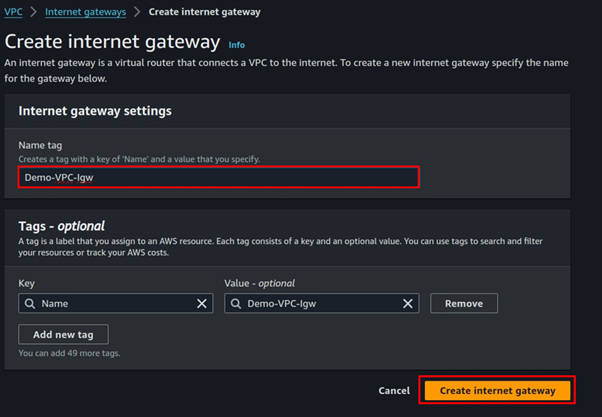
Step 2: Create Internet Gateway and attach it to VPC

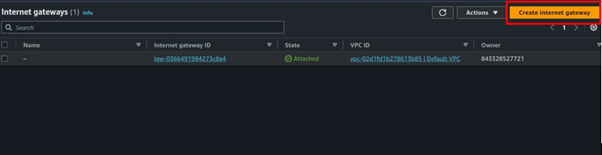
Select Internet Gateway on the left side of VPC UI, then click Create Internet Gateway.

Fill in the details then click Create Internet Gateway.

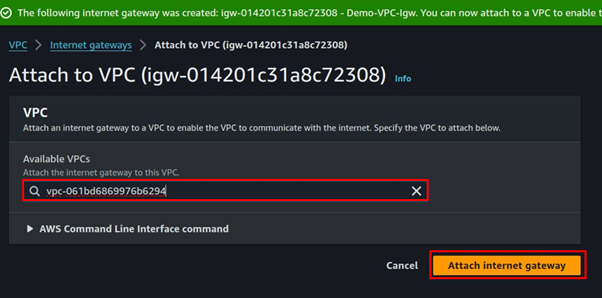
Click the attach button, select the VPC to attach the internet gateway then select attach internet gateway.

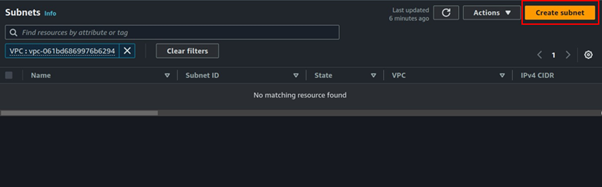
Step 3 create subnets

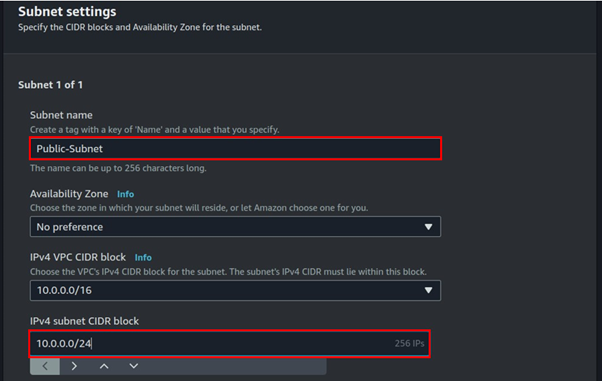
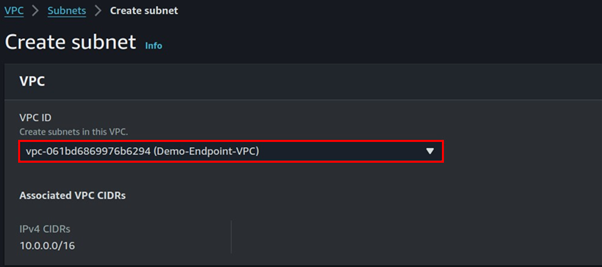
Select subnets in the Left side UI of the VPC dashboard then click Create Subnet.

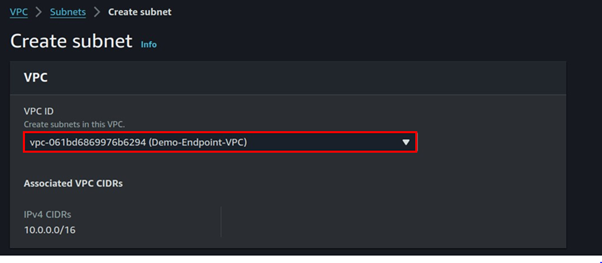
Select the VPC you just created then scroll down.

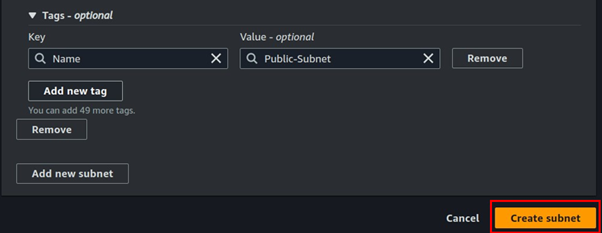
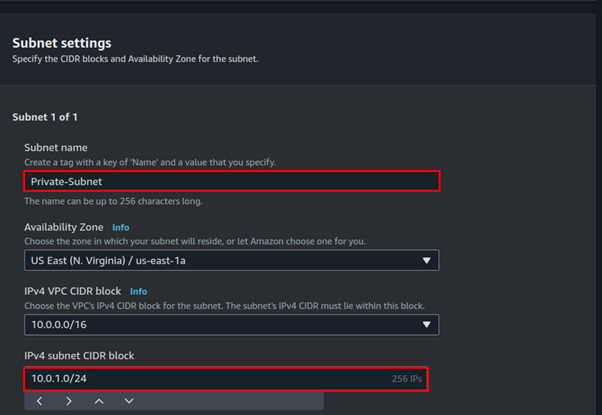
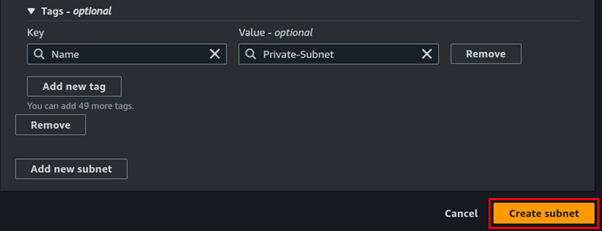
Fill in subnet details, enter your preferred name then for subnet CIDR, enter 10.0.0.0/24, scroll down, and click Create subnet.

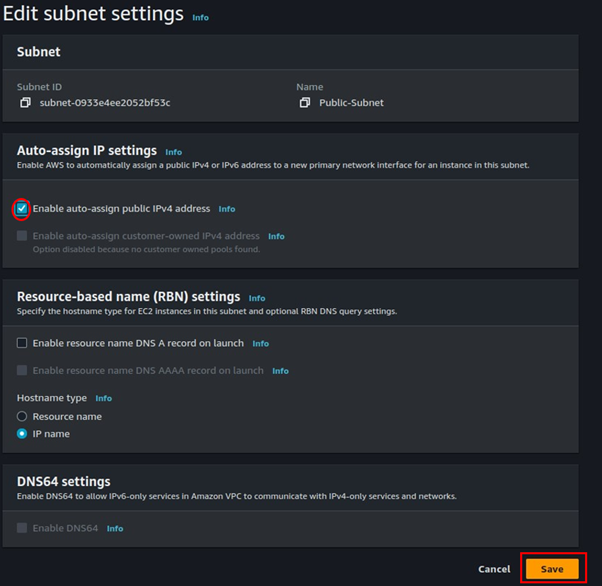
For the public subnet click the Action drop-down button, then navigate to subnet settings then select it. Tick the box enable-auto-assign public IP. Then click save.

Again, click Create subnet, and repeat the above process, but now for IPv4 CIDR enter 10.0.1.0/24, scroll down, and click Create subnet.

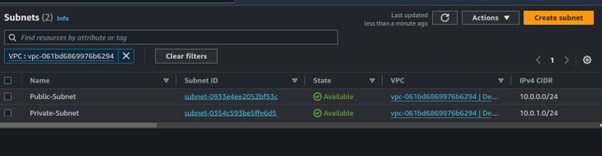
Two subnets were created as you can view them.

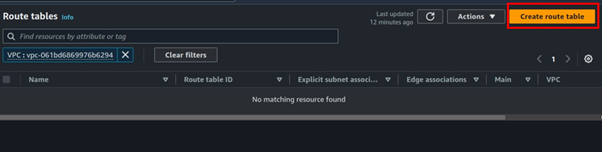
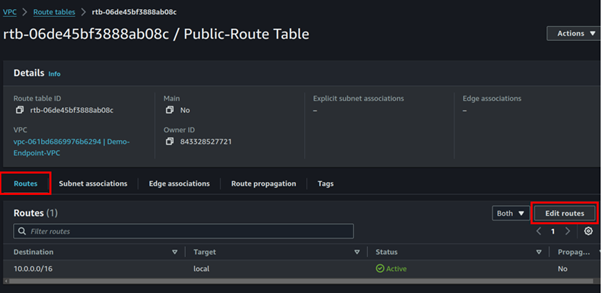
Create a Public route table, add a public route to the Internet, and associate the public route with the public subnet.

Under route tables, click Create route table.

Call it public Route table, select your VPC, then click Create route table.

Select the created route table navigate to the routes tab, click edit routes then add route.

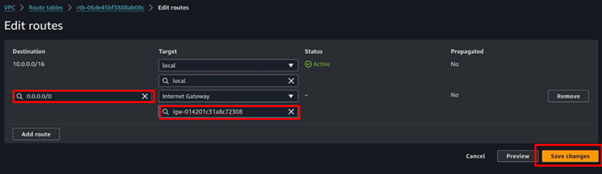
Add the pubic route, 0.0.0.0/24, and destination select the internet gateway of the VPC you created then click save changes.

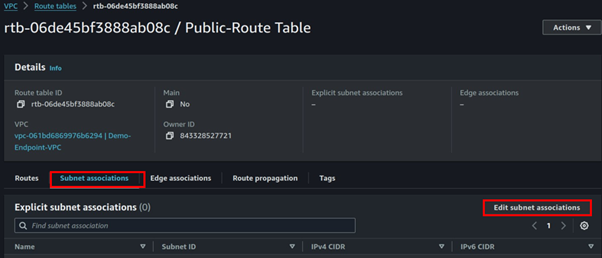
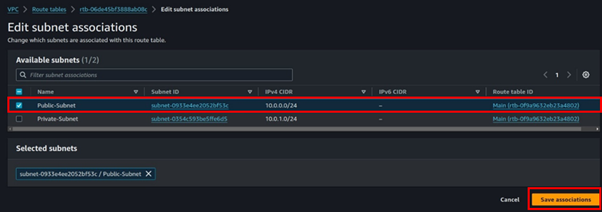
Navigate to the subnet association tab then click Edit associations.

Select the public route table then click Save Associations. The private subnet will be Implicitly associated with the main route table which routes traffic locally within the VPC, hence it’s private by default.

Step 4 create Gateway endpoint

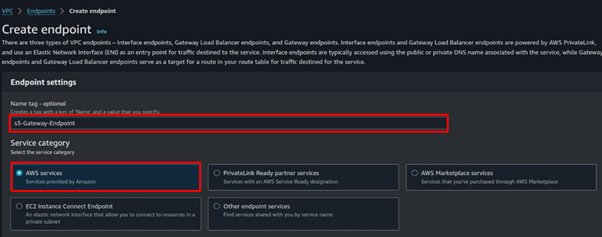
On the left side of VPC UI, select endpoints then click Create Endpoint.

The service category is AWS service.

Under services search Gateway then select it. Under the service name select s3 as shown below. For VPC, select your VPC

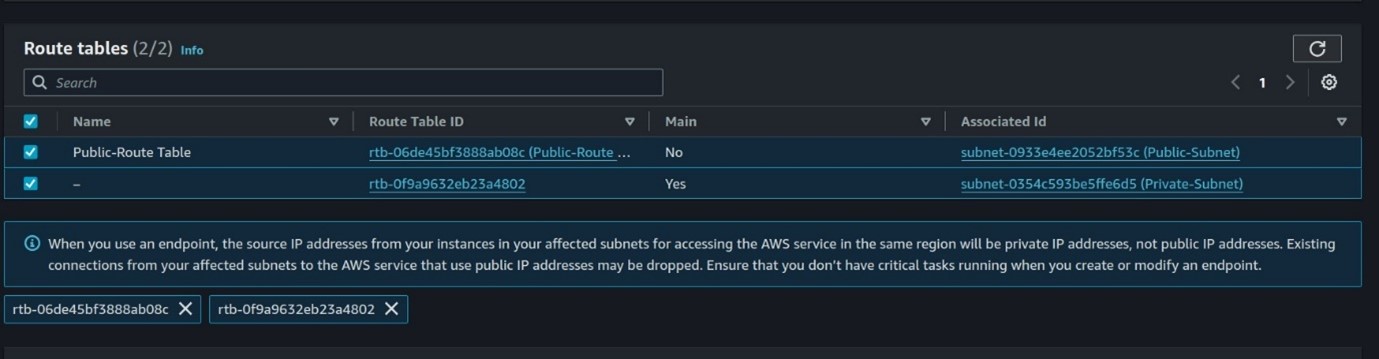
Select all the route tables.

We will not create a custom policy, move with full access, scroll down, and click create endpoint.

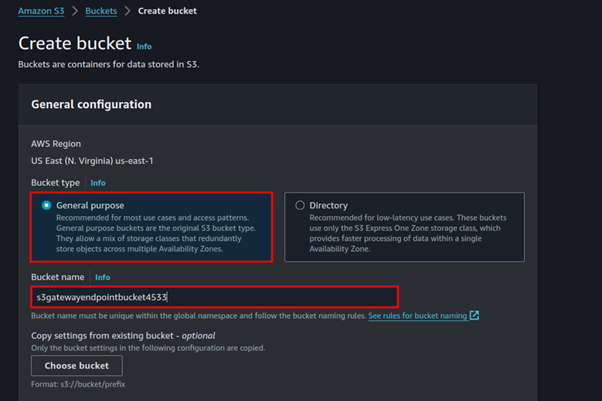
Step 5: Create bucket and upload objects

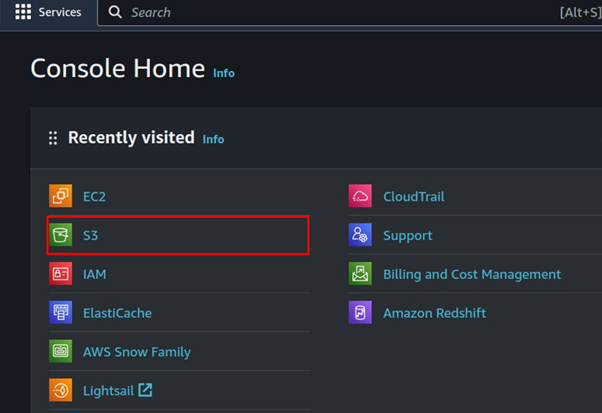
In the console search bar, look for S3, then select it.

Click Create bucket.

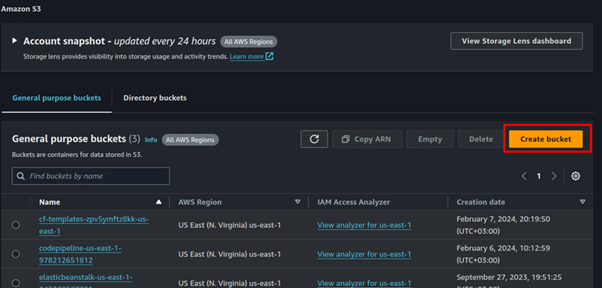
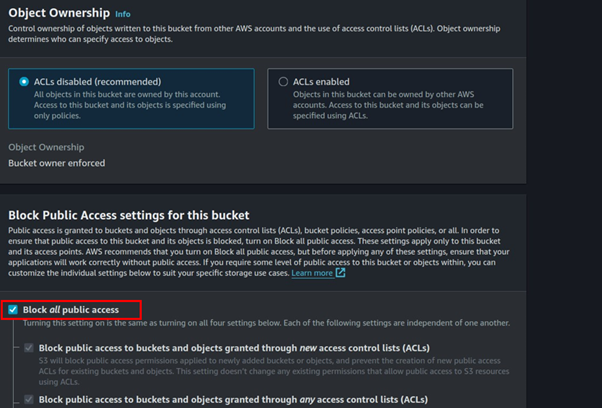
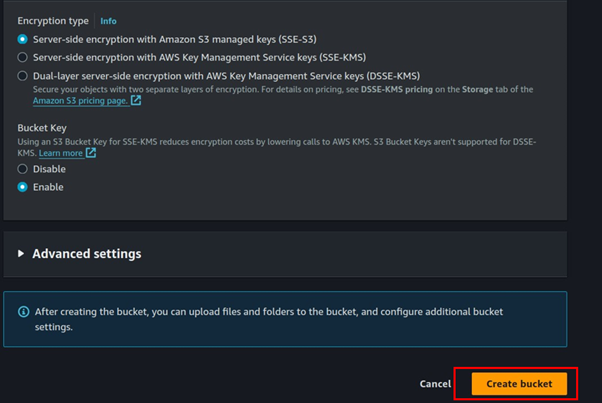
Leave it at general purpose then fill in Bucket name. Block all public access, scroll down, and click Create bucket.

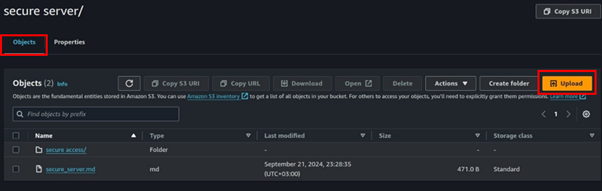
Upload objects to your bucket by Clicking the upload button,  

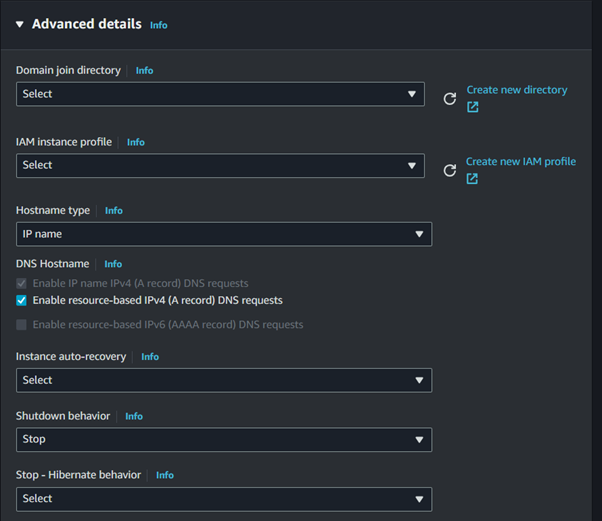
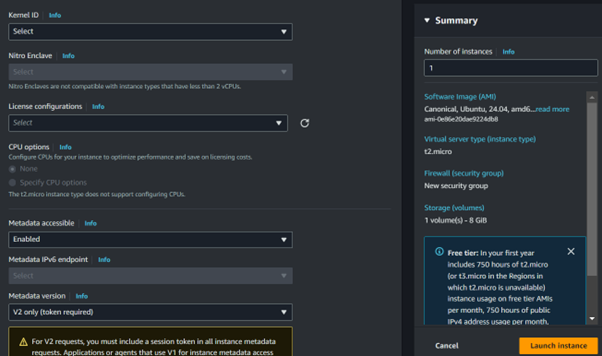
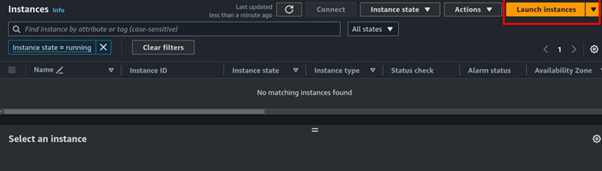
Step 6: Luanch two EC2 Instances, in the private and public subnet

We will begin by launching the private Instance. Navigate to the EC2 console and click Launch Instances.

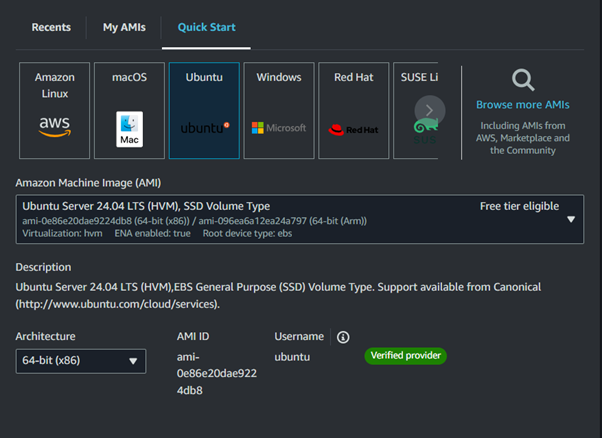
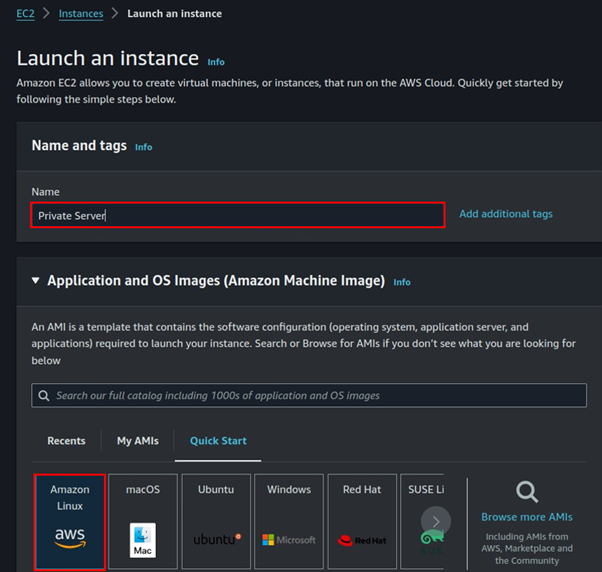
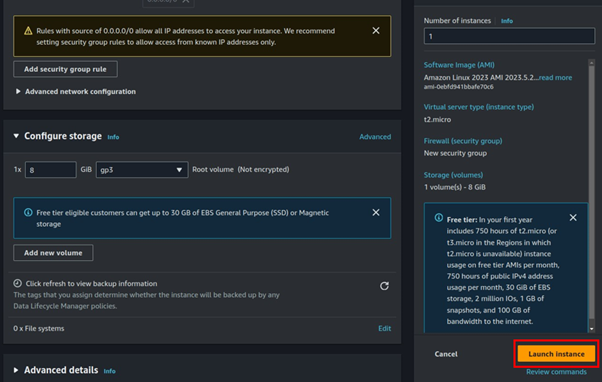
Fill in the Instances details, then for OS select Amazon Linux since it comes with AWS CLI pre-installed.

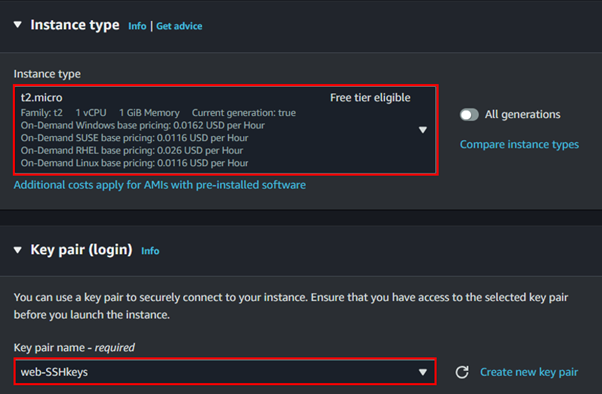
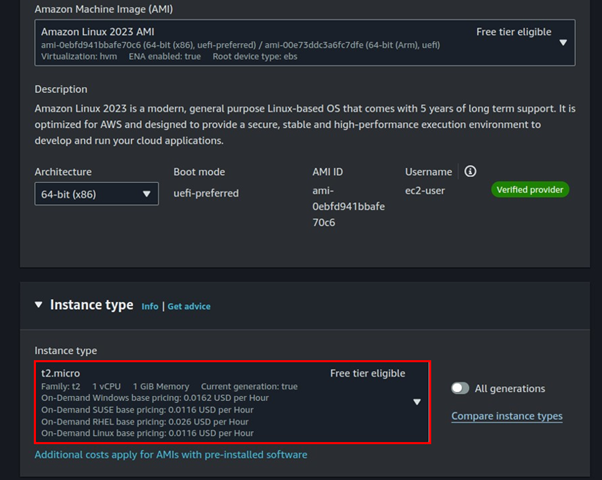
Select t2. Micro instance

Select your key pairs.

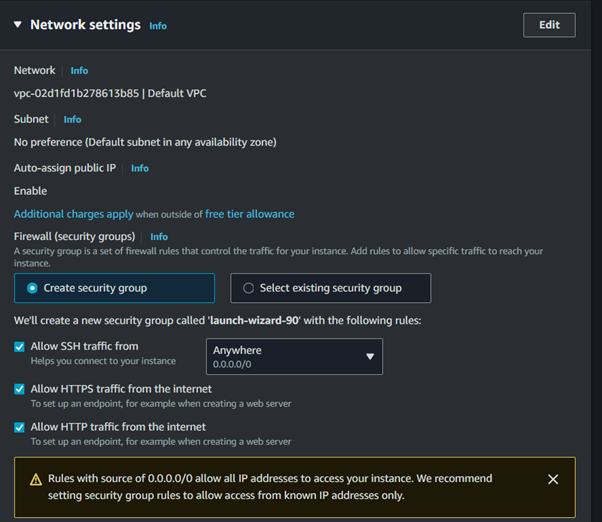
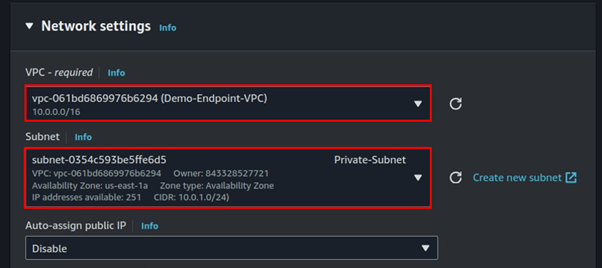
Expand the networking tab, and under VPC select the VPC you just created. Then for subnet select your private subnet.

These are the only settings we need, review under the summary and click Launch Instance.

Repeat the same process for the Instance in the public subnet, the only difference is you will select the public subnet under the Networking tab.

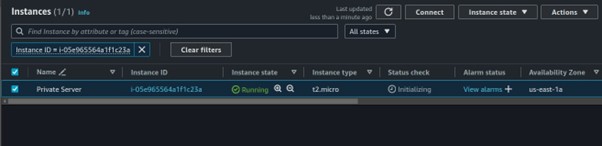
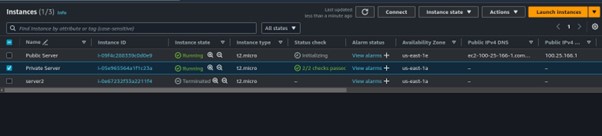
Once the two virtual machines are up and running, connect to your instance in the public subnet.

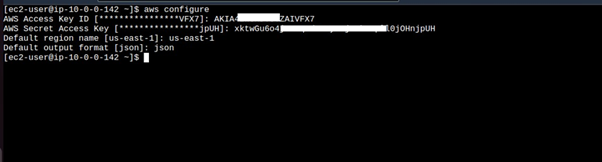
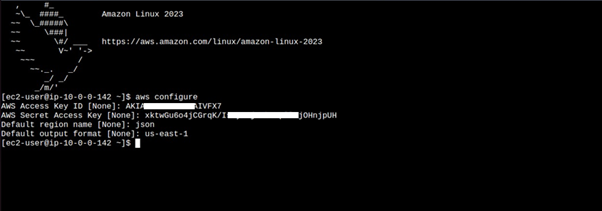
Once in the instance, run the aws configure command, fill in your details.

Once in the instance, run the aws configure command, and fill in your details.

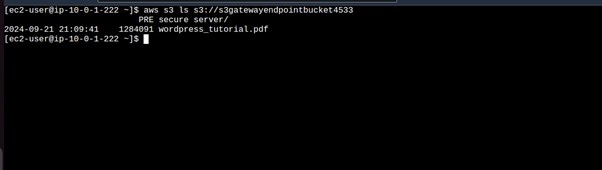
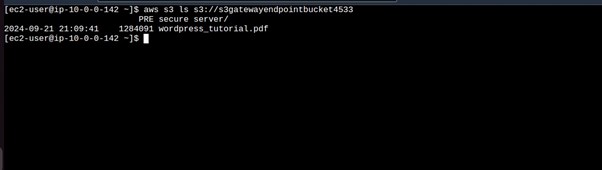
aws s3 ls s3://<bucket-name>

running this command, we can see we can access the contents from our public Instance through the internet.

Let’s do the same for our Instance in the private with no internet access. Log in to your instance in the private subnet, you can use the EC2 Instance connect endpoint. Run the aws configure to configure your credentials.

Fill in your key details.

Try listing bucket contents, we can see we are accessing our bucket contents, remember we are now not using the public internet but accessing our bucket securely through our Gateway endpoint. That’s it.

Clean up.

Thanks for reading and stay tuned for more.

If you have any questions concerning this article or have an AWS project that requires our assistance, please reach out to us by leaving a comment below or email us at sales@accendnetworks.com.


Thank you!