Accend Networks San Francisco Bay Area Full Service IT Consulting Company

Categories
Blogs

Comprehensive Guide to AWS Code Build

Comprehensive Guide to AWS Code Build: Features, Setup, and Best Practices
AWS Code Build setup

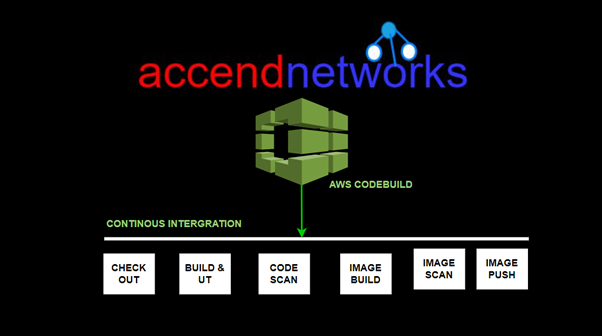
In modern software development, automating the process of building, testing, and deploying applications is key to streamlining workflows. AWS CodeBuild, part of AWS’s continuous integration and delivery (CI/CD) suite, plays a significant role in automating the build process. It compiles source code, runs tests, and produces deployable software packages in a highly scalable, managed environment so read on as we provide comprehensive guide to AWS Code Build in this blog.

What is AWS CodeBuild?

AWS CodeBuild is a fully managed build service that compiles source code, runs tests, and produces software packages that are ready to deploy. With CodeBuild, you don’t need to worry about provisioning and managing your build infrastructure. You simply provide your build project’s source code and build settings, and CodeBuild handles the rest.

For example, if you have a web application that you want to deploy, you can use CodeBuild to compile your source code, run unit tests, and produce a deployable package. You can also use CodeBuild to build Docker images, run static code analysis, and more. CodeBuild integrates with other AWS services like Code Pipeline, so you can easily automate your entire software release process.

Build Projects and Builds

A build project defines how AWS CodeBuild runs a build. It includes information such as where to get the source code, the build environment to use, the build commands to run, and where to store the build output. A build refers to the process of transforming the source code into executable code by following the instructions defined in the build project.

Key Features of AWS CodeBuild

Automated Builds: Compiles source code and packages it for deployment automatically.

CI/CD Integration: Works seamlessly with AWS CodePipeline to automate your entire CI/CD workflow.

Scalability: Automatically scales to meet the demands of your project, ensuring there are no build queues.

Pay-As-You-Go Pricing: You are only charged for the compute time you use during the build process.

How does AWS CodeBuild Work?

AWS CodeBuild uses a three-step process to build, test, and package source code:

Fetch the source code: CodeBuild can fetch the source code from a variety of sources, including GitHubBitbucket, or even Amazon S3.

Run the build: CodeBuild executes the build commands specified in the Buildspec.yaml file. These commands can include compilation, unit testing, and packaging steps.

Store build artifacts: Once the build is complete, CodeBuild stores the build artifacts in an Amazon S3 bucket or another specified location. The artifacts can be used for deployment or further processing.

What is the Buildspec.yaml file for Codebuild?

The Buildspec.yaml file is a configuration file used by AWS CodeBuild to define how to build and deploy your application or software project. It is written in YAML format and contains a series of build commands, environment variables, settings, and artifacts that CodeBuild will use during the build process.

Steps to consider when planning a build with AWS CodeBuild

Source Control: Choose your source control system (e.g., GitHub, Bitbucket) and decide how changes in this repository will trigger builds.

Build Specification: Define a buildspec.yml file for CodeBuild, specifying the build commands, environment variables, and output artifacts.

Environment: Select the appropriate build environment. AWS CodeBuild provides prepackaged build environments for popular programming languages and allows you to customize environments to suit your needs.

Artifacts Storage: Decide where the build artifacts will be stored, typically in Amazon S3, for subsequent deployment or further processing.

Build Triggers and Rules: Configure build triggers in CodePipeline to automate the build process in response to code changes or on a schedule.

VPC: Integrating AWS CodeBuild with Amazon Virtual Private Cloud (VPC) allows you to build and test your applications within a private network, which can access resources within your VPC without exposing them to the public internet.

Conclusion:

AWS CodeBuild is an excellent solution for developers and DevOps teams looking to automate the build process in a scalable, cost-effective manner. Whether you’re managing a small project or handling complex builds across multiple environments, AWS CodeBuild ensures that your software is always built and tested with the latest code changes.

Thanks for reading and stay tuned for more.

If you have any questions concerning this article or have an AWS project that requires our assistance, please reach out to us by leaving a comment below or email us at sales@accendnetworks.com.


Thank you!

Categories
Blogs

Leveraging AWS Lambda for Efficient Stale

Automating Your Infrastructure: Leveraging AWS Lambda for Efficient Stale EBS Snapshot Cleanup

EBS snapshots are backups of your EBS volumes and can also be used to create new EBS volumes or Amazon Machine Images (AMIs). However, they can become orphaned when instances are terminated or volumes are deleted. These unused snapshots take up space and incur unnecessary costs.

Before proceeding, ensure that you have an EC2 instance up and running as a prerequisite.

AWS Lambda creation

We will configure a Lambda function that automatically deletes stale EBS snapshots when triggered.

To get started, log in to the AWS Management Console and navigate to the AWS Lambda dashboard. Simply type “Lambda” in the search bar and select Lambda under the services section. Let’s proceed to create our Lambda function.

In the Lambda dashboard, click on Create Function.

For creation method, select the radio button for Author from scratch, which will create a new Lambda function from scratch.

Next, configure the basic information by giving your Lambda function a meaningful name.

Then, select the runtime environment. Since we are using Python, choose Python 3.12.

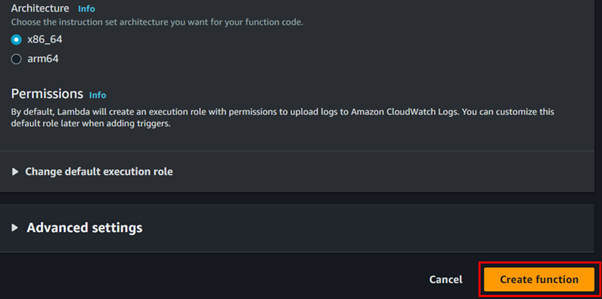
These are the only settings required to create your Lambda function. Click on Create Lambda Function.

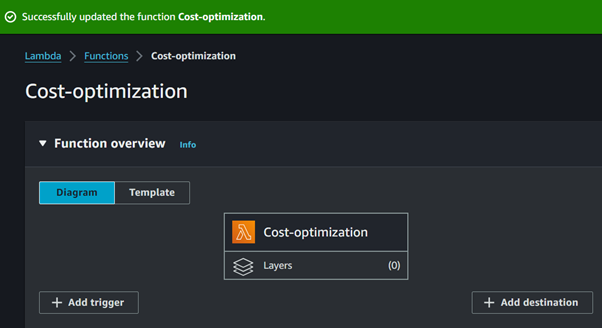
Our function has been successfully created.

By default, the Lambda timeout is set to 3 seconds, which is the maximum amount of time the function can run before being terminated. We will adjust this timeout to 10 seconds.

To make this adjustment, navigate to the Configuration tab, then click on General Configuration. From there, locate and click the Edit button.

In the edit basic settings dashboard, name your basic settings then scroll down.

Under the Timeout section, adjust the value to 10 seconds, then click Save.

Writing the Lambda Function

import boto3

def lambda_handler(event, context):
    ec2 = boto3.client(‘ec2’)

    # Get all EBS snapshots
    response = ec2.describe_snapshots(OwnerIds=[‘self’])

    # Get all active EC2 instance IDs
    instances_response = ec2.describe_instances(Filters=[{‘Name’: ‘instance-state-name’, ‘Values’: [‘running’]}])
    active_instance_ids = set()

    for reservation in instances_response[‘Reservations’]:
        for instance in reservation[‘Instances’]:
            active_instance_ids.add(instance[‘InstanceId’])

    # Iterate through each snapshot and delete if it’s not attached to any volume or the volume is not attached to a running instance
    for snapshot in response[‘Snapshots’]:
        snapshot_id = snapshot[‘SnapshotId’]
        volume_id = snapshot.get(‘VolumeId’)

        if not volume_id:
            # Delete the snapshot if it’s not attached to any volume
            ec2.delete_snapshot(SnapshotId=snapshot_id)
            print(f”Deleted EBS snapshot {snapshot_id} as it was not attached to any volume.”)
        else:
            # Check if the volume still exists
            try:
                volume_response = ec2.describe_volumes(VolumeIds=[volume_id])
                if not volume_response[‘Volumes’][0][‘Attachments’]:
                    ec2.delete_snapshot(SnapshotId=snapshot_id)
                    print(f”Deleted EBS snapshot {snapshot_id} as it was taken from a volume not attached to any running instance.”)
            except ec2.exceptions.ClientError as e:
                if e.response[‘Error’][‘Code’] == ‘InvalidVolume.NotFound’:
                    # The volume associated with the snapshot is not found (it might have been deleted)
                    ec2.delete_snapshot(SnapshotId=snapshot_id)
                    print(f”Deleted EBS snapshot {snapshot_id} as its associated volume was not found.”)

Our Lambda function, powered by Boto3, automates the identification and deletion of stale EBS snapshots.

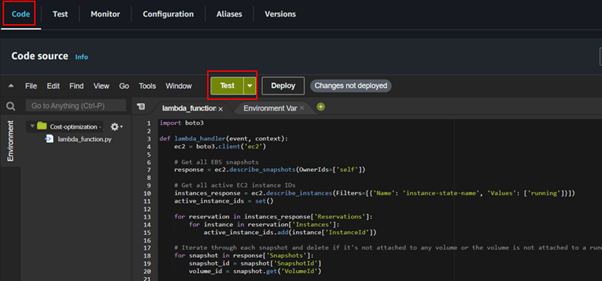
Navigate to the code section then paste in the code.

After pasting the code click on test.

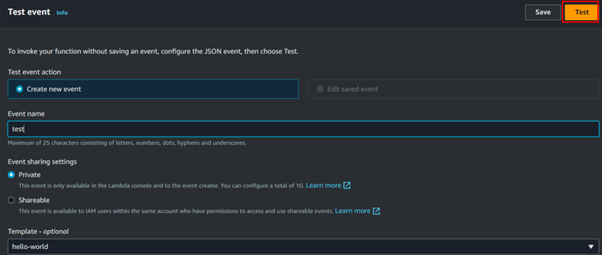
In the test dashboard, fill in the event name, you can save it or just click on test.

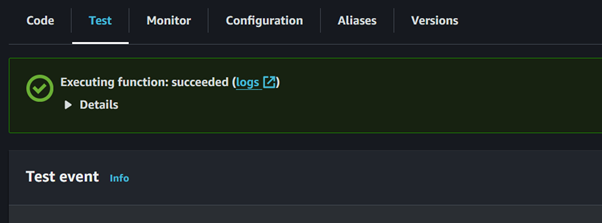
Our test execution is successful.

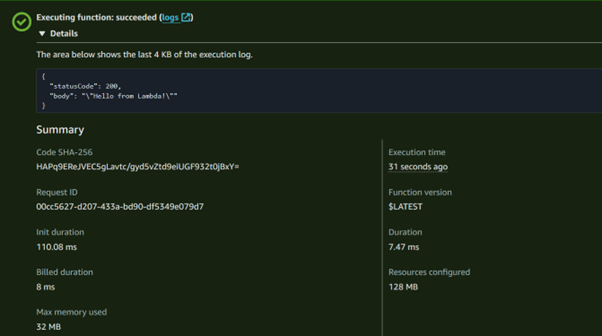
If you expand the view to check the execution details, you should see a status code of 200, indicating that the function executed successfully.

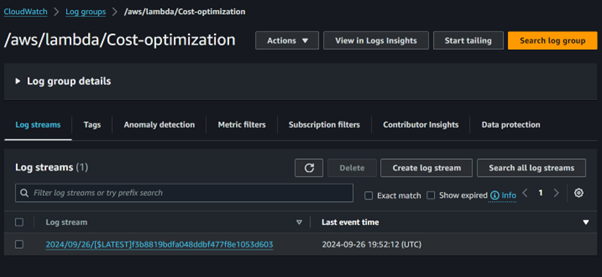
You can also view the log streams to debug any errors that may arise, allowing you to troubleshoot.

IAM Role

In our project, the Lambda function is central to optimizing AWS costs by identifying and deleting stale EBS snapshots. To accomplish this, it requires specific permissions, including the ability to describe and delete snapshots, as well as to describe volumes and instances.

To ensure our Lambda function has the necessary permissions to interact with EBS and EC2, proceed as follows.

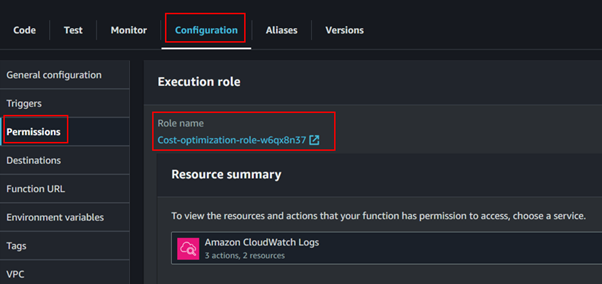
In the Lambda function details page, click on the Configuration tab, scroll down to the Permissions section, and expand it then click on the execution role link to open the IAM role configuration in a new tab.

In the new tab that opens, you’ll be directed to the IAM Console with the details of the IAM role associated with your Lambda function.

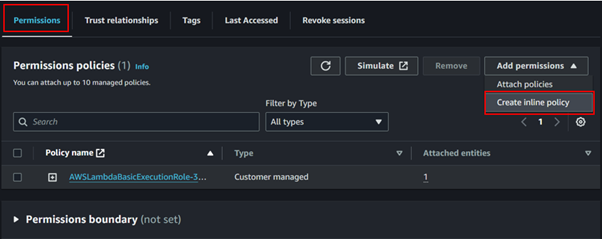
Scroll down to the Permissions section of the IAM role details page, and then click on the Add inline policy button to create a new inline policy.

Choose EC2 as the service to filter permissions. Then, search for Snapshot and add the following options: DescribeSnapshots and DeleteSnapshots.

Also, add these permissions as well Describe Instances and Describe Volume.

Under the Resources section, select “All” to apply the permissions broadly. Then, click the “Next” button to proceed.

Give the name of the policy then click the Create Policy button.

Our policy has been successfully created.

After updating our lambda function permissions, click deploy. After deployment, our lambda function will be ready for invocation, we can either invoke the lambda function directly through the AWS CLI by an API call or indirectly through other AWS services.

After deployment let’s now head to the EC2 console and create a snapshot. Navigate to the EC2 console and locate snapshot in the left UI of EC2 dashboard then click create snapshot.

For resource type, select volume. Choose the EBS volume for which you want to create a snapshot from the dropdown menu.

Optionally, add a description for the snapshot to provide more context.

Double-check the details you’ve entered to ensure accuracy.

Once you’re satisfied, click on the Create Snapshot button to initiate the snapshot creation process.

Taking a look at the EC2 dashboard, we can see we have one volume and one snapshot.

Go a head and delete your snapshot then take a look at the EBS volumes and snapshots, we can see we have one snapshot, we will trigger our lambda function to delete this snapshot.

We can use the Eventbridge scheduler to trigger our lambda function, which automates this process, but for this demo, I will run a CLI command to invoke our lambda function directly. Now going back to the EC2 dashboard and checking our snapshot we can see we have zero snapshots.

This brings us to the end of this blog clean-up.

Thanks for reading and stay tuned for more.

If you have any questions concerning this article or have an AWS project that requires our assistance, please reach out to us by leaving a comment below or email us at sales@accendnetworks.com.


Thank you!

Categories
Blogs

AWS Placement

AWS Placement Group Hands-On Demo

AWS Placement Groups are a useful tool for improving EC2 instance performance, especially when you need fast communication (low latency) or the ability to handle a lot of data (high throughput). They help you arrange your instances in a way that makes them work better and more reliably. In this demo, we’ll show you how to create and use a Placement Group step-by-step.

What is a Placement Group?

Optimizes low latency and high throughput for EC2 instances by grouping them in the same Availability Zone.

Types of Placement Groups

Cluster Placement Group: Packs instances close together inside an Availability Zone. This strategy enables workloads to achieve the low-latency network performance necessary for tightly coupled node-to-node communication that is typical of HPC applications.

Partition Placement Group: Spread your instances across logical partitions such that groups of the cases in one partition do not share the underlying hardware with groups of instances in different partitions. This strategy is typically used by large distributed and replicated workloads, such as Hadoop, Cassandra, and Kafka.

Spread Placement Group: Strictly places a small group of instances across distinct underlying hardware to reduce correlated failures.

A spread placement group is a group of instances that are each placed on distinct racks, with each rack having its own network and power source.

Why use Placement Group?

Placement groups help us to launch a bunch of EC2 instances close to each other.

This can work well for applications exchanging a lot of data and can provide high performance with collocation.

All nodes within the placement group can talk to all other nodes within the placement group at the full line rate of 10 Gbps single traffic flow without any slowing due to over-subscription.

Let’s dive into the hands-on lab.

Step 1: Sign in to AWS Management Console

Login to your AWS account from the AWS console, in the search bar, type EC2 then select EC2 Under services.

Step 2: Create EC2 Placement Groups as desired.

Navigate to the left side of EC2 then select placement group.

Click Create Placement Group

On the Create Placement Group dashboard, enter the name and select a placement strategy to determine how the instances are to be placed on the underlying hardware.

  1. a) For the Cluster placement group, in the placement strategy dropdown, select the cluster option.

b) For Spread Placement Group, in the placement strategy dropdown, select the option as spread and select Spread Level as either Host or Rack.

c) For Partition Placement Group, in the placement strategy dropdown, select the option as Partition and in the Number of Partitions dropdown select several partitions that you want to create in this placement group.

I settled on a Cluster placement Group, and my placement Group has been successfully created.

Step 3: Create EC2 instance and assign placement group to it.

We will now go ahead and launch an EC2 Instance and add the Instance to our placement Group.

Select instances in the EC2 dashboard then click Launch Instance, In the launch Instance dashboard, provide your Instance details.

Select your preferred OS and Machine Image.

Move with the free tier eligible Instance, then select your key pairs.

Leave networking as default, and select your security groups.

Leave storage as default, scroll down.

In the advanced section, expand and then scroll all the way down,

In the advanced section, expand and then scroll down, 

In the placement group section, select the placement group you have just created.

Since t2. Micro is not supported for the Cluster placement group; I will not click Launch.

That’s it, from this demo, I hope you now Know how to create a placement group.

Make sure to delete the placement group, as it is always a good practice to clean up resources.

Since t2. Micro is not supported for the Cluster placement group; I will not click Launch.

That’s it, from this demo, I hope you now Know how to create a placement group.

Make sure to delete the placement group, as it is always a good practice to clean up resources.

If you have any questions concerning this article or have an AWS project that requires our assistance, please reach out to us by leaving a comment below or email us at sales@accendnetworks.com.


Thank you!

Categories
Blogs

Mastering AWS Billing

Mastering AWS Billing: Simple Tips for Managing Costs

Amazon Web Services (AWS) provides many cloud services that help businesses grow and create new things quickly. But with so many options, it can be hard to manage costs. Understanding how AWS billing works is important to avoid surprise charges and make the best use of cloud resources. In this article, we explain AWS billing and give simple tips to help you keep your cloud costs under control.

AWS Billing Overview

AWS charges customers based on usage, meaning that costs can vary depending on the services consumed and the way resources are used. Here’s a breakdown of key concepts in AWS billing:

  1. Pay-As-You-Go Model

AWS operates on a pay-as-you-go model, meaning that you only pay for what you use. This provides flexibility but can also lead to unpredictable costs if not properly managed. Billing is typically based on:

   Compute: Charges for EC2 instances, Lambda executions, and other compute services.

   Storage: Costs for services like S3, EBS (Elastic Block Store), and Glacier.

   Data Transfer: Costs related to transferring data between AWS regions or out to the internet.

  1. Free Tier

AWS offers a Free Tier that allows new customers to explore AWS services without incurring costs. This includes limited usage for services like EC2, S3, and Lambda for 12 months, and certain services that remain free within usage limits.

  1. Reserved Instances (RI)

For predictable workloads, AWS offers Reserved Instances, which allow you to reserve capacity in advance for a reduced hourly rate. These provide significant savings (up to 72%) compared to on-demand pricing.

  1. Savings Plans

AWS Savings Plans are flexible pricing models that allow you to save on EC2, Lambda, and Fargate usage by committing to a consistent amount of usage (measured in dollars per hour) for a 1 or 3-year term. They offer similar savings to Reserved Instances but with more flexibility.

  1. AWS Pricing Calculator

The AWS Pricing Calculator is an invaluable tool for estimating the costs of AWS services before you commit. It allows you to model your architecture and get an estimated cost for the resources you intend to use.

To access the pricing calculator, on the left side of the Billing console select pricing calculator, you can also access this service even if you are not logged in to the management console, lets see how we can create an estimate, click on create an estimate.

Fill in your details for the estimate.

Select your operating system, number of instances, and workloads.

Select payment options,

Then you can save and view estimates.

Tips for Managing AWS Billing

To avoid unexpected charges and optimize your AWS costs, consider these key tips:

  1. Set Billing Alerts

AWS provides the ability to set up billing alerts, which can notify you when your usage exceeds a specified threshold. By configuring these alerts in the AWS Budgets service, you can track your spending in real time and take action before costs spiral out of control.

For example, if you are a new bae, you can set zero spending in the AWS budget, lets create a small budget for zero spend, this will ensure as we navigate the AWS free tier, the AWS budget does not exceed the free tier with any amount.

In your Billing dashboard, click on the AWS budget, then click on Create Budget.

In the choose budget type, select use a template, then select zero spend budget.

Give your budget a name, for example, my zero-spend budget. Provide the email address you will be notified with in case your budget exceeds zero, then scroll down and click Create a budget.

  1. Use Cost Explorer

AWS Cost Explorer allows you to visualize your spending patterns over time. It provides detailed reports on your usage, making it easier to identify which services are consuming the most resources and where potential savings can be made.

Filter by Service: Use filters to see which services are driving the majority of your costs.

Set Time Frames: Analyze costs over different periods (daily, monthly, or yearly).

Track Reserved Instances (RIs): Keep an eye on your RI usage to ensure you’re getting the most out of your investments.

Conclusion

By familiarizing yourself with key AWS billing concepts, taking advantage of available tools, and implementing best practices, you can avoid surprises on your AWS bill and ensure that your company’s cloud spending matches its goals.

Thanks for reading and stay tuned for more.

If you have any questions concerning this article or have an AWS project that requires our assistance, please reach out to us by leaving a comment below or email us at sales@accendnetworks.com.


Thank you!

Categories
Blogs

Hosting Static Website Amazon S3

How to Host a Static Website on Amazon S3 Bucket: A Step-by-Step Guide

Hosting Static Website on Amazon S3

In the current digital landscape, having a simple fast, and cost-effective website is essential for showcasing your content, be it running a personal blog, small business, or portfolio. Amazon S3 provides an excellent platform for hosting static websites with its simple storage services.

In this blog, we will guide you through the essential steps to deploy your static website in Amazon S3.

Deploying a static website in s3 is a straightforward and powerful way to leverage cloud infrastructure for your online presence and this article will equip you with everything you need to launch your website effortlessly in amazon s3.

What is Amazon S3?

Amazon S3 is a highly scalable object storage service that offers data availability, security, and performance. It’s suitable for businesses of all sizes and can be used for various use cases such as data lakes, websites, mobile apps, backup and restore archives, and big data analytics.

Let’s dive into the hands-on where we will break down this into a step-by-step guide.

Step 1: Creating an S3 Bucket

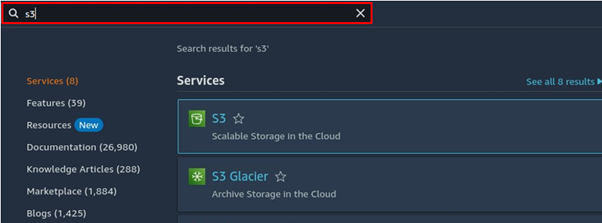
Log in to the management console and type S3 on the Search bar then Select S3 under services.

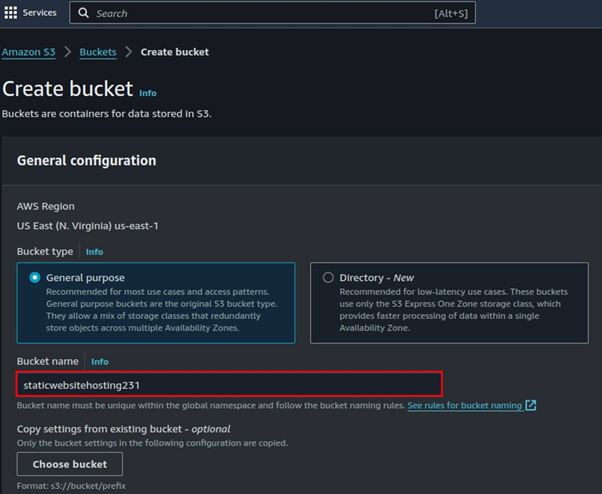
In the s3 console, Click Create Bucket.

Enter the bucket name and choose the region where you want the bucket to be located.

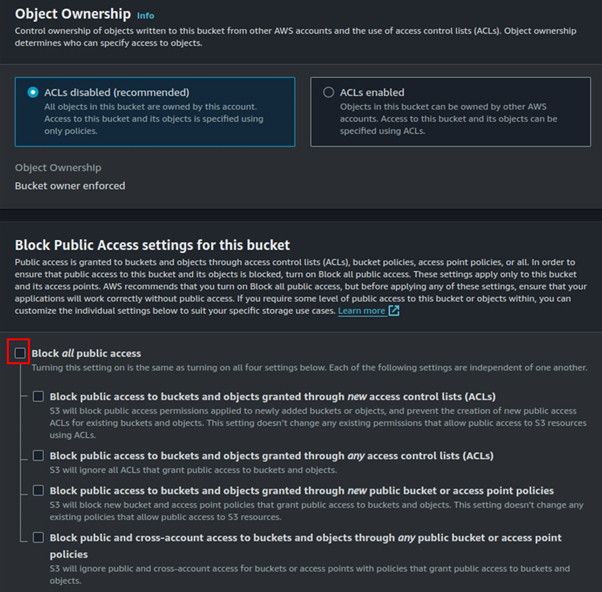
Scroll down and uncheck the Block all public access checkbox to disable Amazon S3’s default setting to block public access to an S3 bucket. A warning will appear beneath this section; click on the checkbox to acknowledge current settings to enable public access to the bucket.

This configuration allows users to access static website pages stored in the S3 bucket.

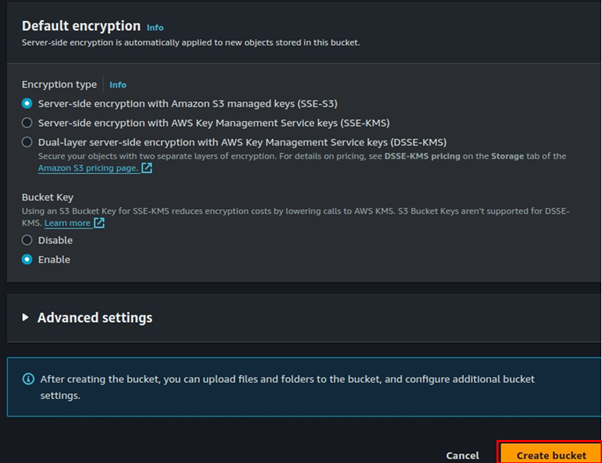
Leave the rest of the options at their default settings, and click on the Create bucket button.

Step 2: Enable Static Website Hosting

On the resulting page from the successful creation of the bucket, click on the bucket name. Select the Properties tab, scroll down to the Static website hosting section, and click Edit

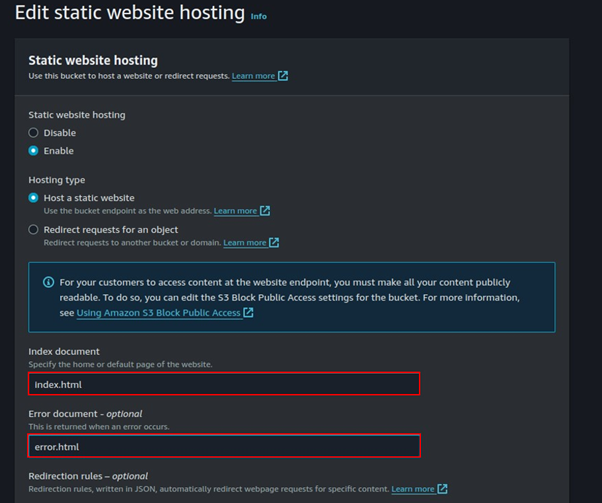
Once you choose Enable, more configuration options will be made available on the console to enable you to provide the necessary settings and documents for hosting your website.

Leave the Hosting type as the default (Host a static website), and enter the exact name of the Index document that should serve as the file for your static webpage. Do the same for the Error document if you want to have a custom web page for 4XX class errors. This section is case-sensitive, therefore ensure the names you provide are the exact match.

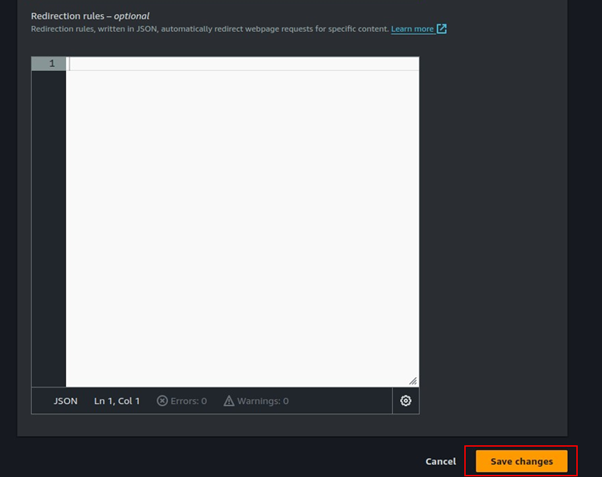
Navigate to the end of the page and click on Save Changes.

When you scroll down the resulting page, you will notice that a bucket endpoint was successfully created.

Step 3: Add a Bucket Policy that Makes an S3 Bucket Content Publicly Available

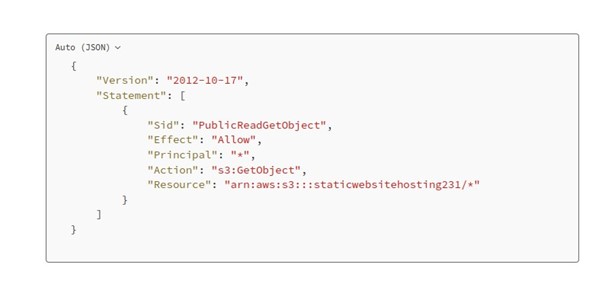
Here we will add a policy to grant public read-only access to our S3 bucket.

To edit the permissions of your bucket, follow these steps:

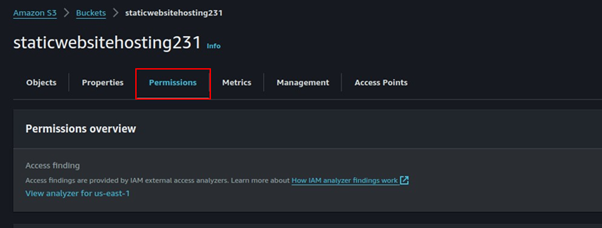
On the current page of the console, navigate to the Permissions tab.

To edit the permissions of your bucket, follow these steps:

On the current page of the console, navigate to the Permissions tab.

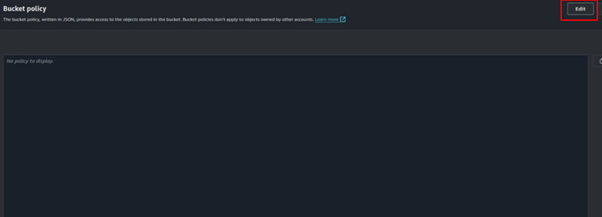
Scroll down to the Bucket policy section and click on Edit.

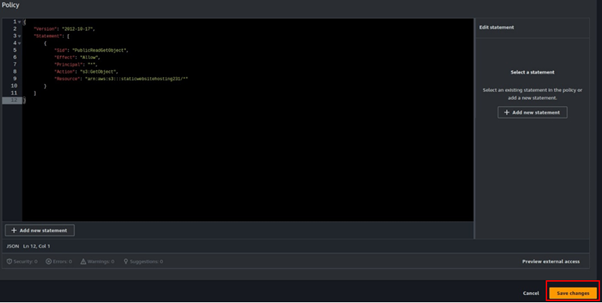
Paste the code into the text editor provided in the console.

In the Resource section of the code, replace the unique bucket name with your own. This will ensure that you have the correct permissions for your bucket.

At the bottom of the page, click on Save Changes.

Step 4: Configure an Index Document

The index document is the root file of our static website. Make sure you have your web files ready.

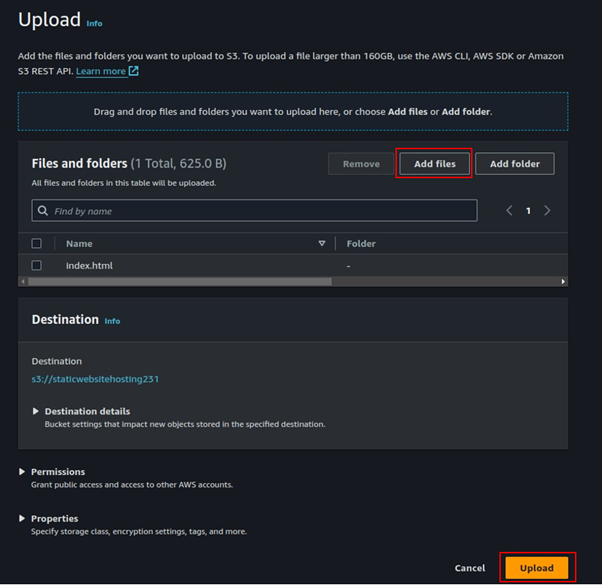
choose the Object tab, and on the resulting page, drag and drop the file (or folders) you want to upload here, or choose Add files (or Add folder). Scroll down and click the Upload button.

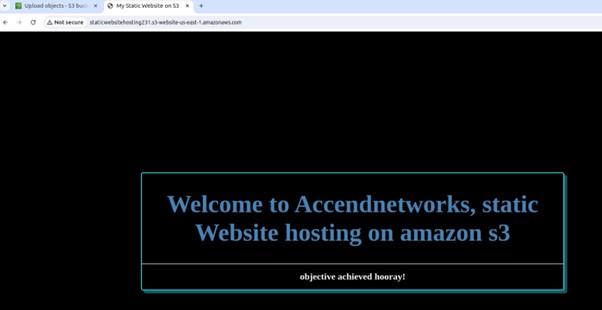
After a successful upload, you can view your static website by visiting the Endpoint of your S3 bucket on your web browser.

To get your bucket endpoint, choose the Properties tab and scroll down to the Static website hosting section at the end of the page. Click on it to open your static website on a new tab.

This brings us to the end of this article, pull everything down.

Conclusion

Hosting a static website on Amazon S3 is an efficient and cost-effective solution for delivering web content to a global audience. By leveraging S3’s robust infrastructure, you can ensure high availability, durability, and scalability for your static website.

Thanks for reading and stay tuned for more.

If you have any questions concerning this article or have an AWS project that requires our assistance, please reach out to us by leaving a comment below or email us at sales@accendnetworks.com.


Thank you!