Accend Networks San Francisco Bay Area Full Service IT Consulting Company

Categories
Blogs

Comprehensive Guide to AWS Code Build

Comprehensive Guide to AWS Code Build: Features, Setup, and Best Practices

AWS Code Build setup

In modern software development, automating the process of building, testing, and deploying applications is key to streamlining workflows. AWS CodeBuild, part of AWS’s continuous integration and delivery (CI/CD) suite, plays a significant role in automating the build process. It compiles source code, runs tests, and produces deployable software packages in a highly scalable, managed environment so read on as we provide comprehensive guide to AWS Code Build in this blog.

What is AWS CodeBuild?

AWS CodeBuild is a fully managed build service that compiles source code, runs tests, and produces software packages that are ready to deploy. With CodeBuild, you don’t need to worry about provisioning and managing your build infrastructure. You simply provide your build project’s source code and build settings, and CodeBuild handles the rest.

For example, if you have a web application that you want to deploy, you can use CodeBuild to compile your source code, run unit tests, and produce a deployable package. You can also use CodeBuild to build Docker images, run static code analysis, and more. CodeBuild integrates with other AWS services like Code Pipeline, so you can easily automate your entire software release process.

Build Projects and Builds

A build project defines how AWS CodeBuild runs a build. It includes information such as where to get the source code, the build environment to use, the build commands to run, and where to store the build output. A build refers to the process of transforming the source code into executable code by following the instructions defined in the build project.

Key Features of AWS CodeBuild

Automated Builds: Compiles source code and packages it for deployment automatically.

CI/CD Integration: Works seamlessly with AWS CodePipeline to automate your entire CI/CD workflow.

Scalability: Automatically scales to meet the demands of your project, ensuring there are no build queues.

Pay-As-You-Go Pricing: You are only charged for the compute time you use during the build process.

How does AWS CodeBuild Work?

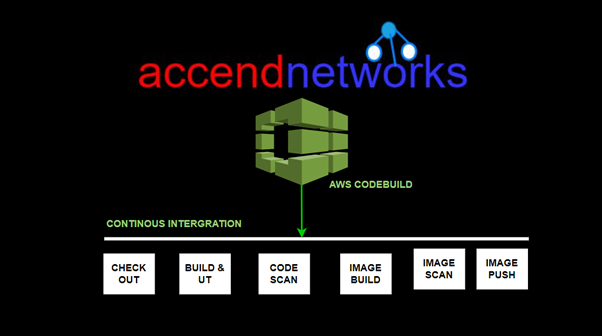
AWS CodeBuild uses a three-step process to build, test, and package source code:

Fetch the source code: CodeBuild can fetch the source code from a variety of sources, including GitHubBitbucket, or even Amazon S3.

Run the build: CodeBuild executes the build commands specified in the Buildspec.yaml file. These commands can include compilation, unit testing, and packaging steps.

Store build artifacts: Once the build is complete, CodeBuild stores the build artifacts in an Amazon S3 bucket or another specified location. The artifacts can be used for deployment or further processing.

What is the Buildspec.yaml file for Codebuild?

The Buildspec.yaml file is a configuration file used by AWS CodeBuild to define how to build and deploy your application or software project. It is written in YAML format and contains a series of build commands, environment variables, settings, and artifacts that CodeBuild will use during the build process.

Steps to consider when planning a build with AWS CodeBuild

Source Control: Choose your source control system (e.g., GitHub, Bitbucket) and decide how changes in this repository will trigger builds.

Build Specification: Define a buildspec.yml file for CodeBuild, specifying the build commands, environment variables, and output artifacts.

Environment: Select the appropriate build environment. AWS CodeBuild provides prepackaged build environments for popular programming languages and allows you to customize environments to suit your needs.

Artifacts Storage: Decide where the build artifacts will be stored, typically in Amazon S3, for subsequent deployment or further processing.

Build Triggers and Rules: Configure build triggers in CodePipeline to automate the build process in response to code changes or on a schedule.

VPC: Integrating AWS CodeBuild with Amazon Virtual Private Cloud (VPC) allows you to build and test your applications within a private network, which can access resources within your VPC without exposing them to the public internet.

Conclusion:

AWS CodeBuild is an excellent solution for developers and DevOps teams looking to automate the build process in a scalable, cost-effective manner. Whether you’re managing a small project or handling complex builds across multiple environments, AWS CodeBuild ensures that your software is always built and tested with the latest code changes.

Thanks for reading and stay tuned for more.

If you have any questions concerning this article or have an AWS project that requires our assistance, please reach out to us by leaving a comment below or email us at sales@accendnetworks.com.


Thank you!

Categories
Blogs

Mastering AWS Cost Monitoring

Mastering AWS Cost Monitoring: Essential Tools & Techniques

AWS Cost Explorer dashboard

Controlling and reducing cloud costs can be challenging, particularly in settings like Amazon Web Services, where resources are constantly changing. To keep your cloud spending in check, it’s important to implement effective and master AWS cost monitoring strategies as a significant part of this process involves leveraging AWS cost reports, and AWS usage reports, and conducting AWS audits. These tools offer insight into how resources are being utilized and where spending can be optimized, contributing to more efficient AWS cost management.

In this blog, we will dive into the role of cost reports in AWS cost management, and how you can use this resource to improve your budgeting and auditing processes.

Why AWS Cost Monitoring is Important

Monitor AWS spending is very important for businesses to keep their cloud spending under control. This monitoring process includes:

  • tracking resource usage and costs in real-time 
  • fixing any inefficiencies as they happen.

The key tools to help with AWS cost monitoring include AWS cost reports and AWS usage reports. These provide:

  • visibility into both current spending and resource utilization, making them indispensable for cloud financial management.

Understanding AWS Cost Reports

AWS cost reports are detailed documents that provide insights into the costs associated with the resources you are using. They break down the costs by service, resource type, and time frame, allowing for an in-depth look at where your budget is going. These reports are essential for businesses looking to optimize their spending.

You can use AWS cost reports to:

  • Track your overall spending trends.
  • Identify which services are consuming the most resources and budget.
  • Make informed decisions on resource allocation and scaling.

By regularly reviewing these reports, you can implement effective AWS cost-monitoring strategies that will help you identify inefficiencies and reduce unnecessary expenses.

Let’s explore how to access and view your AWS usage reports efficiently.

To view AWS usage reports, log in to the AWS Management Console and ensure you have the appropriate permissions. In the search bar type billing and cost management then select it under services.

AWS cost monitoring graph

In the Billing and Cost Management dashboard, navigate to the left side of the panel and select Cost Explorer Saved Reports from the navigation menu.

AWS cost monitoring graph

You will be able to view your saved reports. If you want to create a new report, simply click on Create New Report. Otherwise, you can review the available reports, which are automatically generated by AWS by default.

AWS cost monitoring graph

Let’s try viewing one of the reports to see what it entails. In the Cost Explorer Saved Reports section, click on any available report to open it. The report will display detailed information, including:

Cost breakdown by service, region, or usage type.

AWS cost monitoring graph
  • Usage patterns over time
  • Trends in spending for particular services
  • Forecasting for future costs based on current usage trends

This report will help you analyze your spending and identify opportunities for optimization.

AWS cost monitoring graph

When you scroll down, you’ll see a detailed Cost and Usage Breakdown. This section provides a granular view of your AWS spending, including:

  • Service usage costs (e.g., EC2, S3, RDS)
  • Monthly usage trends for specific services or accounts

This breakdown allows you to pinpoint areas where optimizations can reduce costs and improve overall AWS cost tracking.

AWS cost monitoring graph

On the right side of the reports UI, you can adjust the report parameters. Here, you can customize:

  • Date ranges: Select specific time frames to view cost and usage data, whether for the past month, week or any custom range.
  • Granularity: Choose between monthly, daily, or hourly granularity, depending on how detailed you want the report to be. This helps you monitor your AWS spending more closely based on your needs.
AWS cost monitoring graph

Now, let’s explore how to create a cost report. In the Cost Explorer dashboard, click on the Create Report button.

AWS Cost Explorer dashboard

Next, select your Report Type from the available options, such as Savings Plans reports and Reservation reports. Once you’ve chosen your preferred report type, click on the Create Report button to generate your custom report.

AWS Cost Explorer dashboard

By incorporating these reports into your budgeting strategy, businesses can gain greater control over their cloud expenses, enabling more informed decision-making and optimizing AWS cost management.

Conclusion.

To sum up, implementing effective AWS billing management strategies is important for saving on cloud spending. By using AWS cost and usage reports for budgeting, businesses can track expenses more accurately and make informed decisions. Checking these reports often helps show where money is going and find ways to remediate unnecessary expenditures alongside enhancing good financial planning.

Thanks for reading and stay tuned for more.

If you have any questions concerning this article or have an AWS project that requires our assistance, please reach out to us by leaving a comment below or email us at sales@accendnetworks.com.


Thank you!

Categories
Blogs

AWS Code Commit Obsolete

AWS CodeCommit Obsolete: Transitioning from AWS CodeCommit and Steps for a Seamless Migration

AWS CodeCommit, Amazon Web Services’ fully managed version control service, has been a leading solution for developers and organizations seeking a scalable, secure, and reliable version control system. However, AWS recently announced that it will no longer accept new customers for CodeCommit, effective June 6, 2024.

In this article, we’ll examine the impact of this phase-out, examine alternative version control systems, and offer tips on seamlessly transitioning your repositories.

Adapting to AWS CodeCommit’s Shutdown: Key Impacts and Your Next Step

AWS’s choice to end CodeCommit is part of a bigger plan to simplify its offerings and cut down on duplicate services. The rise in popularity of more powerful platforms like GitHub and GitLab, which provide advanced features and strong community backing, has had a big impact on this change. If you’re still using CodeCommit, the takeaway is clear: you can still access your repositories, but it’s time to start thinking about moving. AWS has given helpful documentation to help you through the switch to a new platform.

Exploring Alternative Version Control Systems

With CodeCommit being phased out, organizations need to explore alternative version control systems, and here are some of the top options.

GitHub: It’s the world’s largest Git repository hosting service and offers extensive features, including GitHub Actions for CI/CD, a vibrant community, and seamless integration with many third-party tools.

GitLab: It stands out for its built-in DevOps capabilities, offering robust CI/CD pipelines, security features, and extensive integration options.

Bitbucket: It is well-suited for teams already using Atlassian products like Jira and Confluence.

Self-Hosted Git Solutions: This is for organizations with specific security or customization requirements.

Migrating your AWS CodeCommit Repository to a GitHub Repository

Before you start the migration, make sure you have set up a new repository and the remote repository should be empty.

The remote repository may have protected branches that do not allow force push. In this case, navigate to your new repository provider and disable branch protections to allow force push.

Log into the AWS management console and navigate to the code commit console, in the AWS CodeCommit console, select the clone URL for the repository you will migrate. The correct clone URL (HTTPS, SSH, or HTTPS (CRC)) depends on which credential type and network protocol you have chosen to use.

In my case, I am using HTTPS.

Step 1: Clone the AWS CodeCommit Repository
Clone the repository from AWS CodeCommit to your local machine using Git. If you’re using HTTPS, you can do this by running the following command:

git clone https://your-aws-repository-url your-aws-repository

Replace your-aws-repository-url with the URL of your AWS CodeCommit repository.

Change the directory to the repository you’ve just cloned.

Step 2: add the New Remote Repository.

Navigate to the directory of your cloned AWS CodeCommit repository. Then, add the repository URL from the new repository provider.

git remote add <provider name> <provider-repository-url>

Step 3. Push Your Repository to the New Provider

Push your local repository to the new remote repository

This will push all branches and tags to your new repository provider’s repository. The provider’s name must match the provider’s name from step 2.

git push <provider name> –mirror

I use SSH keys for authentication, so I will run the git set URL command to authenticate with my SSH keys. Then lastly will run the git push command.

Step 4. Verify the Migration

Once the push is complete, verify that all files, branches, and tags have been successfully migrated to the new repository provider. You can do this by browsing your repository online or cloning it to another location and checking it locally.

Step 5: Update Remote URLs in Your Local Repository

If you plan to continue working with the migrated repository locally, you may want to update the remote URL to point to the new provider’s repository instead of AWS CodeCommit. You can do this using the following command:

git remote set-url origin <provider-repository-url>

Replace <provider-repository-url> with the URL of your new repository provider’s repository.

Step 6: Update CI/CD Pipelines

If you have CI/CD pipelines set up that interact with your repositories, such as GitLab, GitHub, or AWS CodePipeline, update their configuration to reflect the new repository URL. If you removed protected branch permissions in Step 3 you may want to add these back to your main branch.

Step 7: Inform Your Team

If you’re migrating a repository that others are working on, be sure to inform your team about the migration and provide them with the new repository URL.

Step 8: Delete the Old AWS CodeCommit Repository

This action cannot be undone. Navigate back to the AWS CodeCommit console and delete the repository that you have migrated.

Conclusion

By carefully evaluating your options and planning your migration, you can turn this transition into an upgrade for your development processes. Embracing a new tool not only enhances your team’s efficiency but also ensures you stay aligned with current industry standards.

This brings us to the end of this blog.

Thanks for reading and stay tuned for more.

If you have any questions concerning this article or have an AWS project that requires our assistance, please reach out to us by leaving a comment below or email us at sales@accendnetworks.com.


Thank you!

Categories
Blogs

Deep Dive into CloudFront

Deep Dive into CloudFront: Understanding Internal Caching Mechanisms and Implementing Websites on S3 with Region Failover Part One

Amazon CloudFront, a Content Delivery Network (CDN) provided by AWS, is key in ensuring that content is delivered swiftly to users across the globe. When paired with S3, it’s perfect for hosting fast, secure, and reliable static websites. In this article, we will explore CloudFront’s internal caching mechanisms and discuss how to implement an S3-hosted website with region failover capabilities.

What is CloudFront

CloudFront is a CDN service (Content delivery network). CloudFront caches content such as HTML, CSS, and dynamic content to a worldwide data center called Edge Location or Regional Edge location. it is used to boost your website performance by availing content closer to users all over the world.

How it works?

CloudFront caches the contents in all the edge locations around the world. Caching refers to storing frequently accessed data in high-speed hardware, allowing for faster retrieval. This hardware is known as a cache. However, caches have limited memory capacity, and it is not possible to store everything in them due to their relatively expensive hardware. We use caching strategically to maximize performance.

Cache Hierarchy in CloudFront

Regional Edge Caches: Before content reaches the edge locations, it may pass through regional edge caches. These are a middle layer that provides additional caching, helping to reduce the load on the origin server and improve cache hit ratios.

Cache Hit: This refers to a situation where the requested data is already present in the cache. It improves performance by avoiding the need to fetch the data from the source such as a disk or server. Cache hits are desirable because they accelerate the retrieval process and contribute to overall system efficiency.

Cache Miss: This occurs when the requested data is not found in the cache. When a cache miss happens, the system needs to fetch the data from the source, which can involve a longer retrieval time and higher latency compared to a cache hit. The data is then stored in the cache for future access, improving subsequent performance if the same data is requested again. Cache misses are inevitable and can happen due to various reasons, such as accessing new data or when the data in the cache has expired.

How CloudFront utilizes caching to reduce the latency and increase the performance

When a user requests a website, the DNS service resolves to the DNS of the CloudFront distribution, which then redirects the user to the nearest edge location. The user receives the response from that particular edge location. However, there are instances when the requested data is not present in the edge location, resulting in a cache miss. In such cases, the request is sent from the regional edge location, and the user receives the data from there if it is available, indicating a cache hit. However, this process can take some time.

In situations where the data is not present in the regional edge location either, retrieving the data becomes a lengthier process. In such cases, the data needs to be fetched from the origin server, which, in our case, is the S3 bucket. This additional step of fetching the data from the origin server can introduce latency and increase the overall response time for the user.

CloudFront origin failover

For high-availability applications where downtime is not an option, CloudFront origin failover ensures that your content remains accessible even if the primary origin server becomes unavailable. By setting up multiple origins (like two S3 buckets in different regions) and configuring CloudFront to switch to a backup origin when the primary one fails, we can maintain uninterrupted service for users, enhancing our website’s reliability and resilience.

For CloudFront origin to be achieved, we create an origin group with two origins: a primary and a secondary. If the primary origin is unavailable or returns specific HTTP response status codes that indicate a failure, CloudFront automatically switches to the secondary origin.

To set up origin failover, you must have a distribution with at least two origins. Next, you create an origin group for your distribution that includes two origins, setting one as the primary. Finally, you create or update a cache behavior to use the origin group. We will demonstrate this with a hands-on in the second part of this blog.

Thanks for reading and stay tuned for more.

If you have any questions concerning this article or have an AWS project that requires our assistance, please reach out to us by leaving a comment below or email us at sales@accendnetworks.com.


Thank you!

Categories
Blogs

AWS Security Hub

Enhancing Cloud Security with AWS Security Hub

Introduction

In the error of cloud computing, security remains supreme for organizations around the world. With the increasing of sophisticated cyber threats, organizations must adopt robust security measures to safeguard their data and infrastructure. AWS security hub emerges as a comprehensive solution to address these challenges by providing a centralized platform for managing security across the AWS cloud.

What is AWS Security Hub?

AWS Security Hub provides you with a comprehensive view of your security state. It provides a centralized, aggregated, and prioritized overview of security findings and compliance status in a standard format for a single AWS account and multiple AWS accounts. It helps you analyze your security trends and identify the highest-priority security issues.

Key Features of AWS Security Hub

  • Centralized security monitoring
  • Continuous security assessment
  • Prioritized alerting
  • Custom insights and compliance checks: 
  • Integration with third-party security tools
  • Automation
  • Security scores and summary dashboards

Benefits of AWS Security Hub

  • Simplified security operations: It provides a centralized view, simplifying security operations, and enabling faster response to threats.
  • Enhanced threat visibility: By integrating with various AWS security services and third-party tools, it provides a wide range of security insights, ensuring comprehensive visibility into potential threats and vulnerabilities.
  • Proactive risk mitigation: The continuous and automated compliance checks of AWS Security Hub allow organizations to proactively identify and remediate security gaps, reducing the risk of breaches, data leaks, and compliance violations.
  • Simplified compliance management: AWS Security Hub simplifies compliance management by aligning with industry-standard frameworks and providing pre-built compliance checks. It simplifies reporting, and audits, and ensures compliance with regulatory requirements.
  • Efficient collaboration: AWS Security Hub enables seamless collaboration between security teams by providing a centralized and shared view of security findings, allowing them to work together on analysis, remediation, and incident response.

Demo on how to enable AWS Security Hub?

Sign in to the management console and navigate to the security hub console. Then click on Go to security hub.

Before you can enable the security hub, you must first enable recording for the relevant resources in AWS Config.

Then Select the relevant Recording strategy and Recording frequency as per your requirements.

Configure Override settings to override the recording frequency for specific resource types or exclude specific resource types from recording and create a new IAM Role or select the existing IAM Role for AWS Config in Data governance.

Remember AWS Config needs an S3 bucket to store configuration history and configuration snapshots. Configure S3 bucket details, then click on Next.

AWS Config Managed Rules provide a set of predefined rules that you can use to evaluate the compliance of your AWS resources according to best practices and security standards. Select the AWS-managed rules as per your requirements and click on Next.

Review AWS Config details and click on Confirm to finish the AWS Config setup.

Select the Security standards as per your requirement from built-in security standards and click on Enable Security Hub to finish the setup.

Once setup is complete, you’ll be directed to the Security Hub dashboard. Here, you can access a unified view of security findings, compliance status, and actionable insights across your AWS accounts. Explore the dashboard in detail and familiarize yourself with the available features and navigation options.

Once you enable an AWS Security Hub, it will take some time to complete the initial analysis and to appear the results on the dashboard. This is because AWS Security Hub needs to scan your entire AWS environment to identify all the relevant resources to the standard.

After the initial analysis is done, AWS Security Hub will continue to scan your AWS environment regularly to identify any new resources or modifications to existing resources. The results will be posted on the dashboard in real time. You can then check the findings and prioritize the remediation of the threats/vulnerabilities detected.

Below are some sample reports from the AWS Security Hub dashboard.

Security score from AWS Security Hub summary.

Findings from all linked Regions are visible from the aggregation Region

Track New findings over time by severity and the provider, and see the top resources at risk across multiple resource types.

Security score for specific security standards

Conclusion

AWS Security Hub is an essential component in securing AWS cloud infrastructure by providing a comprehensive and centralized view of security posture. As the cloud landscape evolves, AWS Security Hub remains a pivotal tool for enhancing cloud security posture, enabling organizations to proactively identify and mitigate security risks.

This brings us to the end of this blog. Clean up.

If you have any questions concerning this article or have an AWS project that requires our assistance, please reach out to us by leaving a comment below or email us at sales@accendnetworks.com.

Thank you!