


Accend Networks San Francisco Bay Area Full Service IT Consulting Company
https://t.me/pump_upp
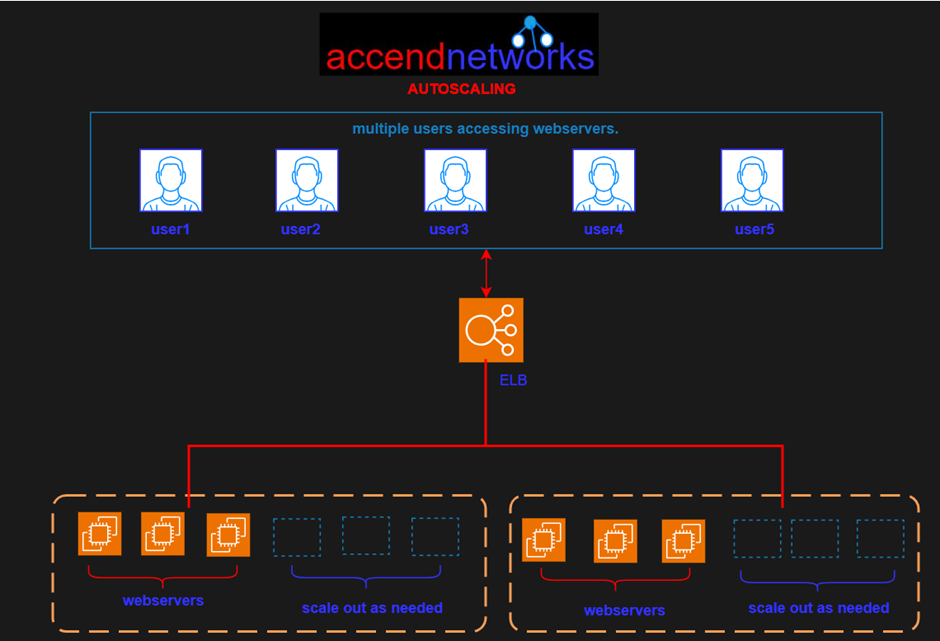
Amazon Web Services (AWS) offers a robust solution through Auto Scaling Groups, facilitating automatic adjustments to instance numbers based on demand.
First, consider a scenario where you want to maintain an average CPU utilization of 40%.
Then, for a more granular approach, consider Simple/Step Scaling.
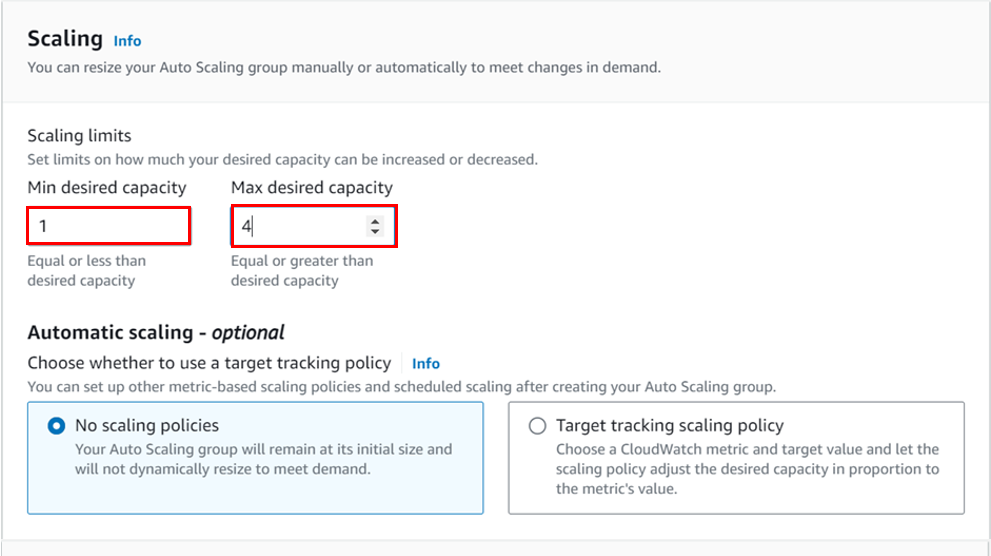
Next, Scheduled Actions can be employed in scenarios where scaling needs can be anticipated. e.g. an increase in minimum capacity to 10 at 5 pm every Friday.
Now, Predictive Scaling introduces a proactive approach by continuously analyzing historical data.
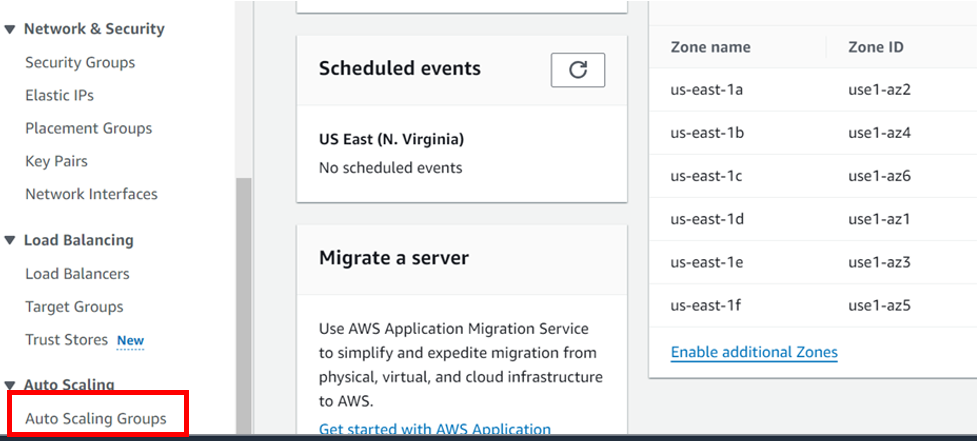
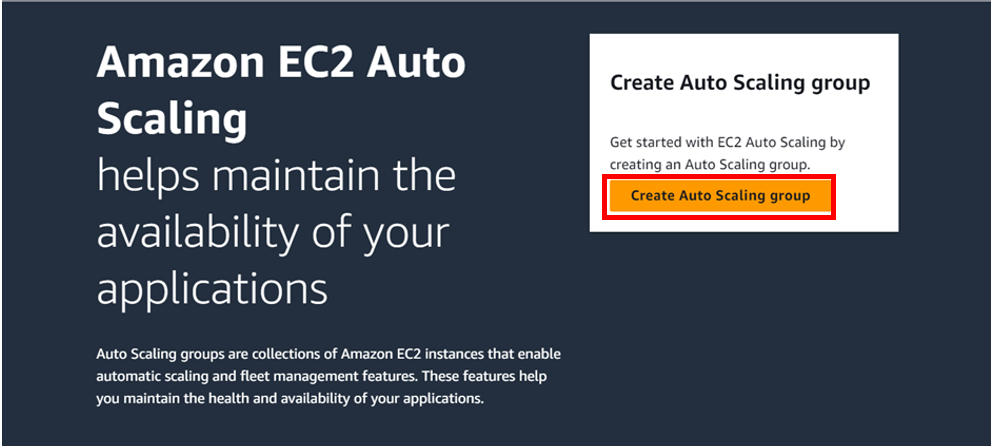
To create an autoscaling group, firstly start by creating a launch template. Then launch template specifies how to configure EC2 instances that are going to be launched by an autoscaling group. We will do this practically.
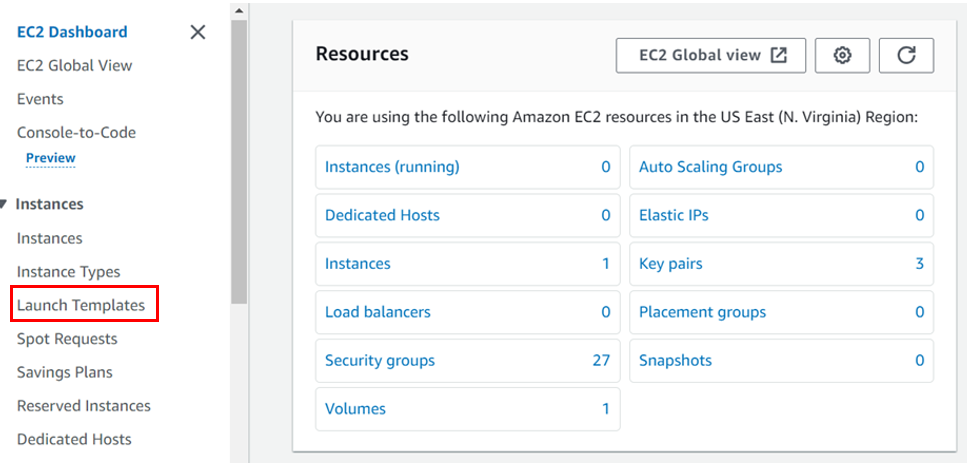
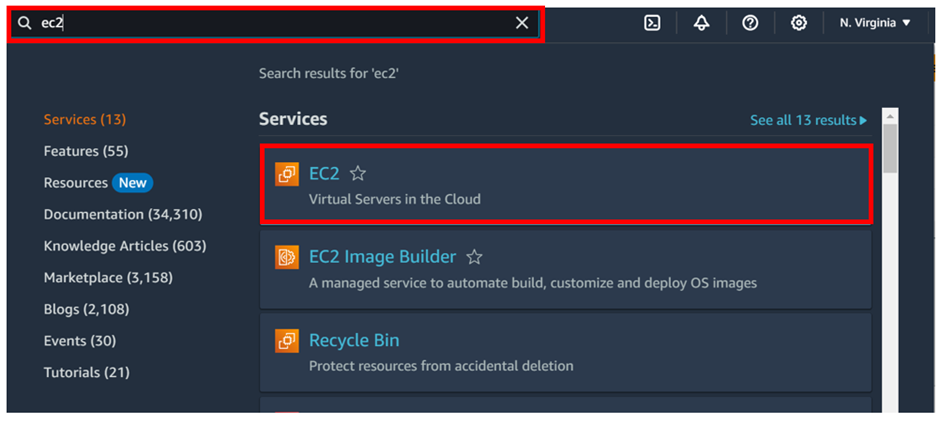
Go to the log into the management console, type EC2 in the search box, and select EC2 under services.
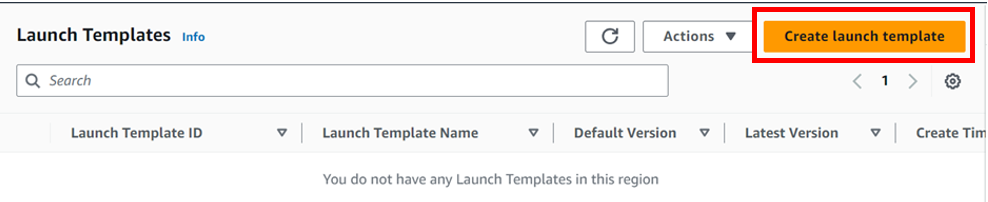
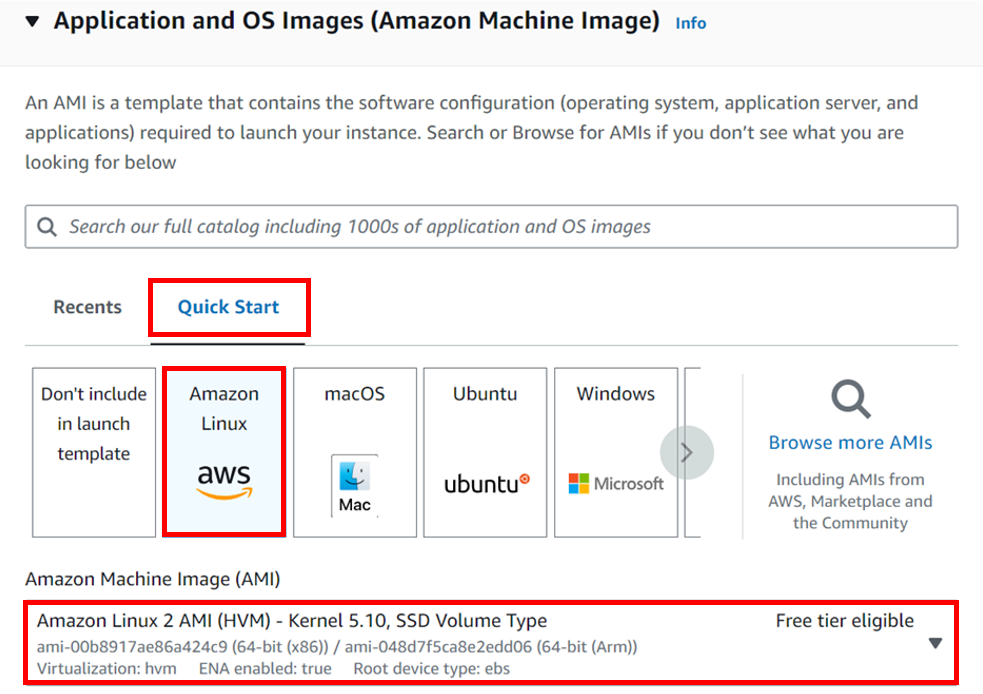
In the EC2 console on the left side of the navigation pane under instances, click launch templates, then click Create launch template.
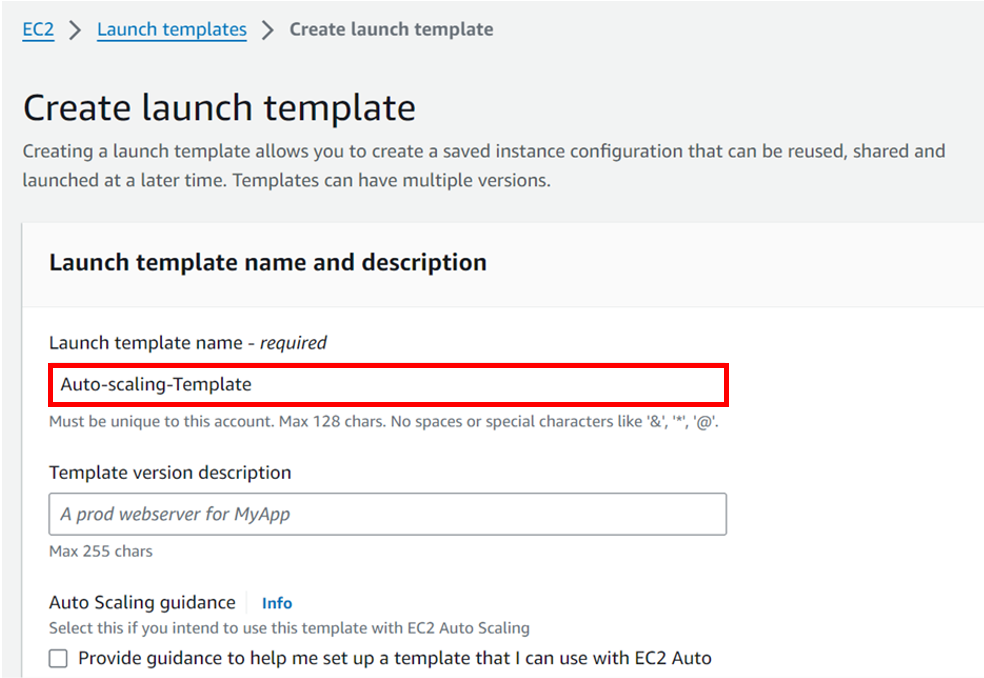
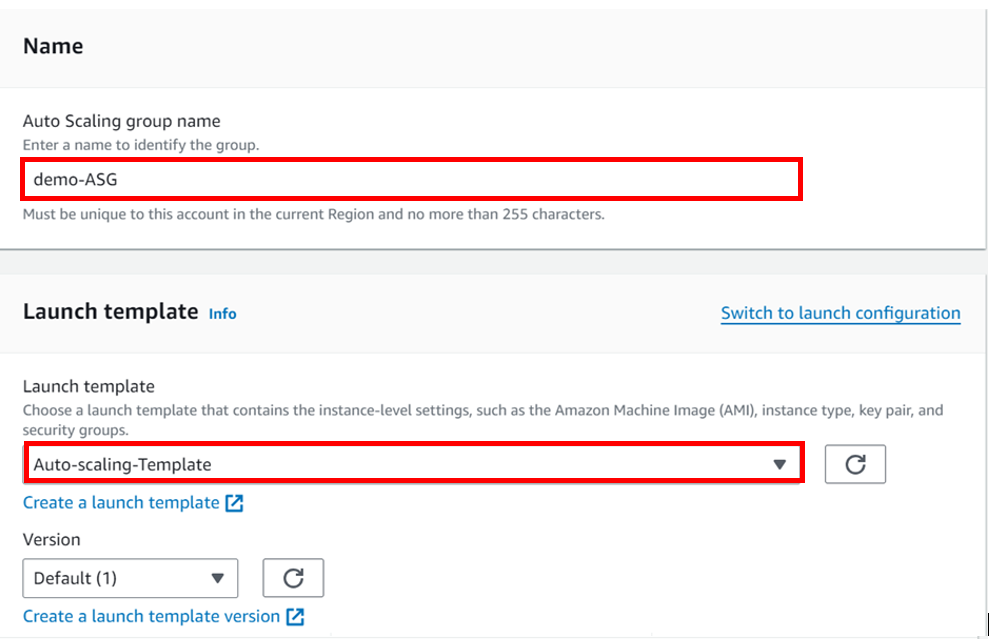
Give your template a name, I will call it Auto-scaling-Template and then you can skip the version description for now and scroll down.
Under instance type select the drop-down button and select t2. Micro because it is the free one. Then under key-pair login, select the drop-down and select your key-pair. Scroll down.
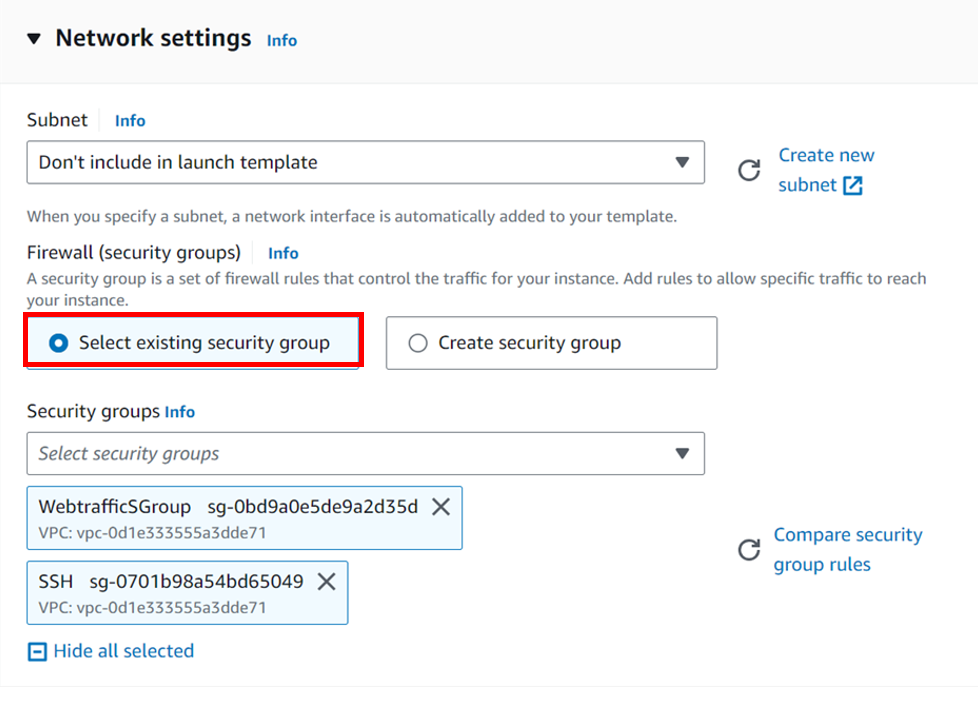
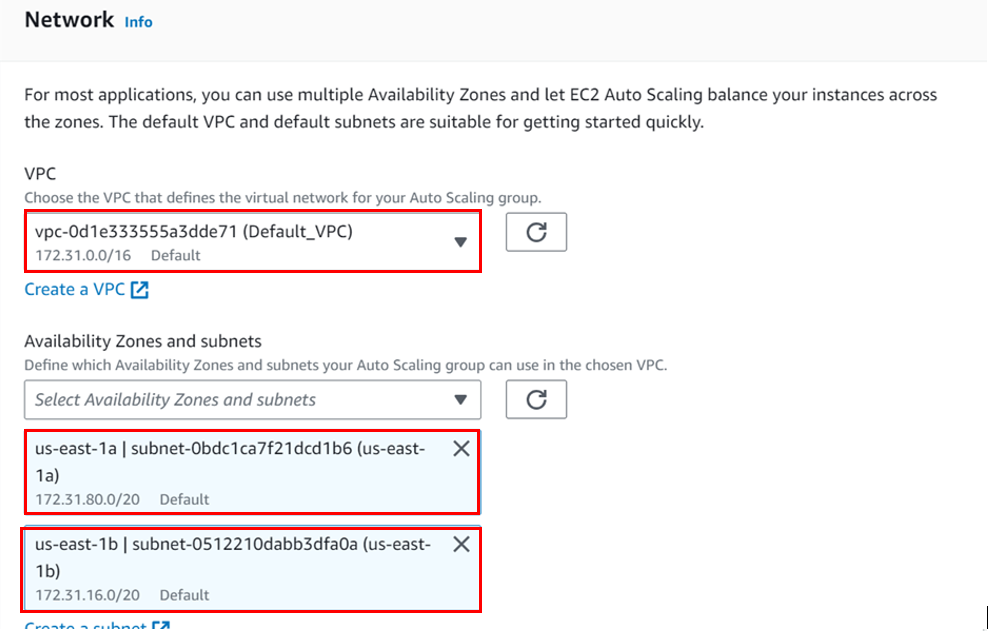
Under network, select your VPC, I will move with the default VPC and then under availability zone, select the drop-down and select your AZs, I will select Us-east-1a, and then 1b AZs then scroll down and click next.
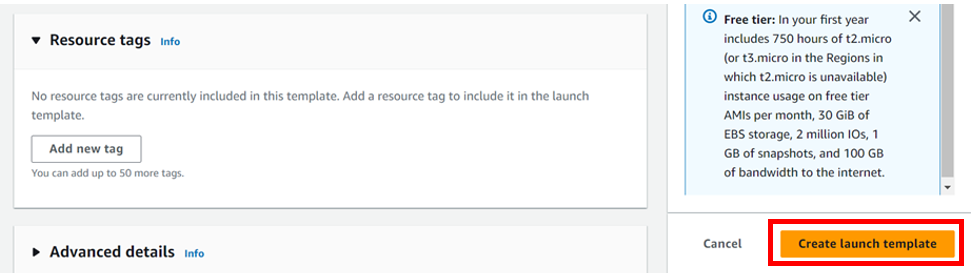
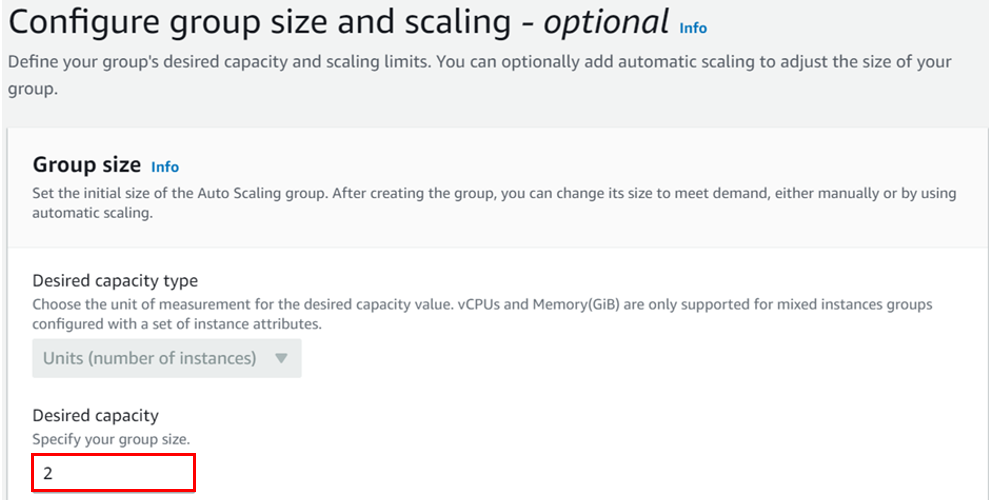
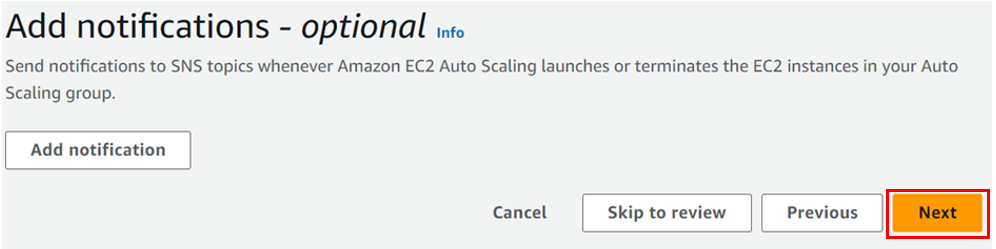
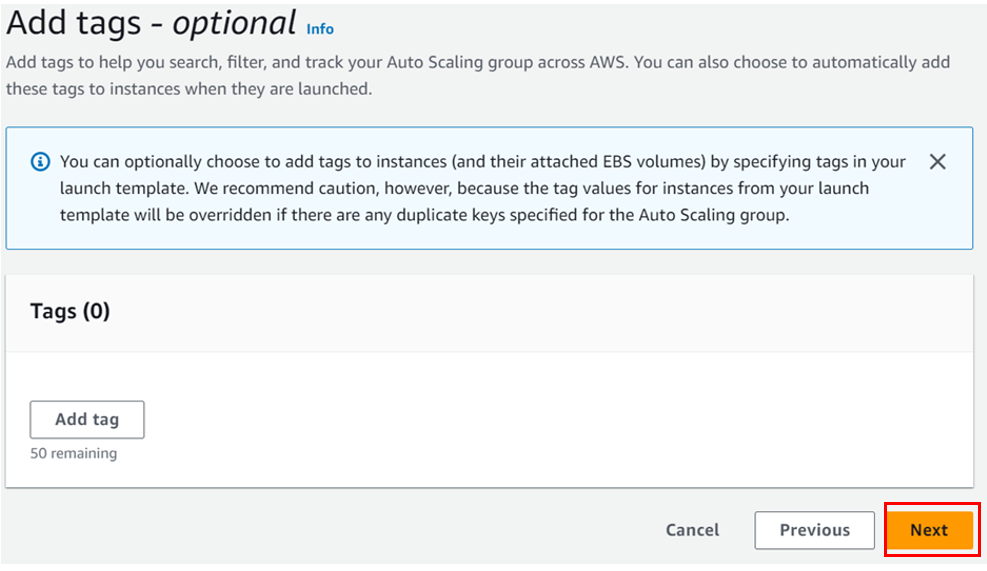
Leave tags optional and click next.
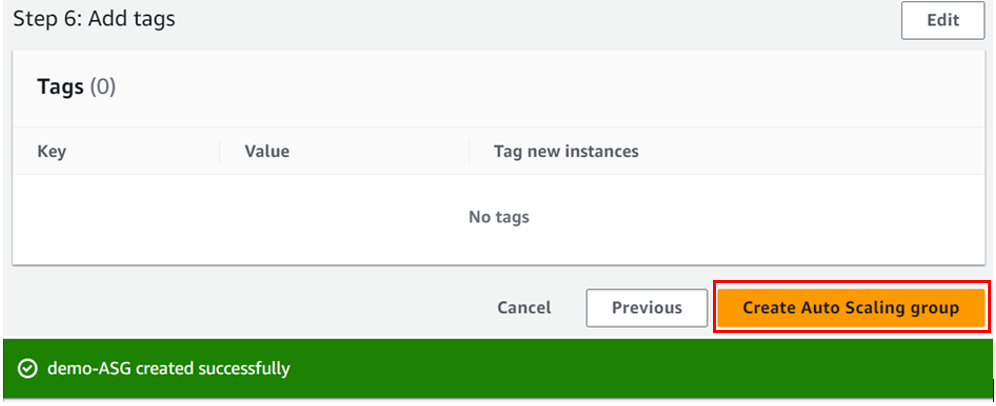
On this page, review and click create auto-scaling-group.
If you have any questions concerning this article or have an AWS project that requires our assistance, please reach out to us by leaving a comment below or email us at sales@accendnetworks.com.
Thank you!
CloudWatch metrics give the users visibility into resource utilization, application performance, and operational health. These help you make sure that you can resolve technical issues and streamline processes and that the application runs smoothly.
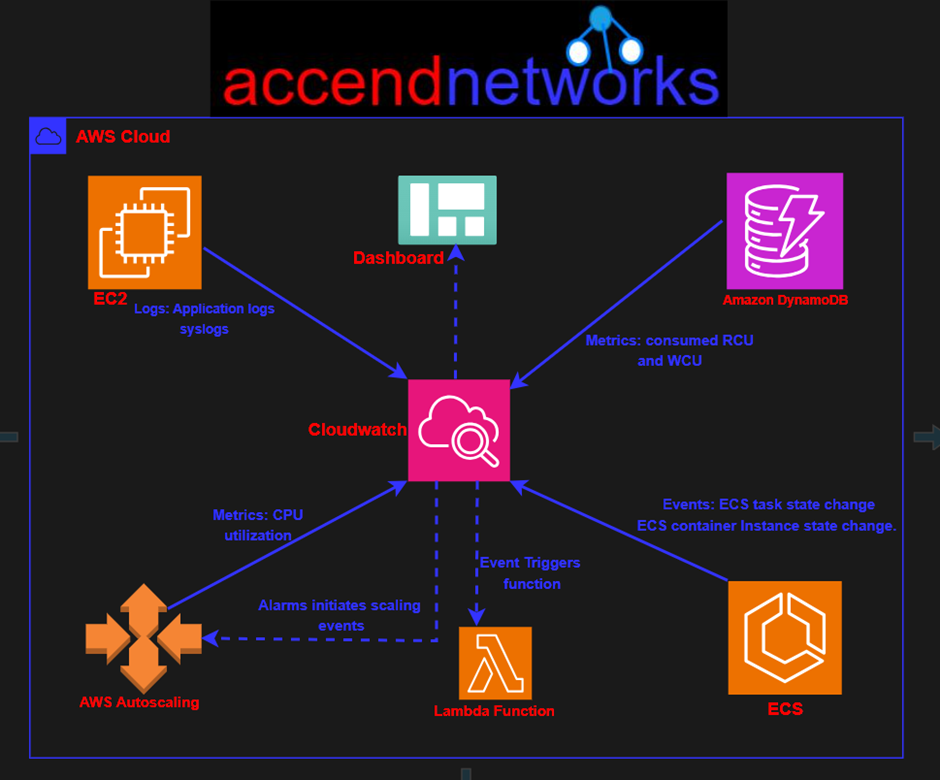

The Amazon CloudWatch service provides real-time insights into cloud operations. Hence, this enable you to optimize operational efficiency and reduce costs.
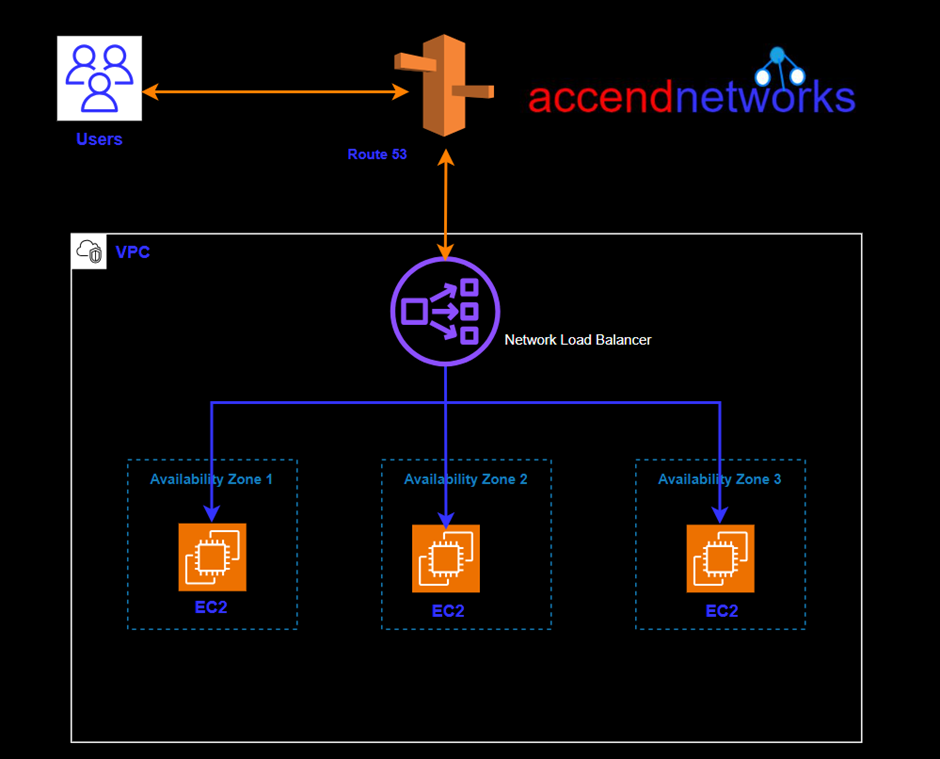
In today’s fast-paced digital era, where every millisecond counts, minimizing latency and optimizing network performance have become paramount for businesses. Network load balancing plays a crucial role in achieving these goals. By distributing incoming network traffic across multiple servers, network load balancing ensures efficient resource utilization, enhances scalability, and reduces latency.
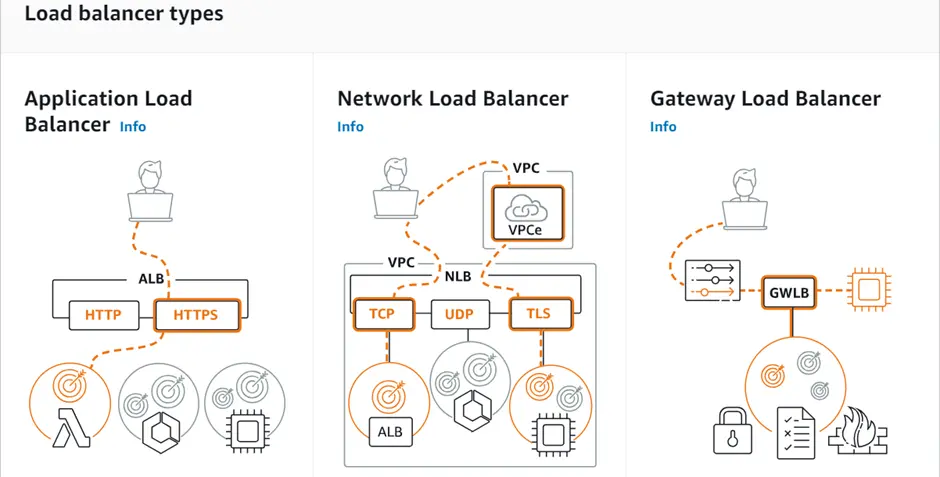
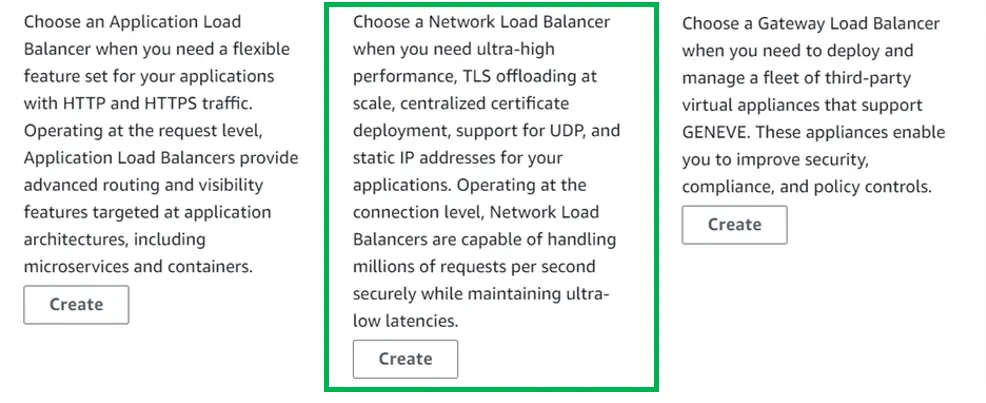
We can see in the above diagram, choose a network load balancer if you need ultra-high performance.
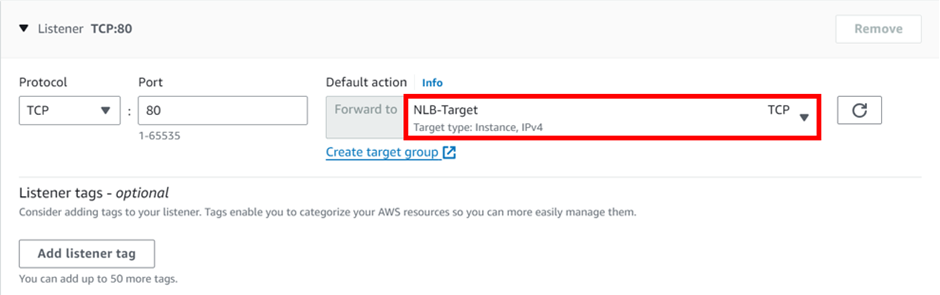
A Network Load Balancer operates on the Transport Layer (Layer 4) of the Open Systems Interconnection (OSI) model rather than the application layer, making it ideal for Transmission Control Protocol (TCP) and User Datagram Protocol (UDP) traffic. It is suitable for applications anticipating an unexpected spike in traffic because it can handle millions of concurrent requests per second.
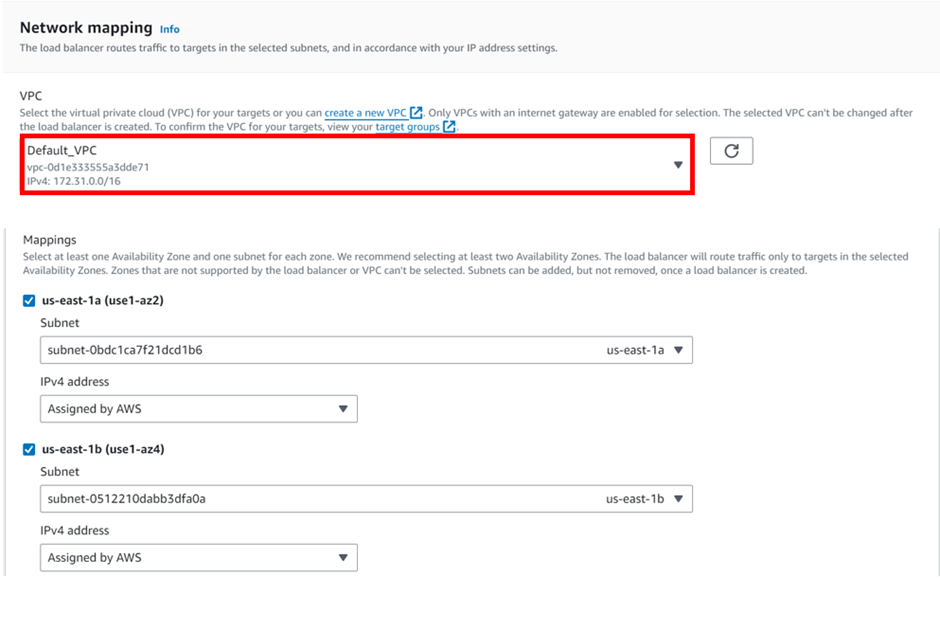
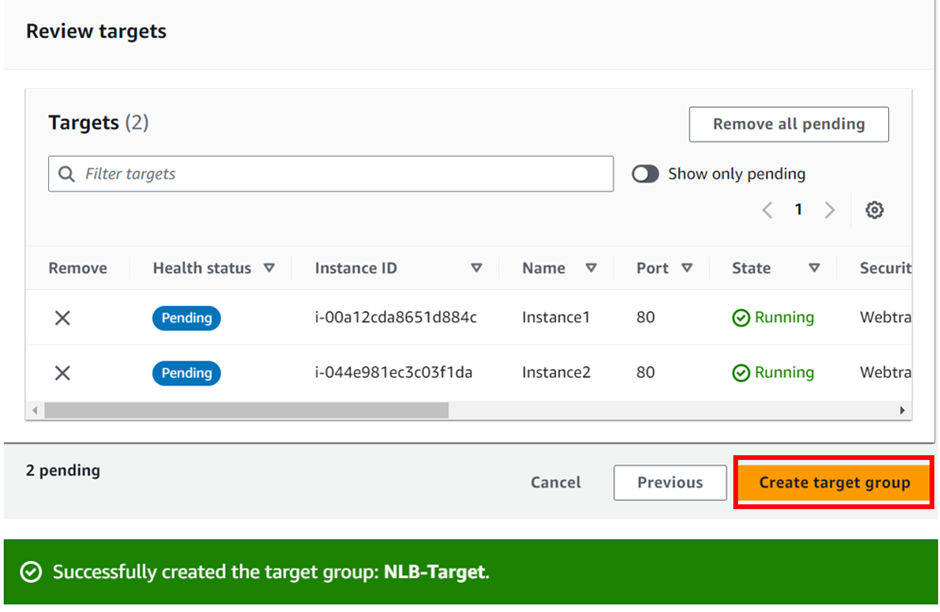
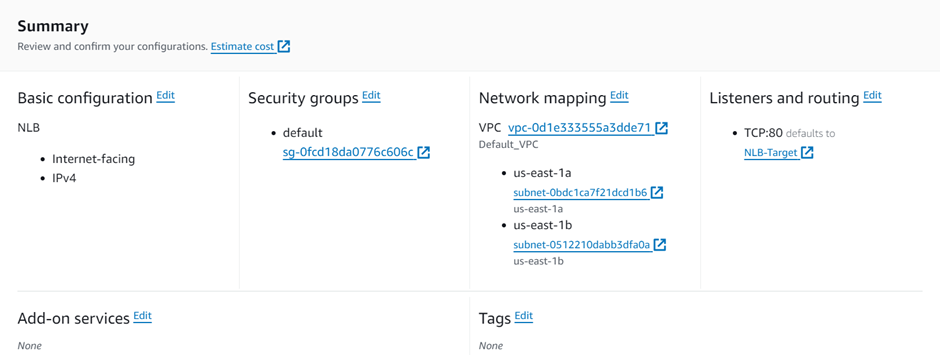
select your VPC, then under mappings select the availability zones make sure to select the AZs where your targets will reside for the EC2 instance target then under security Select the security group for your load balancer then scroll down.


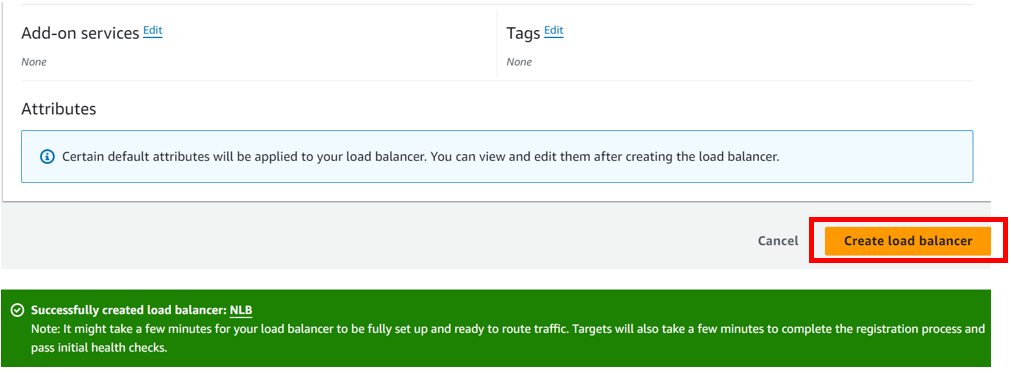
If you have any questions concerning this article or have an AWS project that requires our assistance, please reach out to us by leaving a comment below or email us at sales@accendnetworks.com.
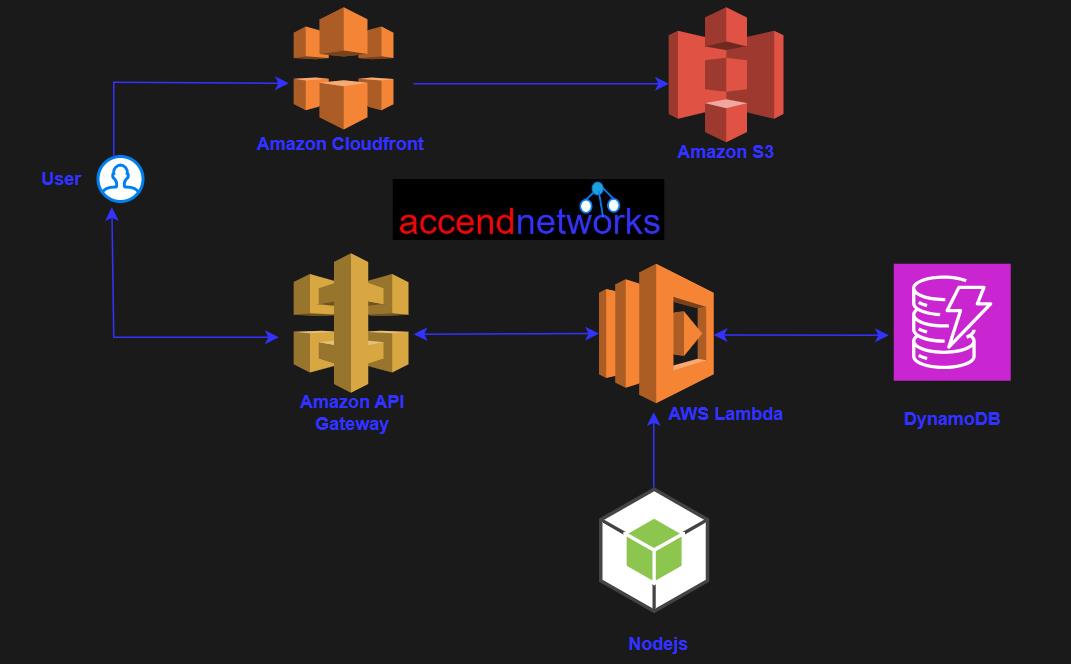
Serverless computing has emerged as a revolutionary paradigm in the world of cloud computing, transforming the way developers build and deploy applications. Unlike traditional server-centric models, serverless computing abstracts away infrastructure management, allowing developers to focus solely on writing code and delivering value to end-users.

Serverless computing is a cloud computing model where the Cloud provider manages the underlying infrastructure required to run an application.
In traditional architecture, developers manage the underlying infrastructure, such as servers, storage, and networking. In serverless computing, the cloud provider manages the infrastructure, allowing developers to focus on writing code.
Conclusion:
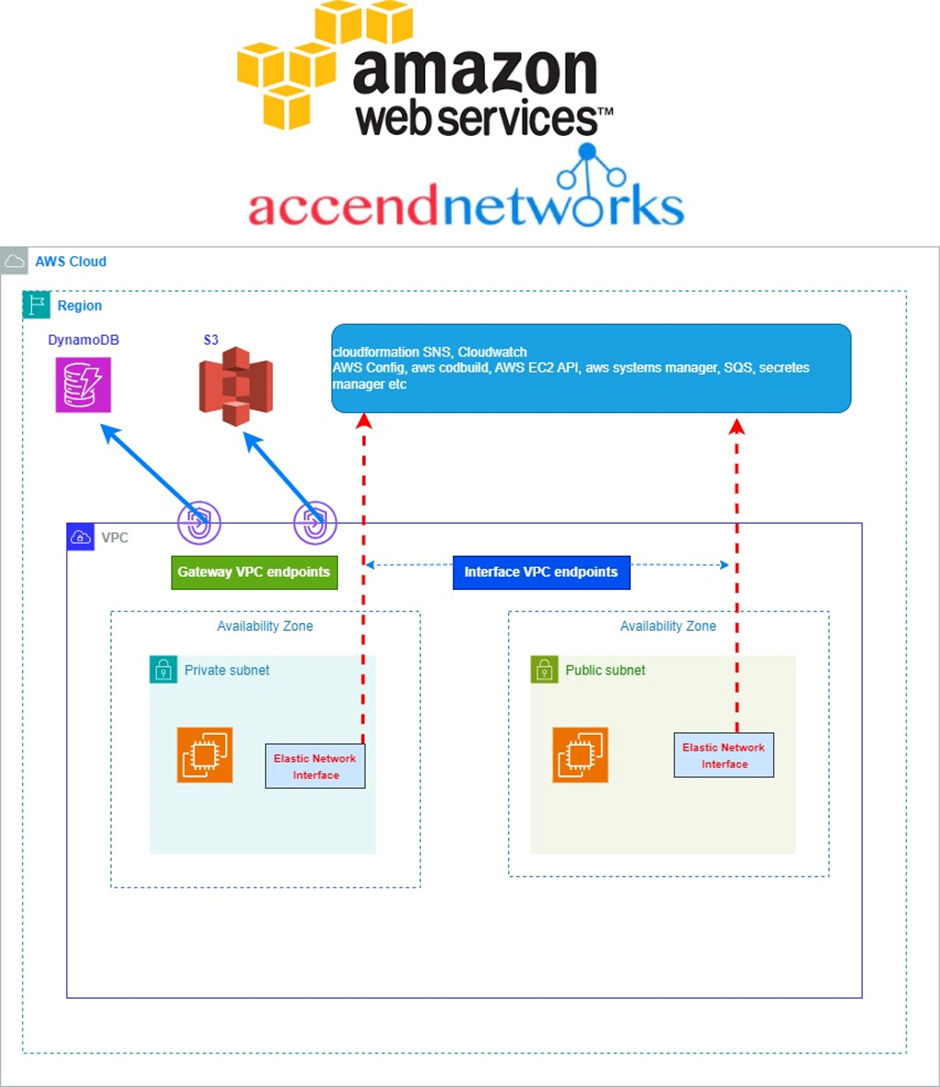
Many AWS customers run their applications within a VPC for security or isolation reasons.
For example, previously, if you wanted your EC2 instances in your VPC to be able to access DynamoDB, you had two options.
You could use an Internet Gateway (with a NAT Gateway or assigning your instances public IPs)
You could route all of your traffic to your local infrastructure via VPN or AWS Direct Connect and then back to DynamoDB.
Both of these solutions had security and throughput implications and it could be difficult to configure NACLs or security groups to restrict access to just DynamoDB.
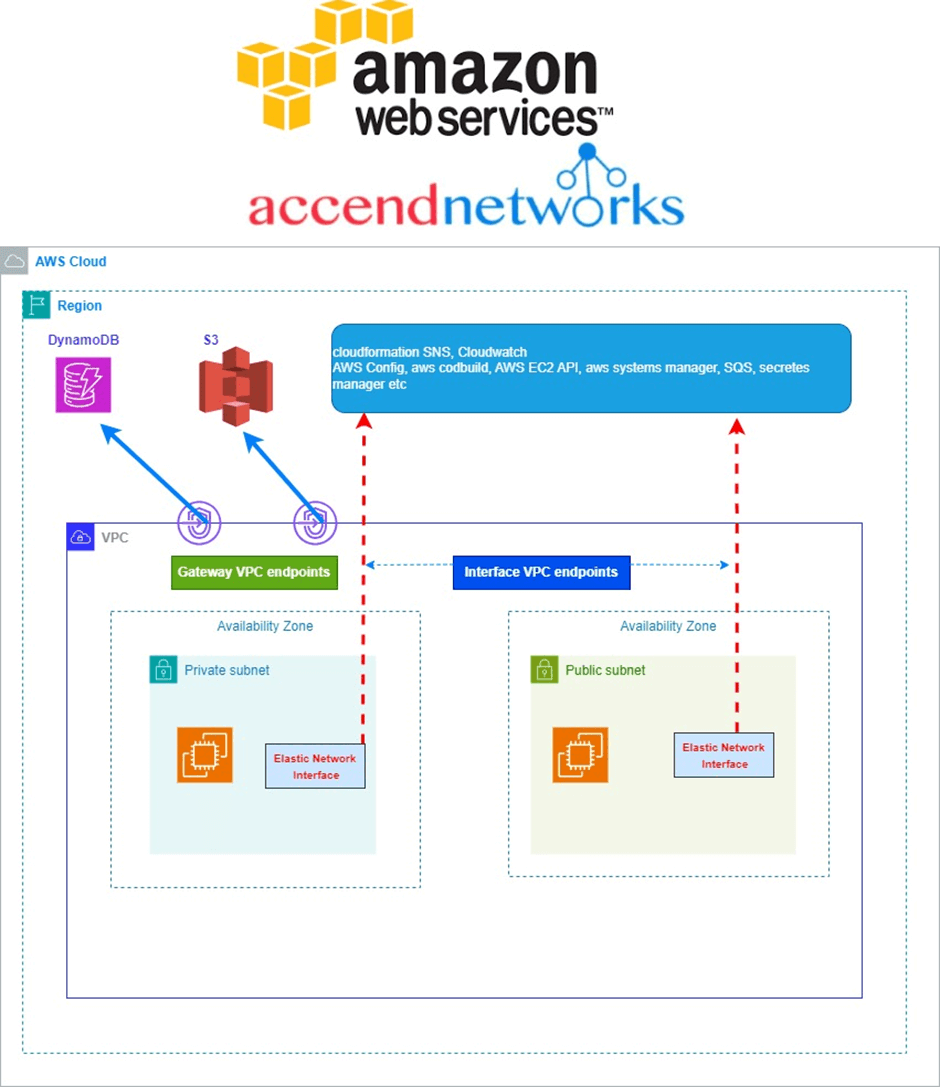
A VPC endpoint is a service offered by AWS VPC, which lets customers privately connect to supported AWS services and VPC endpoint services powered by AWS Private Link.
VPC Endpoints are virtual devices, that can be horizontally scaled, redundant, and highly available VPC components that allow communication between instances in your VPC and services without imposing availability risks or bandwidth constraints on your network traffic.
By using VPC Endpoints we don’t require public IP addresses for Amazon VPC instances to communicate with the resources of the service, and this network traffic between an Amazon VPC and an AWS service does not leave the Amazon network, which is our exact requirement.
VPC endpoints are virtual devices. They are horizontally scaled, redundant, and highly available Amazon VPC components that allow communication between instances in an Amazon VPC and services without imposing availability risks or bandwidth constraints on network traffic.
In other words, VPC endpoints enable you to privately connect your VPC to supported AWS services and VPC endpoint services powered by Private Link without requiring an IGW, NAT instance, VPN connection, or Direct Connect connection. Instances in your VPC do not require public IP addresses to communicate with resources in the service. Traffic between your VPC and the other service does not leave the Amazon network.
There are two types of VPC endpoints we’ve:
1.Gateway Endpoints
2. Interface Endpoints
A VPC Gateway Endpoint is a way to connect your VPC to an AWS service like S3 or DynamoDB without going through the public internet or needing to set up a VPN connection. This helps improve security and can also improve network performance since the traffic stays within the AWS network.
So if we want to utilize S3 or DynamoDB services inside VPC using Gateway Endpoints is recommended over Internet Gateway, NAT, or any other service, as this method also improves security, and latency for the application traffic.
Interface endpoints enable connectivity to services over AWS Private Link. These services include some AWS managed services, services hosted by other AWS customers and partners in their own Amazon VPCs (referred to as endpoint services), and supported AWS Marketplace partner services. The owner of a service is a service provider. The principal creating the interface endpoint and using that service is a service consumer.
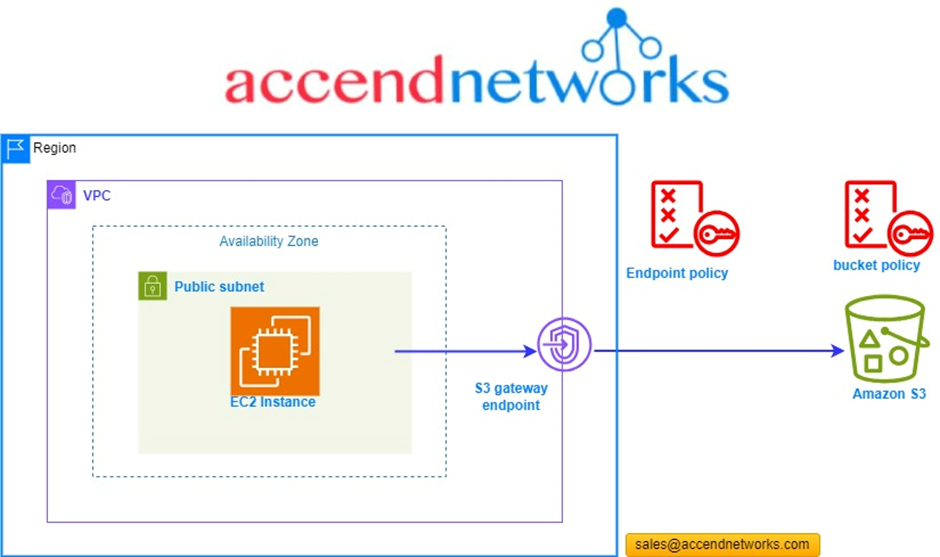
The following scenario connects to an AWS S3 bucket from an EC2 instance (within
a public subnet) via a VPC endpoint.
We are going to create a VPC gateway endpoint. We will use policies to see how we can control traffic access to the AWS S3 bucket. According to our reference architecture, we have a VPC, a public subnet, and an instance running.
When we create our endpoint, a route will be added to our route table which would point to, a destination which would result in the IP addresses of AWS S3. What happens is that this is a more specific route than any other route like the route going out to the internet. So, we get that any connections that go to the AWS S3 endpoints should be routed by the gateway endpoint and will not use the public internet.
Now let’s head over and create the VPC endpoint.
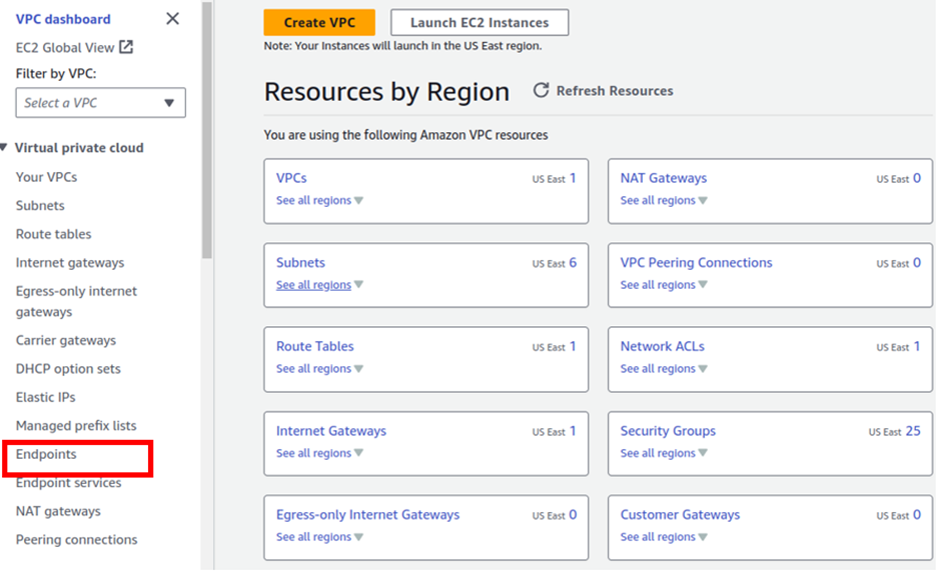
Log into the management console with an admin user privilege. and in the search box, type VPC, then select VPC under services.

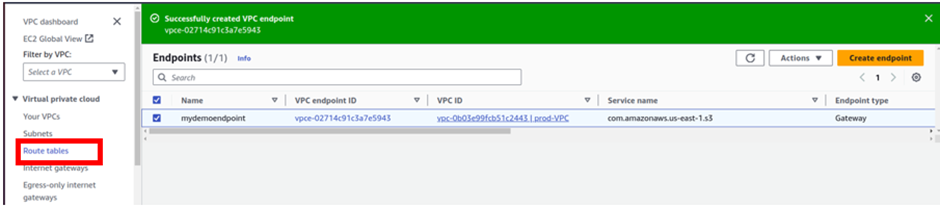
In the VPC dashboard on the left side of the navigation pane select Endpoints.
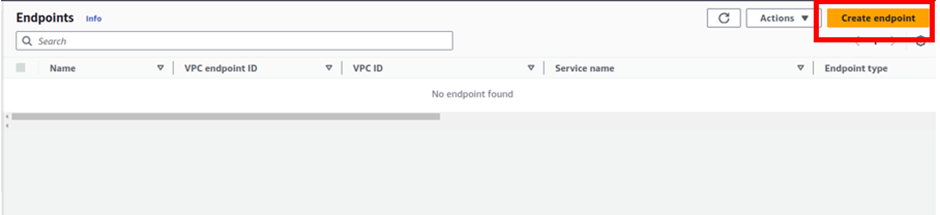
On the Endpoint dashboard, click Create Endpoint.
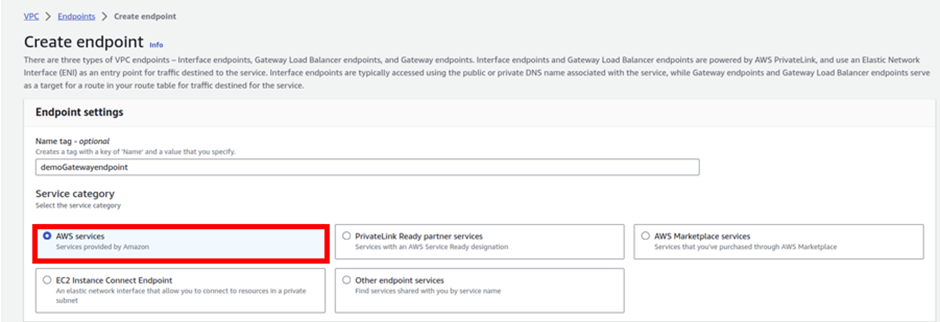
In the create endpoint dashboard, we will enter the settings to create the endpoint.
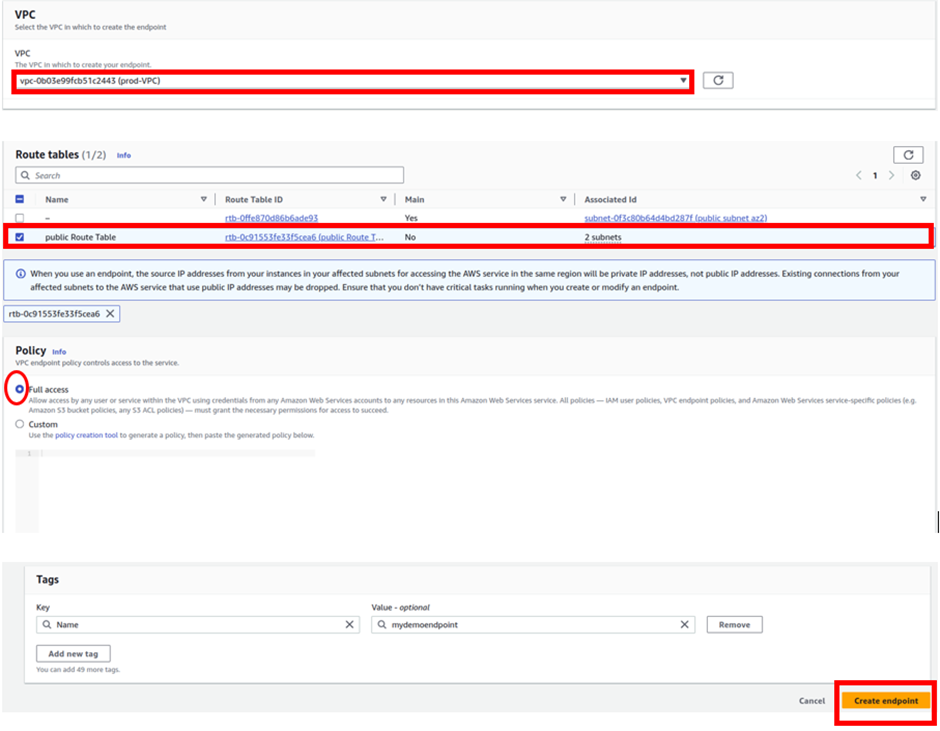
Under the name tag, give your endpoint a name, and call it Demogatewayendpoint.
Then under the service category, leave it on AWS service. Then scroll a little beat down under services.
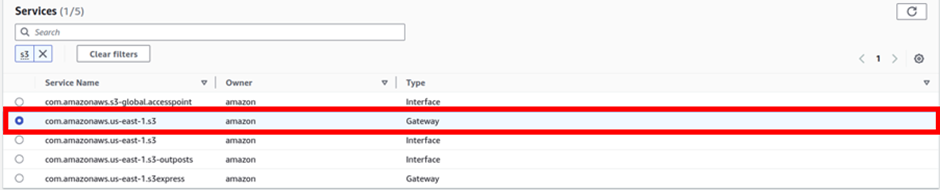
Under services, type S3 in the search box then select the radio button with the gateway type endpoint. Scroll a little beat down to the VPC section.
In the VPC section we will select the VPC we will create this endpoint. I have a VPC created already. Create a VPC, refer to our blog post on creating a custom VPC from scratch.
So, under VPC, I will select the drop-down button and select prod-VPC. Endpoint enables our resources not to access the public internet but to use AWS’s private network.
In the Route table section, I will select the public Route table. Then under policy, I will select full access.
These are the only settings we need to create our Endpoint, scroll down and click Create Endpoint.
And there we go; our endpoint has been successfully created.

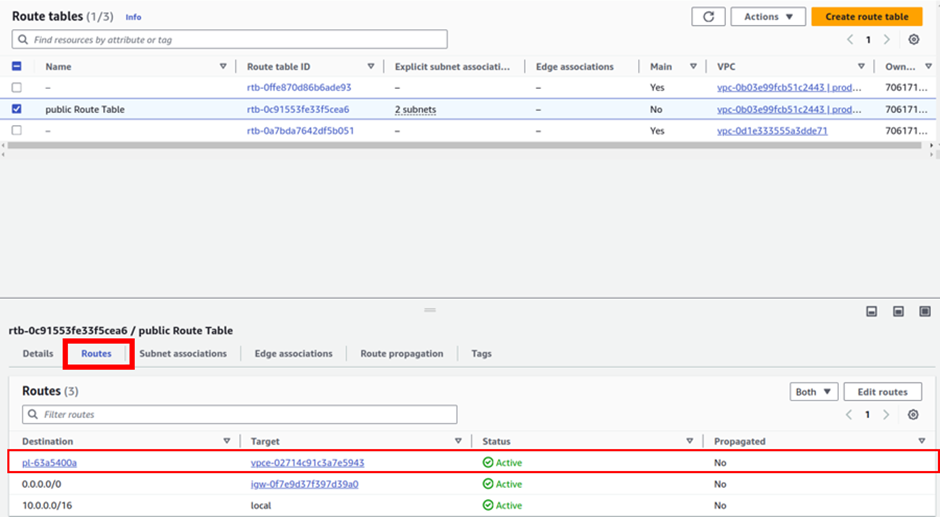
When you create an Endpoint, an endpoint route is added to the route table you selected during creation. Let’s verify this, on the left side of the VPC dashboard, click route tables.
On the route table dashboard, select your public route table then move down to the routes tab and here you will see the VPC endpoint route added to this route table.
With all this done, we will now go to the verification section and test our endpoint. We will do this with an EC2 instance, I have already created an Instance, if you don’t have one create it and then proceed.
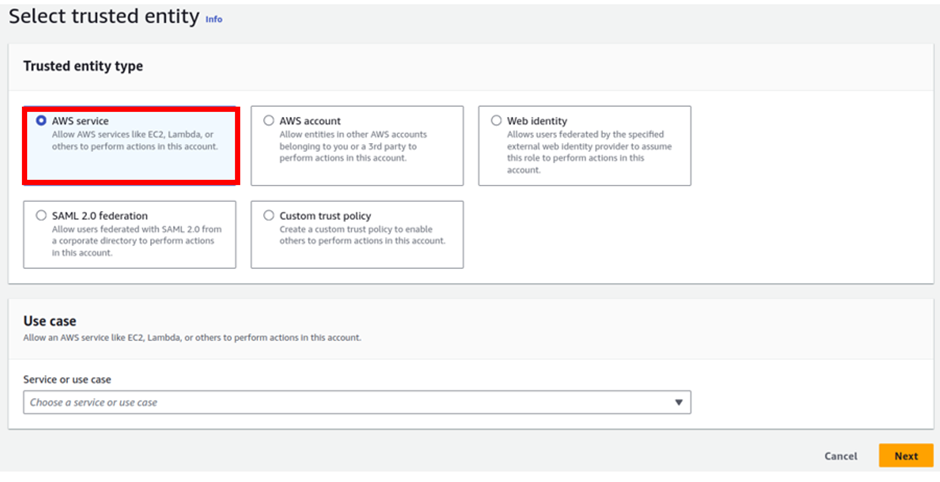
What I will now create is an I am role to allow EC2 Instance access S3 bucket. Straight away let’s proceed to the I am dashboard then select role on the left side of the navigation pane.

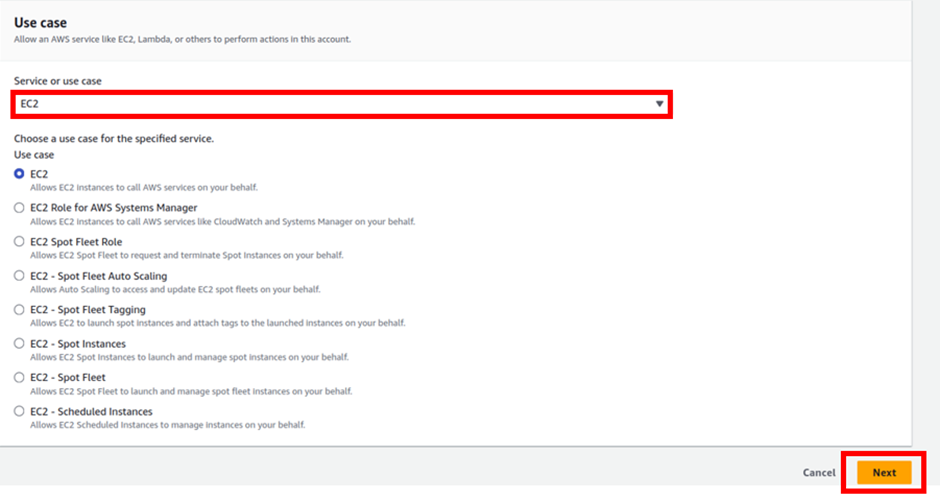
For trusted entity, select AWS services then under use case, select the dropdown and select EC2, then click next.
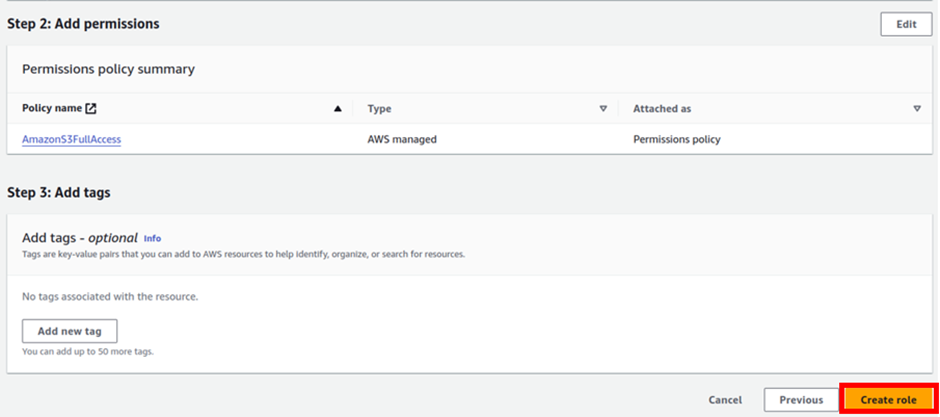
In the add permissions dashboard, type S3 in the search box tick the box with S3 full access then click next.

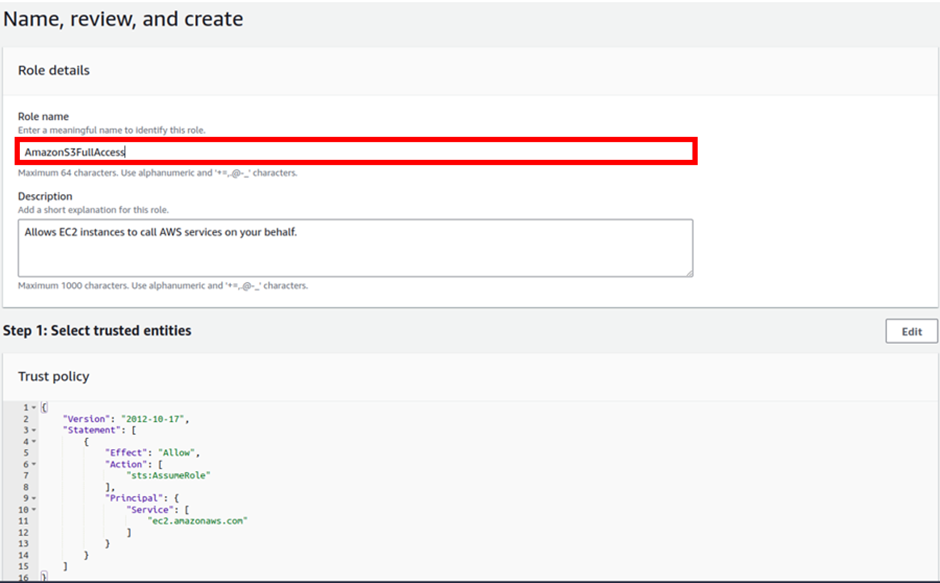
Review the policy then click Create Role.

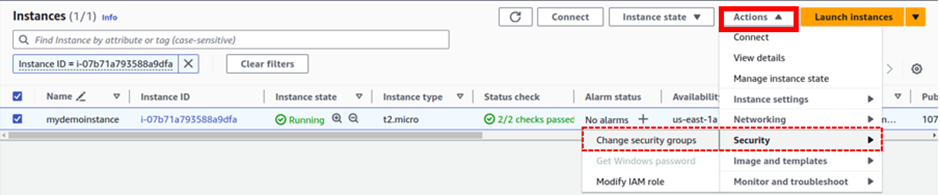
Next, we will attach this role to our EC2 instance. So, let’s go to the EC2 instance console.
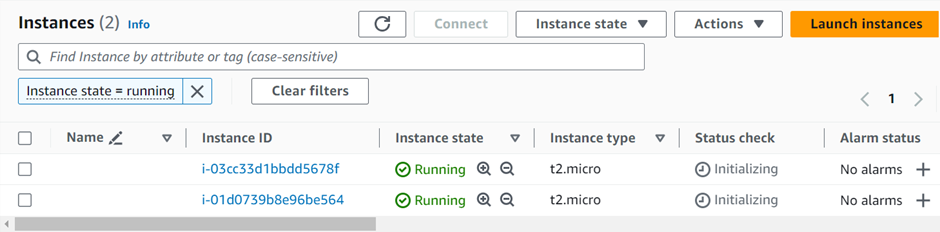
I have one instance running.
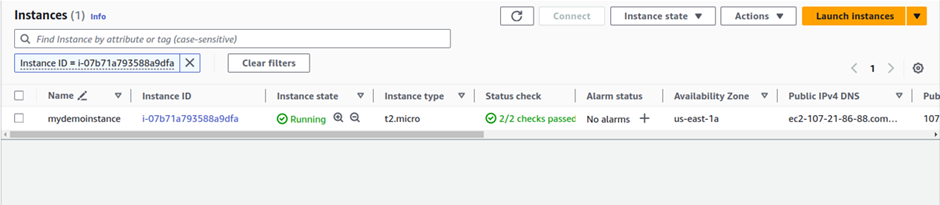
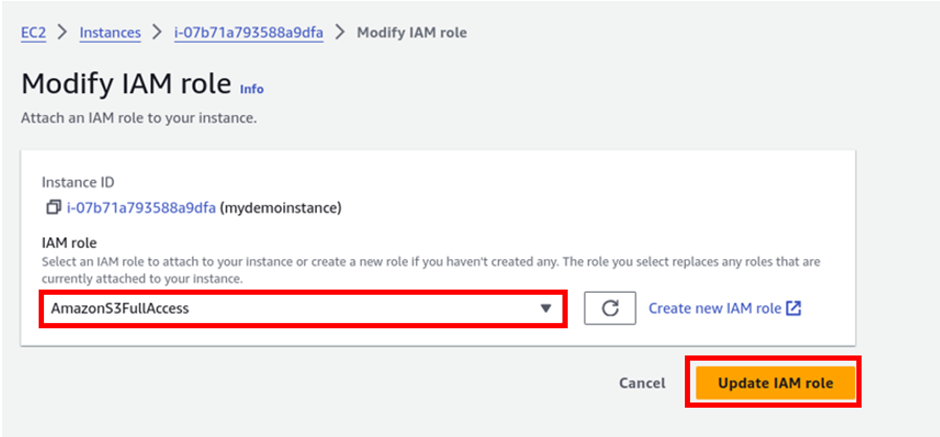
Select it then choose the action drop-down button move down to the security tab then select modify I am role.
In the modify I am role dashboard, select your S3 full access role then click update role.
Next, let’s head to the S3 console, I had already created a bucket, and uploaded files to it. So go ahead and create a bucket for yourself.
Then let’s now SSH into our EC2 instance and then try to list buckets, if we will be able to get access via the endpoint. Success As we can see we can list all the buckets.
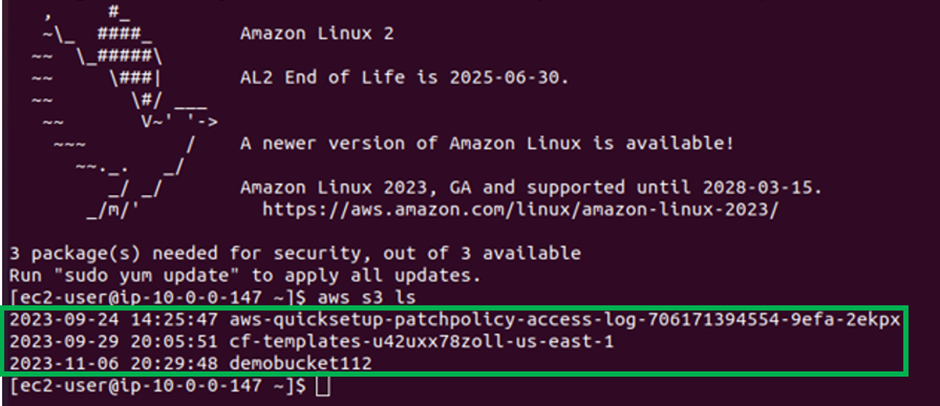
Again, if I try to list the contents of a bucket, I call my demo bucket, and we get success.

To verify that we were accessing the bucket via the endpoint, let us go back to the endpoint and modify its permission to deny. Go back to your endpoint, select it, move to the policy tab, change the policy from allow to deny, and then click save.
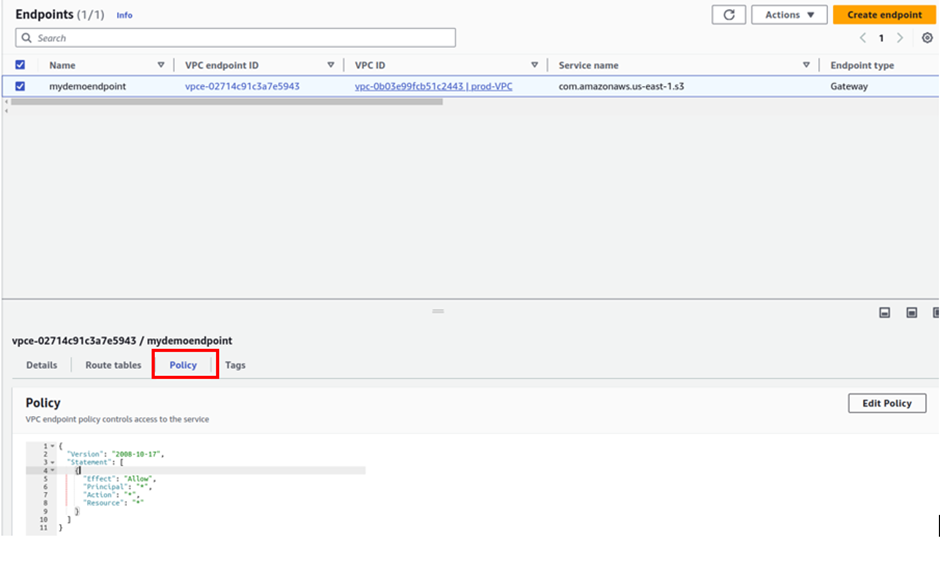
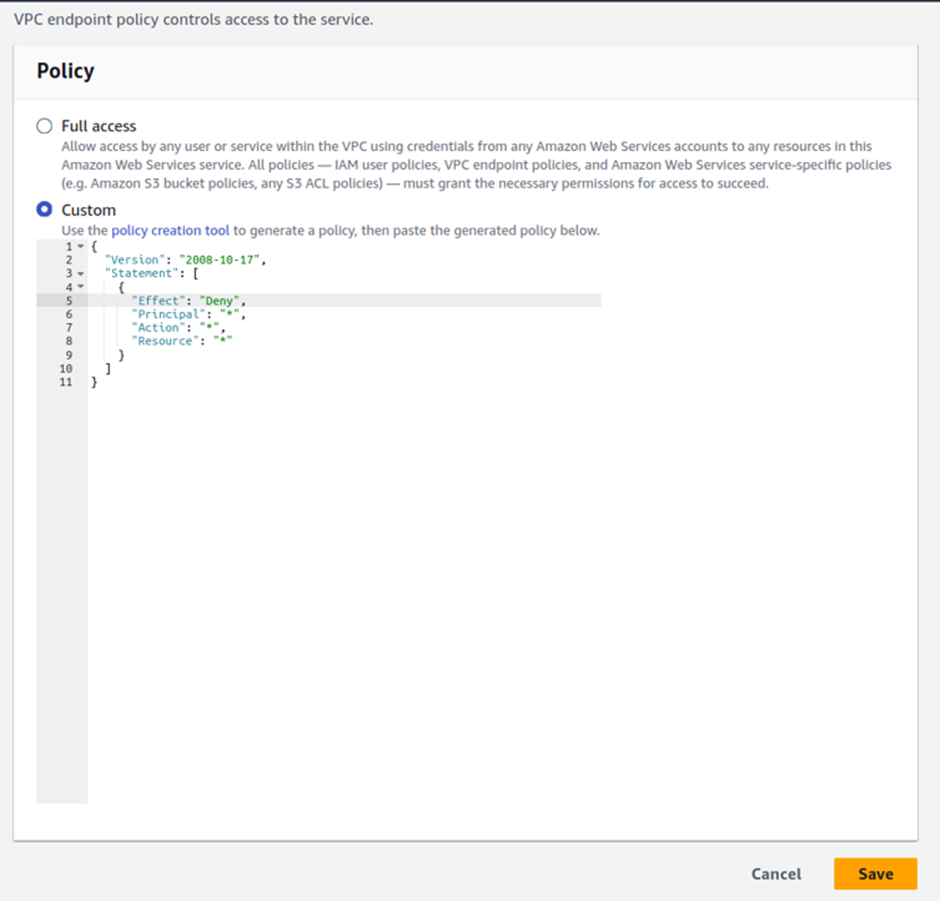

Now come back to your terminal and try to list the contents of your buckets, you will get access denied.

This demonstrates that we were only accessing our bucket plus its contents via the endpoint.
This brings us to the end of this demo. Clean up to avoid surprise bills.
If you have any questions concerning this article or have an AWS project that requires our assistance, please reach out to us by leaving a comment below or email us at sales@accendnetworks.com.
Thank you!