Accend Networks San Francisco Bay Area Full Service IT Consulting Company
Use the Cisco Software Checker to search for Cisco Security Advisories that apply to specific software releases of the following products: Cisco ASA, FMC, FTD, FXOS, IOS, IOS XE, NX-OS and NX-OS in ACI Mode.
To use the tool, select a product, platform (as required) and one or more releases, enter the output of the show version command, or upload a text file that lists specific releases. Then narrow the check to certain advisories, if desired.
The availability of security fixes after the End of Sale is defined in the product’s End-of-Sale announcement, as explained in the Cisco End-of-Life Policy. Additional information about Cisco software updates, vulnerability rating and scoring is available in the Cisco Security Vulnerability Policy.
This tool does not provide information about Cisco IOS XR Software or interim software builds. Also note that for Cisco ASA, FMC, FTD and FXOS Software, the tool only contains vulnerability information for Cisco Security Advisories first published from January 2022 onward, and for NX-OS Software and NX-OS Software in ACI Mode from July 2019 onward.
To find vulnerabilities using the Cisco Software Checker, follow these steps:
Access the Cisco Software Checker:
Visit the Cisco Software Checker web page. You can find this tool on Cisco’s official website or by searching for “Cisco Software Checker” in your preferred search engine.
https://sec.cloudapps.cisco.com/security/center/softwarechecker.x
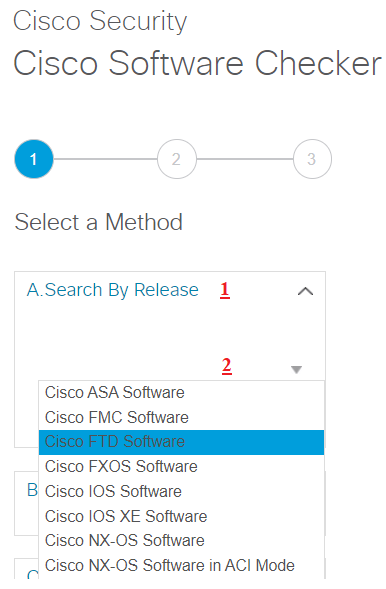
Enter the details of the Cisco software version you want to check for vulnerabilities. This typically includes the software name, version number, and possibly other relevant information
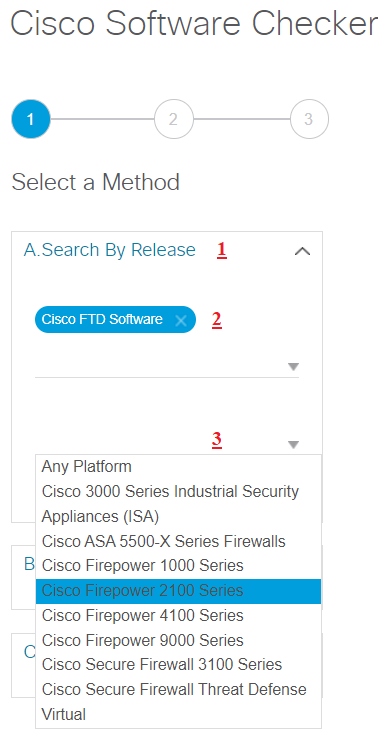
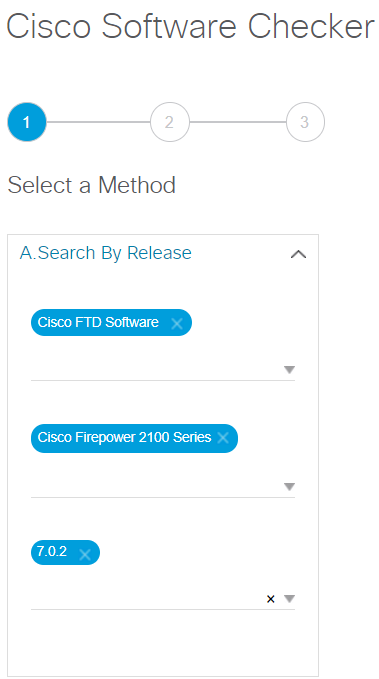
3. Select FTD platform (in this tab you can select your device model)
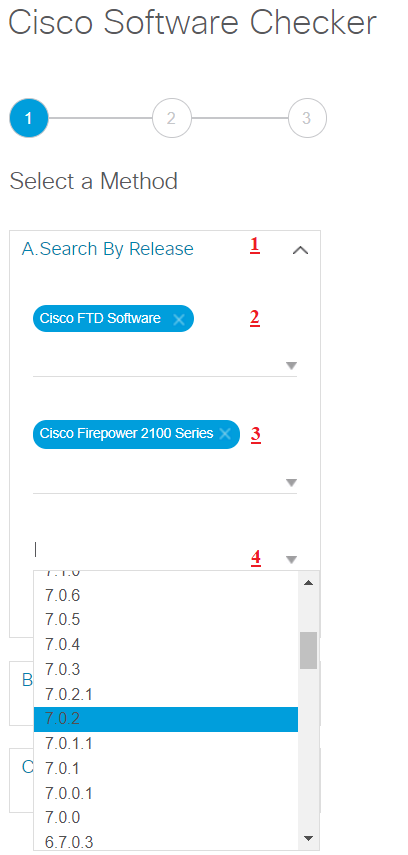
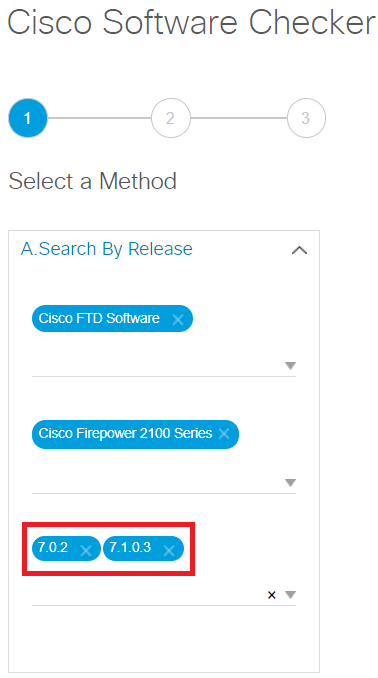
4.Select one or more FTD releases (In this tab you can select current OS version)
You can select more than one OS version too.
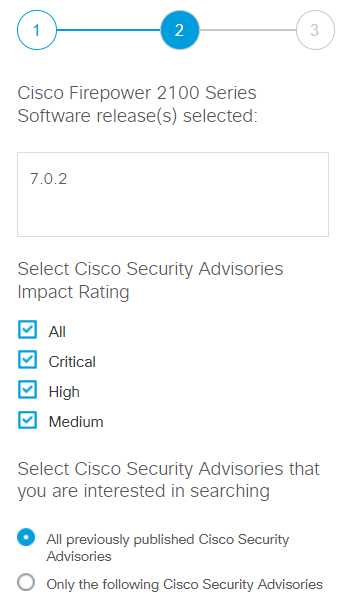
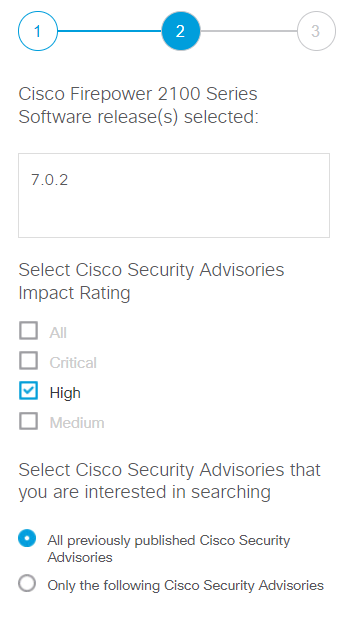
Click the ” Continue “button to initiate the vulnerability check. You can check/uncheck Cisco Security impact rating, like All, Critical, High, Medium etc.
Click the ” Continue “button to initiate the vulnerability check
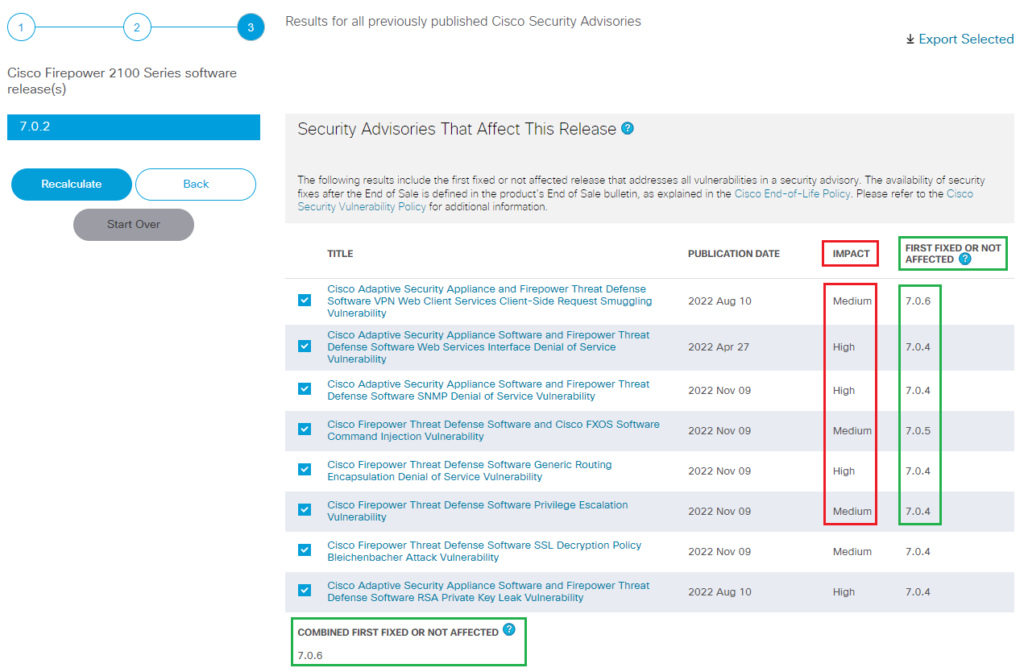
The tool will generate a report that indicates whether the software version you entered is vulnerable to any known security vulnerabilities. The report may include details about the vulnerabilities, their severity, and potential impact.
In this report, we can see all impacts of Cisco FTD 2100 Series software release 7.0.2 and workaround/fixes as well.
For any identified vulnerabilities, the tool will provide recommendations on how to address the issues. These recommendations may include upgrading to a patched version, applying workarounds, or implementing other security measures.
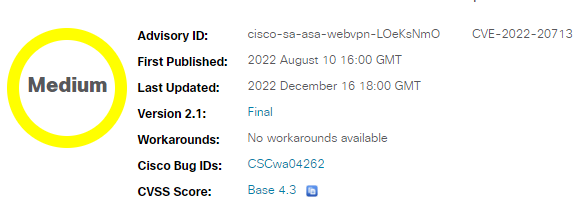
Select any Title and you’ll get more information about that BU
• Summary
• Affected Products
• Vulnerable Products
• Determine the Software Configuration
• Workarounds
• Fixed Software
The tool may provide links to relevant Cisco Security Advisories or other documentation for further information about the vulnerabilities and how to mitigate them.
Based on the results and recommendations, take appropriate action to address the vulnerabilities. This may involve updating your software to a non-vulnerable version, applying patches, or implementing other security measures.
Remember that the Cisco Software Checker is designed to help you identify vulnerabilities in known software versions based on information provided by Cisco. It’s important to regularly check for updates and follow Cisco’s security advisories to stay informed about the latest vulnerabilities and recommended actions. Additionally, consider implementing a comprehensive security strategy that includes regular patching, network segmentation, intrusion detection, and incident response planning to enhance your overall network security.
Public Key infrastructure
The word infrastructure describes PKIs since it does not refer to one single physical entity. Instead, it refers to the components used to encrypt data and authenticate digital certificates. These components include the hardware, software, policies, procedures, and entities needed to safely distribute, verify and revoke certificates.
Public key infrastructure (PKI) is the well-established protocol for organizations that need to secure distributed points of communication, such as browsers and IoT and mobile devices. For device manufacturers and application developers, revenue security depends on creating a highly secure ecosystem that ensures regulatory compliance and consumer trust.
The security needs of networks and the infrastructure protecting them change over time in response to new threats and advances in technology. With tens of billions of IoT devices already in operation, the potential attack vectors for hackers to steal data or infiltrate systems are great and growing exponentially. PKI is a vital element of IoT network security, provisioning unique device identities, bolstering authentication protocols, and enabling trusted communication channels between servers and devices. However, not all implementations follow PKI security best practices, resulting in flawed and vulnerable systems.
in technical terms, PKI is a two-key asymmetric cryptosystem that supports various information technology (IT) systems in their pursuit of high-level information confidentiality, encryption and confidence. The two keys, in this case, are also the two main pieces that facilitate this secure data management: a public key and a private key.
To put PKI in the best practice possible as well efficiently I would like to use the 7-Step Method in order.

Define key and certificate security policies and protocols that address every stage of their lifecycle. Establishing a PKI may seem straightforward from the outset, but when one considers the millions of certificates that will possibly be issued, their expirations, and the security issues that would require revocation, it can quickly become very complicated. This becomes a potential security flaw, as the more complex a PKI is, the more difficult it is to track identities and revoke certificates that could be used to breach a system.
An important PKI design best practice is to plan for the entire lifecycle of certificates. By fully mapping the policies regarding the issuing, updating, monitoring, expiry, revocation, and decommissioning of certificates, all future managers of the PKI will have a clear outline of what should happen with certificates at all stages of their existence.
The cryptographic keys that are used in the PKI are the most vulnerable point of a PKI deployment and must always be protected. Hackers can use a variety of techniques to analyze and detect keys while they are in use or transit. Once in control of these keys, they can decrypt private data or pose as authenticated users to access systems. Within this context another PKI security best practice is to always use hardware security modules (HSMs), where possible, to store keys and perform cryptographic operations.
If you need to provision older devices without a secure update mechanism, which are already in the field, make sure to use white-box cryptography so that keys are not exposed in the clear during the provisioning process. Issuing certificates and provisioning keys and identities as PKI security best practices are still only one step in running a secure PKI. The ongoing integrity must be maintained. This includes a process for revoking keys and certificates that can no longer be trusted. Certificate authorities should maintain a certificate revocation list, which contains all suspended security certificates. Communications with a device or application using a revoked certificate should be blocked. For example, an IoT device using a certificate that is no longer authorized will not be able to gain access to a server.
Creating a highly secure and trusted ecosystem for your organization’s devices or applications depends on a successful and ongoing PKI deployment that follows PKI implementation best practices. While it’s possible to develop and manage a PKI internally, it requires resources and expertise outside of many organizations’ capabilities and may not scale smoothly as production grows.
Configuring IP Cisco Secure Firepower Threat Defense (FTD) & Adding a Secure Firepower Management Center (FMC)

2. Configuring add manager on a FTD Device:
Use the following command to add the FMC manager to the FTD device:
configure manager add <FMC_IP> <REGISTRATION_KEY>
Replace `<FMC_IP>` with the IP address of the FMC and `<REGISTRATION_KEY>` with the registration key provided by the FMC.
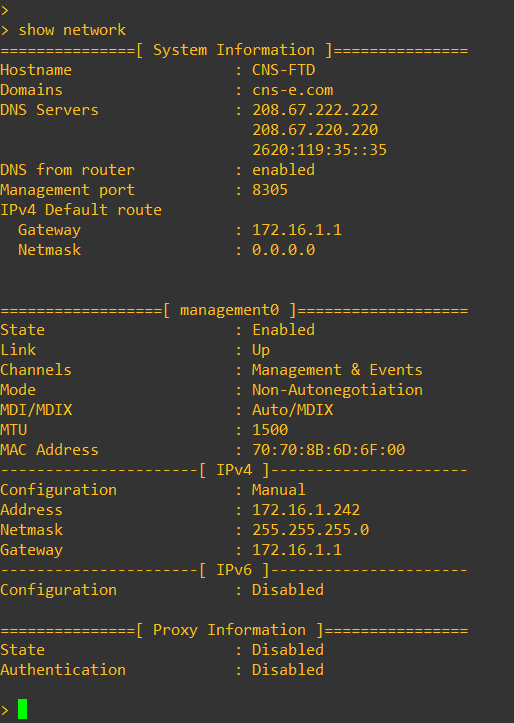
To ensure that the FMC manager has been added successfully, enter the following command:
show managers
This command will display the FMC manager’s IP address and its status.

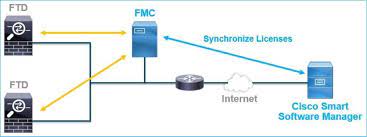
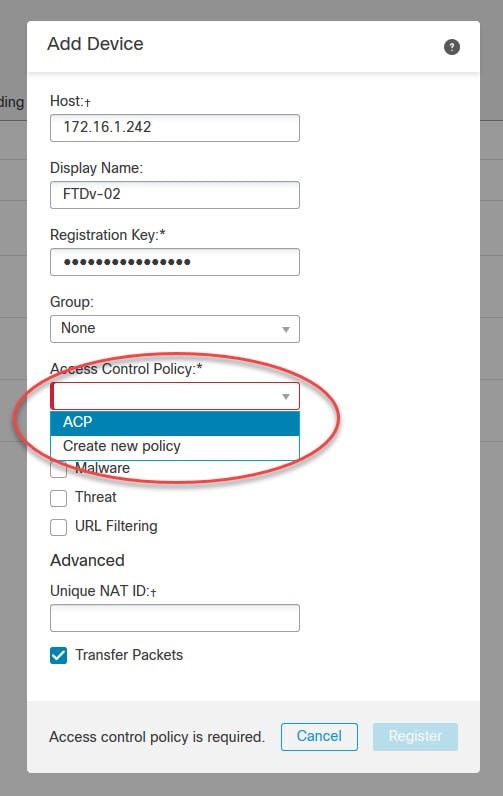
To add a Cisco Secure Firepower Threat Defense (FTD) device to a Secure Firepower Management Center (FMC) for centralized management and monitoring, follow these steps:
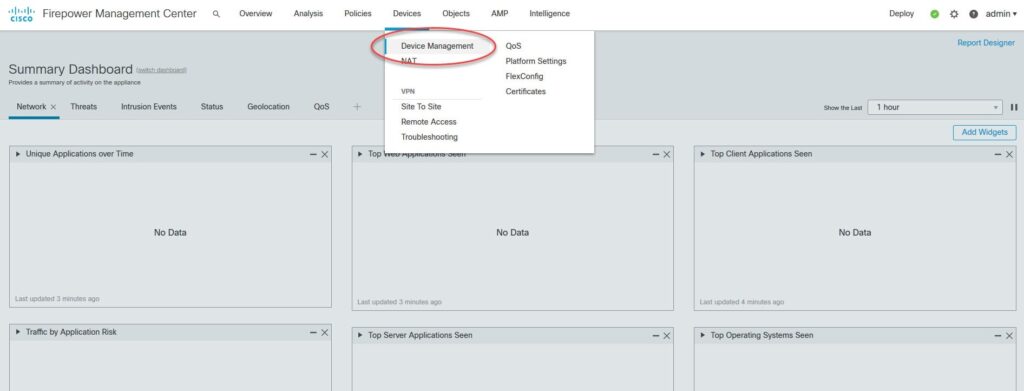
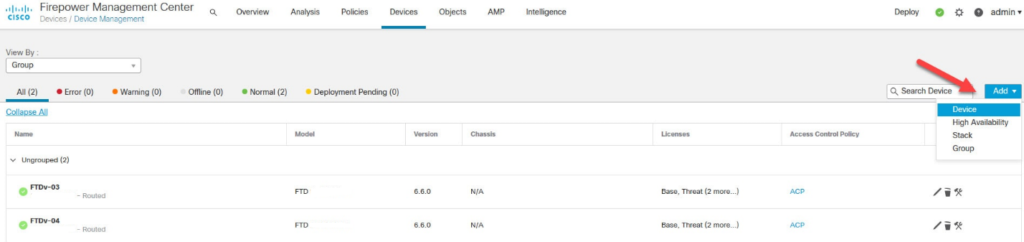
In the “Devices” section, click on the “Device Management” tab.Click on the “Add Device” button to initiate the process of adding a new device to the FMC.
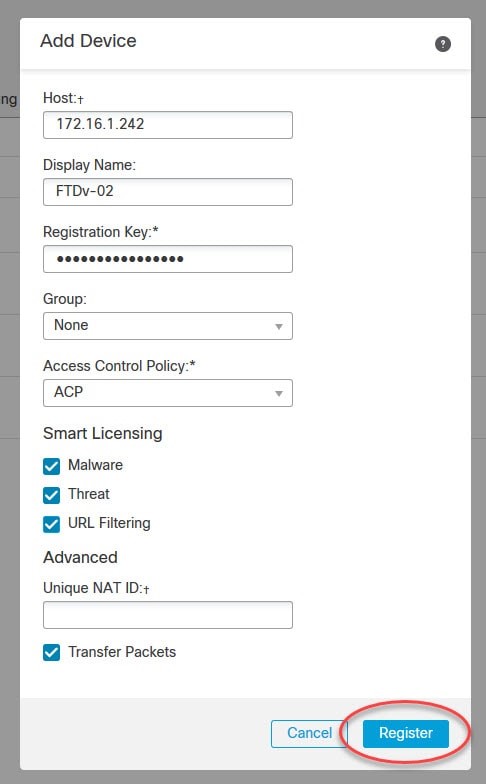
After verifying the device connection, click on the “Save” button to save the device configuration in the FMC.
The FMC will initiate the process of adding the FTD device to its managed devices list
Once the FMC has added the FTD device, it will start the registration process.
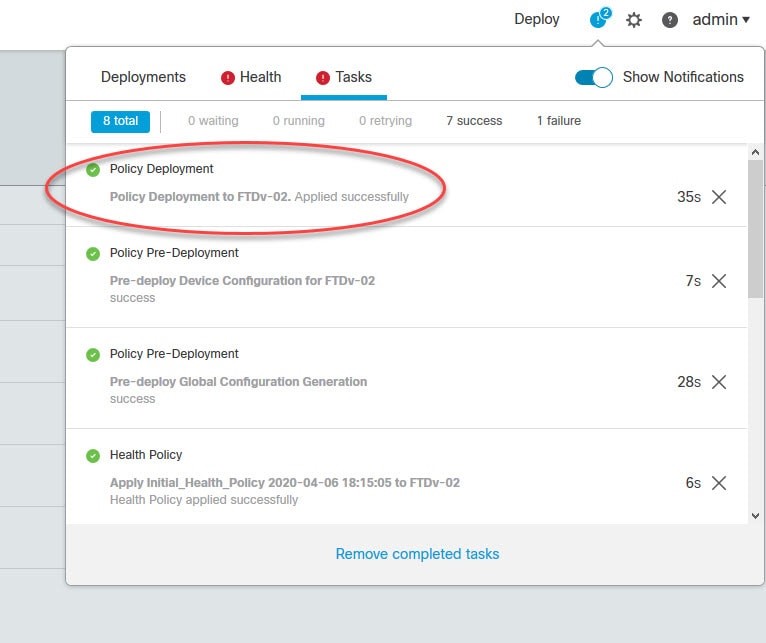
Monitor the “Devices” section or any notifications on the FMC for the registration status of the FTD device. The FMC will retrieve the device configurations and apply the assigned access policy to the FTD device.
Once the FTD device is successfully added to the FMC, it can be centrally managed and monitored through the FMC’s web interface. The FMC provides extensive security policy management, threat monitoring, and reporting capabilities, enabling administrators to effectively manage their network security using the FTD devices.
The FMC would take a few minutes before completing the FTD registration. You can check the status by going to the Notifications > Tasks menu on the top right side:
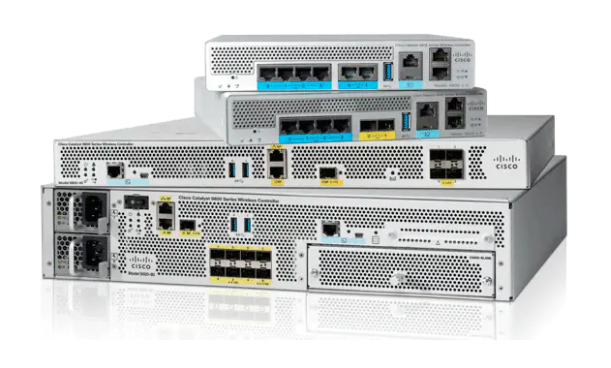
Migrating from Cisco AireOS 3504 WLC to Cisco Catalyst 9800 LAN Controller
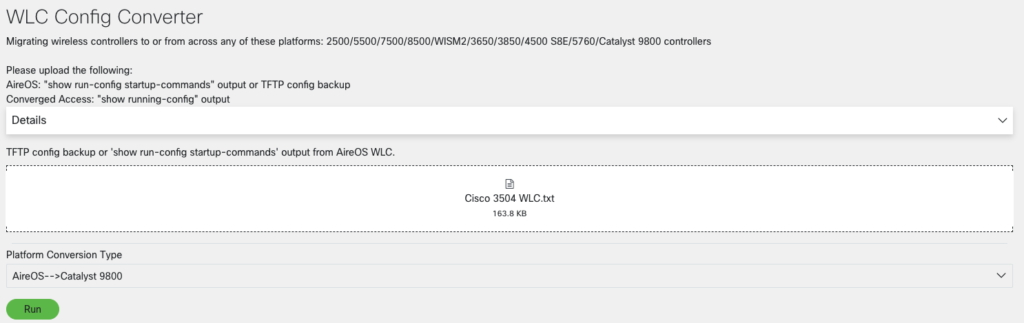
Then select AireOS → Catalyst 9800 from the drop-down menu. (Note: you can use this tool to convert AireOS to Converged Access, AireOS →AireOS (5520/8540) – when you’re upgrading from lower models to higher models, and vice versa).
Once it is done, it will provide you with an output with the following sections:
The tool does allow you to download the migrated configuration in CSV or Translated_Config.cfg format. You can import that to your favorite editor so that you can use it to modify and/or make notes as needed while you are working on your migration project.
I recommend importing the Translated_Cconfig.cfg into Microsoft Excel so that you can make notes, highlight it, or use other editing options while working on it. You will need to reference this file until you’re done migrating everything over to the C9800 controller.
To transfer configuration lines to the C9800 controller, you will ssh to the C9800 controller and start copy lines with without any notes in front of it (i.e., !% or !). You should start several lines or a section at a time and see if there are any errors while pasting it. If so, fix them before moving to the next set of configuration lines.
Once you’re done pasting everything, you can open the GUI of the C9800 and you should see the migrated configuration there.
For the Unsupported Config, Not Applicable, or Unmap Config, go through all of them and see what is needed or not. Add them if they are needed or just leave them.
As you can see, the Cisco WLC Config Converter tool provides an easy way to upgrade your existing legacy or end-of-life WLAN controller to the new model. It assists in migrating the bulk of the critical configuration items but there are still some manual configurations that need to happen. These are things like:
Those are beyond the scope of this article.
Feel free to reach out to us if you need help migrating from your existing Cisco AireOS WLC controllers to the Cisco Catalyst WLC controllers or anything related to the Cisco WLAN controllers, reach out to use at sales@accendnetworks.com and we would love to be able to assist you.


Safety Detectives: Please share your company background, how you got started, and your mission.
Accend Networks: Accend is a 10-year-old company and was started by Paula Wong, its CEO and Founder, with over 25+ years of IT experience.
Paula started it out of some repeated bad experience in a corporate environment after putting in countless hours. First was getting laid off after putting in and working over 16-18 hours for a start-up and even invested her own money into that company (it was during the dot com boom) in hopes that it would return a great profit.
Unfortunately, the company went belly-up. The second was working for a Webex where Paula was terminated due to subordination right before her stock option was going to get vested. She also worked crazy hours at this company.
After two bad luck experiences, Paula felt the corporate environment wasn’t for sure and thought starting a company would be the next best venture.
Accend’s own is to be the go-to IT Solutions provider nationwide.
Apart from our typical network implementation and support projects, we often get requests to help clients install their commercial off-the-shelf (COTS) projects such as SolarWinds and Cisco Unified Communications Manager. Part of our process is to assess the current environment and understand the software purchased so that our consultants can take over seamlessly. The consultants who get assigned to assist clients typically have over 5+ years, sometimes up to 20+ years, in supporting products so that best practice recommendations can be made to guide the clients as needed. We either work with the customer or do the installation ourselves, depending on the client’s preference. Another COTS product is implementing VMware Horizon and Workspace ONE. This is just an example of our approach to getting things done.
In terms of area coverage, we provide advanced network services in California (both northern and southern), and nationwide with several clients on the east coast. The work can be on-site or remote; but luckily, with the availability of remote tools, we can easily support customers with just a phone call.
These are highlights of what we provide, but it is not limited to these examples. We offer dynamic network services since we’re flexible and understand client needs.
SD: What is the main service your company offers?
AN: Accend specializes in cybersecurity but we also provide network design, implementation, and support for data, voice, wireless, and video networks.
SD: What is something unique that helps you stay ahead of your competition?
AN: Accend is very efficient in delivering our services to our customers. We are also able to solve complex problems that our competition can’t.
SD: What do you think are the worst cyberthreats today?
AN:We keep hearing about ransomware attacks affecting many companies and it tends to increase. Not only is it targeting large and well-known enterprises and the government, but they are also costly.