


Accend Networks San Francisco Bay Area Full Service IT Consulting Company
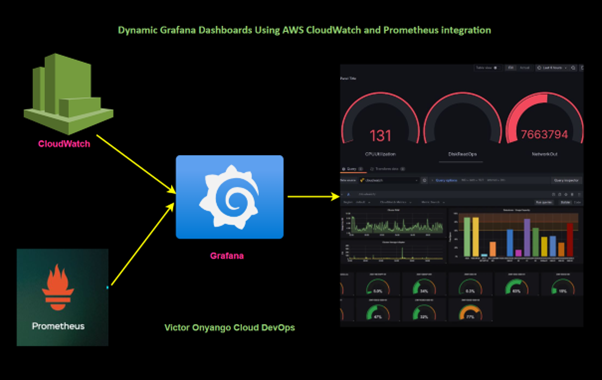
In today’s fast-paced cloud environments, real-time monitoring and visualization are key to ensuring your infrastructure operates efficiently. Grafana dashboards, when combined with AWS CloudWatch, offer a powerful solution for visualizing and analyzing data from your AWS services. In this blog, we will walk you through setting up Dynamic Grafana Dashboards using AWS CloudWatch metrics.
Grafana is an open-source platform designed for monitoring and observability. It allows users to query, visualize, alert, and explore metrics no matter where they are stored.
AWS CloudWatch is Amazon’s monitoring and observability service. While CloudWatch offers built-in visualization options, they can be limited in flexibility and customization. This is where Grafana dashboards come in.
With Grafana, you can:
We will first start by launching an EC2 instance.
To launch an EC2 instance for running Grafana, you can follow these steps:
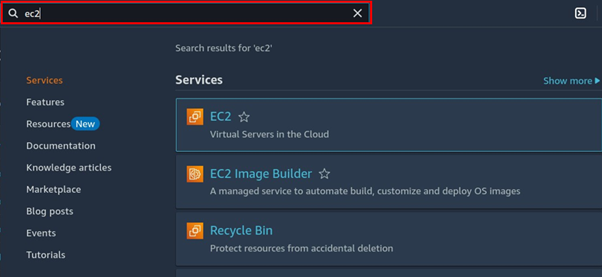
In the search bar type EC2 then select EC2 under services.
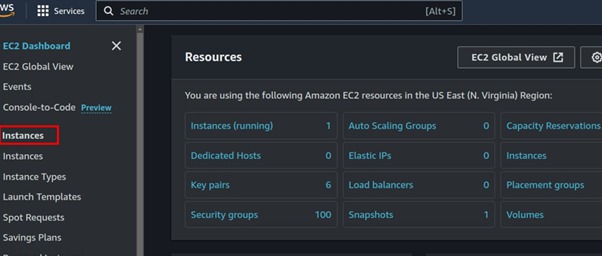
In the EC2 Dashboard, choose Instances from the navigation panel on the left side.
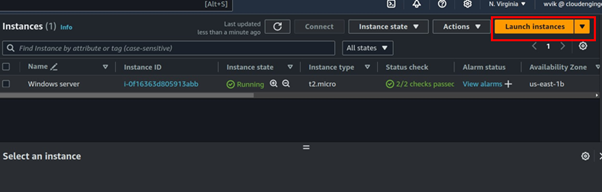
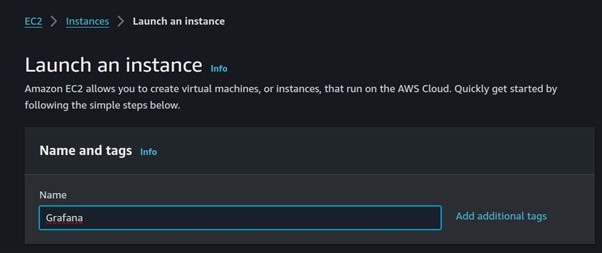
Click on the Launch Instances button.
Enter your preferred name for the instance in the name field.
Enter your preferred name for the instance in the name field.
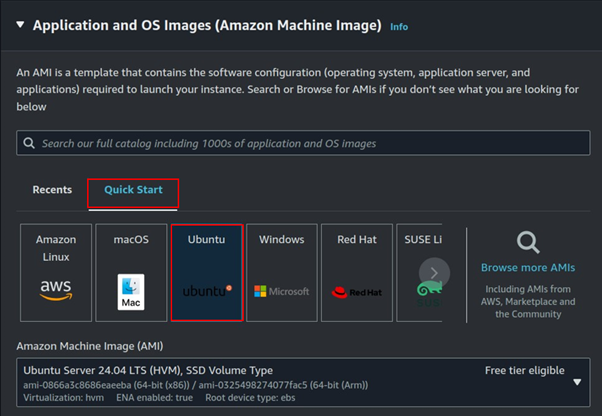
Under Application and OS Images, select the Quick Start tab, then choose your preferred AMI. For this setup, I will select Ubuntu.
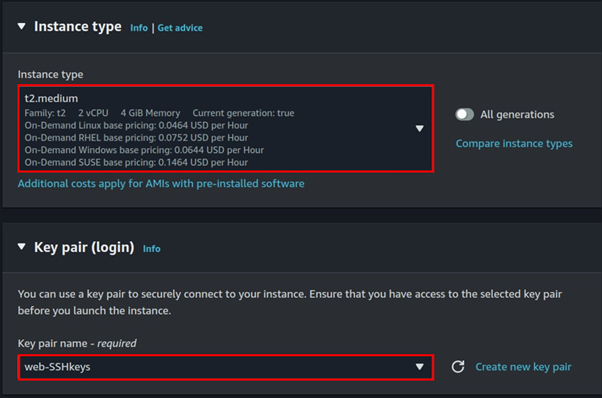
Under Instance Type, you can select t2. Micro, which is free tier eligible. However, for this project, I will choose t2. Medium.
Next, under Key Pair (login), select your existing key pair.
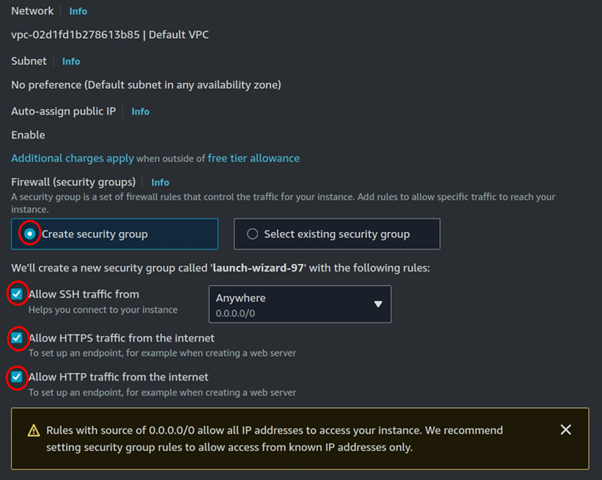
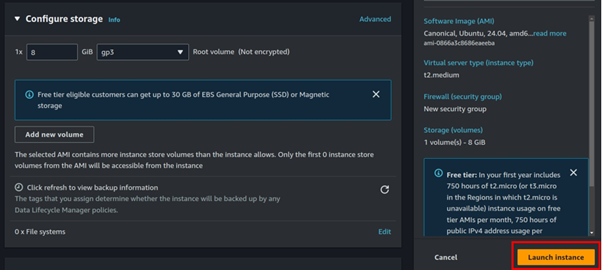
Under Firewall, select the Create New Security Group radio button. Then, open the following ports
Always follow best practices when configuring SSH ports by limiting access to your IP address.
Leave storage as the default, then review it and click launch instance.
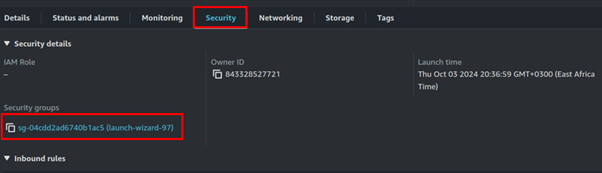
After launching the instance, adjust its security groups by opening port 3000 for Grafana.
Click on the Instance ID, then scroll down to the Security section. Next, click on the Security Group associated with the instance.
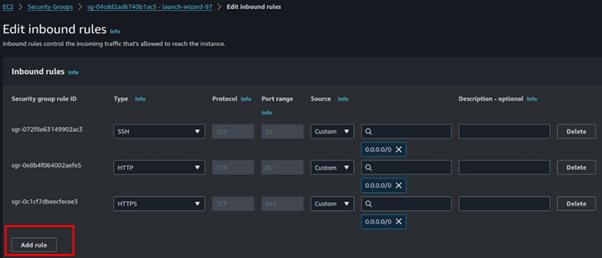
Go to the Inbound Rules tab and click on Edit Inbound Rules.
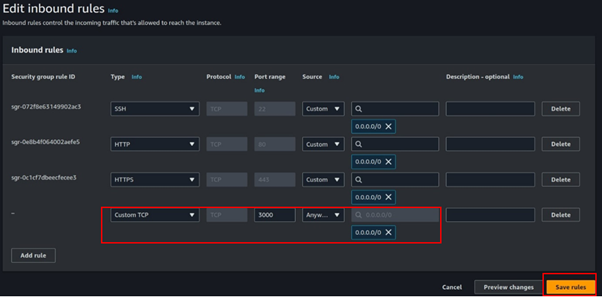
In the Edit Inbound Rules dashboard, click on Add Rule.
In the Port Range section, enter 3000, then click on Save Changes.
Now is the time to install Grafana, SSH into your instance by entering this command in your terminal.
# ssh -i <key.pem> user@publicIP
# your code should look like this.
ssh -i web-SSHkeys.pem ubuntu@44.212.29.235
Run the system update then paste in this command to install Grafana.
wget https://dl.grafana.com/enterprise/release/grafana-enterprise-11.1.0.linux-amd64.tar.gz tar -xvzf grafana-enterprise-11.1.0.linux-amd64.tar.gz cd grafana-v11.1.0/bin ./grafana-server &
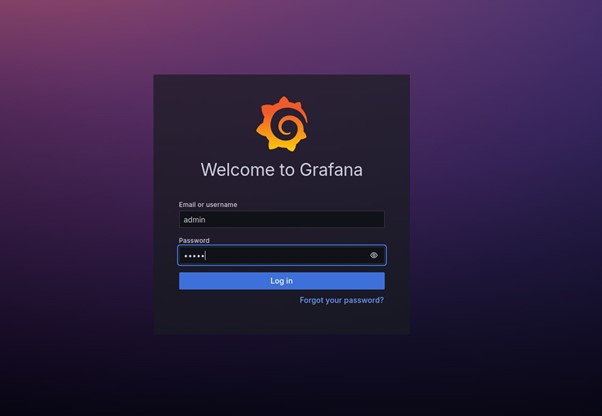
Access Grafana: Open your web browser and navigate to http://<your-server-ip>:3000. Login using the default credentials (admin/admin).
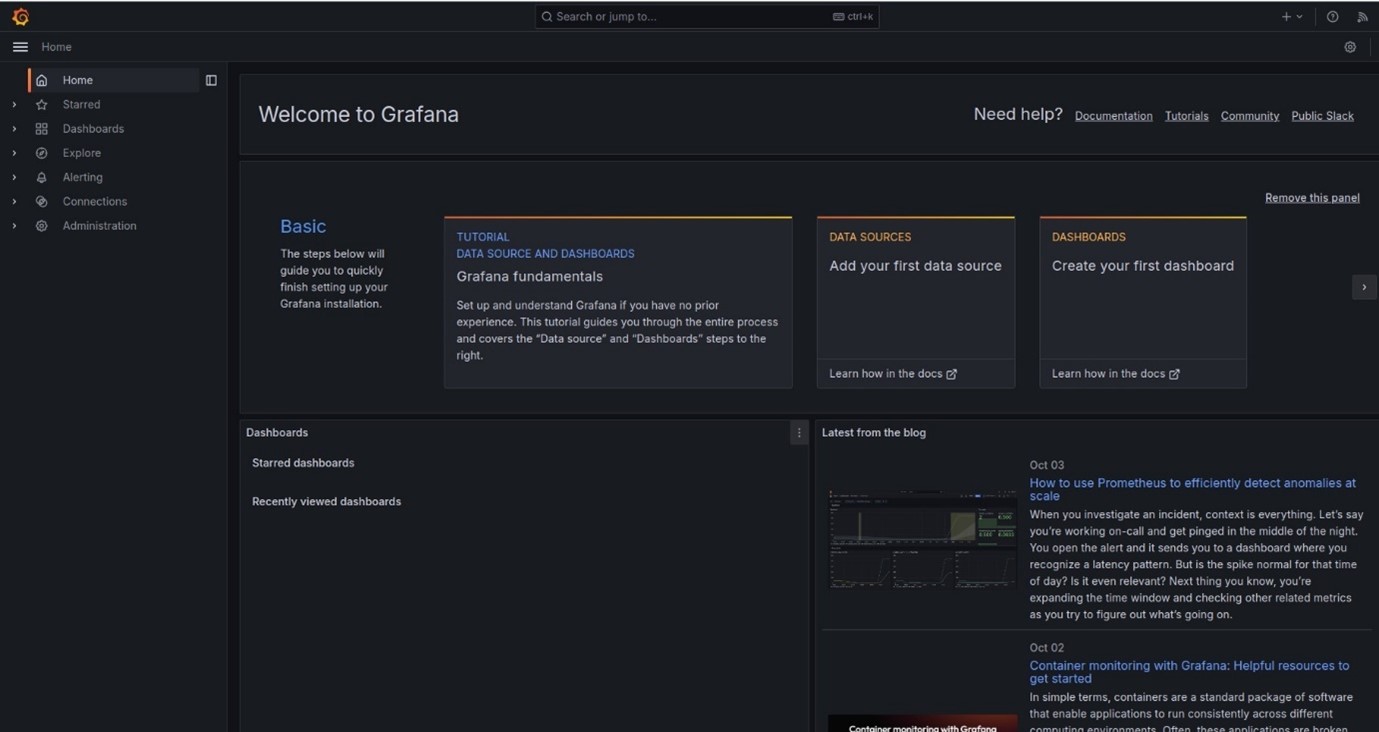
Update your new password then you will be logged in to your Grafana dashboard.
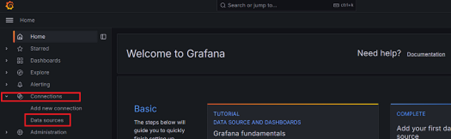
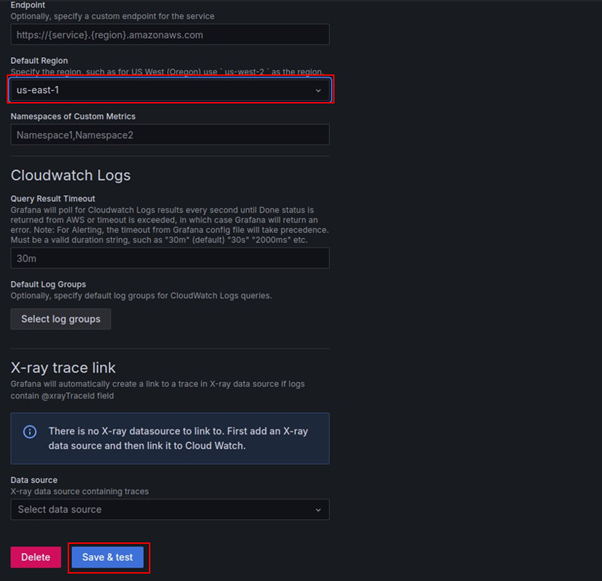
Adding CloudWatch as a Data Source
Grafana can integrate with AWS CloudWatch to visualize metrics from your AWS services.
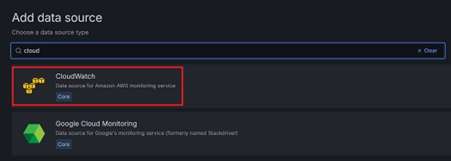
Add Data Source: In Grafana, go to the Left panel > Connections > Data Sources and click Add data source. Select CloudWatch from the list.
Configure CloudWatch: Enter your AWS credentials, specify the default region, and save the data source.
Creating a Dashboard for EC2 Metrics
Create Dashboard: Click on the Dashboards icon in the sidebar and select New.
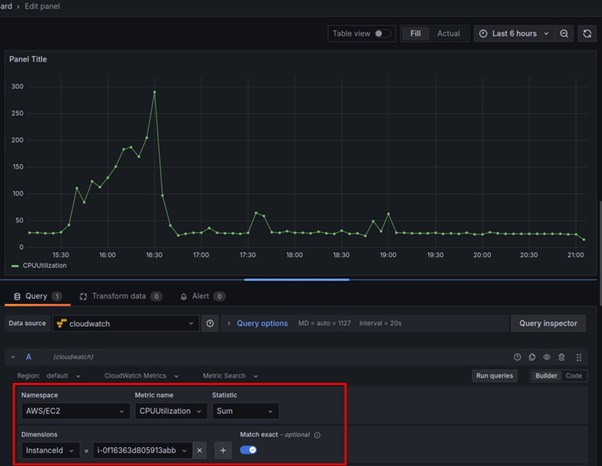
Add Panels: Click Add visualization, select CloudWatch-metrics as the data source, and configure queries to fetch metrics for your EC2 instances, such as CPU utilization and network traffic.
Here we have configured the first query to fetch CPU utilization of our EC2 instance running in our default region from CloudWatch.
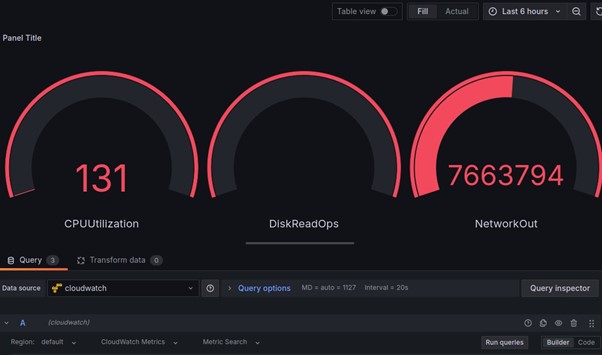
Similarly, we will add additional queries to fetch other metrics for this instance from CloudWatch, such as Network In/Out or Status Checks.
Now save the dashboard by clicking on the save option in the right corner.
And that’s it! We have successfully achieved our objective by building a dynamic Grafana dashboard using AWS CloudWatch metrics.
Conclusion
Using Grafana dashboards with AWS CloudWatch provides real-time monitoring and valuable insights into your AWS infrastructure, helping optimize performance and manage costs effectively.
Thanks for reading and stay tuned for more. Make sure you clean up.
If you have any questions concerning this article or have an AWS project that requires our assistance, please reach out to us by leaving a comment below or email us at sales@accendnetworks.com.
Thank you!
In today’s cloud-centric environment, managing costs effectively is paramount for organizations leveraging Amazon Web Services (AWS). One of the essential tools for achieving this is AWS Budget Reports, which help track and manage your cloud spending. In this article, we’ll explore how to create and utilize AWS budget reports for effective cost tracking and monitoring, alongside a hands-on demo to guide you through the process.
AWS Budget Reports are powerful tools that provide insights into your spending patterns and allow you to set financial goals for your AWS usage. By establishing budgets, you can proactively manage your costs and receive alerts when you approach or exceed predefined thresholds. This functionality is crucial for organizations seeking to maintain control over their AWS billing.
Cost Tracking: AWS budget reports help you monitor your expenditures in real time, allowing you to identify spending trends and variances from your budget.
Budget Monitoring: By setting up budgets, you can keep your spending in check and ensure that you stay within your financial limits.
Budget Alerts: AWS allows you to create alerts that notify you when your costs approach or exceed your budget, enabling proactive cost management.
Cloud Cost Optimization: Analyzing budget reports can help identify areas for cost savings, leading to more efficient use of resources.
Hands-On Demo: Creating AWS Budget Reports
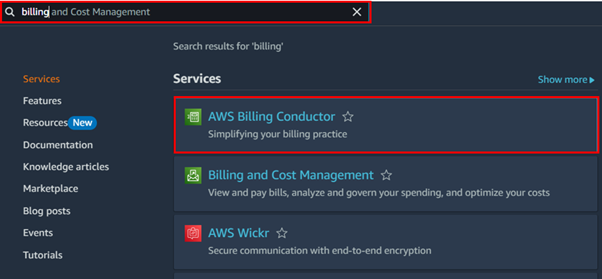
To get started with AWS budget reports, log in to the AWS Management Console. Make sure you have the necessary permissions to access the Billing and Cost Management dashboard.
On the main console, search for and select Billing from the Services menu. This will take you to the Billing and Cost Management Dashboard.
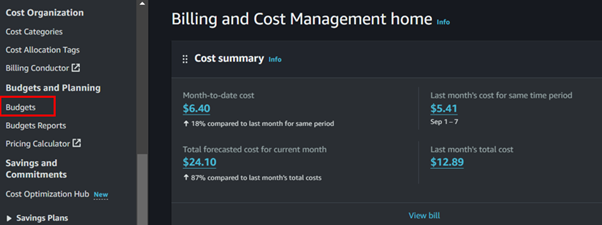
In the Billing and cost management dashboard on the left side UI, select budgets.
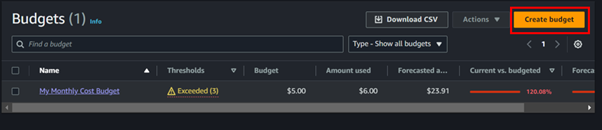
Click on the Create budget button.
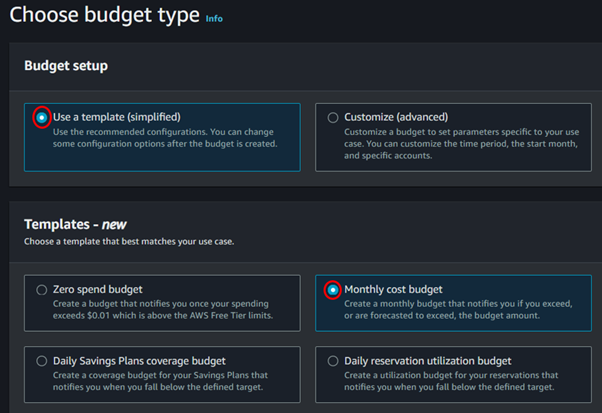
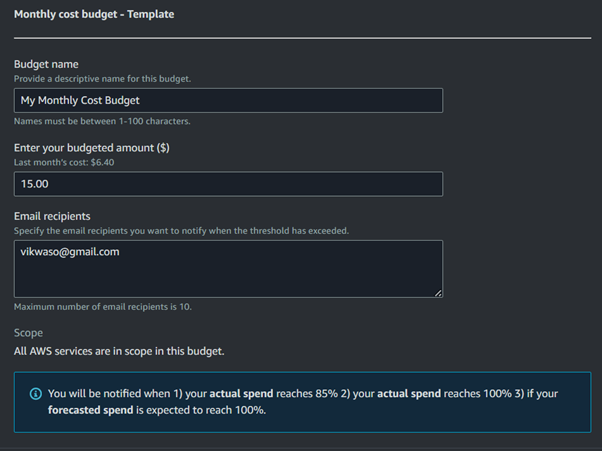
Choose Your Budget Type, you will have options to create different types of budgets choose a monthly cost budget.
In the monthly cost budget console, fill in your budget details name and your budget focus, then fill in the email address where you would like to receive a notification in case your budget threshold has been exceeded. Those are the only settings we need. Scroll down and click on Create Budget.
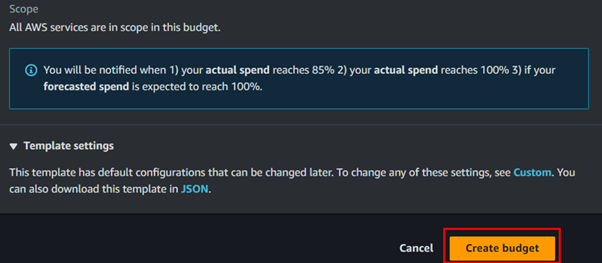
Our budget has been successfully created.
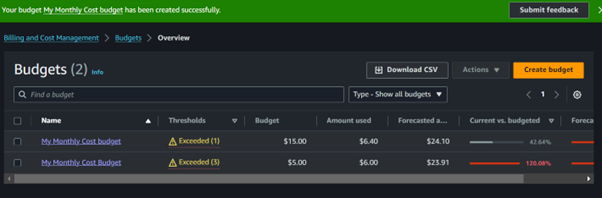
We will now configure our budget report. To create a budget report, click on the checkbox next to one of your budgets, then select the Actions dropdown button, and choose Create Budget Report.

In the Create Budget Report dashboard, enter a descriptive name for your report in the Report Name field.
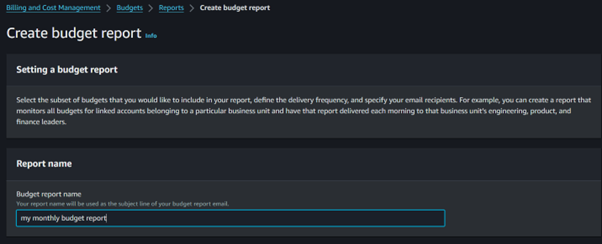
Select the budgets you want to include in your report. Next, under Delivery Frequency, choose how often you want the report to be generated—whether daily, weekly, or monthly. In the Email Recipients section, enter the email address to which you want the report sent. Finally, click on Create Budget Report.
Keep in mind that each budget incurs a cost of USD 0.01.

Now that you have set up your budget, you can utilize AWS budget reports for efficient cost management:
Analyze Spending Trends
Regularly review your AWS budget reports to analyze spending trends. This insight will help you understand where your costs are originating and identify any unexpected spikes in your AWS usage.
Adjust Budgets as Necessary
If you notice consistent overspending in certain areas, consider adjusting your budget or investigating specific services contributing to the costs. Use the insights gained from your budget reports to inform decisions on resource allocation and scaling.
Implement Best Practices for Cost Control
To maximize the benefits of AWS budget reports, implement best practices for cost control, such as rightsizing instances, using Reserved Instances, and optimizing storage usage.
Conclusion
AWS budget reports are invaluable for organizations looking to master cost tracking and budget monitoring in their AWS environments. By following the steps outlined in this hands-on demo, you can effectively create and utilize budget reports to manage your AWS spending. Establishing a proactive approach to AWS billing through budget reports will not only help you avoid unexpected expenses but also lead to significant cost savings and optimization in your organization.
Thanks for reading and stay tuned for more.
If you have any questions concerning this article or have an AWS project that requires our assistance, please reach out to us by leaving a comment below or email us at sales@accendnetworks.com.
Thank you!
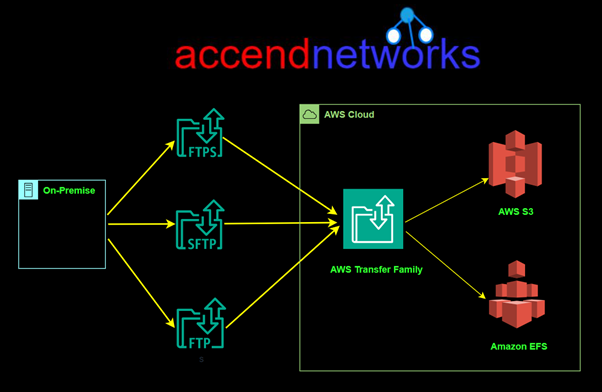
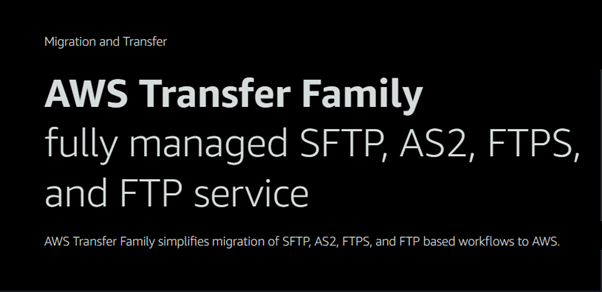
Amazon Web Services (AWS) provides a variety of services to cater to different business needs, and one of these key services is AWS Transfer Family, and we’ll be providing more on AWS Transfer Family Overview in this blog. This managed service helps you move files to and from Amazon S3 or Amazon EFS using secure methods like SFTP, FTPS, and FTP. It ensures safe and dependable file transfers in and out of AWS storage services, making it perfect for businesses looking for seamless file management.
In this blog, we’ll explore the structure and common uses of AWS Transfer Family.
It is not uncommon for applications to accumulate large amounts of data and the applications need this data. So how can the respective data move to the cloud securely? The AWS Transfer Family solves this challenge.
AWS Transfer Family is a fully managed service that allows businesses to securely transfer files over SFTP, FTPS, and FTP. The service is highly scalable, allowing users to integrate with Amazon S3 or Amazon Elastic File System (EFS) for backend storage. With AWS Transfer Family, businesses can replace their traditional file transfer servers, reduce management overhead, and scale file transfer workflows securely.
Multiple Protocol Support: AWS Transfer Family supports SFTP, FTPS, and FTP, which allows seamless integration with legacy file transfer systems.
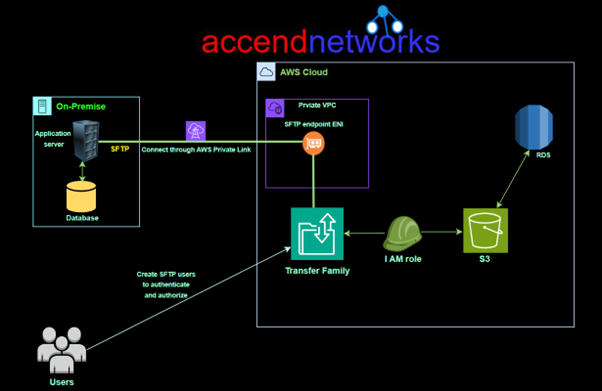
Secure Transfers: It uses modern security protocols for data encryption both in transit and at rest. Integration with AWS Identity and Access Management (IAM) allows fine-grained access control.
Scalable Architecture: The service scales automatically based on file transfer volume, providing a cost-effective solution for businesses with fluctuating file transfer needs.
Integration with AWS Services: AWS Transfer Family works with Amazon S3 and Amazon EFS, which means you can leverage scalable storage for both structured and unstructured data.
Pay-As-You-Go Pricing: With AWS Transfer Family, you pay only for the data transferred and the resources used, without upfront costs or long-term contracts.
AWS Transfer Family is ideal for businesses that need to securely transfer files between on-premises systems and cloud environments. Here are some common use cases:
Data Exchange: Companies need to exchange sensitive data with partners or clients securely via SFTP.
Application Data Transfers: Integration with business-critical applications that require reliable and secure file exchanges.
Backup and Restore: Using AWS Transfer Family to move files for backup or disaster recovery purposes.
Data Lakes: Transfer large datasets into Amazon S3 to power data lakes and analytics workloads.
AWS Transfer Family pricing follows a pay-as-you-go model. You are billed based on:
Cost Efficiency: Traditional file transfer systems can incur high maintenance costs. AWS Transfer Family eliminates the need for on-premises servers and reduces operational overhead.
High Availability: AWS automatically manages the infrastructure, ensuring high availability for your file transfer server.
Compliance and Security: AWS Transfer Family complies with HIPAA, PCI DSS, and other security standards, making it ideal for businesses in regulated industries like healthcare and finance.
Many businesses rely on legacy systems for file transfers. However, these systems often lack scalability, modern security features, and seamless cloud integration. AWS Transfer Family provides a managed, cloud-native solution that:
Conclusion
AWS Transfer Family is a powerful solution for businesses looking to modernize and secure their file transfer workflows. With support for SFTP, FTPS, and FTP, AWS Transfer Family offers a flexible, scalable, and highly secure platform for transferring files into and out of AWS.
Thanks for reading and stay tuned for more.
If you have any questions concerning this article or have an AWS project that requires our assistance, please reach out to us by leaving a comment below or email us at sales@accendnetworks.com.
Thank you!
Amazon Elastic File System (Amazon EFS) provides a fully managed service that enables easy file storage management for applications and workloads on AWS. In the blog, we will provide an overview of EFS architecture, key features, and how it compares to other storage options.
There are multiple storage offerings in AWS, each designed to meet different storage needs. Some of the most popular storage solutions include:
Amazon Elastic File System (EFS) is a scalable, fully managed, cloud-based file storage service provided by Amazon Web Services. It is designed to work with Linux-based workloads and can be mounted on Amazon EC2 instances, containers (ECS), and AWS Lambda functions across multiple Availability Zones within an AWS region.
Amazon Elastic File System (EFS) is AWS’s implementation of NFS (Network File System) v4. With Amazon EFS, you can grow and shrink storage automatically as you add or remove files, providing read-after-write consistency for your data.
Amazon EFS file systems can be accessed by multiple compute instances like EC2, ECS, or Lambda within a VPC in various Availability Zones (AZs) within an AWS region. Additionally, Amazon EFS can connect to multiple VPCs via VPC Peering connections and can even be accessed from on-premises environments through VPN or Direct Connect.
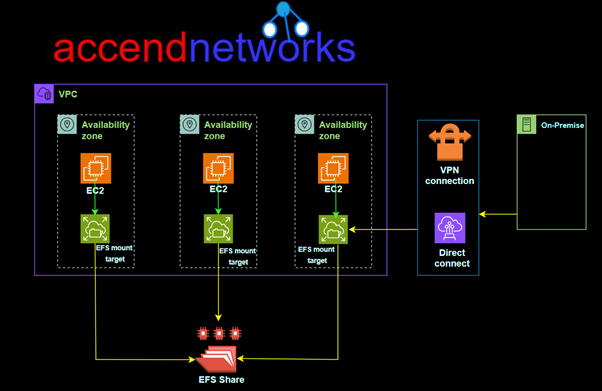
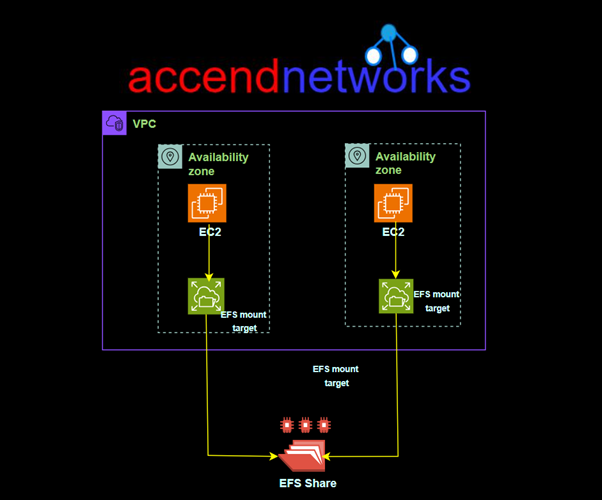
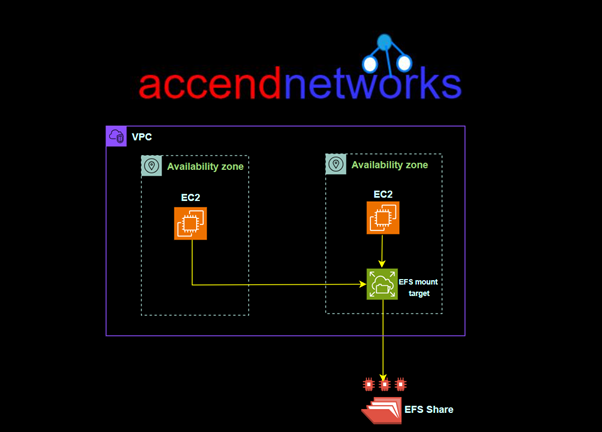
A mount target in Amazon EFS is an endpoint that allows EC2 instances to connect to and access an EFS file system. Each mount target is associated with a specific Availability Zone (AZ) and provides network access to the EFS file system within that zone.
Key Features of Mount Targets in EFS:
Per AZ Mount Target: To access an EFS file system from EC2 instances in a specific AZ, you must create a mount target in that AZ, enabling VPC-based connectivity.
Security Group Control: Each mount target can have its security group attached to control traffic. Typically, you must allow inbound traffic on NFS port 2049 from EC2 instances accessing the EFS.
Highly Available: By creating a mount target in each AZ, EFS ensures high availability and fault tolerance.
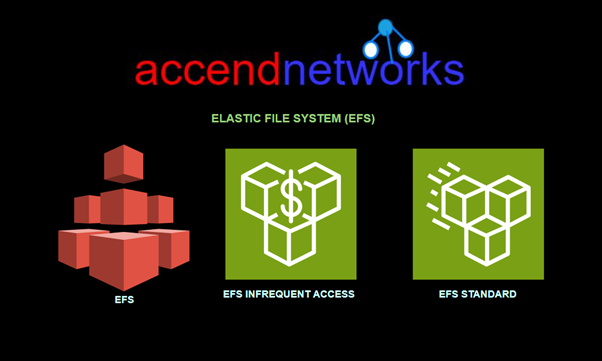
For standard Amazon EFS file systems, you need to create a mount target in each AZ within your AWS region.
When using the One Zone storage class, however, only a single mount target can be created in the AZ where the file system is located.
Amazon offers two throughput modes:
Bursting mode: This is the default and allows throughput to scale based on the amount of data stored.
Provisioned mode: Suitable for applications that require higher throughput than what is provided by bursting mode.
Performance Modes
There are two performance modes available for Amazon EFS:
General Purpose (recommended): Best for most workloads and is ideal for latency-sensitive applications.
Max I/O: Designed for use cases where many EC2 instances are accessing the file system simultaneously, such as big data and media processing applications.
Both Amazon EBS and Amazon EFS offer storage solutions, but they are designed for different purposes. Amazon EBS is a block storage solution used for a single EC2 instance and is ideal for high-performance storage, whereas Amazon EFS is designed for shared file storage across multiple EC2 instances, providing elastic scalability without manual intervention.
If you’re choosing between Amazon EBS vs EFS, EFS is the better option for shared storage and file-based workloads, while EBS is optimal for individual instances with higher performance needs.
Amazon Elastic File System is an ideal solution for workloads that require scalable, shared file storage. Whether you’re running an application in AWS Lambda, working on big data analysis, or simply need shared storage for multiple EC2 instances, Amazon EFS provides a reliable, fully managed, and elastic solution.
Conclusion
Amazon Elastic File System (EFS) is robust and scalable. With its elastic capabilities, seamless AWS integration, and strong security features, Amazon EFS is ideal for a wide range of cloud storage needs.
Thanks for reading and stay tuned for more.
If you have any questions concerning this article or have an AWS project that requires our assistance, please reach out to us by leaving a comment below or email us at sales@accendnetworks.com.
Thank you!
In modern software development, automating the process of building, testing, and deploying applications is key to streamlining workflows. AWS CodeBuild, part of AWS’s continuous integration and delivery (CI/CD) suite, plays a significant role in automating the build process. It compiles source code, runs tests, and produces deployable software packages in a highly scalable, managed environment so read on as we provide comprehensive guide to AWS Code Build in this blog.
AWS CodeBuild is a fully managed build service that compiles source code, runs tests, and produces software packages that are ready to deploy. With CodeBuild, you don’t need to worry about provisioning and managing your build infrastructure. You simply provide your build project’s source code and build settings, and CodeBuild handles the rest.
For example, if you have a web application that you want to deploy, you can use CodeBuild to compile your source code, run unit tests, and produce a deployable package. You can also use CodeBuild to build Docker images, run static code analysis, and more. CodeBuild integrates with other AWS services like Code Pipeline, so you can easily automate your entire software release process.
A build project defines how AWS CodeBuild runs a build. It includes information such as where to get the source code, the build environment to use, the build commands to run, and where to store the build output. A build refers to the process of transforming the source code into executable code by following the instructions defined in the build project.
Automated Builds: Compiles source code and packages it for deployment automatically.
CI/CD Integration: Works seamlessly with AWS CodePipeline to automate your entire CI/CD workflow.
Scalability: Automatically scales to meet the demands of your project, ensuring there are no build queues.
Pay-As-You-Go Pricing: You are only charged for the compute time you use during the build process.
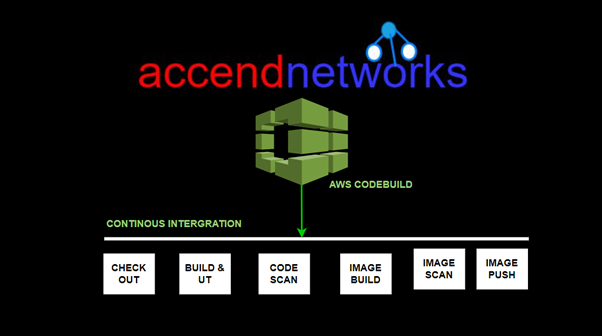
AWS CodeBuild uses a three-step process to build, test, and package source code:
Fetch the source code: CodeBuild can fetch the source code from a variety of sources, including GitHub, Bitbucket, or even Amazon S3.
Run the build: CodeBuild executes the build commands specified in the Buildspec.yaml file. These commands can include compilation, unit testing, and packaging steps.
Store build artifacts: Once the build is complete, CodeBuild stores the build artifacts in an Amazon S3 bucket or another specified location. The artifacts can be used for deployment or further processing.
The Buildspec.yaml file is a configuration file used by AWS CodeBuild to define how to build and deploy your application or software project. It is written in YAML format and contains a series of build commands, environment variables, settings, and artifacts that CodeBuild will use during the build process.
Source Control: Choose your source control system (e.g., GitHub, Bitbucket) and decide how changes in this repository will trigger builds.
Build Specification: Define a buildspec.yml file for CodeBuild, specifying the build commands, environment variables, and output artifacts.
Environment: Select the appropriate build environment. AWS CodeBuild provides prepackaged build environments for popular programming languages and allows you to customize environments to suit your needs.
Artifacts Storage: Decide where the build artifacts will be stored, typically in Amazon S3, for subsequent deployment or further processing.
Build Triggers and Rules: Configure build triggers in CodePipeline to automate the build process in response to code changes or on a schedule.
VPC: Integrating AWS CodeBuild with Amazon Virtual Private Cloud (VPC) allows you to build and test your applications within a private network, which can access resources within your VPC without exposing them to the public internet.
Conclusion:
AWS CodeBuild is an excellent solution for developers and DevOps teams looking to automate the build process in a scalable, cost-effective manner. Whether you’re managing a small project or handling complex builds across multiple environments, AWS CodeBuild ensures that your software is always built and tested with the latest code changes.
Thanks for reading and stay tuned for more.
If you have any questions concerning this article or have an AWS project that requires our assistance, please reach out to us by leaving a comment below or email us at sales@accendnetworks.com.
Thank you!