Accend Networks San Francisco Bay Area Full Service IT Consulting Company

Categories
Blogs

Mastering Data Protection: AWS Backup.

Mastering Data Protection: AWS Backup.

In the ever-evolving digital landscape, where data is the lifeblood of businesses and organizations, the concept of data backup has become paramount. In essence, a backup is a secure and duplicate copy of your critical data and information. ensuring that in the face of unexpected calamities, or data corruption, your valuable information remains intact and recoverable. A well-implemented backup strategy is akin to a safety net for your digital assets, providing you with the assurance that, even in the worst-case scenarios, your data can be resurrected, and business operations can continue with minimal disruption.

What is AWS Backup Service and Why It Matters?

AWS Backup is a fully managed service offered by Amazon Web Services (AWS). It makes it easy to centralize and automate data protection across AWS services. AWS Backup is designed to simplify the backup process, making it easier to create, manage, and restore backups for critical data.

Key components of AWS backup service.

Backup’s

A backup or recovery point represents the content of a resource, such as an Amazon Elastic Block Store (Amazon EBS) volume at a specified time. It is a term that refers generally to the different backups in AWS services, such as Amazon EBS snapshots and DynamoDB backups.
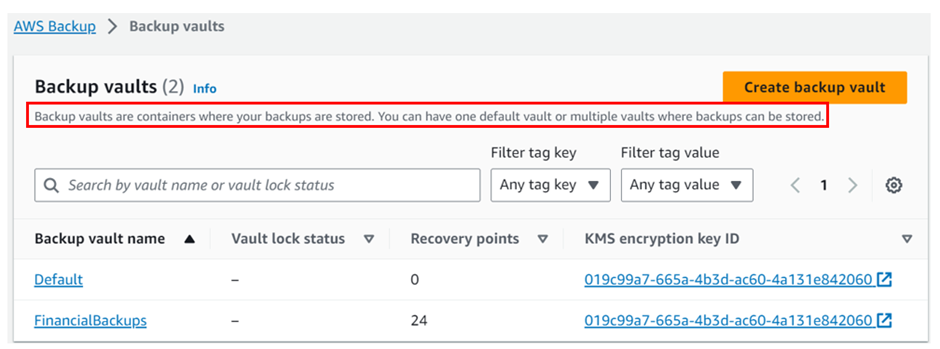
Backup vaults

Vaults are simply logical containers that help you organize and manage your backups effectively. You can create multiple vaults to categorize and store backups based on your requirements.
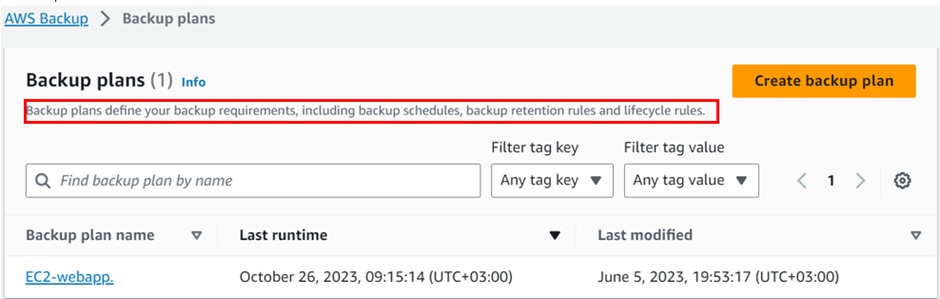
Backup plan

These are at the heart of AWS Backup and define your backup policies and schedules. Within a backup plan, you specify settings such as backup frequency, retention periods, and lifecycle rules.

Lifecycle Rules:

Lifecycle rules determine the retention period of your backups and when they should be deleted. You can configure rules to automatically transition backups to cold storage or remove them when they’re no longer needed.
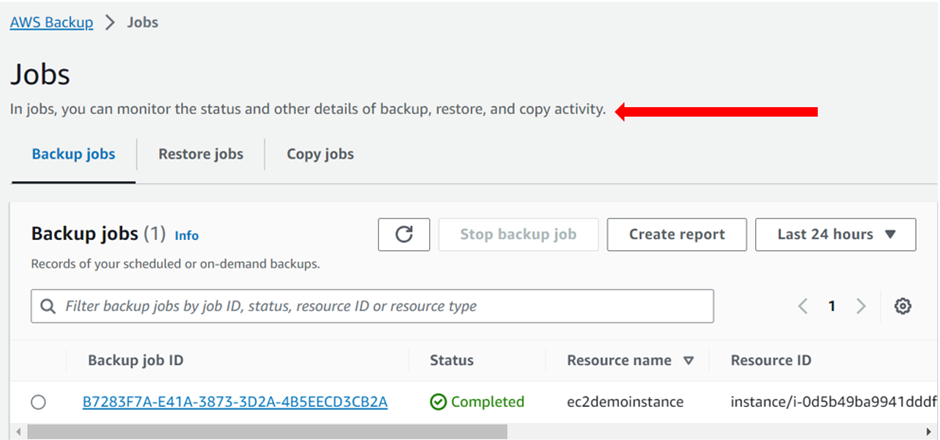
Backup Jobs:

Once the backup is scheduled, the backup details can be monitored status and other details like backup, restore, and copy activity. Backup job statuses include pending, running, aborted, completed, and failed.

Recovery Points:

These are specific states of your resources captured by backup jobs at particular points in time. AWS Backup retains multiple recovery points based on the retention settings in your backup plan.

Vault Lock:

Vault lock provides an additional layer of security for your backups. When enabled, it prevents the deletion of backup data for a specified retention period, ensuring data integrity and compliance with retention policies.

the importance of AWS backup in today’s data-driven world.

Data resilience.

Data loss can be catastrophic for any organization. AWS Backup ensures that your critical data is protected and can be quickly recovered in case of accidental deletions, hardware failures, or data corruption.

Security and Compliance

AWS Backup integrates with AWS Identity and Access Management (IAM) and AWS Key Management Service (KMS) to provide secure, encrypted backups. This is crucial for meeting regulatory requirements and maintaining data privacy.

Simplicity and Automation

AWS Backup simplifies the backup process with automated policies, making it easy to create, schedule, and manage backups without the need for complex scripting or manual interventions.

Centralized Management

With AWS Backup, you can manage backups for multiple AWS services from a single console, streamlining backup operations and reducing management overhead.

Cross-Region and Cross-Account Backups

AWS Backup enables you to create backups that span regions and AWS accounts, enhancing data resilience and disaster recovery capabilities.

Cross-Account and Cross-Regional Backups

Cross-account and cross-regional backups form the cornerstone of a resilient data protection strategy. Cross-account backups involve replicating critical data from one AWS account to another, mitigating the risk of accidental data loss, and enhancing security by adhering to the principle of least privilege.

Cross-regional backups extend this protection by replicating data across different AWS regions, guarding against region-specific outages or unforeseen disruptions.

If you have any questions concerning this article or have an AWS project that require our assistance, please reach out to us by leaving a comment below or email us at sales@accendnetworks.com! 

Thank you!

Categories
Blogs

A Comprehensive Guide to Creating and Managing Security Groups for Your Amazon EC2 Instances

A Comprehensive Guide to Creating and Managing Security Groups for Your Amazon EC2 Instances

Security-group-for-amazon

Introduction:

In the ever-evolving landscape of cloud computing, Amazon Elastic Compute Cloud (EC2) has emerged as a cornerstone for hosting web applications, running virtual servers, and managing various workloads in a scalable and cost-effective manner. As EC2 instances play a pivotal role in your AWS infrastructure, it’s essential to ensure that they are not only readily available but also well-protected from unauthorized access. This is where Amazon EC2 Security Groups come into the picture. In this comprehensive guide, we will provide you with a step-by-step approach to creating and managing security groups effectively.

Understanding Amazon EC2 Security Groups

Security Groups in AWS are essentially virtual firewalls that allow you to define inbound and outbound traffic rules for your EC2 instances. With security groups, you can establish fine-grained control over your EC2 instances’ network traffic, ensuring they are protected and compliant with your organization’s security policies

Let’s dive into the process of creating your first security group for an EC2 instance:

In the previous article on creating a new EC2 instance, we created our EC2 instance using the launch wizard security group that opened port 22 and source was from anywhere from the internet.

We will now configure the security group for our EC2 instance.

We will modify our SSH security group and only limit the source traffic to my IP address.

Again, we will open port 80 for HTTP and source is going to come from anywhere from the internet. we will also open port 443 for HTTPS and the source of this web traffic is also going to come from anywhere from the internet.

We will then go to our EC2 instance already launched and add these security group.

Log in to your AWS Management Console

Navigate to the EC2 Dashboard.

In the EC2 dashboard on the left side of the navigation pane under Network and security select security groups. Then click create security group

amazon-ec2
create-security-group

In the security group dashboard, give your security group a name, call it SSH security Group.

Use the same name as the description.

Under VPC, select your VPC click in the search box and select the default VPC.

Scroll down.

Under inbound rule click add rule.

Under type select the drop down and look for SSH, then select it. Under source select the drop down and select my IP, this will select the IP address of your local machine.

inbound-rules-info

Scroll down and click create security group.

create-security-group-tag

We have successfully created the SSH security group, and limited the source of traffic to our IP address. This is always a security best practice. This means that its only my IP address that can SSH into my EC2 instance through port 22.

shh-security-group

if you look at inbound rules tab under type, its SSH and under protocol is TCP, port range is 22 and source we can see my IP address 196.216.90.16/32

Next we will proceed and create our Web traffic security group, so click create security group a gain.

Under basic details, give your security group a name, call it web traffic security group. Under description I will give it a description. Type in allow HTTP and HTTPS traffic from the internet. Under VPC, select the default one.

Scroll down, under inbound rule, click add rule.

add-rules

Under type, select the drop down look for HTTP then select it. Under destination, click the drop and select anywhere for IPv4 addresses.

This will open port 80 for HTTP traffic if you look under port range, you will see the value 80.

Click add rule again then under source select the drop down and look for HTTPS then select it. Under destination, click the drop and select anywhere for IPV4 addresses.

Again, this will open port 443 for HTTPS traffic if you look under port range, you will see the value 443.

http-rules-info

Scroll down and click create security group.

create-security-group-tag

There we go; we have successfully created the web traffic security group and opened port 80 for HTTP and port 443 for HTTPS and our destination is anywhere in the internet.

web-traffic-security-group

If you look under inbound rules tab, we can see our IP version is IPv4, type is HTTPS and HTTP and port range is 80 and 443.

Next, we will now associate our security groups we’ve created to our EC2 instance.

Select your instance, click action drop down button, select security tab then click change security groups.

In the change security group tab, under associated security groups, click remove launch wizard security group.

Click add security group then click the search box for add security group, select the two security groups we’ve just created. The SSH and the web traffic security groups then click save.

associated-security-groups-add

We have successfully changed the security group settings for our EC2 instance.

security-groups-changed-successfully-1

Click instance ID, then navigate to the security tab, you will see the three security groups, one on port 22, port 80 and port 443.

instances-demo
instances-demo

This brings us to the end of this blog. Thanks for your time.

Pull everything down to avoid surprise bills.

Please leave us a comment or any questions if you have concerning this article below. Thank you! 

Categories
Blogs

EMBARK ON YOUR CLOUD JOURNEY – A GUIDE TO CREATING A NEW AMAZON EC2 INSTANCES

EMBARK ON YOUR CLOUD JOURNEY - A GUIDE TO CREATING A NEW AMAZON EC2 INSTANCES

In the realm of cloud computing, the Amazon Elastic Compute Cloud (EC2) service stands as a cornerstone of innovation, offering the power to deploy virtual servers with unparalleled flexibility and scalability. Whether you are an experienced cloud architect or just setting foot in the world of AWS, understanding how to create an EC2 instance is the first step towards harnessing the full potential of cloud-based computing.
In this comprehensive guide, we will walk you through the intricacies of creating an EC2 instance, demystifying the process from start to finish.
We will use the following reference architecture to accomplish our project.

What is an EC2 instance?

Amazon Elastic Compute Cloud (Amazon EC2) is a virtual server within Amazon Web Services (AWS) that provides on-demand, scalable computing capacity in the Amazon Web Services (AWS) Cloud. It allows users to run applications, host websites, and perform various computing tasks in a scalable and flexible manner.
Some key advantages of EC2 is that it reduces hardware costs so you can develop and deploy applications faster. You can use Amazon EC2 to launch as many or as few virtual servers as you need, configure security and networking, and manage storage. You can add capacity (scale up) to handle compute-heavy tasks, such as monthly or yearly processes, or spikes in website traffic. When usage decreases, you can reduce capacity (scale down) again. This is where the name Elastic comes from.
According to our reference architecture, we will launch this ec2 instance in the Northern Virginia region us-east-1.
Our reference architecture has not specified the VPC CIDR and subnet CIDR blocks so we will assume the default VPC.
Remember when you first created an AWS account, a default VPC is always created for you.
A Virtual Private Cloud (VPC) is a network infrastructure service provided by Amazon Web Services (AWS) that allows users to create and manage isolated, secure, and customizable network environments within the AWS cloud.
Our reference architecture contains two data centers (availability zones) for high availability and fault-tolerance.
To create an EC2 instance we need key pairs.
To create a key pair in the EC2 dashboard under network and security click key pairs
Then in the key pair dashboard click create key pairs.
We will give our key pair a aname  and I will call it ec2demokeypair. Key pair type will be RSA, and private key file formart will be .pem
Then click create key pair.
Succesfully created our key pairs. Take note of the directory where your private key is downloaded.
After creating our key pair we will now proceed and create our EC2 instance.
So in the search box, type EC2 then select EC2 under services.
In the EC2 dashboard select instances then select launch instances.

In the launch instance dashboard under name and tags, give your instance a name, and I will call it ec2demoinstance.

Then under application and OS Images, select the quickstart tab then select Amazon Linux.
Under Amazon machine Images, choose your machine image, I will leave it at Amazon Linux 2023 AMI this is free tier eligible.
Scroll down.

Under instance type, select the drop down and select t2.Micro, this is also free tier eligible then under key pair name select the drop down and select ec2demokey key pair you just created previously.

Scroll down, then click the edit button under networking.
Under VPC, we will leave it at our default VPC as you can see its already selected. When you first create an AWS account, a VPC is always created for you.
Then under subnet let’s put this instance in the us-east-1a this is according to our reference architecture, select the drop down and select it.
Then under firewall and security we will move with the launch wizard and if we can see  its inbound rules security details description it allows SSH on port 22 and source is anywhere from the internet. This will enable us SSH into our instance

We will leave storage as default:

We will also not use advance details so we will leave it. Move under review summery, take a review and then click launch instance:

There we go, our instance is launching:

Then success, our instance has successfully launched click your instance ID to view it.
We can see our instance is up and running and the status cheque is initializing wait for it to pass the status cheque, meanwhile you can click the refresh button.
After waiting for a couple of seconds our instance has initialized and passed status cheque. You can now start performing your operations on your instance.
This is all we need to do for this project.

Clean up resources to avoid surprise bills. Stay tuned for more thank you for your time.  

Feel free to reach out to us for any questions concerning this blog at sales@accendnetworks.com.

Categories
Blogs

AWS root user best practice

A COMPREHENSIVE GUIDE TO SECURING YOUR AWS ROOT USER

At the core of your AWS account lies the root user, the ultimate authority that wields unparalleled power to control every aspect of your AWS environment. It is therefore, no exaggeration to say that the root user is the linchpin of your AWS security. Failing to secure this key account could lead to catastrophic consequences, from data breaches to financial losses, and damage to your organization’s reputation.
This article serves as your essential guide to understanding the significance of securing your AWS root user. We will explore the unique risks associated with this account, discuss best practices, and provide practical steps to ensure its robust protection. Let’s embark on this crucial voyage toward safeguarding your AWS infrastructure.

What is a root user?

When you first create an Amazon Web Services (AWS) account, you begin with a single sign-in identity that has complete access to all AWS services and resources in the account. So basically, the identity used for the account creation is the root user. You can sign in as the root user using the email address and password that you used to create the account
The root account is the most privileged AWS account; it has unrestricted access to all resources in the AWS account.

Security best practices for a root user:

Avoid the use of root account!

Surprising right? There may be two questions that instantly come up: WHY and HOW?

WHY to avoid the use of root account?

The root account is the most privileged account with all the access, and hence compromise of a root account potentially means a transfer of ownership, as the attacker has the privilege to change the root password and keep the account.
So, it is recommended to avoid/minimize the use of root account.

HOW to access the AWS Console then, if not the root account?

One can create an IAM user administrator account to manage day-to-day activities and minimize the risk associated with root account access.

IAM User Administrator Account:

Immediately after creating an AWS account, one should start by creating an IAM user account specifically designated as the administrator account. This user should have elevated permissions but not full root access. This strategy minimizes the chances of unintended actions and provides a clear audit trail for all activities.

The Role of the Admin User:

The administrator user should be responsible for the following tasks:
Regular Administrative Tasks: All routine administrative tasks, such as creating, modifying, or deleting user accounts, configuring security policies, and managing resources, should be performed through the administrator account.
Access Control: The administrator account can delegate access rights to other users or roles, ensuring proper segregation of duties and limiting the scope of each administrator’s responsibility.
Monitoring and Auditing:The administrator should regularly review logs, access history, and monitor for any unusual activities within the system, maintaining a high level of vigilance.

Using the Administrator Account:

To maintain security, administrators should use the IAM administrator account for all their day-to-day activities. Using root access should be reserved for essential system maintenance or configuration changes that cannot be accomplished through the IAM administrator account.

Setup root account usage alarms.

Using Amazon CloudWatch alarms to detect AWS Root Account usage will help you monitor AWS (root) account activities. You can identify and act on activities which can lead to unauthorised access or other security breaches.

Delete your root account access keys.

Access keys are long-term credentials for an IAM user or the AWS account root user. You can use access keys to sign programmatic requests to the AWS CLI or AWS API (directly or using the AWS SDK).

Never share your root user password or access keys with anyone

Always ensure that your root account remain to yourself.

Monitor and review root user activity

Whenever the root user password or its storage location are accessed, the event should be logged and monitored to verify that your account root user is following best practices. When the root user credentials are used, Amazon CloudWatch Application Insights and AWS CloudTrail record the activity in the log and trail.

Don't create access keys for the root user

Don’t use highly privileged credentials for programmatic access. Credentials that are stored within applications are an easily exploited attack surface.

Use a strong root user password to help protect access

Strong passwords are more difficult to guess or break using brute-force attacks. Have root user passwords follow password complexity guidelines.

Configuring Security Best Practices for the Root User:

Sign in to the AWS Management Console and open the IAM console at https://console.aws.amazon.com/iam/

Deleting Root Access Keys

log in as root, click in my security credentials as shown below,
For my case I don’t have any access keys for my root account since it’s not a best practice, but we will create one for this demo. Under security credentials scroll down to access keys and click create access keys.
As you can already see the red flag, Root user access keys are not recommended. Check the box down on “I understand creating is not recommended but I still want to create one” then click create access key.
There we go, access keys created and you can download the csv file
Coming back to our I am dashboard, already we can see there is a red flag. we are advised to deactivate or delete access keys for root user. We will now proceed and see how we can delete access keys for root user account.
Select the radio button under access key ID, then select action drop-down button then click deactivate. Remember you must first deactivate an access key before deleting it. When prompted proceed and click deactivate.
we have successfully deactivated our access keys. We will now proceed and delete them. Again, select the radio button next to access key Id, select the drop-down button but this time round select delete. Confirm the deletion then click delete.
We have successfully deleted our access keys.

Activating Root Account MFA

Multi-Factor Authentication (MFA) is a security system that verifies a user’s identity by requiring multiple credentials. An MFA device signature adds an extra layer of protection on top of your existing root credentials making your AWS root account virtually impossible to penetrate without the MFA generated passcode.
Logged in as root, under I am dashboard, already you can see there is a one security recommendation red flag. And the red-flag is Add MFA(Multi-Factor-Authentication) for the root user.
Install any authenticator app from the list provided here, Then logged in as root, click assign MFA as shown below.
You will be brought to assign MFA device dashboard, under MFA device name enter device name for my case, I will enter vik@root.
Under MFA device, select MFA device to use, for my case because am using an Authenticator app, I will select the radio button next to the authenticator app.
click show QR code.
Open your authenticator app on your device, select add then scan a QR code, alternatively, you can type a secrete key, but for this article, we will work with the QR code. After the scan you will be prompted on your console to fill in two consecutive codes from your MFA device. Fill them then click add MFA
MFA device assigned as you can see it on your dashboard. Clap for yourself.
Now try to login into your AWS account as root user, you’ll have to provide the MFA code as follows:

This is how you can configure Security Best Practices for the Root User and enhance the security of the AWS Account.

If you have any questions, feel free to reach out to us at sales@accendnetworks.com and we would be glad to schedule a call with you to discuss your project further. 

Thank you!  

Categories
Blogs

Zero Trust Network Access (ZTNA) Best Practices Guide

Zero Trust Network Access (ZTNA) Best Practices Deployment Guide


Zero Trust Network Access (ZTNA) is a holistic approach to network security that combines multiple layers of protection. It commences with robust user authentication, employs the principle of least privilege, incorporates micro-segmentation to isolate and protect critical assets, and implements continuous monitoring to detect and respond to anomalies. User and device profiling, secure access control, and context-aware policies further enhance security. Secure remote access, an application-centric approach, and the use of secure web gateways and firewalls add additional layers of defense. By adopting this comprehensive approach, organizations can significantly enhance their network security and reduce the risk of breaches and data loss.
Implementing a Zero Trust Network Access (ZTNA) solution is crucial for enhancing network security in today’s digital landscape. Here, we provide a concise summary of the best practices for ZTNA implementation, which are essential for maintaining a robust security posture.
Identifying and Verifying Users and Devices

The foundation of Zero Trust Network Access (ZTNA) lies in robust user authentication, ensuring the security in the digital realm. This security measure involves employing advanced methods, such as multi-factor authentication (MFA) or digital certificates, to unequivocally verify the identity of both users and devices. This two-fold verification process goes beyond traditional username and password authentication, substantially increasing the confidence in the system’s ability to determine the legitimacy of access requests. By utilizing MFA, users are required to provide multiple pieces of evidence to establish their identity, making it significantly more challenging for unauthorized individuals or devices to infiltrate the network.

Least Privilege Access

In the realm of network security, the principle of least privilege is a fundamental concept. It dictates that users and devices should be granted the minimum level of access necessary to carry out their respective functions. This approach plays a pivotal role in minimizing potential damage in the event of a security breach. By restricting access to only what is essential, the attack surface is significantly reduced. Even if a malicious actor manages to compromise an account or device, the extent of the damage they can inflict is curtailed, as their access is limited to a narrow scope.

Micro-Segmentation

Micro-segmentation serves as a potent safeguard within the ZTNA framework. It involves dividing the network into smaller, isolated segments or zones, effectively creating secure compartments. The primary objective is to limit lateral movement within the network. In doing so, the risk of unauthorized access to critical assets is dramatically diminished. This approach isolates and fortifies these assets, rendering them impervious to threats that may have penetrated other parts of the network. Micro-segmentation exemplifies a proactive defense strategy, ensuring that even if a breach occurs, the potential for damage is confined to a specific zone.

User and Device Profiling

In the realm of ZTNA, creating comprehensive profiles of users and devices is a fundamental practice. These profiles encompass a wealth of information, including user roles, behavior patterns, and security postures. This in-depth understanding of the entities seeking access to the network plays a vital role in effective access control. By tailoring access permissions based on these profiles, organizations can ensure that the right individuals and devices have access to the right resources, while also flagging any deviations from the norm for further investigation.

Secure Access Control

The heart of ZTNA lies in dynamic access control policies that adapt to the ever-changing landscape of network security. These policies take into account a variety of factors, such as user behavior and the prevailing risk level. This adaptive approach ensures that security policies remain effective, regardless of the evolving circumstances. Security is no longer a one-size-fits-all approach but rather a finely tuned orchestration that responds to the nuances of each access request.

Context-Aware Policies

Context-aware access policies take the security of ZTNA to a new level. These policies consider a multitude of contextual factors, including the user’s location, the time of access, and the sensitivity of the requested resource. By factoring in these variables, access decisions become more fine-grained and secure. For instance, access to sensitive data may be restricted when a user is attempting to log in from an unfamiliar location, even if their credentials are valid. These policies add an extra layer of protection, enhancing security.

Secure Remote Access

Remote access is a critical aspect of ZTNA, and the approach to it is far from traditional. Rather than relying on conventional Virtual Private Networks (VPNs), organizations are increasingly implementing alternatives such as Software-Defined Perimeters (SDPs). SDPs offer enhanced remote security by dynamically adjusting access based on user profiles and contextual factors. This adaptive approach ensures that remote access remains secure and compliant with the principles of Zero Trust.