Accend Networks San Francisco Bay Area Full Service IT Consulting Company

Categories
Blogs

Cisco Umbrella

Cisco Umbrella

Cisco Umbrella

In today’s fast-paced digital world, the need for robust security measures is more critical than ever. Cisco Umbrella, a cloud-delivered security service, is one of the leading solutions in providing secure internet access and controlling cloud app usage from your network, branch offices, and roaming users. This article delves into the configuration of Cisco Umbrella, ensuring your organization remains protected against cyber threats.

Understanding Cisco Umbrella

Cisco Umbrella offers a range of security functionalities, including secure web gateways, DNS-layer security, firewall, and cloud access security broker (CASB) capabilities. It blocks malware, phishing, and command-and-control callbacks over any port or protocol, preventing potential attacks before they even occur.

Components of Cisco Umbrella

Before diving into policy configuration, it’s crucial to understand the key components of Cisco Umbrella:

  1. DNS Security: Umbrella uses the Domain Name System (DNS) to block malicious domains before a connection is ever established.
  2. Secure Web Gateway (SWG): Provides deeper inspection of web traffic to prevent malware from being downloaded or data from being exfiltrated.
  3. Cloud-Delivered Firewall: Manages and enforces application, URL, and IP-based policies to restrict inappropriate access.
  4. Cloud Access Security Broker (CASB): Offers visibility and control over the use of sanctioned and unsanctioned cloud services.
  5. API Integrations: Integrates with other security solutions to provide comprehensive protection.

Configuring Cisco Umbrella Policies

Configuring policies in Cisco Umbrella involves setting rules that dictate how traffic is handled. These policies help in controlling access to malicious sites, enforcing acceptable use policies, and securing sensitive data. Here’s a step-by-step guide to configuring these policies:

  1. Accessing the Umbrella Dashboard:
    • Log in to your Cisco Umbrella account.
    • Navigate to the Dashboard, where you can manage and configure your policies.
  2. Creating Policy Sets:
    • Go to the Policies section and select Policy Components.
    • Click on Create New Policy Set. Name your policy set to reflect its purpose, such as “Corporate Office” or “Remote Workers.”
  3. Defining Policy Rules:
    • Within the policy set, you can define specific rules based on your organization’s needs.
    • Security Settings: Enable DNS-layer security to block malicious domains and prevent malware, phishing, and command-and-control callbacks.
    • Content Filtering: Use content categories to block access to inappropriate or non-work-related websites. For example, you can restrict access to social media, gambling, or adult content.
    • Application Settings: Control access to cloud applications using the CASB feature. You can define which applications are allowed, monitored, or blocked.
  4. Setting Up SafeSearch and YouTube Restrictions:
    • Under the Content Filtering section, enable SafeSearch to ensure inappropriate content is filtered out from search engine results.
    • Enable YouTube Restricted Mode to prevent users from viewing adult or inappropriate content on YouTube.
  5. Configuring Firewall Policies:
    • Navigate to the Firewall section.
    • Create rules to control traffic based on IP addresses, ports, and protocols. This helps in blocking unwanted or potentially harmful traffic.
  6. Applying the Policy:
    • Once the policy set is configured, apply it to specific networks, user groups, or devices.
    • Use the Identity Management section to assign policies to different user identities, such as Active Directory users, network devices, or roaming clients.
  7. Monitoring and Reporting:
    • Cisco Umbrella provides comprehensive reporting tools. Regularly monitor these reports to understand the effectiveness of your policies and to make necessary adjustments.
    • Use the Reports section to view details on blocked requests, security threats, and overall internet activity within your organization.
    • Monitoring can also be found right at the main Dashboard screen, see below for an example:security-category-graph

Best Practices for Policy Configuration

  • Regularly Update Policies: Cyber threats evolve, and so should your policies. Regularly review and update your policies to address new risks and vulnerabilities.
  • User Education: Educate users about the importance of these policies and the role they play in maintaining organizational security.
  • Leverage Integrations: Integrate Cisco Umbrella with other security tools for a more comprehensive defense strategy.
  • Test Policies: Before applying new policies organization-wide, test them in a controlled environment to ensure they don’t disrupt business operations.

Conclusion

Configuring Cisco Umbrella is essential for maintaining a secure and resilient IT environment. By understanding the various components and carefully setting up policies, organizations can effectively protect against a wide range of cyber threats. Regular monitoring and updates ensure that these protections remain robust in the face of evolving challenges, providing peace of mind and a secure digital experience for all users.

If you have any questions concerning this article or would like for us to assist you with your Cisco Umbrella installation and configuration, please reach out to us by emailing us at sales@accendnetworks.com or call us at 415-408-6111 and we can have an initial discovery call to discuss your requirements.

Categories
Blogs

AWS CodeCommit: Streamlining Source Control in the Cloud.

What is AWS CodeCommit? Streamlining Source Control in the Cloud.

aws-code-commit

In the era of cloud computing, source control is a pivotal aspect of the workflow, ensuring that code changes are managed efficiently, collaborative efforts are streamlined, and the integrity of the codebase is maintained. Amazon Web Services (AWS) offers a robust solution for source control in the cloud with AWS CodeCommit. This article delves into the features, benefits, and use cases of AWS CodeCommit. We will also go ahead and create a code commit repository and clone the repo to our local machine, add files, commit and push them to our AWS code repository.

What is AWS CodeCommit?

AWS CodeCommit is a version control service hosted by Amazon Web Services that allows developers to store and manage their source code, binaries, and other assets in the AWS cloud.  Additionally, it is designed to work seamlessly with existing Git tools, making it easy for developers to integrate it into their current workflows.

Key Features of AWS CodeCommit.

Fully Managed Service: AWS CodeCommit takes care of the backend infrastructure, so developers can focus on writing code. There are no servers to manage.

Scalability: CodeCommit can handle repositories of any size, with the ability to scale up as your project grows.

High Availability and Durability: your repositories are always accessible and your data is protected against loss.

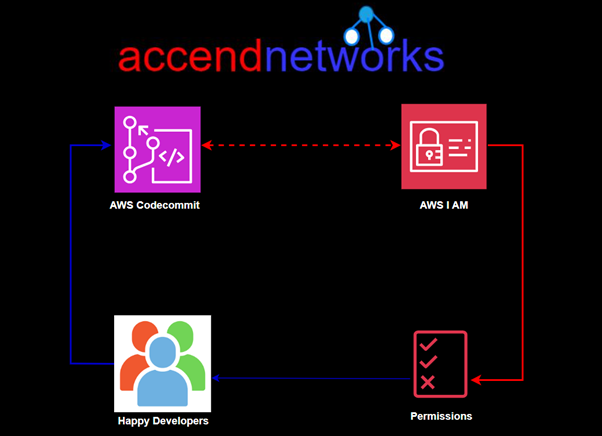
Security: CodeCommit integrates with AWS Identity and Access Management (IAM) to provide robust access control. You can use IAM policies to define who can access your repositories and what actions they can perform.

code-commit-security

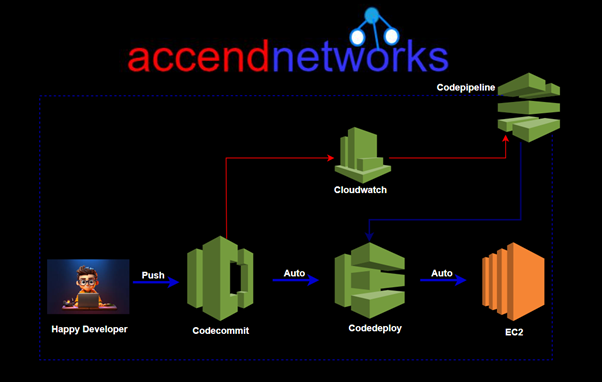
Integration with AWS Services: CodeCommit integrates seamlessly with other AWS services such as AWS CodeBuild, AWS CodeDeploy, and AWS CodePipeline. This allows you to create a complete CI/CD pipeline using AWS tools, enhancing your development and deployment workflows.

integration-aws

Standard Git Interface: CodeCommit supports the standard Git interface, so developers can use their preferred Git client, command-line tools.

Getting Started with AWS CodeCommit

Prerequisite.

Make sure you have full permission to Codecommit, or you can log in as an administrative user additionally, you should have git installed and configured on your machine.


Create a Repository

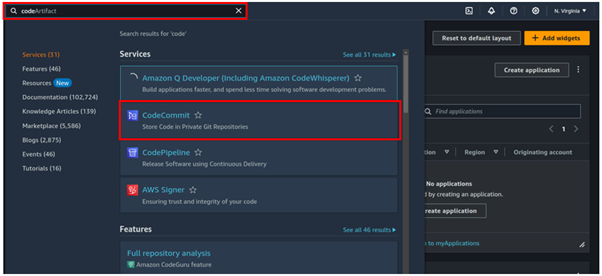
Log in to your AWS management console, in the search box, type Codecommit then select codecommit under services.

repository

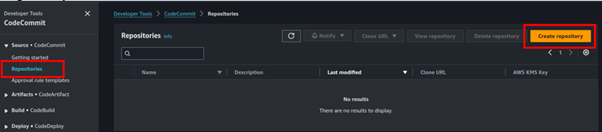
In the code commit UI on the left-hand side, select repositories then click Create Repository.

create-repository

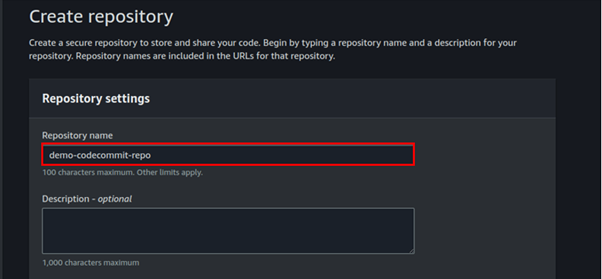
In the create repository dashboard, under repository settings, name your repo, will call mine demo-commit-repo.

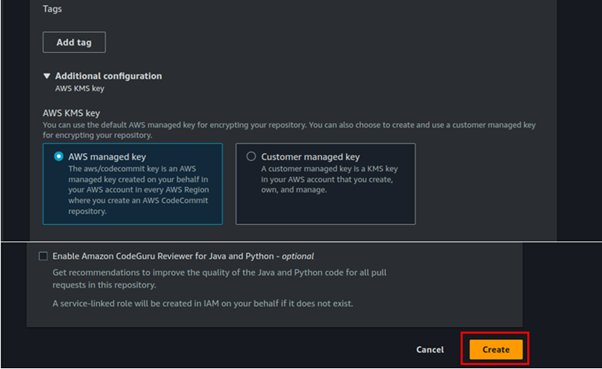
Codecommit is encrypted by default using KMS, but you can also choose your custom keys. We will leave it at AWS-managed keys with KMS.

Leave all other settings as default then click Create Repository.

create-respository

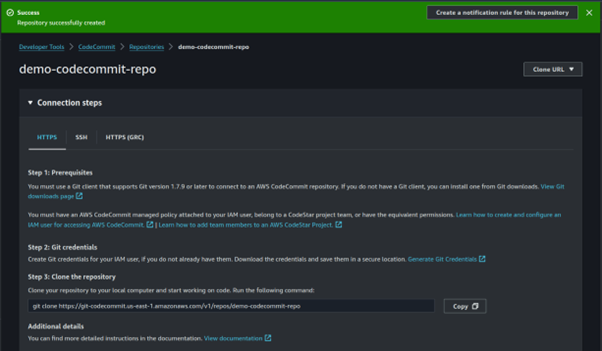
Success, we are greeted with connection steps. We can see HTTPS, SSH, HTTPS(GRC).

demo-code-commit

If you don’t see SSH then it means you are connected as the root user.

We will for now use HTTPS git credentials for Codemmit to connect to our git repository.

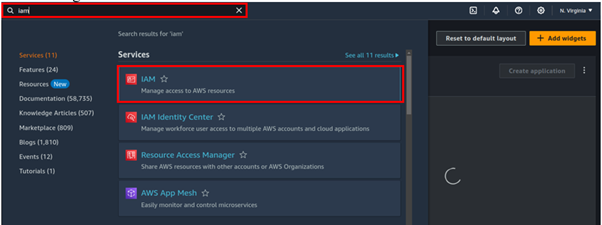
So let us log in to the I AM console.


services

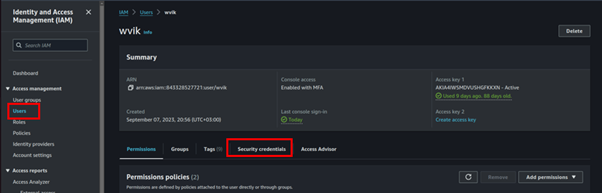
Select users. Click your username, move to the security tab then scroll all the way down to HTTPS for git credentials.


git-credentials

Click on generate and your codecommit credentials will be generated. Click the download button.

git-download

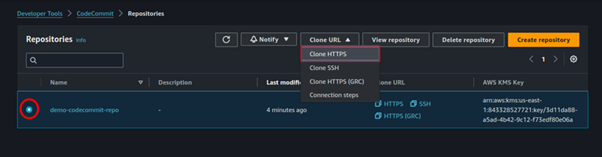
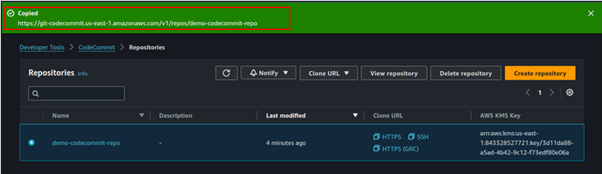
Go back to the codecommit repository select your repo then click the drop-down button of the clone URL then select clone HTTPS.

In this case, it will copy the HTTPS-type URL.

repo-copied

Use your preferred Git client to clone the repository to your local machine. This allows you to start adding code and making changes.

Go back to your terminal and type in git clone and paste in the cloned URL. When you press enter, you will be prompted for your username and password. Paste them in then press enter.

git-command

We have cloned our remote repo into our local machine.

git-command

With the repository cloned, you can push your changes to CodeCommit.

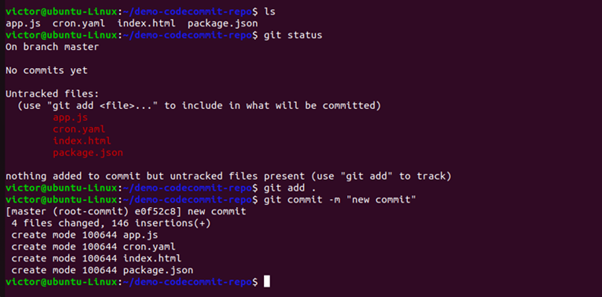
We will now copy a few files into our directory, commit these files, and push them to our remote repo.

Using linux command make sure you are in the repo directory then add copy files to your repo.

git-command

Using git add the files and then commit the changes as shown in the picture bellow.

ubuntu-command-line
ubuntu-command-line

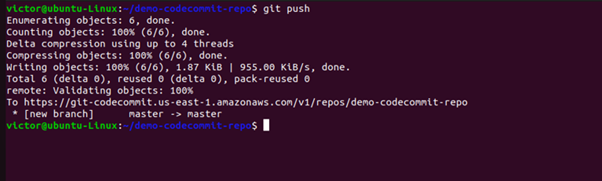
Once the changes are commited, you can then push them to the remote repo by using the below command.

ubuntu-command-line

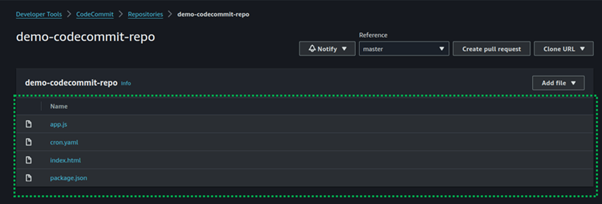
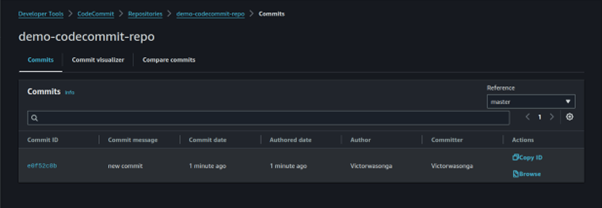
Now let’s go and check codecommit, and yes indeed the new files have been pushed to the codecommit repository.

code-commit-repo

If you click on the commits on the left side of the repo UI, you can see the commit history.

code-commit-repo

This brings us to the end of this blog. AWS CodeCommit offers a powerful, secure, and scalable solution for source control in the cloud.

Thanks for reading, and stay tuned for more.

If you have any questions concerning this article or have an AWS project that requires our assistance, please reach out to us by leaving a comment below or email us at sales@accendnetworks.com.


Thank you!

Categories
Case Studies

Chartwell School Vulnerability Assessment


Case Study
Chartwell School
Vulnerability Assessment

The Challenge

  • Chartwell School never had a Vulnerability
    Assessment done for their environment and
    needed one by an experienced Network Security
    consultant.

Our Solution

  • Security Policy and process review against
    CSF/CIS categories such as the following:
    • Acceptable use policy, Incident Response,
      and Recovery
  • Reviewed configurations of system security
    policies
  • Assessed the risks relating to program
    implementation issues identified in
    vulnerability assessment and program
    findings
  • Reviewed the overall recovery capability and
    model of critical data

The Results

  • Report included specific information for
    each task above, along with
    recommendations for remediation and/or
    mitigation of any identified security or
    network issues (Gap Analysis)
Contact Us

Services Covered

Categories
Case Studies

PCS Technology Site To Site VPN Issue


Case Study
PCS Technologyy
Remote Access VPN Connectivity Issue

The Challenge

  • Accend was contacted by one of our partners
    to assist with a Remote Access VPN issue to a
    remote end network part of the site-to-site
    tunnel late Friday and the partner was given
    until Monday to resolved everything because
    one end user was down almost all day due to a
    network change that was made the week
    before.
  • Customer was using Anyconnect Remote
    Access VPN with route-based site-to-site VPN
    tunnel
  • Remote Access VPN clients’ network was Port
    Address Translated (PAT) to a single IP that was
    allowed through the IPSec Site-to-Site Tunnel
  • Senior IT Manager worked on it for two weeks
    and couldn’t resolve the issue

Our Solution

The Results

Contact Us

Services Covered