Accend Networks San Francisco Bay Area Full Service IT Consulting Company

Categories
Blogs

How To Configure AWS Transit Gateway

How To Configure AWS Transit Gateway

AWS Transit Gateway

The network architecture in the cloud can quickly become complex as the number of VPCs, accounts, regions, on-premises data Centers, and edge locations grows. Transit Gateways allow customers to simplify the network layout and connectivity between all these environments.

What is AWS Transit Gateway?

AWS Transit Gateway serves as a central hub that connects VPCs and on-premises networks, eliminating the need for individual connections.

With Transit Gateway, you only need to create connections from the VPCs, VPNs, and Direct Connect links to the Transit Gateway. Transit Gateway will then dynamically route traffic between all the connected networks.

Why Choose Amazon Transit Gateway?

  • Simplifies Connectivity: Transit Gateway lets you quickly connect to one central gateway, making it easier for users to interconnect to all VPCS and onsite networks, regardless of how many connected accounts there are. Transit Gateway also supports dynamic and static layer 3 between Amazon VPCs and VPNs.
  • Facilitates Greater Control and Monitoring: AWS Transit Gateway allows users to monitor and manage all their Amazon VPC and edge connections in one place. The service makes it easier to find issues and handle events as they come. You may also enable Equal Cost Multipath (ECMP) between these connections to load balance between paths and increase bandwidth.
  • Bandwidth On Demand: Obtain the network bandwidth you need to move terabytes of data at a time for your applications, or even migrate into the cloud. You may add Amazon VPCs to your network without needing to provision extra connections from on-site networks.
  • Highly Secure: With its integration with IAM, users may control who can access Transit Gateway. Create and manage user accounts and groups and establish permission for them centrally.

Pricing

This service charges you per number of connections you attach to the Transit Gateway per hour, and also for each GB of data processed. The owner is billed per hour their Amazon VPCs or VPN are connected, starting from the instant the VPC is connected to Transit Gateway and until the VPC is disconnected. Note that a portion of an hour is still billed as one full hour.

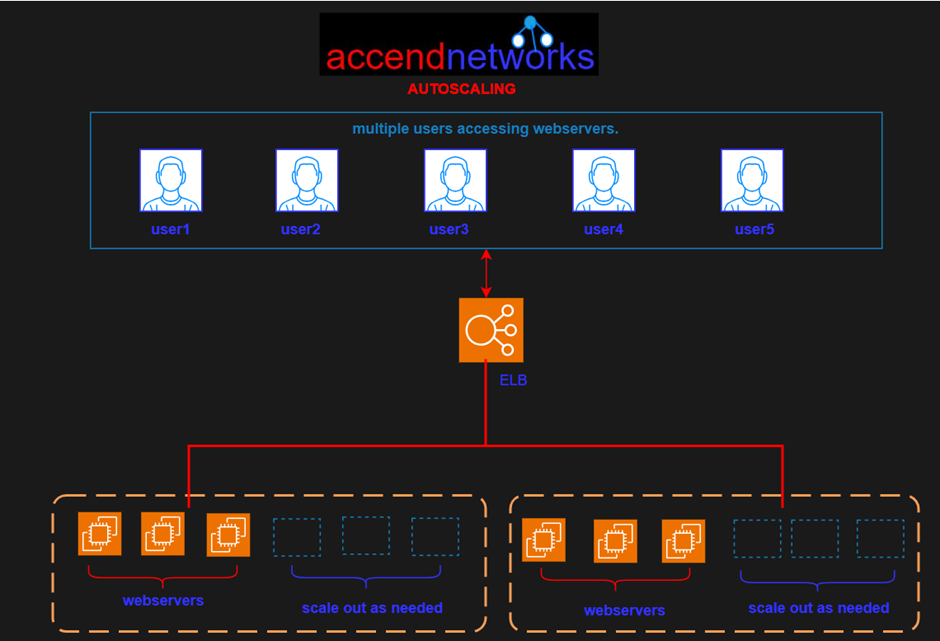
So, as we can see, AWS Transit Gateway is an awesome service. It’s further described by AWS as being a cloud router and it connects VPCs and on-premises locations together using a central hub. To prove how transit gateway simplifies connectivity, we will look at different scenarios. First will concider a fully meshed architecture without AWS Transit Gateway. This will help us understand the problem Transit Gateway is trying to solve.

We get that when we have lots of VPCs and on-premises location connections without Transit Gateway, the peering connections that we set up if we use VPC peering can become extremely complex.
Mesh Architecture with Transit Gateway v2

Examining the above architecture, we find ourselves navigating through four distinct Virtual Private Clouds (VPCs) denoted as A, B, C, and D, all seamlessly interconnected through established VPC peering links. The complexity becomes apparent as we observe the presence of six peering links, a testament to the intricacy involved in setting up connections for just four VPCs. It becomes evident that as the number of VPCs increases, the complexity of the setup grows exponentially.


In this complicated setup, we have six connections between the VPCs, and the corporate office is linked in through a customer gateway. Now, here’s where it gets tricky: connecting the corporate office to each VPC using Site-to-Site VPNs. This involves having a virtual gateway in each VPC and making a separate secure connection (VPN) to the customer gateway for each VPC. So, in the end, we’re dealing with four of these VPN connections, and it gets even more complicated if we want a backup plan (redundancy).


If we dive a bit deeper into the problem, adding redundancy means we need an extra customer gateway and twice the number of those VPN connections. The more we look into it, the more complex it becomes, turning our setup into a really tangled network.


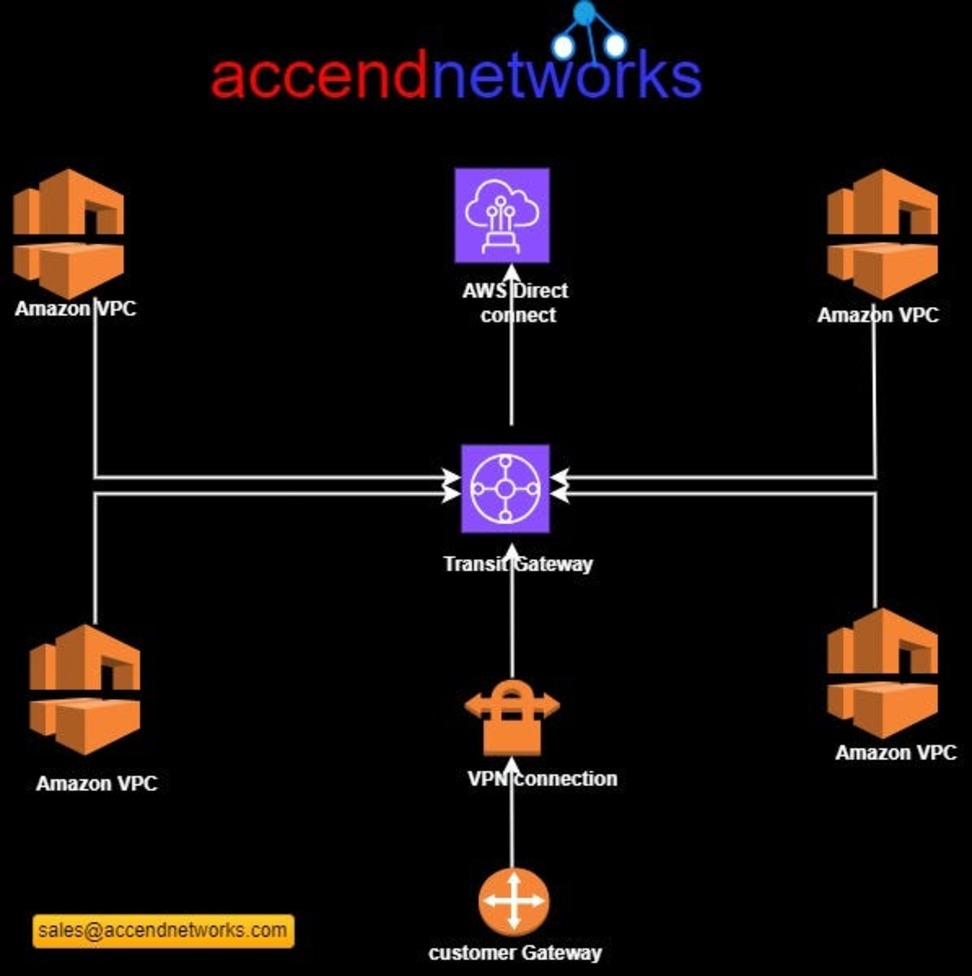
Now, let’s check out the same setup but using a Transit Gateway. This other option can make all the connections simpler and easier to deal with.

Mesh Architecture with Transit Gateway

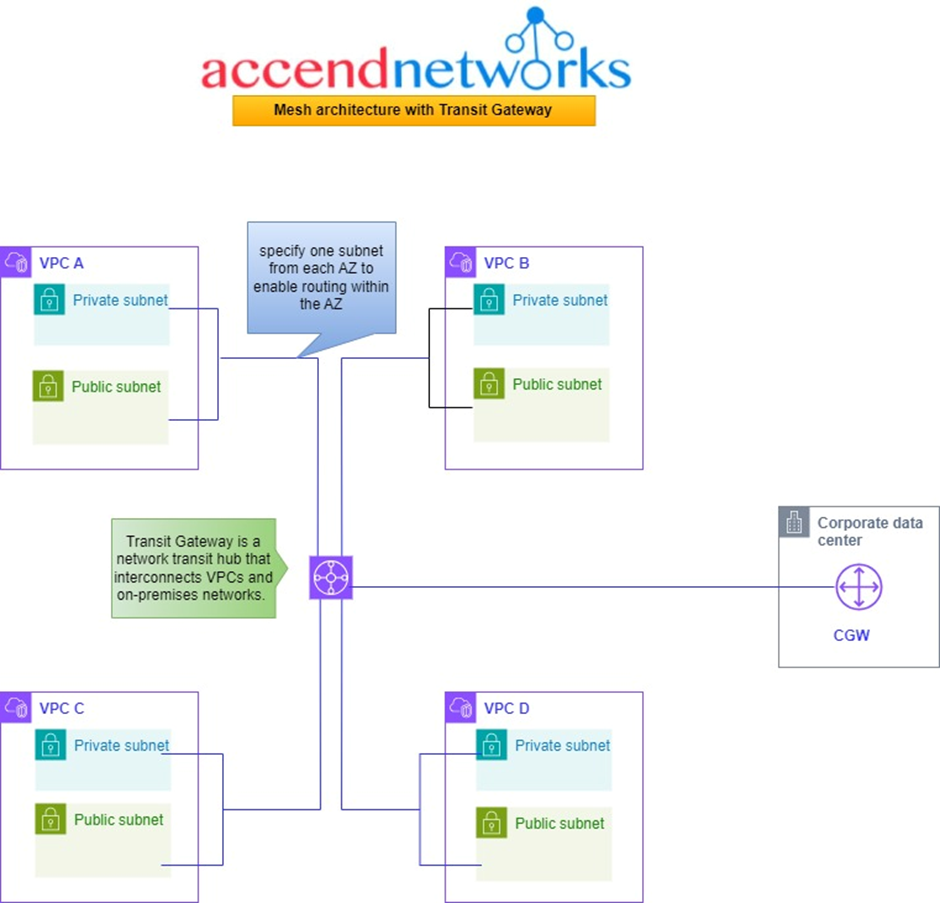
In this situation, as seen from the above architecture, we have the same four VPCs and a corporate office. Now, let’s simplify things by putting a Transit Gateway in the middle. It acts like the main hub that connects all the VPCs and the on-premises networks.

So, each of these VPCs gets linked to the Transit Gateway. You choose a subnet from each availability zone, which helps in directing traffic within that zone for other subnets. It’s like giving each area its own route.

Now, there’s also the customer data Center and the corporate office has a customer gateway that also connects to the Transit Gateway. That’s pretty much the setup. This service allows us to connect through a cloud router, this central hub, to any of these VPCs.

Transit Gateways (TGWs) can be attached to VPNs, Direct Connect Gateways, third-party appliances, and even other Transit Gateways in different regions or accounts.

Explore how AWS Transit Gateway seamlessly integrates with Direct Connect Gateway, enabling transitive routing for growing companies with multiple VPCs.

AWS Transit Gateway and Direct Connect Gateway
Instead of using a complicated Site-to-Site VPN, our corporate office has a customer router. We connect to a DX (Direct Connect) location using a DX Gateway.

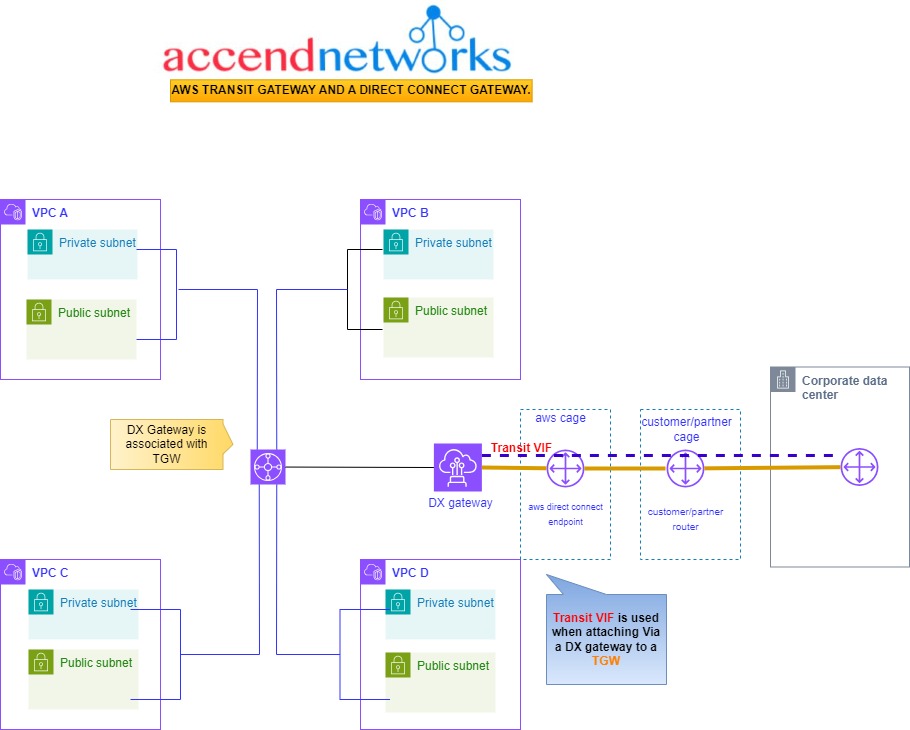
Now, the DX Gateway has a connection with the Transit Gateway. This connection is called an association. We then physically connect back to the corporate office from Direct Connect, creating something called a Transit VIF. This is like a special connection used only when you’re connecting a DX Gateway to a Transit Gateway.

This setup supports full transitive routing between on-premises, the Transit Gateway, and all those connected VPCs. When your company gets bigger and uses more VPCs in different areas, and you want them all to connect smoothly, Transit Gateway becomes super helpful.

Conclusion.

AWS Transit Gateway makes cloud network setups simpler. It acts like a hub connecting your VPCs, VPNs, and data Centers, making things easy to manage. It does away with confusing mesh setups, provides easy scalability, and keeps your network organized and secure.

As your cloud presence grows, Transit Gateway is the key to keeping your network simple, efficient, and secure.
If you have any questions concerning this article or have an AWS project that requires our assistance, please reach out to us by leaving a comment below or email us at sales@accendnetworks.com.

Thank you!


Categories
Blogs

How To Create AWS EC2 Auto Scaling

How To Configure AWS EC2 Auto Scaling

aws ec2 auto scaling groups

Amazon Web Services (AWS) offers a robust solution through Auto Scaling Groups, facilitating automatic adjustments to instance numbers based on demand.

Auto Scaling Group Fundamentals

In real-world scenarios, the demand for websites and applications can fluctuate significantly. AWS Auto Scaling Groups allow rapid creation or termination of servers to accommodate these changes. The key objectives of ASGs encompass dynamically adding or removing EC2 instances based on demand, setting limits on instance numbers, and ensuring the automatic registration of newly launched instances with load balancers. Furthermore, ASGs are designed to replace terminated instances, ensuring continuous availability, all while being cost-effective as you only pay for the underlying EC2 instances.

How Do Auto Scaling Groups Work?

The size of your auto scaling group is maintained according to a pre-defined number of instances, which you configure as the required capacity. You can use manual or automatic sizing to resize groups according to application requirements.

Initially, an auto scaling group launches enough instances to reach the required capacity. By default, it maintains this number of instances by performing regular health checks, identifying unhealthy instances, terminating them and launching other replacement instances.

So let’s look at auto-scaling policies

Auto Scaling and CloudWatch Alarms

Target Tracking Scaling

First, consider a scenario where you want to maintain an average CPU utilization of 40%.

Simple/Step Scaling

Then, for a more granular approach, consider Simple/Step Scaling.

Scheduled Actions

Next, Scheduled Actions can be employed in scenarios where scaling needs can be anticipated. e.g. an increase in minimum capacity to 10 at 5 pm every Friday.

Predictive Scaling

Now, Predictive Scaling introduces a proactive approach by continuously analyzing historical data.

Metrics for Scaling

Choosing appropriate metrics is crucial. Consider metrics such as average CPU utilization, requests per EC2 instance, average network in/out, or custom metrics pushed using CloudWatch.

Scaling Cooldowns

To prevent rapid and unnecessary scaling activities, cooldown periods are essential.

Instance Refresh

Instance Refresh allows you to update the launch template of your Auto Scaling Group and then gradually replace instances with the new configuration. This process helps you seamlessly apply changes to your instances, ensuring that your application remains available and responsive during the update.

Auto Scaling Group Configuration

To create an autoscaling group, firstly start by creating a launch template. Then launch template specifies how to configure EC2 instances that are going to be launched by an autoscaling group. We will do this practically.


Go to the log into the management console, type EC2 in the search box, and select EC2 under services.


In the EC2 console on the left side of the navigation pane under instances, click launch templates, then click Create launch template.

aws ec2 auto scaling groups

Give your template a name, I will call it Auto-scaling-Template and then you can skip the version description for now and scroll down.

We will do configurations for our launch template. Under launch template contents under Application and OS images, select the QuickStart tab then select Amazon Linux. Then under Amazon Machine Image (AMI) select the dropdown and select Amazon Linux 2 AMI. Scroll down.

Under instance type select the drop-down button and select t2. Micro because it is the free one. Then under key-pair login, select the drop-down and select your key-pair. Scroll down.

In the network settings section, for subnet Leave it as it is. Then move to firewall and security, then select the existing security group. For security groups, select your security groups. I created a security group and opened port 22 for SSH and called it SSH security group. Again, I opened ports 80 and 443 for HTTP and HTTPS traffic and called this security group, web traffic. Scroll down. Leave all the other settings as default and click Create Launch template.
Come back to the EC2 dashboard at the bottom left of the navigation pane and select Auto Scaling groups.
aws ec2 auto scaling groups
In the create auto-scaling group dashboard under the name, give a name to your auto-scaling group. Then in the launch template section, select the drop-down and choose the template you just created. Then scroll down and click next.

Under network, select your VPC, I will move with the default VPC and then under availability zone, select the drop-down and select your AZs, I will select Us-east-1a, and then 1b AZs then scroll down and click next.

aws ec2 auto scaling groups
Under the configure advance option because we don’t have a load balancer, we will pass that page and click next. Then under the configure group size and scaling section, under desired capacity, select 2, then scroll down.
For scaling limits, minimum desired capacity select 1, and for maximum desired capacity select 4. Leave the other options and click next.
We will not add notification, click next.

Leave tags optional and click next.

On this page, review and click create auto-scaling-group.

When you come back to the EC2 dashboard under instances already we can confirm autoscaling has provisioned our desired capacity instances.
This brings us to the end of this demo. Pull down everything. Stay tuned for more.

If you have any questions concerning this article or have an AWS project that requires our assistance, please reach out to us by leaving a comment below or email us at sales@accendnetworks.com.

Thank you!

Categories
Blogs

How Does Amazon CloudWatch Work?

How Does Amazon CloudWatch Work?

Amazon CloudWatch monitors your Amazon Web Services (AWS) resources and the applications you run on AWS. Additionally, CloudWatch enables real-time monitoring of various AWS resources including EC2 instances, RDS database instances, load balancers, and AWS Lambda. CloudWatch allows to collect & track metrics, monitor log files, set alarms, and automate reactions to AWS resource changes.
It automatically provides metrics for CPU utilization, latency, and request counts. Moreover, it can monitor other vital metrics such as memory usage, error rates, etc.

CloudWatch Metrics

CloudWatch metrics give the users visibility into resource utilization, application performance, and operational health. These help you make sure that you can resolve technical issues and streamline processes and that the application runs smoothly.

How does Amazon CloudWatch work?

Basically, the Amazon CloudWatch primarily performs the following four actions:

Collect metrics and logs

In the first step, CloudWatch gathers metrics and logs from all your AWS services, like AWS EC2 instances. Following this, CloudWatch retrieves these metrics from the repository. This repository may also contain custom metrics entered into it.

Monitor and visualize the data

Next, CloudWatch monitors and visualizes this data using CloudWatch dashboards. These dashboards provide a unified view of all your AWS applications, resources, and services, on-premise or in the cloud. In addition, you can correlate metrics and logs. Consequently, this facilitates visual analysis of your resources’ health and performance.

Act on an automated response to any changes.

In this step, CloudWatch executes an automated response to any operational changes using alarms. For example, you can configure an alarm to start or terminate an EC2 instance after it meets specific conditions. Additionally, you can use alarms to start services such as Amazon EC2 auto-scaling or Amazon SNS If a triggered alarm activates, you can set up automated actions such as auto-scaling.

Analyze your metrics

The final step is analyzing and visualizing your collected metric and log data for better insight. You can perform real-time analysis using CloudWatch Metric Math which helps you dive deeper into your data.

Amazon CloudWatch Logs

CloudWatch Logs helps users access, monitor, and store access log files from EC2 instances, CloudTrail, Lambda functions, and other sources. With the help of CloudWatch Logs, you can troubleshoot your systems and applications. It offers near real-time monitoring and users can search for specific phrases, values, or patterns. You can provision CloudWatch logs as a managed service without any extra purchases from within your AWS accounts. CloudWatch logs are easy to work with from the AWS console or the AWS CLI. They have deep integration with AWS services. Furthermore, CloudWatch logs can trigger alerts based on certain logs occurring in the logs. For log collection, AWS provides both a new unified CloudWatch agent and an older CloudWatch Logs agent. However, AWS recommends using the unified CloudWatch agent. When you install a CloudWatch Logs agent on an EC2 instance, it automatically creates a log group. Alternatively, you can create a log group directly from the AWS console. For the demonstration, I have the following Lambda functions that I created.
Next, we will proceed to view the CloudWatch logs of my destination test function. To do so, select it and navigate to the monitoring tab. Then, click on “View CloudWatch logs,” as shown below.
After clicking “View CloudWatch logs,” the system takes you to the CloudWatch dashboard. And under log streams, you can select one of the log streams to view.
On selecting the first one we can see the below logs events.

CloudWatch Events

CloudWatch Events allows users to consume a near real-time stream of events as changes to their AWS environment occur. These event changes can subsequently trigger notifications or other actions. Despite this, CloudWatch events monitor EC2 instance launches, shutdowns, and detect auto-scale events. Additionally, it detects when AWS services provision or terminate.

What are the benefits of Amazon CloudWatch?

Access all monitoring data from a single dashboard

Essentially, Amazon CloudWatch allows you to monitor data from different services using a single dashboard.

Collects and analyzes metrics from AWS and on-premise applications

Thanks to its seamless integration with over 70 AWS services, CloudWatch can collect and publish metric data automatically.

Using this metric and log data, you can now optimize your AWS services and resources

Improve your operational efficiency and optimize your available resource

The Amazon CloudWatch service provides real-time insights into cloud operations. Hence, this enable you to optimize operational efficiency and reduce costs.

Improve operational visibility

With the Amazon CloudWatch service, you gain operational visibility across all your running applications

Extract valuable insights

Ultimately, Amazon CloudWatch enables you to extract valuable and actionable insights from generated logs.

Conclusion

Using the Amazon CloudWatch service, you can monitor cloud-based applications and other AWS services. Consequently, this helps you in troubleshooting any performance issues. With its centralized dashboard, AWS administrators have complete visibility into applications and services across AWS regions. In conclusion, this brings us to the end of this blog. Stay tuned for more.
For questions or AWS project assistance, contact us at sales@accendnetworks.com. or leave a comment below. Thank you!
Categories
Blogs

How To Create with Network Load Balancer in AWS

Extreme Performance with Network Load Balancers

In today’s fast-paced digital era, where every millisecond counts, minimizing latency and optimizing network performance have become paramount for businesses. Network load balancing plays a crucial role in achieving these goals. By distributing incoming network traffic across multiple servers, network load balancing ensures efficient resource utilization, enhances scalability, and reduces latency.

We can see in the above diagram, choose a network load balancer if you need ultra-high performance.

What is a Network Load Balancer?

A Network Load Balancer operates on the Transport Layer (Layer 4) of the Open Systems Interconnection (OSI) model rather than the application layer, making it ideal for Transmission Control Protocol (TCP) and User Datagram Protocol (UDP) traffic. It is suitable for applications anticipating an unexpected spike in traffic because it can handle millions of concurrent requests per second.

Network load balancing is the process of evenly distributing incoming network traffic across multiple servers or resources. This intelligent traffic management technique helps to eliminate overload on individual servers and optimizes resource utilization.

Components of AWS NLB

A load balancer serves as the single point of contact for clients. The following are the two main components of the AWS NLB:
Listeners. Before an AWS NLB can be used, an admin must add one or more listeners. A listener is a process that uses the configured protocol and port number to look for connection requests. The rules defined for a listener dictate how an NLB routes traffic to the target groups.
Target groups. A target group consists of multiple registered targets to which the listener can route traffic, such as Amazon EC2 instances, IP addresses, microservices, and containers. A target can be registered with multiple target groups, which increases the availability of the application, especially if demand spikes.

How does load balancing work in AWS?

The network load balancer performs health checks on targets to ensure traffic is routed to only high-performing resources. When a target becomes slow or unresponsive, the NLB routes traffic to a different target.

Features of Network Load Balancer

Network Load Balancer serves over a million concurrent requests per second while providing extremely low latencies for applications that are sensitive to latency.

The Network Load Balancer allows the back end to see the client’s IP address by preserving the client-side source IP.

Network Load Balancer also provides static IP support per subnet.

To provide a fixed IP, Network Load Balancer also gives the option to assign an Elastic IP per subnet.

Other AWS services such as Auto Scaling, Elastic Container Service (ECS), CloudFormation, Elastic BeanStalk, and CloudWatch can be integrated with Network Load Balancer.

To communicate with other VPCs, network load balancers can be used with AWS Private Link. AWS Private Link offers secure and private access between on-premises networks, AWS services, and VPCs.

Network load balancing offers several key advantages:

Improved Scalability: By distributing incoming traffic across multiple servers, network load balancing ensures that your system can handle increasing demands without compromising performance.

Enhanced Redundancy: Network load balancing introduces redundancy into your network infrastructure. If one server fails or experiences a high load, the load balancer automatically redirects traffic to the healthy servers, eliminating downtime.

Minimized Latency: Latency, Network load balancing helps minimize latency by dynamically directing requests to the server with the lowest latency or optimal proximity.

How to Create a Network Load Balancer?

To create a network load balancer, log in to the management console then type EC2 in the search and select EC2 under services. On the EC2 console under load balancing, select load balancers.
Fill in your load balancer details. Under name give it a name, leave it on internet facing and IPV4 address then scroll down to the networking section.

select your VPC, then under mappings select the availability zones make sure to select the AZs where your targets will reside for the EC2 instance target then under security Select the security group for your load balancer then scroll down.

Under listener will move with TCP on port 80. Then for default action, click Create Target group. Remember you can also create it before.
In the target group console, under target types, we will move with instances, and for a name call it NLB-Target. Leave it on TCP port 80, select your VPC then scroll down and click next.
Then under register targets, select your instances, I had already created two instances for this demo. will select my instances. Then click Include as pending below then click Create target group.
Come back to the network load balancer and select your target group. It will now be showing up.
Scroll down to review the summery then click create load balancer.
This is how we create a network load balancer. This brings us to the end of this blog. Make sure to clean up.

If you have any questions concerning this article or have an AWS project that requires our assistance, please reach out to us by leaving a comment below or email us at sales@accendnetworks.com.

Thank you!

Categories
Blogs

How to Configure A Dual-NAT Gateway

HOW TO CONFIGURE A DUAL-NAT GATEWAY IN TWO DIFFERENT AVAILABILITY ZONES.

In this comprehensive guide, we will take you through configuring a dual-NAT gateway in two different availability zones, paired with route tables, enabling your private subnets to access the internet securely.

According to our reference architecture, we will create a Nat gateway in the public subnet az1, we will create a route table that we call private route table az1. We will then add a route to that route table to route traffic to the internet through the Nat gateway. We will then associate that route table with the private app subnet az1, and private data subnet az1.

Again, for the second availability zone:

We will create another Nat gateway in the public subnet az2. We will then create another route table called private route table az2, we will add traffic to this route table to route traffic to the internet through the Nat gateway in the public subnet az2. We will then associate this route table with the private app subnet az2 and private data subnet az2.

Let’s start.

Refer to our previous post on creating a Custom 3 tier-VPC. We will use that VPC project to accomplish this project.

To create the Nat gateway first make sure you are in the region where you created the VPC.

Then in the search box, type VPC and select VPC under services.

On the VPC dashboard on the left side of the navigation pane select Nat gateway, then click Create Nat gateway.

We will create the first Nat gateway in the public subnet az1.

In the create Nat gateway dashboard under name give your Nat gateway name, call it Nat gateway az1. Once you’ve given your Nat gateway a name, select the subnet where you want to put your Nat gateway. so under subnet, select the drop-down and look for public subnet az1 then select it. Then for connectivity type leave it on the default public, because we are creating a public Nat gateway.

Scroll down, under elastic allocation ID click allocate an elastic IP and that is going to allocate an elastic IP for you.

These are the only settings we need to create a Nat gateway, scroll down and click Create Nat gateway.
Success, we have created our first Nat gateway in the public subnet az1
Next, we will create a route table and call that route table, private route table az1. On the left side of your screen, select route tables then click create route table.

In the create route table dashboard under name, give your route table a name, and call it private route table az1. Once you’ve given the route table a name, select the VPC you want to create this route table in, so under VPC, select the drop-down and select your prod- VPC.

These are the only settings we need to create a route table now click create route table.

Success, we have successfully created our first private route table in private subnet az1.

Next, we will add a route to the private route table az1 to route traffic to the internet through the Nat gateway in the public subnet az1.

To add a route to this route table, navigate to the routes tab, select edit routes then click Add route

For the destination remember internet traffic is always 0.0.0.0/0 so under destination type in this value.

Then under target, the target is going to be our Nat gateway in the public subnet az1, so click in the search box, then select Nat gateway. Make sure you select Nat Gateway and not Internet Gateway. You should see the Nat gateway in the public subnet az1, it is the Nat gateway we call Nat gateway az1. Select it then click Save Changes.

Successfully, we have added a route to the route table to route traffic to the internet through the Nat gateway in the public subnet az1.
When you scroll down, you can see the routes here.

Next, we will associate this route table with private app subnet az1 and private data subnet az1.

To associate this route table with our subnets, click subnet associations, then click edit subnet associations.

In the edit subnet associations dashboard, under the available subnets, select private app subnet az1, and private data subnet az1. Once you’ve selected the two subnets, click Save Associations.

We have successfully associated our private app subnet az1 and private data subnet az1 to this route table.

And you can see that information, under explicit subnet associations, we have two subnets there.

If you click on the subnet’s association tab a gain, you will see that the private app subnet az1 and private data subnet az1 are associated with the route table.

Next, we will create the second Nat gateway in the public subnet az2. On the left side of the VPC dashboard select Nat gateway. then click Create Nat gateway.

Under Nat gateway settings give the Nat gateway a name, call it Nat gateway az2. Then select the subnet you want to put the NAT gateway in. Under subnets, select the drop-down and select public subnet az2. For connectivity type leave it on the default public because we are creating a public Nat gateway. Under elastic IP allocation ID, click the allocate elastic IP button, this will allocate an elastic IP for you.

Scroll down and click Create Nat gateway.

We have successfully created the Nat gateway.

The next thing we will do is to create another route table and call it private route table az2.

On the left side, select the route table. then click Create Route Table.

Under name give your route table a name, call it private route table az2. Once you’ve given your route table a name then, select the VPC you want to put your route table in, so under VPC, select the drop-down and select your prod VPC. These are the only settings we need to create this route table, click create route table.

We have successfully created a private route table az2.
Now that we have successfully created the private route table az2, we will add a route to this route table to route traffic to the internet through the Nat gateway in the public subnet az2. To add a route to this route table, select the routes tab then click edit routes.

In the edit routes dashboard click Add route

Under destination remember traffic going to the internet is always 0.0.0.0/0 so type it in there and select it.

Then under targets, we will select our Nat gateway, so select the search box, and select Nat gateway.

And this time make sure you select Nat gateway az2. Then click save changes.

We have successfully added a route to this route table to route traffic to the internet through the Nat gateway in the public subnet az2.

To see that route scroll down and you will see it there.

The last thing we will do is associate this route table with private app subnet az2, and private data subnet az2

To associate this route table with our subnets, go to the subnets associations tab, select it then click edit subnet associations.

Under available subnets, we will select the private app subnet az2 and private data subnet az2. Once you’ve selected the subnets, click Save Associations.

We have successfully associated our private app subnet az2, and private data subnet az2 with the private route table az2.

To see that, we can see that we have two subnets under explicit subnet associations.

and if you click on the subnet’s associations tab, you will see that our private app subnet az2, and private data subnet az2 are associated with this route table.

This is how we create Nat gateway to allow resources in our private subnet, to have access to the internet.
Delete The AWS NAT Gateway
After completion of your practice on the NAT Gateway you have to delete it to avoid incurring charges. Remember when you provision a NAT gateway, you are charged for each hour that your NAT gateway is available and each gigabyte of data that it processes.
Deleting a NAT gateway disassociates its Elastic IP address, but does not release the address from your account. So again, make sure you release the elastic IP address from your account.
Stay tuned for more.
If you have any questions concerning this article or have an AWS project that requires our assistance, please reach out to us by leaving a comment below or email us at sales@accendnetworks.com
Thank you!