Accend Networks San Francisco Bay Area Full Service IT Consulting Company

Categories
Blogs

AWS Systems Manager

Unveiling the Power of AWS Systems Manager: Simplifying Management and Automation.

AWS Systems Manager

Managing and maintaining a fleet of virtual machines and services in the error of cloud computing can be a daunting task. This is where AWS systems manager comes in as a powerful suit of tools designed to simplifying operational tasks, automate workflows and enhance security a cross your AWS infrastructure. In this blog article, we will delve into the capabilities and benefits of AWS Systems Manager.

What is AWS Systems Manager

According to AWS documentation, AWS Systems Manager is the operations hub for your AWS applications and resources and a secure end-to-end management solution for hybrid and multicloud environments that enables secure operations at scale. AWS Systems Manager (SSM) is an agent-based service for managing servers on any infrastructure: AWS, on-premise and other clouds.

SSM Agent

The AWS Systems Manager Agent (SSM Agent) is Amazon software that operates on Amazon EC2 instances, edge devices, and on-premises servers and virtual computers (VMs). Systems Manager may update, manage, and configure these resources using the SSM Agent. The agent receives requests from the AWS Cloud’s Systems Manager service and executes them as stated in the request. The SSM Agent then uses the Amazon Message Delivery Service to deliver status and execution information back to the Systems Manager service.

AWS Systems Manager Features Automation

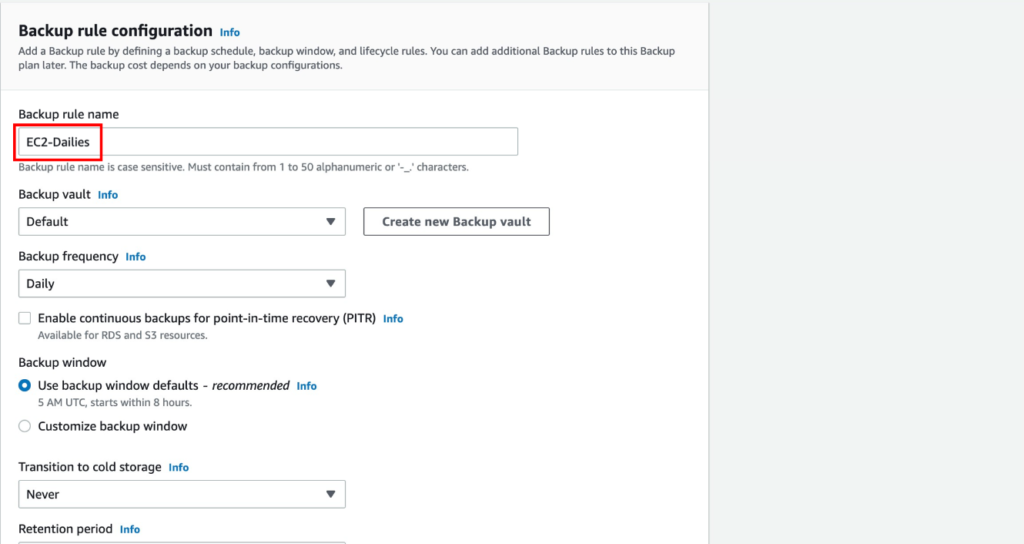
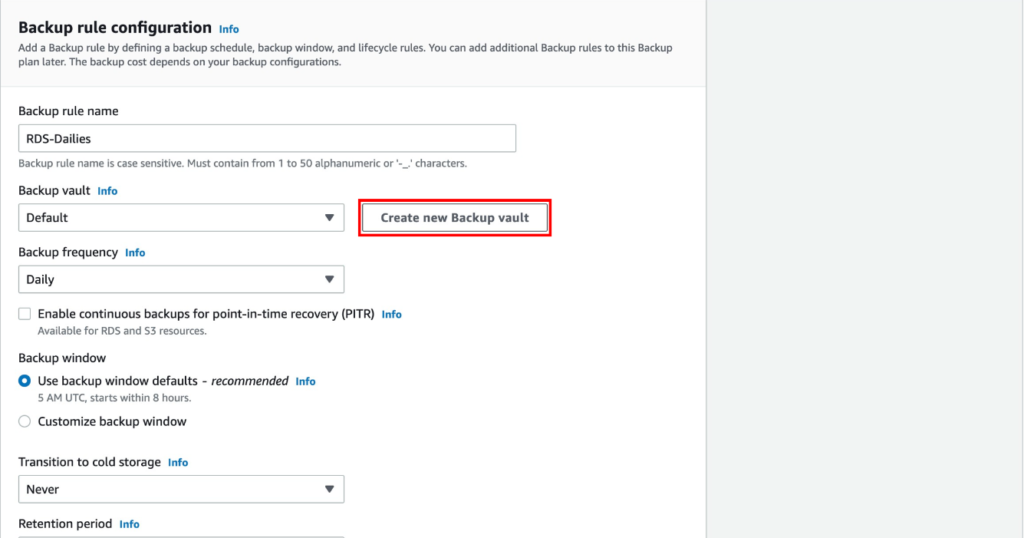
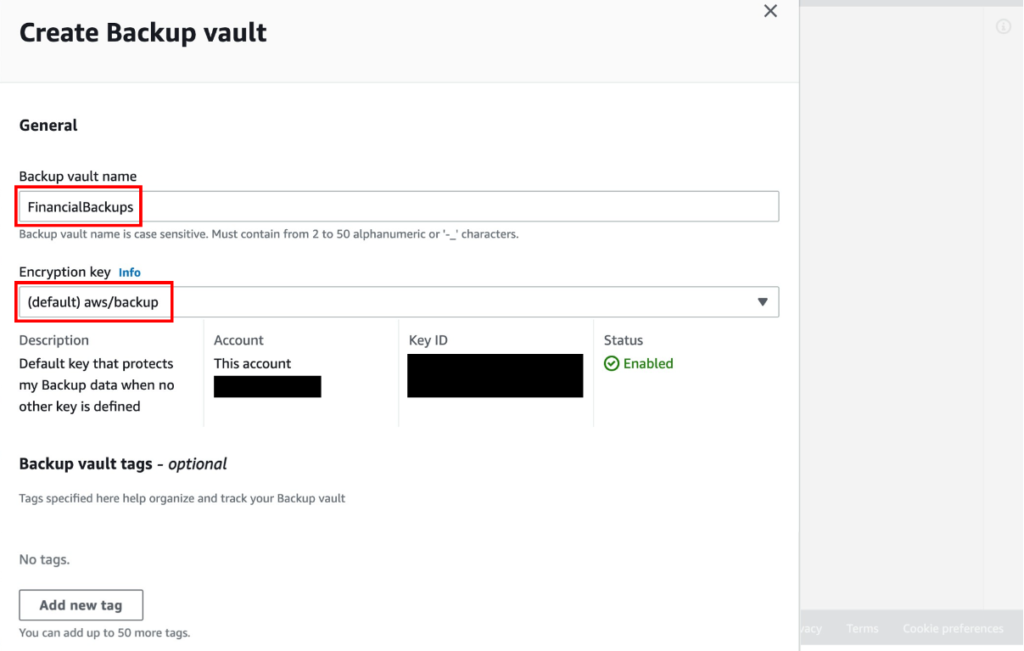
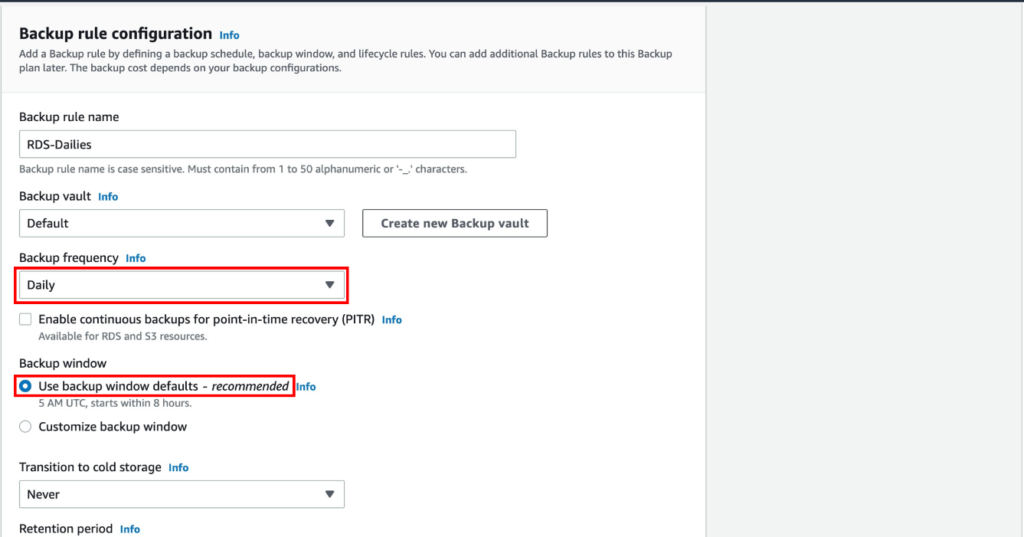
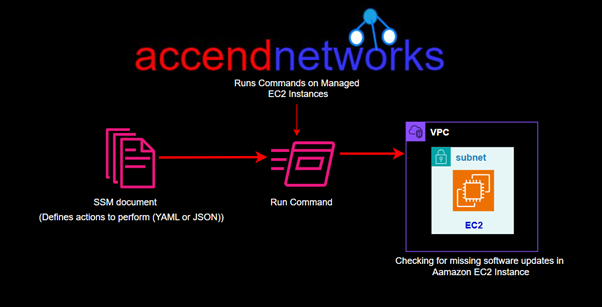
With SSM automation we have something called a document which defines an action to perform and it’s written in YAML or JSON. For instance, we can have a document that creates a snapshot of an RDS database. The documents are fed into the SSM automation which will then automate the IT operations and management tasks across the AWS resources.

Run Commands

The run command is also very similar, it also has documents. They include things such us commands, automation and packages. For example, we have run command that lists missing Microsoft windows updates, find out what they are and be able to patch them.

Inventory

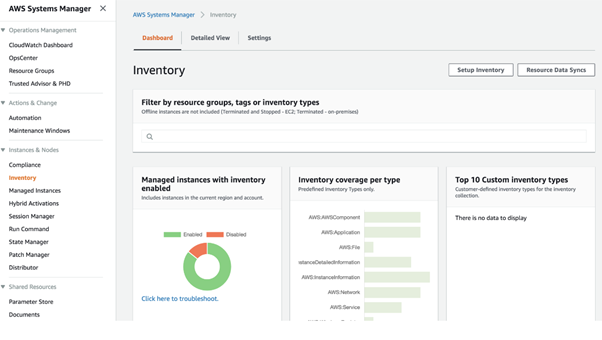
This quit gives you an inventory of resources that you are managing. Once the information is collected, we can gather all that data, visualize it then drill down into the various components of the inventory.

Patch Manager

Helps you select and deploy operating systems and software patches across large groups of Amazon EC2 and on-premises instances.

We have something called patch baselines where we can set rules to auto approve select categories of patches to be installed, specify a group of patches that override these rules and are automatically approved or rejected.

We can also specify maintenance windows for patches so that they are only specified during predefined times.

Patch manager helps to ensure that your software systems are up to date and meets your compliance policies you might have in your organisation.

SSM helps you scan your managed instances for patch compliance as well as configuration inconsistencies.
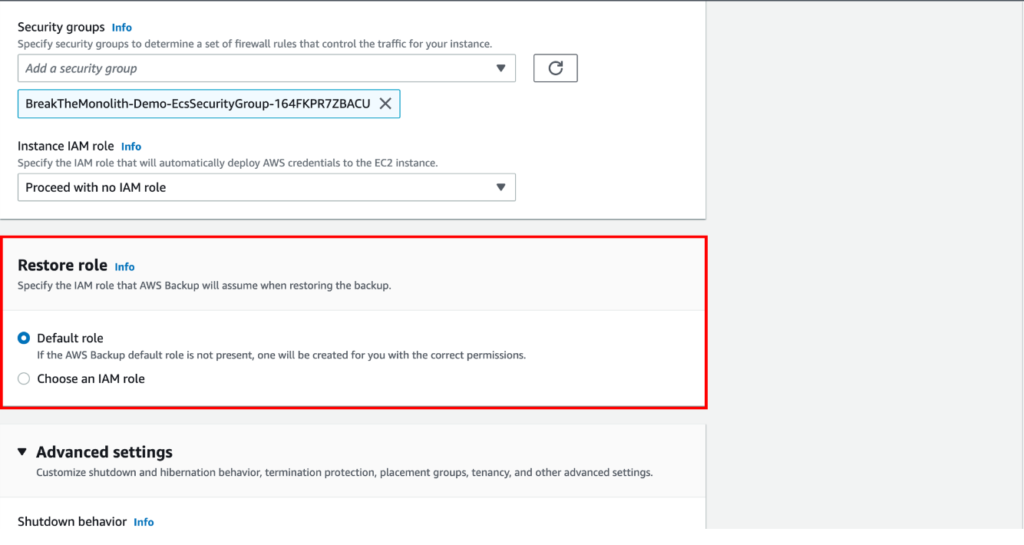
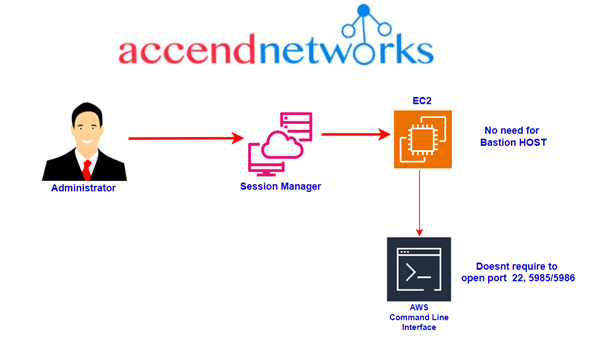
Session Manager

Allows you to connect to the command lines on your instances enabling secure management of instances at scale without logging into your servers. It replaces the needs for Bastion hosts, SSH or Remote PowerShell.

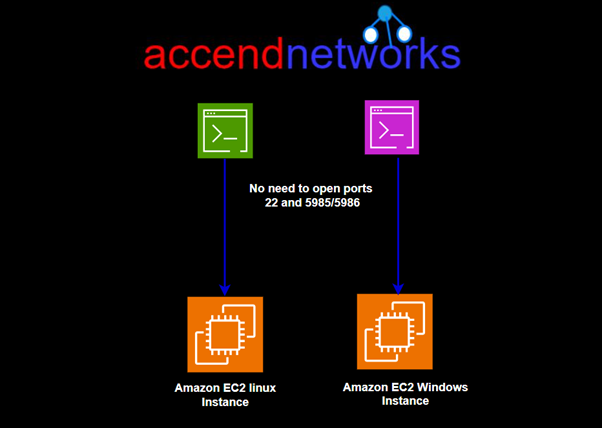
This means you don’t open ports you typically need for these protocols. It also integrates with I AM for granular permissions and all the actions that are taken can be seen in AWS cloud Trail. You can store your session logs in AWS S3 and have outputs go to Amazon CloudWatch logs as well.

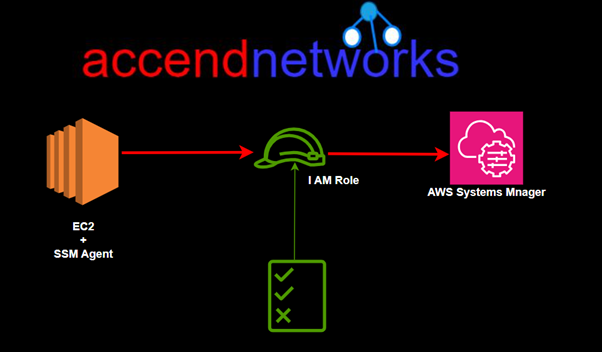
To enable this to work you need I AM permissions for EC2 instance to access SSM, S3 and CloudWatch logs.

Parameter Store

This is a service that allows you to store configuration data and secretes. You can store data such us passwords, database strings and licence codes. Data can be stored in plain text, or cyphertext.

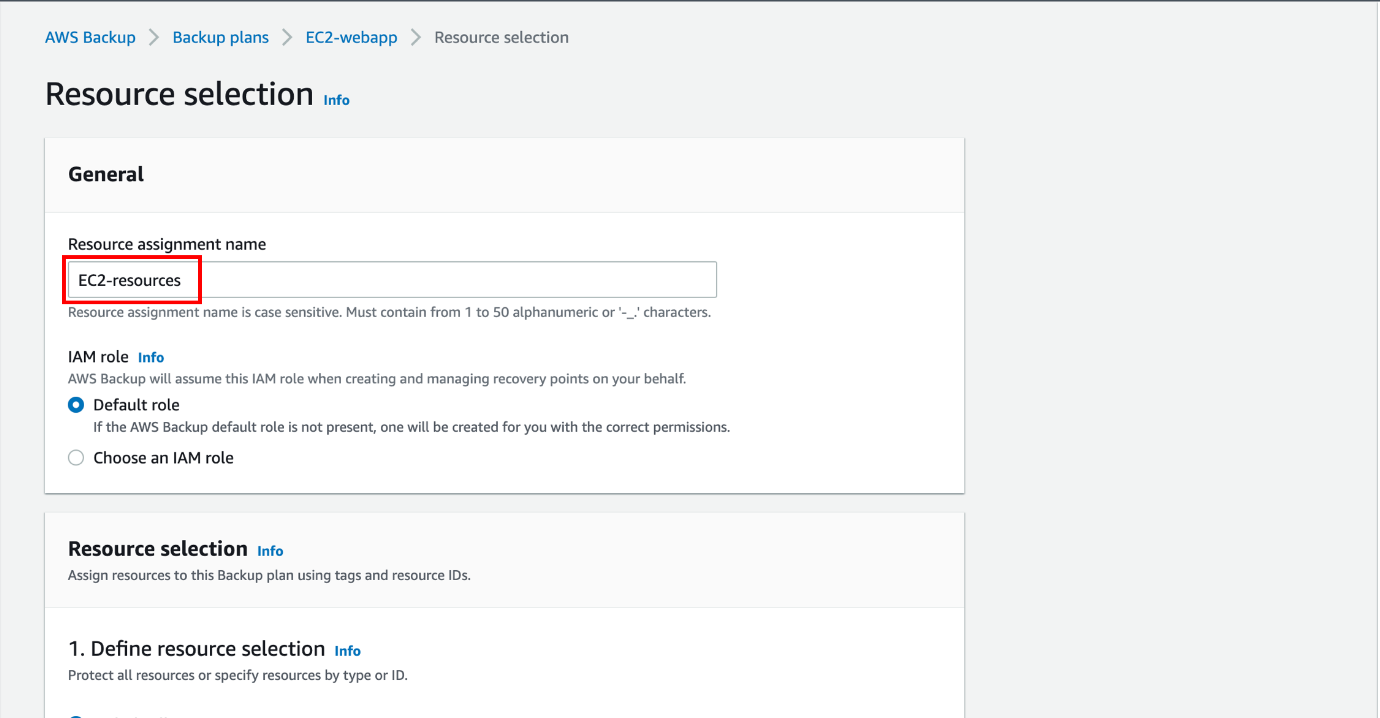
How does Systems Manager work?

Let’s understand with a general example of a systems Manager process flow.

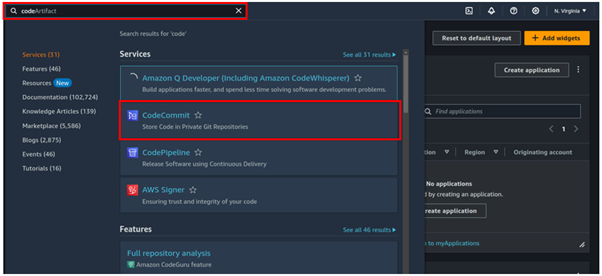
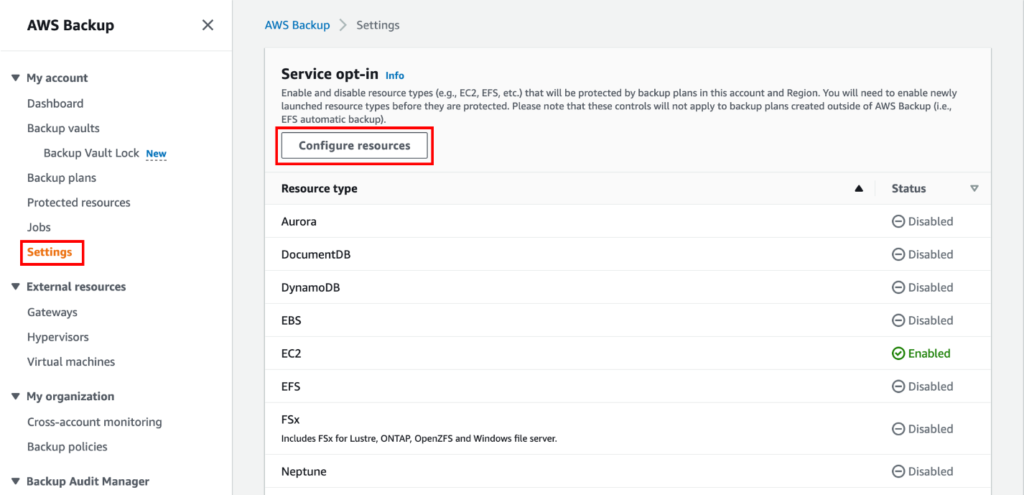
  1. Access Systems Manager– The AWS Console provides access to the Systems Manager. You can use the AWS Command Line Interface, AWS Tools for Windows PowerShell, or the AWS SDK to manage resources programmatically. You may use Systems Manager to configure, schedule, automate, and execute operations on your AWS resources and managed nodes.
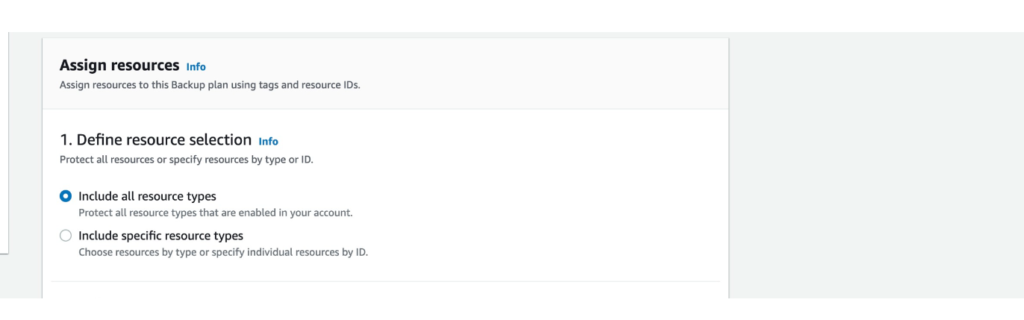
  2. Choose a systems Manager capability – More than two dozen functions are included in Systems Manager to assist you in performing activities on your resources. Only a handful of the features that administrators employ to configure and manage their resources are shown in the illustration.
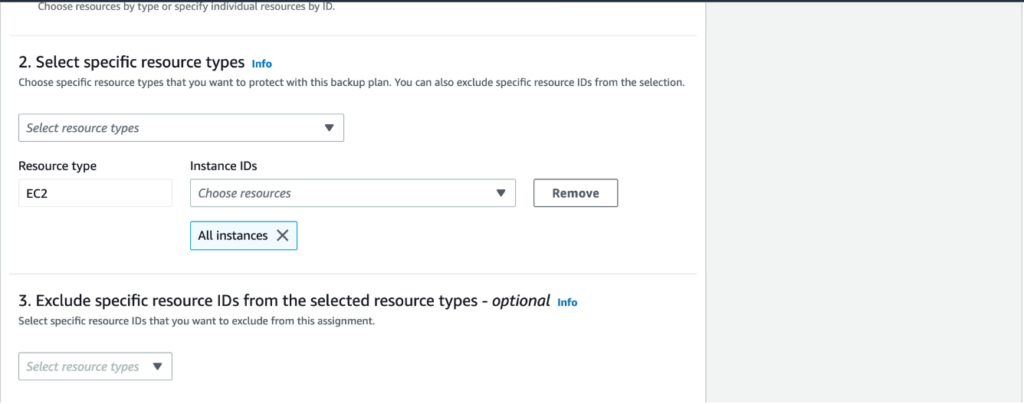
  3. Verification and processing – Systems Manager verifies configurations, including permissions, and makes requests to the AWS Systems Manager agent (SSM Agent) running on your hybrid environment’s instances, edge devices, or servers and VMs. The configuration changes given by SSM Agent are implemented.
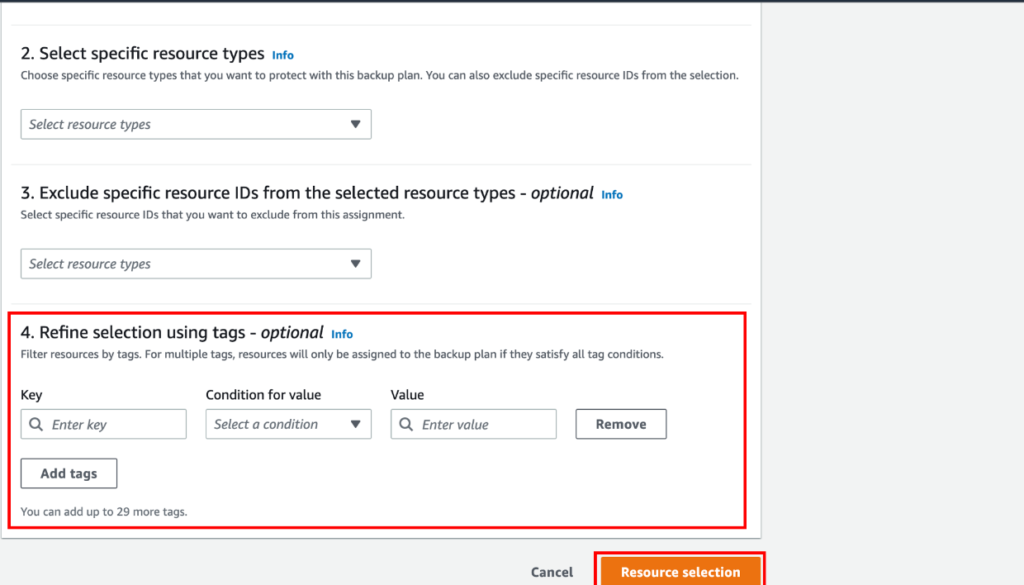
  4. Reporting– SSM Agent notifies the user, Systems Manager in the AWS Cloud, Systems Manager operations management capabilities, and various AWS services, if configured, about the status of the configuration changes and actions.
  5. Systems Manager operations management capabilities– In reaction to events or issues with your resources, Systems Manager operations management features such as Explorer OpsCenter and Incident Manager aggregate operations data or create artifacts such as operational work items (Ops Items) and incidents if enabled. These features might assist you in investigating and troubleshooting issues.

This brings us to the end of this blog, thanks for reading and stay tuned for more.

If you have any questions concerning this article or have an AWS project that requires our assistance, please reach out to us by leaving a comment below or email us at sales@accendnetworks.com.

Thank you!

Categories
Blogs

Slash AWS Expenses

Slash AWS Expenses: Automate EC2 Idle Instance Shutdown with CloudWatch Alarms.

Slash AWS

Introduction

Effective management of cloud resources is important for anyone who uses cloud services, especially when it comes to managing costs. A common issue is that you forget to stop using EC2 instances for purposes such as development, testing, and temporary work, which can lead to unexpectedly high costs.

There are several scenarios in which you might want to automatically stop or terminate your instance. For example, you might have instances dedicated to batch payroll processing jobs or scientific computing tasks that run for some time and then complete their work. Rather than letting those instances sit idle (and accrue charges), you can stop or terminate them, which helps you to save money.

Forgetting to stop an EC2 instance used for brief testing can lead to unnecessary charges. To solve this, create a CloudWatch alarm to automatically shut down the instance after 1 hour of inactivity, ensuring you only pay for what you use. In this article, I’ll share how to set up this solution using the AWS Management Console.

CloudWatch Alarm

Amazon CloudWatch is a monitoring service for AWS. It serves as a centralized repository for metrics and logs that can be collected from AWS services, custom applications, and on-premises applications. One of its important features is CloudWatch Alarms, which allows you to configure alarms based on the collected data.

A CloudWatch alarm checks the value of a single metric, either simple or composite, over some time you specify and launches the actions that you specify once the metric reaches a threshold that you define.

Key Components of CloudWatch Alarms

Metric: A metric is performance data that you monitor over time.


Threshold: This is the value against which the metric data is evaluated.


Period (in seconds): The period determines the frequency at which the value of the metric is collected.


Statistic: This specifies how the metric data is aggregated over each period. Common statistics include Average, Sum, Minimum, and Maximum.


Evaluation Periods: The number of recent periods that will be considered to evaluate the state of the alarm, based on the metric values during these periods.


Datapoints to Alarm: The number of evaluation periods during which the metric must breach the threshold to trigger the alarm.


Alarm Actions: Actions that are taken when the alarm state changes. These can include sending notifications via Amazon SNS, and stopping, terminating, or rebooting an EC2 instance.

Setting Up a CloudWatch Alarm to Automatically Stop Inactive Instances.

Solution with Console

Open the CloudWatch console, In the navigation pane, choose AlarmsAll alarms. Then choose Create alarm.

Choose Select Metric

for AWS namespaces, choose EC2

Choose Per-Instance Metrics

Select the check box in the row with the correct instance and the CPUUtilization metric, and select “select metric”.

For the statistic, choose Average. Choose a period (for example, 1 Hour).

For threshold type select static, then select lower/average. Select threshold value, and data points to alarm then select treat missing data as missing then click next.

The first action is to send a notification to an SNS topic with an email subscription. This ensures that you will be notified when the alarm stops the instance. You can create the SNS topic at this step, or you can reference an existing one if you have already created it. Had already created an SNS topic.

The second action will be to terminate the EC2 instance, under the alarm state trigger, select in alarm then select stop instance, and click next.

Provide a name for the alarm, and you can also add a description then click next.

Review a summary of all your configurations. If everything is correct, confirm the alarm creation.

The alarm was successfully created, and we can see the alarm state is ok.

You can either wait for the alarm state to be in alarm or you can use the below command to set the alarm to alarm state.

Our alarm has gone to an alarm state and if you check the state of the EC2 instance, we can see our objective has been achieved and our EC2 instance is already stopped.

Additionally, a notification has also been sent to my email via SNS.

This brings us to the end of this demo, clean up. Thanks for reading, and stay tuned for more.

Conclusion

Automating idle EC2 instance shutdown with CloudWatch Alarms cuts AWS costs and ensures efficient resource use, preventing unnecessary charges and optimizing cloud spending.

If you have any questions concerning this article or have an AWS project that requires our assistance, please reach out to us by leaving a comment below or email us at sales@accendnetworks.com.


Thank you!

Categories
Blogs

AWS CodeCommit: Streamlining Source Control in the Cloud.

What is AWS CodeCommit? Streamlining Source Control in the Cloud.

aws-code-commit

In the era of cloud computing, source control is a pivotal aspect of the workflow, ensuring that code changes are managed efficiently, collaborative efforts are streamlined, and the integrity of the codebase is maintained. Amazon Web Services (AWS) offers a robust solution for source control in the cloud with AWS CodeCommit. This article delves into the features, benefits, and use cases of AWS CodeCommit. We will also go ahead and create a code commit repository and clone the repo to our local machine, add files, commit and push them to our AWS code repository.

What is AWS CodeCommit?

AWS CodeCommit is a version control service hosted by Amazon Web Services that allows developers to store and manage their source code, binaries, and other assets in the AWS cloud.  Additionally, it is designed to work seamlessly with existing Git tools, making it easy for developers to integrate it into their current workflows.

Key Features of AWS CodeCommit.

Fully Managed Service: AWS CodeCommit takes care of the backend infrastructure, so developers can focus on writing code. There are no servers to manage.

Scalability: CodeCommit can handle repositories of any size, with the ability to scale up as your project grows.

High Availability and Durability: your repositories are always accessible and your data is protected against loss.

Security: CodeCommit integrates with AWS Identity and Access Management (IAM) to provide robust access control. You can use IAM policies to define who can access your repositories and what actions they can perform.

code-commit-security

Integration with AWS Services: CodeCommit integrates seamlessly with other AWS services such as AWS CodeBuild, AWS CodeDeploy, and AWS CodePipeline. This allows you to create a complete CI/CD pipeline using AWS tools, enhancing your development and deployment workflows.

integration-aws

Standard Git Interface: CodeCommit supports the standard Git interface, so developers can use their preferred Git client, command-line tools.

Getting Started with AWS CodeCommit

Prerequisite.

Make sure you have full permission to Codecommit, or you can log in as an administrative user additionally, you should have git installed and configured on your machine.


Create a Repository

Log in to your AWS management console, in the search box, type Codecommit then select codecommit under services.

repository

In the code commit UI on the left-hand side, select repositories then click Create Repository.

create-repository

In the create repository dashboard, under repository settings, name your repo, will call mine demo-commit-repo.

Codecommit is encrypted by default using KMS, but you can also choose your custom keys. We will leave it at AWS-managed keys with KMS.

Leave all other settings as default then click Create Repository.

create-respository

Success, we are greeted with connection steps. We can see HTTPS, SSH, HTTPS(GRC).

demo-code-commit

If you don’t see SSH then it means you are connected as the root user.

We will for now use HTTPS git credentials for Codemmit to connect to our git repository.

So let us log in to the I AM console.


services

Select users. Click your username, move to the security tab then scroll all the way down to HTTPS for git credentials.


git-credentials

Click on generate and your codecommit credentials will be generated. Click the download button.

git-download

Go back to the codecommit repository select your repo then click the drop-down button of the clone URL then select clone HTTPS.

In this case, it will copy the HTTPS-type URL.

repo-copied

Use your preferred Git client to clone the repository to your local machine. This allows you to start adding code and making changes.

Go back to your terminal and type in git clone and paste in the cloned URL. When you press enter, you will be prompted for your username and password. Paste them in then press enter.

git-command

We have cloned our remote repo into our local machine.

git-command

With the repository cloned, you can push your changes to CodeCommit.

We will now copy a few files into our directory, commit these files, and push them to our remote repo.

Using linux command make sure you are in the repo directory then add copy files to your repo.

git-command

Using git add the files and then commit the changes as shown in the picture bellow.

ubuntu-command-line
ubuntu-command-line

Once the changes are commited, you can then push them to the remote repo by using the below command.

ubuntu-command-line

Now let’s go and check codecommit, and yes indeed the new files have been pushed to the codecommit repository.

code-commit-repo

If you click on the commits on the left side of the repo UI, you can see the commit history.

code-commit-repo

This brings us to the end of this blog. AWS CodeCommit offers a powerful, secure, and scalable solution for source control in the cloud.

Thanks for reading, and stay tuned for more.

If you have any questions concerning this article or have an AWS project that requires our assistance, please reach out to us by leaving a comment below or email us at sales@accendnetworks.com.


Thank you!

Categories
Blogs

An Overview of DDoS Attacks: Understanding the Threat.

An Overview of DDoS Attacks: Understanding the Threat.

In the current digital era, cybersecurity is key. Among the various threats that organizations face are Distributed Denial of Service (DDoS) attacks which are particularly disruptive. DDoS attack defence is one of the top security concerns on the web today, regardless of the attacker’s purpose, because disruption of availability can result in financial losses and other undesirable repercussions. In this blog article we will explore how AWS Shield operates, its features, and its importance in the current cybersecurity landscape.

DDoS Attacks

DDoS attacks involve overwhelming a server, service, or network with more traffic than it can handle, causing it to slow down or crash. Attackers use millions of tonnes of traffic to bring down a victim’s web applications from multiple sources, which is known as DDoS extortion.

There are basically 3 types of DDoS attacks:

Volume-Based Attacks

These attacks use methods to create huge amounts of traffic in order to completely saturate bandwidth, causing a traffic jam that prevents genuine traffic from flowing into or out of the targeted site.

Protocol Based Attacks

By consuming enormous amounts of per-connection resources, these attacks misuse stateful protocols and therefore put a strain on firewalls and load balancers.

Application Layer Attacks

Some of the most advanced DDoS attacks take use of flaws in the application layer by establishing connections and launching process and transaction requests that consume finite resources such as disc space and memory.

AWS Shield Overview

What is AWS Shield?

AWS Shield is a managed solution for preventing DDoS attacks basically on AWS-hosted applications. It inspects traffic in real-time and applies mitigation strategies automatically in order to avoid performance degradation.

There are basically two types of AWS Shields.

AWS Shield Standard (Free Service)

It is a free service offered to all AWS customers. It guards you against 96% of today’s most prevalent attacks, such as SYN/ACK floods, Reflection attacks, and HTTP slow reads. This protection is deployed to your Elastic Load Balancers, CloudFront distributions, and Route 53 resources automatically and transparently.

AWS Shield Advanced (Paid Service)

It is a paid service that adds volumetric DDoS mitigation, sophisticated attack detection, and mitigation for attacks at the application as well as network layers to AWS Shield.

You also have access to DDoS Response Team (DRT) 24*7 for tailored mitigation during attacks.

Key Features of AWS Shield.

Automatic Protection: AWS Shield offers automatic protection for all AWS customers at no additional cost. This basic protection, known as AWS Shield Standard, defends against most common, frequently occurring network and transport layer DDoS attacks.

Advanced Protection: AWS Shield Advanced provides enhanced protections for more sophisticated and larger scale DDoS attacks. It includes additional detection and mitigation capabilities, 24/7 access to the AWS DDoS Response Team (DRT), and financial protection against spikes in your AWS bill resulting from a DDoS attack.

Real-Time Visibility: AWS Shield Advanced customers have access to detailed attack diagnostics and the ability to create alarms in Amazon CloudWatch based on the occurrence of DDoS events.

Integration with AWS Services: AWS Shield works seamlessly with other AWS services like AWS WAF (Web Application Firewall), Amazon CloudFront, and Amazon Route 53, providing a holistic approach to security.

Why AWS Shield is Important

Comprehensive Protection

AWS Shield’s multi-layered defence strategy covers a wide range of attack vectors. Its integration with other AWS services ensures a robust security posture for your applications.

Cost-Effective

With its automatic protection feature, AWS Shield Standard offers fundamental DDoS protection at no extra cost, making it a cost-effective solution for all AWS customers. For those requiring advanced protection, AWS Shield Advanced offers additional benefits, including financial safeguards.

Reduced Complexity

Managing cybersecurity can be complex, AWS Shield’s managed service approach reduces this complexity, allowing organizations to focus more on their core business activities.

Enhanced Business Continuity

DDoS attacks can disrupt business operations significantly. AWS Shield enhances business continuity by ensuring that applications remain available and performant even under attack.

This brings us to the end of this blog, thanks for reading and stay tuned for more.

If you have any questions concerning this article or have an AWS project that requires our assistance, please reach out to us by leaving a comment below or email us at sales@accendnetworks.com.

Thank you!

Categories
Blogs

AWS Backup an Amazon EC2 instance

AWS Backup of an Amazon EC2 Instance

AWS Backup is a fully managed backup services that Centralises data protection across AWS services and on-premises enviroments. It simplifies the backup process by providing a unified interfaces to manage backups, retention policies , and recovery options. In this blog article, we will provide a demo of a backup and restore job on an AWS EC2 instance.

Let’s proceed as follows.

In the left navigation pane in the AWS Backup console, under My account, choose Settings. On the Services opt-in, choose Configure resourses.

On the Configure resources page, use the toggle switches and make sure only EC2 is selected.

In the AWS Backup console, select  Backup plans in the left navigation pane under My account, and then click Create Backup Plan.

For backup plan options, select Build New Plan.

Backup plan name — provide a unique backup plan name. For this demo, enter EC2-webapp.

Backup rule name — For this tutorial, enter EC2-Dailies.

Instead of using the default backup vault that is automatically created for you in the AWS Backup console, you can create specific backup vaults to save and organize groups of backups in the same vault.
To create a backup vault, choose Create new Backup vault.

Enter a name for your backup vault. Encryption move with the default one.

Backup frequency select daily, for the backup window move with the default backup window which is set to start at 5 AM UTC and lasts 8 hours.

For the retention period, select always.

Copy to destination — As part of your backup plan, you can optionally create a backup copy in another AWS Region. Select your destination region then move with the default vault.

Note: Cross-region copy incurs additional data transfer costs.

Those are the only settings we need. Click Create Plan.

Assign resources to the backup plan

Select the created backup plan and choose the Assign resources button.

Under the resource assignment name, choose a name.

For the IAM role move with the default role.


Define resource selection move as shown below.

Foe resources ID-based assignment, select the Resource type and the name of the resource.

To exclude specific resource IDs, select the Resource type and the name of the resource.

For tags-based resource assignment, provide the key-value pair of the Amazon EC2 instance.

Choose the Resource selection button to assign the resources to the backup plan.

Navigate to the AWS Backup console. The backup jobs will be seen under Jobs.

Restore an Amazon EC2 instance using AWS Backup

Navigate to the backup vault selected in the backup plan and select the latest completed backup.

To restore the EC2 instance, select the recovery point ARN and choose Restore.

The restore of the ARN will bring you to a Restore backup screen that will have the configurations for the EC2 instance using the backed-up AMI and all the attached EBS volumes.

In the Network settings pane, accept the defaults or specify the options for the Instance type, Virtual Private Cloud (VPC), Subnet, Security groups, and Instance IAM role settings.

This example proceeds with no IAM role. The IAM role can be applied to the EC2 instance after the restore process is completed.

To successfully do a restore with the original instance profile, you must edit the restore policy. If you apply an instance profile during the restore, you must update the operator role and add the PassRole permissions of the underlying instance profile role to Amazon EC2. The default service role created by AWS Backup manages creating and restoring backups.

It has two managed policies: AWSBackupServiceRolePolicyForBackup and AWSBackupServiceRolePolicyForRestores. It also allows “Action”: “I AM PassRole” to launch EC2 instances as part of a restore.

In the Restore role pane, accept the Default role or Choose an IAM role to specify the IAM role that AWS Backup will assume for this restore.

In the Advanced settings pane, accept the defaults.

AWS Backup will use the SSH key pair used at the time of backup to automatically perform your restore.

After specifying all of your settings, choose Restore Backup. The Restore jobs pane will appear, and a message at the top of the page will provide information about the restore job.

Check for your restored backup job under Restore jobs in the AWS Backup console.

Once the job status appears as completed, navigate to the Amazon EC2 console and select Instances in the left navigation pane to see the restored EC2 instance. The EC2 instance is restored using the backup of the AMI and the attached EBS volume.

This brings us to the end of this blog article.

AWS Backup empowers organizations to protect their data assets with a scalable, automated, and secure backup solution.

Thanks for reading and stay tuned for more.

If you have any questions concerning this article or have an AWS project that requires our assistance, please reach out to us by leaving a comment below or email us at sales@accendnetworks.com

Thank you!