Accend Networks San Francisco Bay Area Full Service IT Consulting Company

Categories
Blogs

Cisco WebEx Hybrid Solutions

Cisco WebEx Hybrid Solutions

By connecting existing network resources and on-premises unified communications services to the Cisco WebEx cloud. More collaboration capabilities will be provided, along with consistent, unified user and administrator experiences
These days almost organizations are choosing collaboration services from the cloud but many are unable to move all their services to the cloud. WebEx Hybrid Services bring cloud and premises based services together as one solution to deliver the best calling ,meeting and messaging .
There are different scenarios for hybrid calling between WebEx Cloud and CUCM on premise

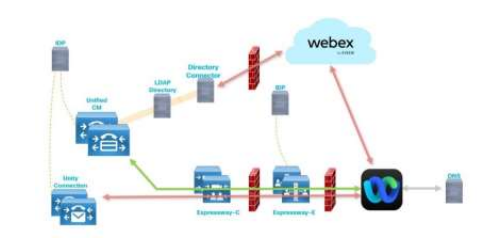
1.0 Hybrid Calling for WebEx Devices (Device Connector)

Hybrid Calling for WebEx Devices provides hybrid call functionality for devices that are added to Workspaces in Control Hub. WebEx devices are registered to the cloud, and when they are enabled with Hybrid Calling, they also connect to onpremises Unified Communication Solution.
WebEx devices in the Workspace become a part of your existing on-premises dial plan, allowing these devices to call user extensions or the PSTN, and receive incoming calls Like devices registered directly to the on premise Cisco Unified Communication Solution (CUCM).
WebEx App can also have a calling capability while WebEx APP connected to a cloud-registered WebEx device that is enabled for Hybrid Calling. At this case, Users dial directly from WebEx App and have the call take place on the WebEx device.

On-premises and cloud Requirements for Hybrid Calling for WebEx Devices.

Before configuring devices for the service, ensure to meet all the prerequisites

WebEx Devices

These devices can get on-premises and PSTN calling functionality from the Unified CM after they’re enabled for Hybrid Calling. You could check all supported devices through below link

Cisco Unified Communication on-premises Solution

WebEx Device Connector

To configure Hybrid Calling for WebEx Devices, the WebEx Device Connector Software has to be installed on Machine has network access to the Unified CM that contains configuration that you want to synchronize to WebEx cloud-registered devices in Workspaces.
The WebEx Device Connector is a lightweight piece of software that could be installed on supported Windows or MAC operating systems:

Active Hybrid calling services for organization

Hybrid Calling is a service hosted by WebEx Control Hub, Administrator of WebEx Control Hub can enable this service then add this service to WebEx cloud-registered devices.

Network requirements

Open required ports for

2.0 Hybrid Calling for Webex App (Unified CM)

This Hybrid Scenario known as Migration from Jabber to WebEx App, WebEx App can be registered directly to Cisco Unified Communications Manager call control environment (on-premises enterprise). WebEx App Users will gain all on Premises experiences like Cisco Jabber, allowing them to directly make calls in WebEx App through your Unified CM environment without linking WebEx App with Devices registered on Cloud.
Cisco Unified CM and Mobile and Remote Access (MRA) solution will be used by WebEx App for registration to calling Services on Cisco Call Manager on premise similar to Jabber.
WebEx App makes its primary connection to the WebEx cloud to get its service configuration (messaging, meetings, presence, contact lists, calling behavior, and so on), but it registered directly with on premise Cisco Call manager for calling services like Jabber.

On-premises and cloud Requirements for Hybrid Calling for WebEx App.

Cisco Unified Communication on-premises Solution

Licenses

Recommended configuration but not mandatory

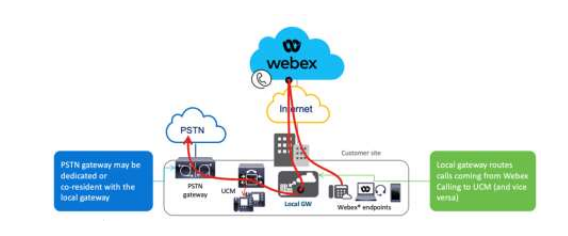
3.0 Hybrid Calling Through Integration between WebEx Calling and Cisco CUCM

To allow direct dialing between phones registered to Unified CM and phones in WebEx Calling locations, the integration through SIP trunk between Cisco Call manager (on-premises calling solution) and WebEx Calling (cloud calling solution) will be required.
Also this integration is required in case of transition FROM Unified CM (on-premises calling solution) TO WebEx Calling (cloud calling solution)

Local Gateway

The local gateway is an edge device for Public Switch Telephony Network (PSTN) interworking and on premises Unified CM interworking with WebEx Calling. The local gateway can be deployed standalone or in deployments where integration into Cisco Unified Communications Manager is required.
The trunk between the local gateway and WebEx Calling is always secured using SIP TLS transport and SRTP for media between Local Gateway and the WebEx Calling Access SBC.

Hardware and Software Requirements for Local Gateway

Make sure the platform is running a supported IOS-XE release as per the

License for Local Gateways

CUBE calling licenses must be installed on the local gateway

Configuring Local Gateway on WebEx Calling

There are two options to configure the Local Gateway for your WebEx Calling trunk
WebEx Calling requires secure signaling and media. The local gateway performs the encryption, and a TLS connection must be established outbound to the cloud

Configuring Local Gateway on Cisco Unified CM

Integration between Cisco Call Manager and CUBE has to be SIP based , this integration could be secured or non

Call Routing Considerations

Calls from WebEx Calling to Unified CM

The WebEx Calling routing logic works like this: if the number that is dialed on a WebEx Calling endpoint cannot be routed to any other destination within the same customer in WebEx Calling, then the call is sent to the local gateway.

Calls From Unified CM to WebEx Calling

To enable call routing from Unified CM to WebEx Calling on Unified CM a set of routes need to be provisioned to define the set of +E.164 and enterprise numbering plan addresses in WebEx Calling

WebEx Calling Licenses

WebEx Calling provides three license types
Categories
Blogs

ClearPass Self Signed Certificate

What are Digital Certificates?

Digital certificates are a crucial component of modern cybersecurity and online authentication. They are essentially electronic documents used to verify the identity of individuals, devices, or services on the network. Digital certificates serve several important purposes, with the primary one being the assurance of the authenticity and security of online communications and transactions.

Certificate Authorities (CAs) are entities responsible for issuing digital certificates. CAs are organized into a hierarchical structure, with Root CAs positioned at the top of the hierarchy. When a Root CA signs digital certificates, it employs its private key to create digital signatures. These signatures serve as a cryptographic seal of approval, attesting to the authenticity and integrity of the certificates being signed. The signed certificates, whether they belong to intermediate CAs or end entities, inherit the trust associated with the Root CA.

Types of CAs That Sign Digital Certificates?

Certificates can be signed by one of three types of CAs:

  • Public Certificate Authority (CA)
  • Private CA
  • Self-signed certificates.

Public CA Signed Certificates are perhaps the most familiar type of digital certificate. These certificates are issued by well-known and trusted third-party Certificate Authorities. Certificates signed by Public CAs enjoy widespread recognition and trust across the internet. Web browsers and operating systems come preloaded with the root certificates of these CAs, ensuring that users won’t encounter security warnings when visiting websites secured with these certificates. Public CA certificates work seamlessly across a vast array of devices, browsers, and platforms, ensuring a consistent and secure user experience.

Private CA Signed Certificates are generated and managed by organizations for their internal use. These CAs operate within closed environments. Private CAs provide complete control over certificate issuance and management. This makes them invaluable for securing internal network resources, services, and communications. Using Private CAs can be cost-effective, especially for organizations that require multiple certificates for various internal services. There are no ongoing per-certificate fees. The main drawback of these certificates is that the private root CA must be trusted by all devices that need to build trust relation ship using these certificates.

Self-signed certificates are precisely what the name suggests—they are generated and signed by the entity for which they are intended, without the involvement of any external CA. Self-signed certificates are free to create and use, making them a budget-friendly choice for those on a tight budget. These certificates can be generated and deployed rapidly without the need for external validation, which is ideal for testing and development environments.

There are some limitations with self-signed certificates:

  • Limited Trust: Self-signed certificates are not trusted by default in most web browsers and systems. Users will often encounter security warnings when accessing services secured with self-signed certificates.
  • Security Risks: Since self-signed certificates do not undergo third-party validation, there is a higher risk of them being used maliciously or mistakenly, potentially compromising security

Follow Recommendations:

As a RADIUS server, ClearPass benefits from digital certificates for mutual authentication to ensure the security and trustworthiness of the authentication and authorization process in network environments. Mutual authentication between the RADIUS server and the client provides several crucial advantages:

  • Protection Against Impersonation: Mutual authentication using digital certificates prevents impersonation attacks. Without certificates, malicious parties could potentially impersonate either the RADIUS server or the client, leading to unauthorized access or the interception of sensitive data. Certificates verify the authenticity of both parties involved in the communication, making it significantly more difficult for attackers to impersonate them.
  • Enhanced Security: Mutual authentication significantly enhances security by requiring both the server and the client to present valid digital certificates. This means that not only does the client verify the server’s identity (as is the case with one-way authentication), but the server also verifies the client’s identity. This two-way trust ensures that only authorized and trusted parties can participate in the authentication and authorization process.
  • Protection Against Man-in-the-Middle (MITM) Attacks: Digital certificates help mitigate MITM attacks, where an attacker intercepts communications between the RADIUS server and the client. In a mutual authentication setup, an attacker would need to possess valid certificates for both the client and the server to successfully impersonate them, making MITM attacks significantly more challenging.
  • Identity Verification: Mutual authentication using digital certificates ensures that the client and the RADIUS server verify each other’s identities before proceeding with the authentication process. This adds an extra layer of assurance that the parties involved are legitimate and authorized to access the network resources.
  • Secure Key Exchange: During the mutual authentication process, the client and the RADIUS server may also exchange encryption keys securely. This is essential for establishing a secure communication channel for the exchange of sensitive data, such as usernames and passwords. Without mutual authentication, there would be a greater risk of these keys falling into the wrong hands.
  • Compliance and Security Best Practices: Many security standards and best practices recommend or require mutual authentication using digital certificates to ensure the security of network access control systems like RADIUS. This includes protocols like EAP-TLS (Extensible Authentication Protocol-Transport Layer Security), which relies on mutual authentication through certificates for secure authentication.
  • Protection of Sensitive User Data: RADIUS servers often handle sensitive user data, including usernames and passwords. Mutual authentication using digital certificates helps safeguard this sensitive information by ensuring that it is transmitted securely between trusted parties.

ClearPass Seld-Signed Certificate Renewal?

Although public or private Cas are recommended in many cases for ClearPass EAP or HTTPS services, there are cases where self-signed certificate provides some advantages like ease of generation and renewal. In this article I am explaining the steps required to renewing/issuing-a-new self-signed certificate for different ClearPass certificates:

1- Login to ClearPass Policy Manager from WebUI.

2- From the left side menu, click on administration.

3- From the “Administration” sub-menu go to Administration  Certificates  Certificate Store.

ClearPass Policy Manager

4-  From this page you can see current certificates for different usages. You can select a combination of server (if you have multiple servers in a cluster) and usage. Usage can be one of the following options in ClearPass 6.9

    1. RADIUS/EAP
    2. HTTPS(ECC)
    3. HTTPS(RSA)
    4. RadSec Server
    5. Database Server

5- Select the certificate you want to reissue/renew and verify issue and expiry dates.

6- You can export the certificate from this page, you can also view details (I suggest you capture the current details if you want the new certificate to match the current one)

7- If any certificate is about to expire, click on “Create Self-Signed Certificate”

8- Select “Server Certificate”

9-  Select the server and usage you want and fill the details (you can follow the same values as current certificate or use the values that matches your organization better). Please note:

  1. You need to provide private key password. You need to take note of this password and store it in a safe place for any future retrieval.
  2. The maximum number of days of validity is 2000 days

10- After filling all required fields, click on submit.

11- Review the new certificate. If all good click on install

12- Make sure the certificate is updated successfully. Verify new certificate details.

13- You need to repeat the same process for every certificate usage you need to renew/re-issue. You can also consider exporting and importing this same certificate to other usages.

Categories
Blogs

Check Your Cisco Software

Check Your Cisco Software

Use the Cisco Software Checker to search for Cisco Security Advisories that apply to specific software releases of the following products: Cisco ASA, FMC, FTD, FXOS, IOS, IOS XE, NX-OS and NX-OS in ACI Mode.

To use the tool, select a product, platform (as required) and one or more releases, enter the output of the show version command, or upload a text file that lists specific releases. Then narrow the check to certain advisories, if desired.

The availability of security fixes after the End of Sale is defined in the product’s End-of-Sale announcement, as explained in the Cisco End-of-Life Policy. Additional information about Cisco software updates, vulnerability rating and scoring is available in the Cisco Security Vulnerability Policy.

This tool does not provide information about Cisco IOS XR Software or interim software builds. Also note that for Cisco ASA, FMC, FTD and FXOS Software, the tool only contains vulnerability information for Cisco Security Advisories first published from January 2022 onward, and for NX-OS Software and NX-OS Software in ACI Mode from July 2019 onward.

To find vulnerabilities using the Cisco Software Checker, follow these steps:

Access the Cisco Software Checker:

Visit the Cisco Software Checker web page. You can find this tool on Cisco’s official website or by searching for “Cisco Software Checker” in your preferred search engine.

https://sec.cloudapps.cisco.com/security/center/softwarechecker.x

Provide Software Information:

Enter the details of the Cisco software version you want to check for vulnerabilities. This typically includes the software name, version number, and possibly other relevant information

Select a Method

  1. Search By Release
  2. Select a Cisco Operating System (In this tab you can select your device)

      3. Select FTD platform (in this tab you can select your device model)

     4.Select one or more FTD releases (In this tab you can select current OS version)

You can select more than one OS version too.

Run the Continue:

Click the ” Continue “button to initiate the vulnerability check. You can check/uncheck Cisco Security impact rating, like All, Critical, High, Medium etc.

Run the Continue

Click the ” Continue “button to initiate the vulnerability check

Review the Results:

The tool will generate a report that indicates whether the software version you entered is vulnerable to any known security vulnerabilities. The report may include details about the vulnerabilities, their severity, and potential impact.

In this report, we can see all impacts of Cisco FTD 2100 Series software release 7.0.2 and workaround/fixes as well.

Follow Recommendations:

For any identified vulnerabilities, the tool will provide recommendations on how to address the issues. These recommendations may include upgrading to a patched version, applying workarounds, or implementing other security measures.

Select any Title and you’ll get more information about that BU

•  Summary
• Affected Products
• Vulnerable Products
• Determine the Software Configuration
• Workarounds
• Fixed Software

Additional Information:

The tool may provide links to relevant Cisco Security Advisories or other documentation for further information about the vulnerabilities and how to mitigate them.

Take Action:

Based on the results and recommendations, take appropriate action to address the vulnerabilities. This may involve updating your software to a non-vulnerable version, applying patches, or implementing other security measures.

Remember that the Cisco Software Checker is designed to help you identify vulnerabilities in known software versions based on information provided by Cisco. It’s important to regularly check for updates and follow Cisco’s security advisories to stay informed about the latest vulnerabilities and recommended actions. Additionally, consider implementing a comprehensive security strategy that includes regular patching, network segmentation, intrusion detection, and incident response planning to enhance your overall network security.

Categories
Case Studies

Managed Service Provider


Managed Service Provider

The Challenge

  • Naprotek was not pleased with their current IT provider and was looking for a local IT/Managed Service Provider to help them with local Helpdesk support for their two locations with a total of 200 users. The locations were less than 3 miles apart.
  • Naprotek was looking for an IT/Managed Service Provider who is compliant DFARS 252.204-7012 and technicians have U.S. citizenship due to the government work they deal with
  • Naprotek needed 24×7 support and after hours cover

Our Solution

The Results

Contact Us

Services Covered

Managed Services

Full time On-Site Helpdesk Support

24x7 Helpdesk Services