Accend Networks San Francisco Bay Area Full Service IT Consulting Company

Categories
Blogs

Understanding Relational Database Service in AWS

Understanding Relational Database Service in AWS: A Comprehensive Guide

AWS Relational Database Service (RDS) setup

Amazon Web Services (AWS) offers a powerful database service known as Amazon Relational Database Service (RDS). It simplifies the process of setting up, operating, and scaling relational databases in the cloud. With built-in scalability, automated backups, and security features, RDS in AWS allows organizations to focus on applications rather than database management.  We will dive deeper into relational database service in AWS.

What is Amazon RDS?

Amazon RDS (Relational Database Service) is a managed service that makes it easy to set up, operate, and scale relational databases in the cloud. It automates tedious administrative tasks like hardware provisioning, database setup, patching, and backups. Whether you’re working with MySQL, PostgreSQL, MariaDB, Oracle, or SQL Server, AWS RDS offers optimized solutions for every need.

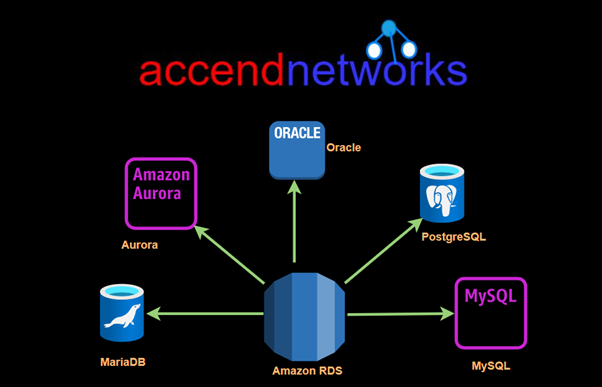
Types of Database Engines in Amazon RDS

Amazon RDS supports multiple database engines. AWS offers six popular engines that cater to different use cases.

Amazon Aurora: A MySQL and PostgreSQL compatible relational database designed for the cloud. It offers the performance and availability of high-end commercial databases at a fraction of the cost.

Amazon RDS for MySQL: Provides a fully managed MySQL database environment. It’s one of the most popular open-source databases, known for its speed and reliability.

Amazon RDS for PostgreSQL: Offers managed environments for PostgreSQL, a powerful, open-source database engine known for its advanced data types and support for complex queries.

Amazon RDS for MariaDB: This is another open-source option derived from MySQL. It’s designed for developers who prefer MariaDB over MySQL.

Amazon RDS for Oracle: Offers a fully managed environment for Oracle Database.

Amazon RDS for SQL Server: Provides managed Microsoft SQL Server databases, making it easy to deploy SQL Server in the cloud.

Amazon RDS DB instances

AWS Relational Database Service (RDS) setup

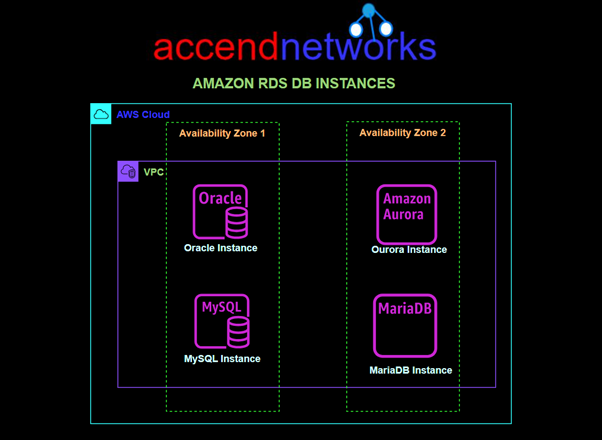
A DB instance is an isolated database environment in the AWS Cloud. The basic building block of Amazon RDS is the DB instance. Your DB instance can contain one or more user-created databases.

Access control with security groups
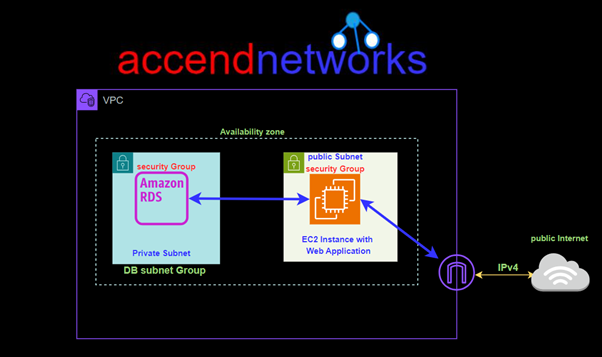
managing databases in AWS RDS

security group controls access to a DB instance by allowing access to IP address ranges or Amazon EC2 instances that you specify. You can apply a security group to one or more DB instances.

Key Features of AWS RDS

Automated Backups and Snapshots: Amazon RDS automatically performs backups of your database, ensuring data recovery in case of a disaster. You can also create point-in-time snapshots manually.

Scalability and Flexibility: RDS allows you to easily scale the storage and compute resources of your database instances based on application demand. AWS provides vertical and horizontal scaling options for high availability and performance.

Multi-AZ Deployment for High Availability: With multi-AZ deployments, Amazon RDS provides enhanced availability and data durability. This feature automatically replicates your data across multiple Availability Zones (AZs), ensuring failover support.

Security and Compliance: AWS RDS integrates with AWS Identity and Access Management (IAM), Virtual Private Cloud (VPC), and other security services to ensure encryption, access control, and network isolation. It also meets various compliance standards, such as HIPAA and SOC 1, 2, and 3.

Automatic Software Patching: Amazon RDS regularly applies security patches and updates to your database engines, reducing the manual effort required for patch management.

Monitoring and Performance Insights: RDS provides performance metrics through AWS CloudWatch and Amazon RDS Performance Insights, enabling you to monitor database performance and optimize queries.

Benefits of Using AWS RDS:

Ease of Use: AWS RDS abstracts away the complexity of database administration, providing a fully managed experience.

Cost Efficiency: With Amazon RDS, you only pay for the storage and compute resources you use, and there are no upfront costs. You can also take advantage of reserved instances for long-term savings.

High Availability: RDS Multi-AZ deployments ensure that your database is always available, even in the event of a hardware failure. This is critical for mission-critical applications where downtime can lead to significant business losses.

Automatic Failover: RDS automatically performs failover to a standby replica in case of a primary database instance failure, ensuring minimal downtime and data loss.

Integrated with Other AWS Services: AWS RDS seamlessly integrates with other AWS services like Amazon S3 and EC2 enabling businesses to create end-to-end automated solutions.

Common Use Cases for AWS RDS

Web and Mobile Applications: AWS RDS is ideal for applications that require scalable databases to manage customer data, transactions, and other relational data.

Enterprise Applications: Enterprises using ERP, CRM, or custom applications often use Amazon RDS for databases, leveraging its security, high availability, and scalability.

E-commerce Platforms: E-commerce businesses benefit from the reliable, scalable, and secure nature of AWS RDS to handle growing databases and real-time transactions.

Conclusion

Amazon RDS is a flexible and strong tool for handling relational databases in the cloud. It offers managed services, automatic backups, and scaling options, making database management easier while maintaining high availability, security, and performance. Whether you’re managing a large business application or a fast-changing web app, RDS on AWS can help you reach your database objectives efficiently and affordably.

Thanks for reading and stay tuned for more.

If you have any questions concerning this article or have an AWS project that requires our assistance, please reach out to us by leaving a comment below or email us at [email protected].


Thank you!

Categories
Blogs

Migrating Data to Amazon Redshift

Migrating Data to Amazon Redshift: Best Practices for ETL Pipelines

ETL pipeline for Amazon Redshift

An extract, transform, load (ETL) process is fundamental to loading data from source systems into a data warehouse. This process, typically executed in batch or near real-time, ensures your data warehouse remains up to date, providing timely, analytical data to end users. When migrating data to Amazon Redshift, following the right ETL best practices is crucial for a smooth transition and optimal performance.

This blog outlines the best practices for ETL pipelines to Amazon Redshift to ensure your data migration is efficient, scalable, and optimized for performance.

What is Amazon Redshift?

Amazon Redshift is a fully managed data warehouse service offered by AWS. It is built for large-scale data storage and analytics. It is a fast, petabyte-scale data warehouse designed to enable businesses to make data-driven decisions effortlessly.

It provides cost-effective big data analytics using standard SQL, supporting various data models, from star and snowflake schemas to denormalized tables, and running complex analytical queries with ease.

Best Practices for ETL Pipelines to Amazon Redshift

Here are the best practices you should follow for consistent and efficient ETL runtimes:

Use Workload Management to Improve ETL Runtimes

Configuring Redshift’s workload management (WLM) ensures efficient resource allocation for multiple ETL tasks. By allocating memory and setting appropriate concurrency levels, you can ensure that your ETL jobs run faster without interfering with other operations.

Maximize ETL Performance with Concurrency Scaling

Amazon Redshift offers Concurrency Scaling, which provides additional processing power during peak ETL loads. This feature allows for faster data migration and ensures that multiple queries can run in parallel, reducing wait times.

To get the most out of Concurrency Scaling for your ETL needs, leverage the following best practices:

  • Enable Concurrency Scaling for ETL workloads 
  • Integrate Concurrency Scaling with WLM 
  • Use Concurrency Scaling credits
  • Understand Concurrency Scaling limitations

Perform Regular Table Maintenance

Regularly performing maintenance tasks, such as vacuuming and analyzing tables, helps optimize query performance and keeps your database running smoothly.

Use Automatic Table Optimization (ATO)

Automatic Table Optimization (ATO) in Amazon Redshift simplifies table management by automatically optimizing the distribution and sort keys of your data. This feature reduces manual effort and improves overall performance.

Maximize the Benefits of Materialized Views

Materialized views allow you to precompute complex joins and aggregations, which can be reused for faster query execution. When dealing with large-scale ETL pipelines, materialized views can significantly speed up query times, especially for repeated queries.

Perform Multiple Steps in a Single Transaction

For more efficient data processing, group multiple ETL steps within a single transaction.

Load Data in Bulk

When migrating data to Amazon Redshift, use the COPY command to load data in bulk from sources like Amazon S3. Bulk loading ensures faster data ingestion and minimizes the overhead of inserting rows one at a time.

Use UNLOAD to Extract Large Result Sets

When extracting large datasets from Amazon Redshift, the UNLOAD command is more efficient than SELECT queries.

Use Amazon Redshift Spectrum for One-Time ETL Processing

If you need to process large amounts of data only once or occasionally, Amazon Redshift Spectrum allows you to query data stored in Amazon S3 without needing to load it into Redshift.

ETL pipeline for Amazon Redshift

How to Migrate Data to Amazon Redshift

When planning your data migration to Amazon Redshift, it’s crucial to set up a well-structured ETL pipeline. Here are key steps and strategies:

Plan Your Migration Strategy: Choose between full load, incremental load, or a hybrid approach depending on the size and nature of your data. For large datasets, incremental load strategies are often more efficient.

Optimize ETL Processes for Redshift: Compress your data, leverage parallel processing, and use appropriate distribution keys for maximum performance.

Use the COPY Command: The COPY command is a powerful tool for bulk loading large datasets from sources like Amazon S3, reducing load times significantly.

Monitor and Tune Performance: Use AWS CloudWatch to monitor ETL jobs and Redshift’s performance, adjusting workloads and resources as necessary.

Conclusion

Migrating data to Amazon Redshift can offer significant performance improvements, especially when following the right best practices for ETL pipelines. By adhering to these guidelines and optimizing ETL processes for Amazon Redshift, businesses can ensure a smooth data migration, unlocking the full potential of their data warehousing capabilities.

Thanks for reading and stay tuned for more.

If you have any questions concerning this article or have an AWS project that requires our assistance, please reach out to us by leaving a comment below or email us at [email protected].


Thank you!

Categories
Blogs

Mastering Amazon Elasticsearch

Mastering Amazon Elasticsearch (Amazon OpenSearch): A Comprehensive Overview

Introduction

Amazon Elasticsearch Service, now known as Amazon OpenSearch Service, is a fully managed solution that makes it easy to deploy, secure, and operate Elasticsearch clusters on AWS. Elasticsearch, an open-source search and analytics engine, is commonly used for log analytics, real-time application monitoring, and search functionalities.

In this blog, we’ll explore the essentials of Amazon OpenSearch Service and its key features.

What is Amazon Elasticsearch

Amazon Elasticsearch Service, now known as Amazon OpenSearch Service, is a fully managed service provided by AWS that makes it easy to deploy, secure, and scale Elasticsearch clusters in the cloud. Elasticsearch is an open-source search and analytics engine, often used for log analytics, full-text search, real-time application monitoring, and operational intelligence.

Amazon OpenSearch Service automates many administrative tasks such as hardware provisioning, patching, backup, recovery, and monitoring, enabling users to focus on extracting insights from their data.

Amazon Elasticsearch fully integrates with open-source APIs and seamlessly connects with popular data visualization and ingestion tools such as Logstash and Kibana, as well as other AWS services. This integration allows you to leverage your existing code and tools for data ingestion, visualization, and analysis, enabling you to extract valuable insights quickly and securely without the need for extensive reconfiguration. Whether you’re building a search engine or performing log analytics, Amazon OpenSearch Service ensures compatibility and ease of use across your workflows, empowering you to focus on deriving insights from your data efficiently.

Why Use Amazon Elasticsearch (OpenSearch)?

Amazon OpenSearch is an ideal solution for users who need a powerful search engine but want to avoid the operational complexity of managing their infrastructure. Below are some of the key reasons to use this service:

Fully Managed: AWS handles everything from patching and backups to security and monitoring, allowing you to focus on your application.

Scalability: You can start small and scale as your needs grow, from a few documents to petabytes of data.

Security: Integration with AWS Identity and Access Management (IAM) and encryption options, like encryption at rest and in transit, ensures your data is secure.

Cost-Effective: Amazon OpenSearch provides flexible pricing, and you pay only for what you use.

Key Features of Amazon Elasticsearch Service

High Availability: OpenSearch Service distributes data across multiple Availability Zones, ensuring that your cluster is fault-tolerant.

Monitoring and Alerting: It integrates with AWS CloudWatch for detailed monitoring and provides features like OpenSearch Dashboards to visualize data and set up custom alerts.

Data Security: Built-in encryption features and integration with AWS IAM enable role-based access control to ensure secure data management.

Automatic Snapshots: Amazon OpenSearch Service provides automatic, daily snapshots, and you can configure manual snapshots for your cluster’s data backups.

Log Analytics and Search: Elasticsearch is widely used for analyzing logs, monitoring system performance, and providing full-text search capabilities.

OpenSearch Dashboards

OpenSearch Dashboards is a user-friendly interface that lets you interact with the data stored in your OpenSearch domain. You can use it to:

Visualize Data: Create interactive visualizations to explore your data.

Create Dashboards: Build custom dashboards for monitoring, system performance, or any other real-time metrics.

Set Alerts: Set up alerts to notify you when certain thresholds or conditions are met.

Pricing and Cost Optimization

Amazon OpenSearch Service pricing is based on a pay-as-you-go model. You pay for:

Instance hours: The time your instances are running.

Data transfer: Data moved in and out of your cluster.

Storage: Persistent storage and EBS volumes.

Conclusion

Amazon Elasticsearch (Amazon OpenSearch) Service is a powerful, fully managed solution for anyone looking to use Elasticsearch without the operational burden of managing clusters. It offers high availability, scalability, security, and cost-effectiveness, making it ideal for both small and large-scale applications.

Thanks for reading and stay tuned for more.

If you have any questions concerning this article or have an AWS project that requires our assistance, please reach out to us by leaving a comment below or email us at [email protected].


Thank you!

Categories
Blogs

Introduction to Amazon LightSail

Introduction to Amazon LightSail: Simplified Cloud Hosting for Your Projects

Amazon LightSail WordPress setup

Amazon LightSail is an easy-to-use virtual private server (VPS) that offers everything needed to build a budget-friendly website with a simple monthly plan. It’s ideal for, test setups, blogs, custom sites, and even e-commerce applications. In this blog, we’ll dive deep into everything you need about Amazon LightSail.

What is a VPS?

A Virtual Private Server (VPS) is a virtualized server that simulates the environment of a dedicated physical server within a larger, shared hosting infrastructure. It allows users to run their operating system, manage resources, and install software.

Types of VPS

There are two main types of VPS:

Managed VPS: The hosting provider manages server management, including maintenance, updates, and security.

Unmanaged VPS: The user is responsible for all aspects of server management, offering more control but also requiring more technical expertise.

What is Amazon LightSail?

Amazon LightSail is a simplified cloud service provided by AWS (Amazon Web Services) that offers everything needed to easily launch and manage virtual private servers (VPS). It is designed for users who want to quickly deploy and manage websites, web applications, and development environments without needing to handle the complexities of other AWS services like EC2.

AWS LightSail is a great choice for setting up WordPress sites because it provides ready-to-use setups, making WordPress hosting on AWS very easy. It comes with everything you need (such as computing power, storage, and networking) all in one place, which simplifies the process of WordPress deployment.

What is a LightSail Instance?

A LightSail instance is essentially a virtual private server in the AWS cloud. These instances can be used to run web applications, store data, or host websites. They offer public (internet-facing) and private (VPC) networking options, which you can easily configure from the LightSail console.

Amazon LightSail is perfect for the following use cases:

Website hosting: Deploy WordPress, Magento, or Joomla quickly with pre-configured options.

Dev/test environments: Easily spin up development or test environments to try new ideas without affecting production.

Web application deployment: Simplifies the process with pre-configured stacks like LAMP, MEAN, and Node.js.

Key Features of Amazon LightSail:

Pre-configured Application Stacks: LightSail provides pre-configured templates for common applications such as WordPress, LAMP, Node.js, and more, making deployment easy.

Integrated Compute, Storage, and Networking: LightSail includes compute power (VPS), SSD storage, and networking components like static IPs and DNS management all in one package.

Simple Pricing: LightSail offers predictable monthly pricing, starting as low as $3.5/month, which includes the server, storage, and bandwidth.

Snapshots: LightSail allows users to take snapshots of their server, enabling easy backups and restorations.

Load Balancers: You can configure load balancers to distribute traffic across multiple instances, ensuring high availability for your applications.

SSH Access and Console Management: LightSail includes a built-in SSH terminal to securely access your instances, along with a user-friendly management console.

Connectivity to Other AWS Services: LightSail instances can be connected to other AWS services such as RDS (Relational Database Service), S3 (Simple Storage Service), and CloudFront for a more powerful infrastructure.

Benefits of Using LightSail

Here are some reasons why LightSail stands out:

User-friendly: It’s great for first-timers with its intuitive interface.

Affordable: Free for the first month, with plans starting at just $3.5 per month.

Easy access to AWS services: You can integrate your LightSail instance with other AWS services.

Reliable: With AWS’s infrastructure, downtime is minimal, and scaling is easy.

How is LightSail Different from EC2?

Although both LightSail and EC2 are VPS solutions, LightSail is more user-friendly and designed for simpler use cases like WordPress hosting on AWS. EC2 offers more control and scalability, but it’s generally more complex to set up, while LightSail WordPress deployment is quicker and easier for users who need to get started right away.

Conclusion

Amazon LightSail is a great choice for WordPress deployment, offering a simplified, cost-effective solution for beginners and experienced developers alike. With AWS LightSail, setting up a WordPress site is fast, easy, and affordable.

Thanks for reading and stay tuned for more.

If you have any questions concerning this article or have an AWS project that requires our assistance, please reach out to us by leaving a comment below or email us at [email protected].


Thank you!

Categories
Blogs

How to Deploy a WordPress Site on Amazon LightSail

How to Deploy a WordPress Site on Amazon LightSail: A Step-by-Step Guide

Deploying WordPress on AWS LightSail

If you want to quickly and easily set up a WordPress website with budget-friendly hosting, Amazon LightSail is a good option. This service from AWS makes it simple to create virtual private servers, which helps make WordPress deployment easier, even for beginners. In this blog post, we will show you how to deploy a WordPress site on Amazon LightSail, from starting your server to accessing your new website.

Why Choose AWS LightSail for WordPress Hosting?

AWS LightSail provides an easy-to-use platform for WordPress hosting, combining scalability, cost-efficiency, and AWS’s trusted infrastructure. LightSail is ideal for beginners or small business owners who need a quick WordPress deployment solution without diving into complex configurations.

Key benefits of using AWS LightSail for WordPress deployment include:

Affordable pricing: You can start with a low-cost plan and scale as your website grows.

Ease of use: LightSail offers pre-configured WordPress images, which simplifies installation.

Scalability: You can easily upgrade your instance, add storage, or integrate with other AWS services as needed.

Hands-on lab: Step-by-Step Guide to Deploying WordPress on Amazon LightSail

Let’s get started with a detailed guide on how to set up a WordPress site using AWS LightSail.

Step 1: Sign Up for AWS and Navigate to LightSail

Sign in to the AWS management console, in the search bar type LightSail then select LightSail under services.

Deploying WordPress on AWS LightSail

Step 2: Create a New Instance

In the LightSail console, on the left side of the navigation pane, select instances then click Create instance.

Deploying WordPress on AWS LightSail

In the create instance UI, choose your Instance location (AWS region). It’s essential to choose the region closest to your target audience for optimal performance.

Deploying WordPress on AWS LightSail

Choose your instance image: Select Linux/Unixas the platform and then choose WordPress as the application.

Deploying WordPress on AWS LightSail

Optionally, you can add a shell script to run at launch and also change SSH key pairs but we will move with the default options for now. Scroll down.

Deploying WordPress on AWS LightSail

Select your instance plan based on your needs. For a small blog or a personal website, the lower-cost plans are often sufficient. For this demo, I will choose 5 USD, and scroll down.

Deploying WordPress on AWS LightSail

Step 3: Configure Your Instance

Name your instance—this could be something relevant to your site or simply “Demo-instance.”

Optionally add tags to organize your resources if needed. Click Create Instance. LightSail will begin the process of deploying your WordPress site on the instance.

Deploying WordPress on AWS LightSail

Step 4: Accessing Your WordPress Site

Once the instance is up and running (it usually takes a few minutes), you can access your WordPress site:

Go to the LightSail instances page and access the newly created instance.

Deploying WordPress on AWS LightSail

Under the Connect tab, you’ll find the Public IP of your instance. This is the IP address you’ll use to access your WordPress site. Enter the IP in a browser, and you’ll see your new WordPress site live.

Deploying WordPress on AWS LightSail

Step 5: Logging Into Your WordPress Admin Panel

To access the WordPress admin dashboard:

Add /wp-admin to the IP address in your browser. Example: http://<your-instance-ip>/wp-admin.

The default credentials (username and password) for your WordPress admin dashboard can be retrieved from the instance management page:

Under the Connect tab, click on SSH to open a terminal window.

Deploying WordPress on AWS LightSail

Run the following command to retrieve the password:

cat bitnami_application_password

Amazon LightSail WordPress setup

Use the retrieved password and username (user) to log in.

Amazon LightSail WordPress setup

You are already logged into the admin dashboard.

Amazon LightSail WordPress setup

Step 6: Add a static IP address to your WordPress Instance.

On the left side of WordPress UI, select Networking, then click Create Static IP.

Amazon LightSail WordPress setup

Under attach to an instance, select the instance you just created. Then scroll down and click on Create.

Amazon LightSail WordPress setup

That’s it, with a static IP address whether you restart your instance, it will remain unchanged.

This brings us to the end of this hands-on exercise.

Final Thoughts

Using AWS LightSail for WordPress hosting offers a quick, easy, and cost-effective solution for both beginners and professionals. With its pre-configured WordPress images and seamless integration with other AWS services, setting up WordPress has been simplified.

Thanks for reading and stay tuned for more. Make sure you clean resources by deleting your Instance and releasing your static IP address.