


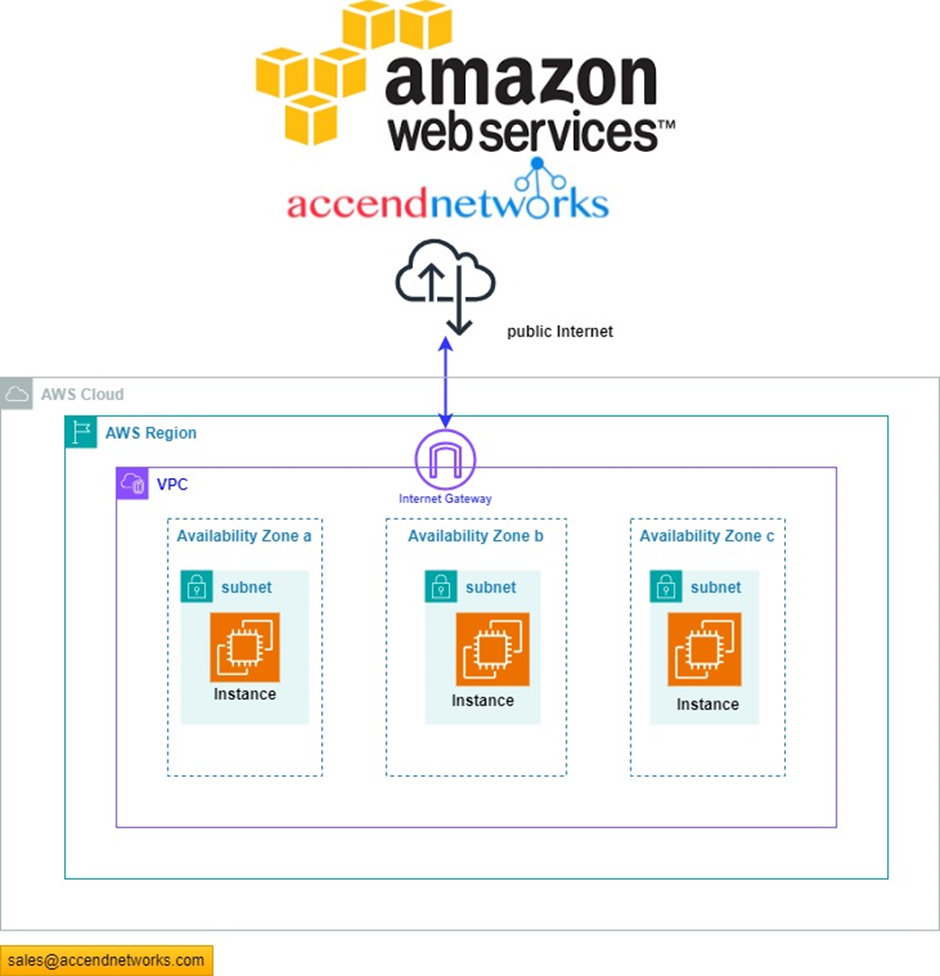
Accend Networks San Francisco Bay Area Full Service IT Consulting Company
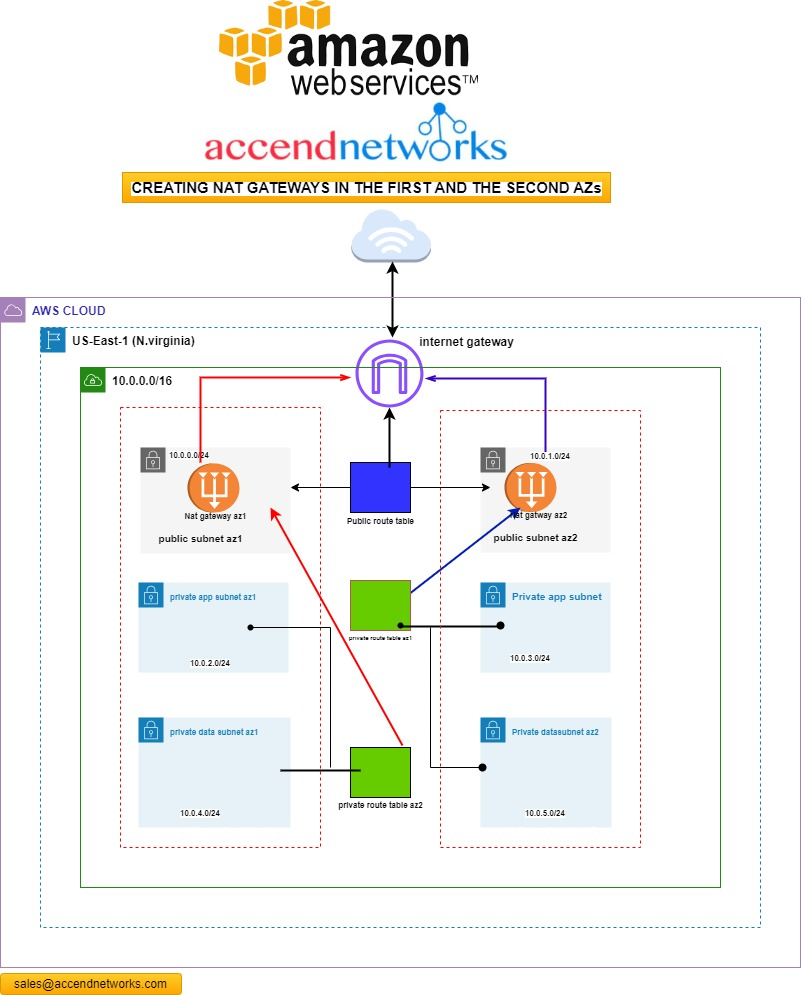
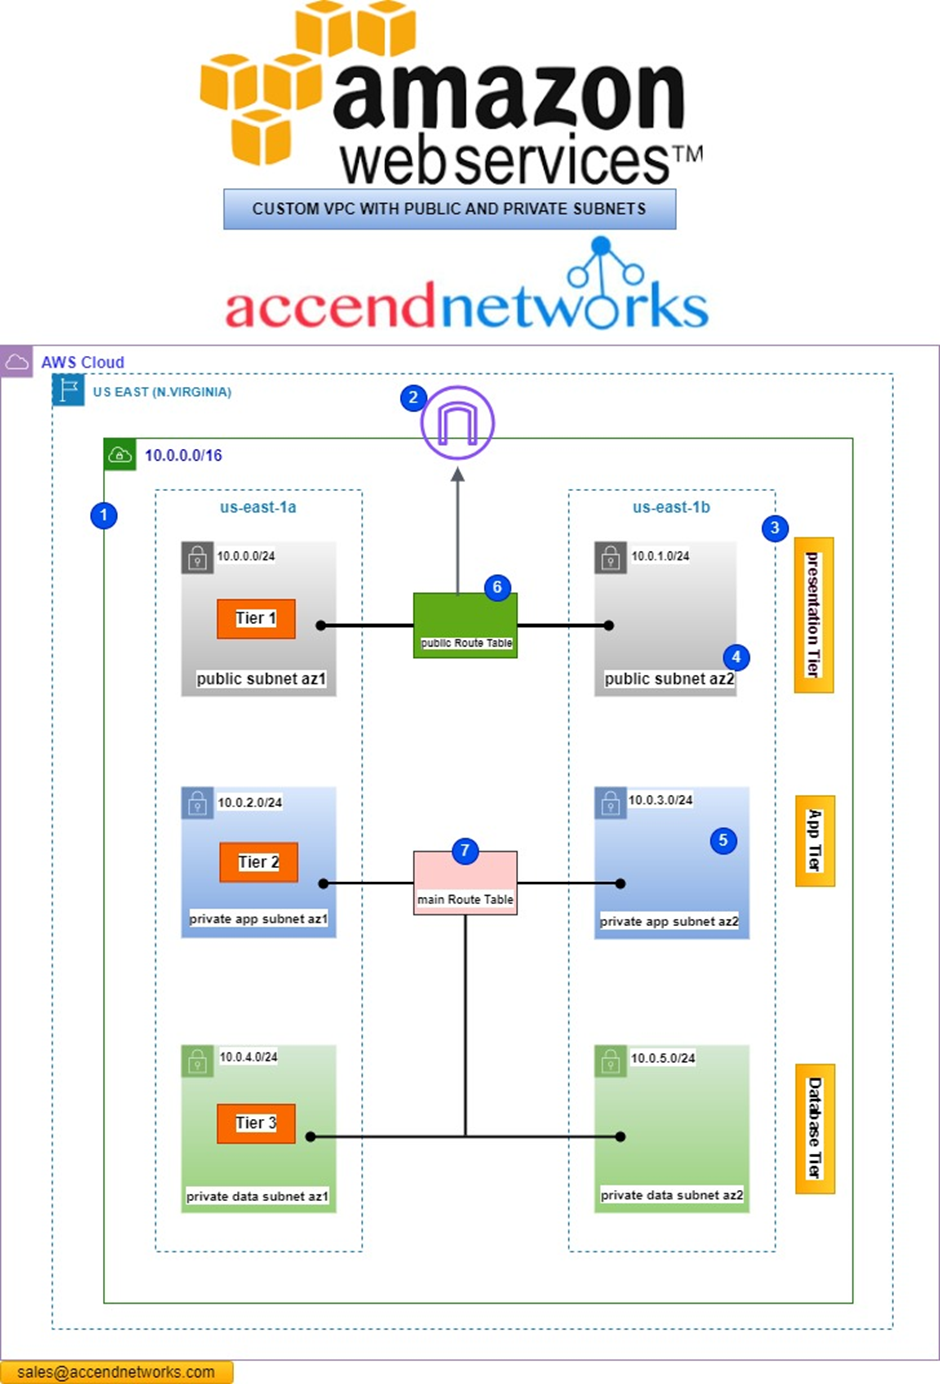
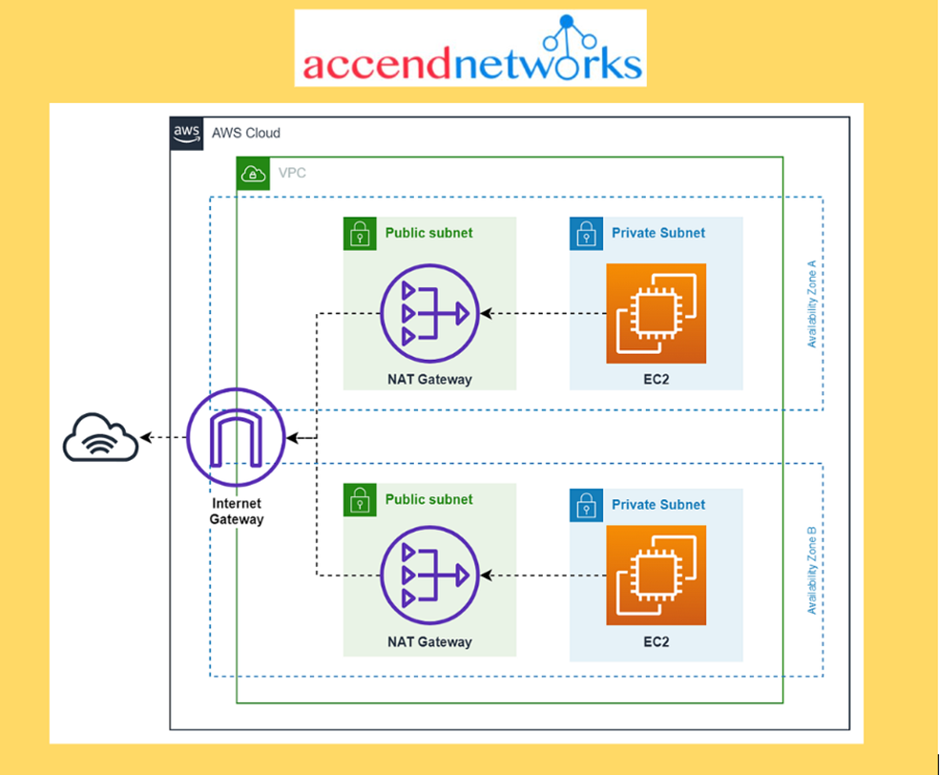
In this comprehensive guide, we will take you through configuring a dual-NAT gateway in two different availability zones, paired with route tables, enabling your private subnets to access the internet securely.
According to our reference architecture, we will create a Nat gateway in the public subnet az1, we will create a route table that we call private route table az1. We will then add a route to that route table to route traffic to the internet through the Nat gateway. We will then associate that route table with the private app subnet az1, and private data subnet az1.
Again, for the second availability zone:
We will create another Nat gateway in the public subnet az2. We will then create another route table called private route table az2, we will add traffic to this route table to route traffic to the internet through the Nat gateway in the public subnet az2. We will then associate this route table with the private app subnet az2 and private data subnet az2.
Let’s start.
Refer to our previous post on creating a Custom 3 tier-VPC. We will use that VPC project to accomplish this project.
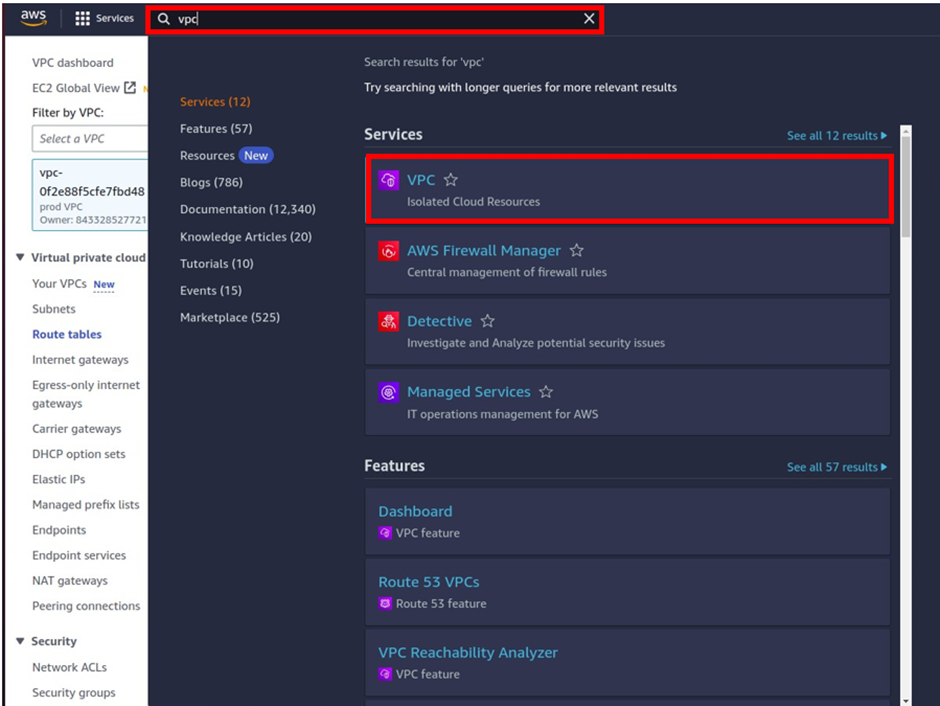
To create the Nat gateway first make sure you are in the region where you created the VPC.
Then in the search box, type VPC and select VPC under services.
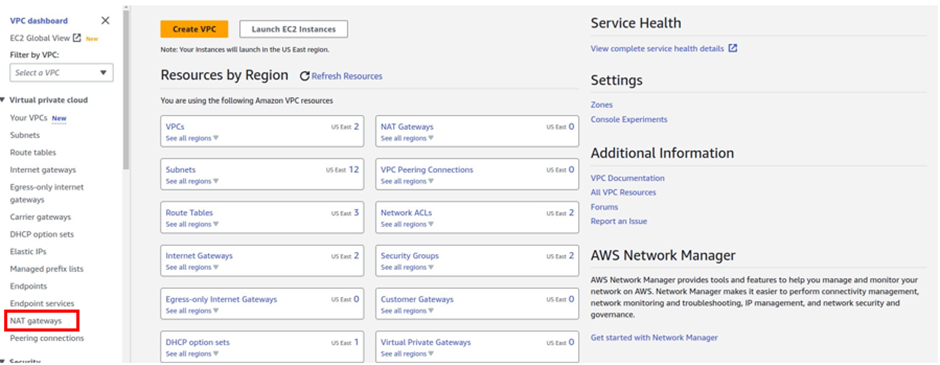
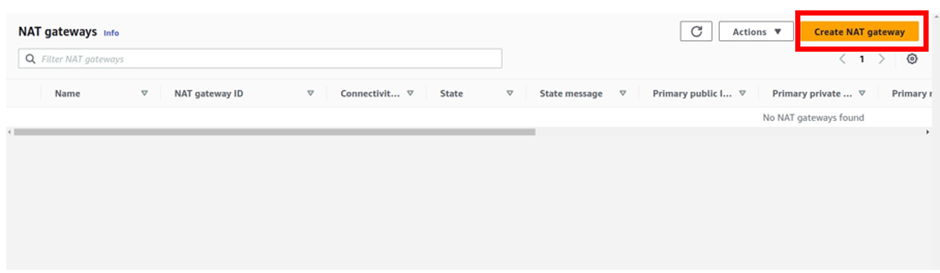
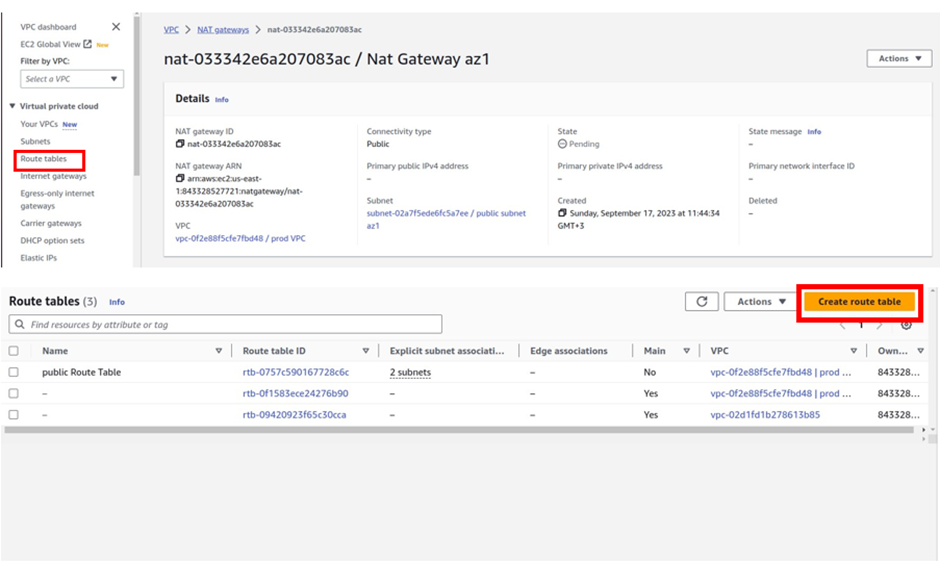
On the VPC dashboard on the left side of the navigation pane select Nat gateway, then click Create Nat gateway.
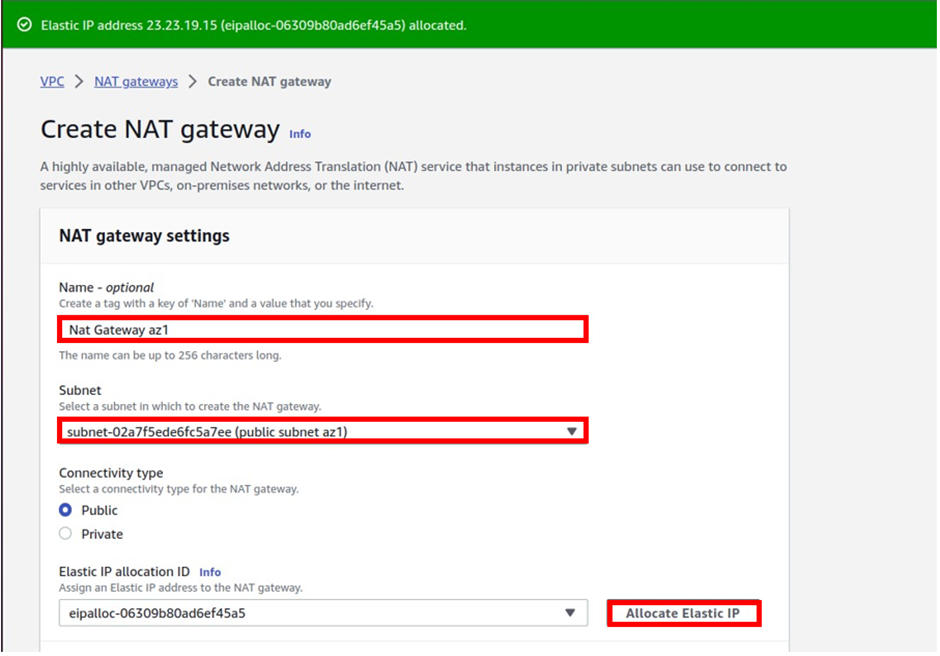
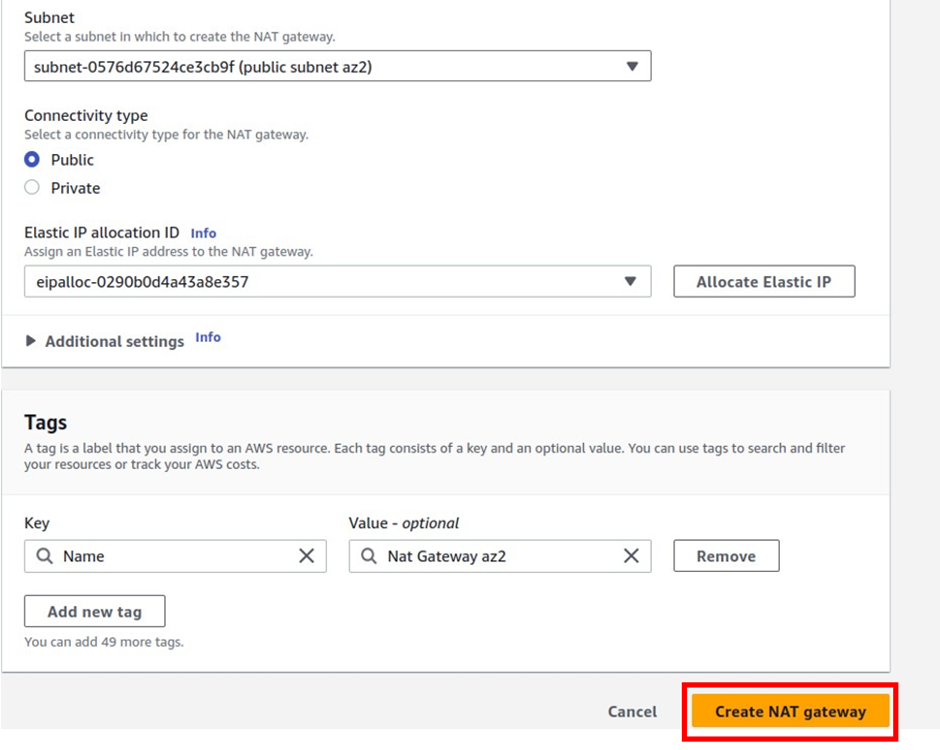
We will create the first Nat gateway in the public subnet az1.
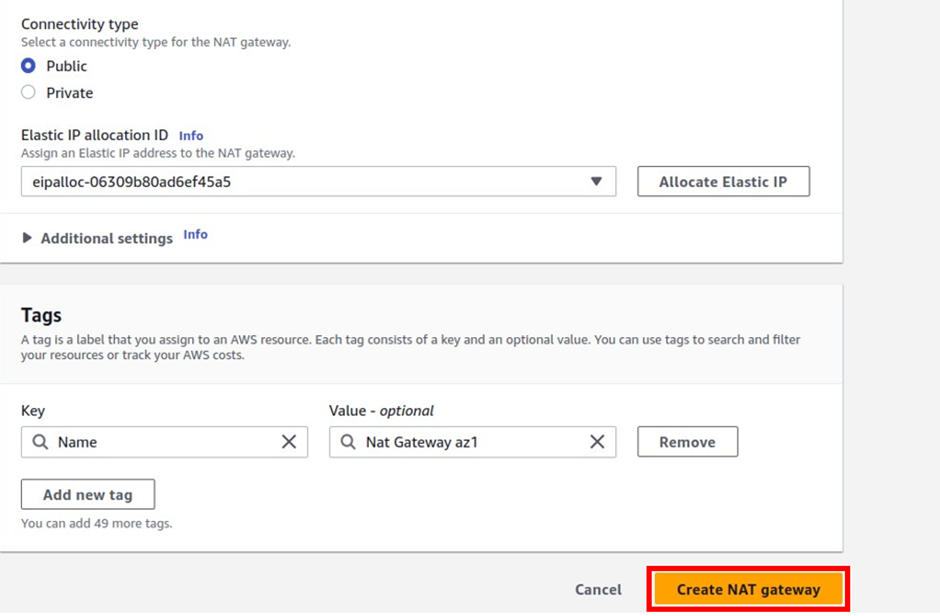
In the create Nat gateway dashboard under name give your Nat gateway name, call it Nat gateway az1. Once you’ve given your Nat gateway a name, select the subnet where you want to put your Nat gateway. so under subnet, select the drop-down and look for public subnet az1 then select it. Then for connectivity type leave it on the default public, because we are creating a public Nat gateway.
Scroll down, under elastic allocation ID click allocate an elastic IP and that is going to allocate an elastic IP for you.
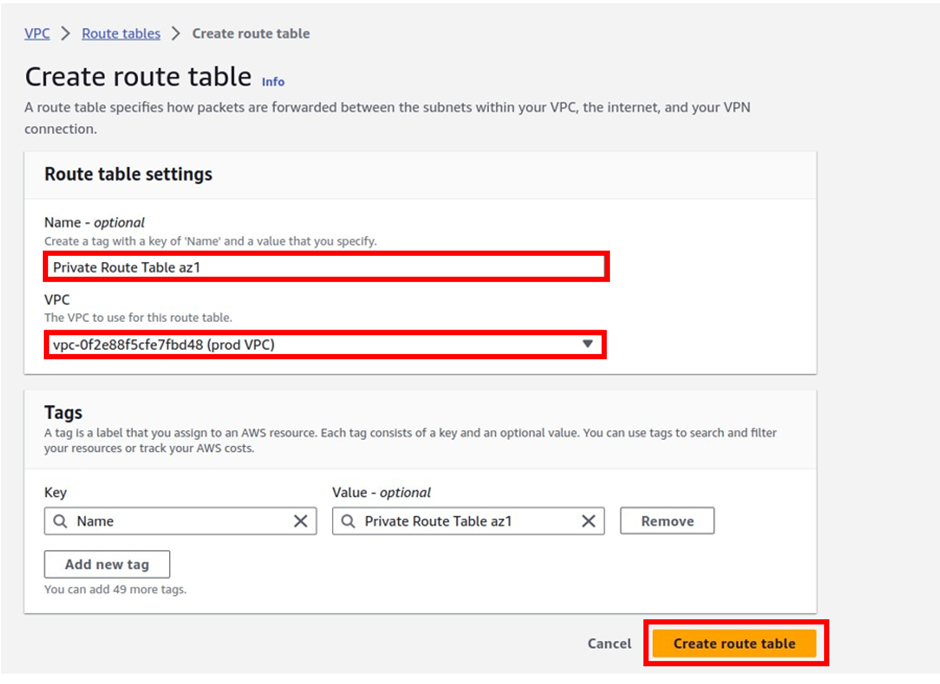
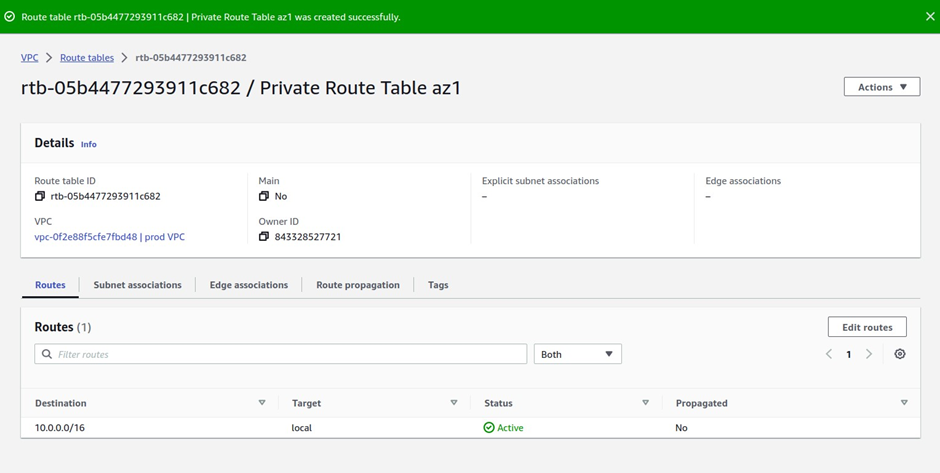
In the create route table dashboard under name, give your route table a name, and call it private route table az1. Once you’ve given the route table a name, select the VPC you want to create this route table in, so under VPC, select the drop-down and select your prod- VPC.
These are the only settings we need to create a route table now click create route table.
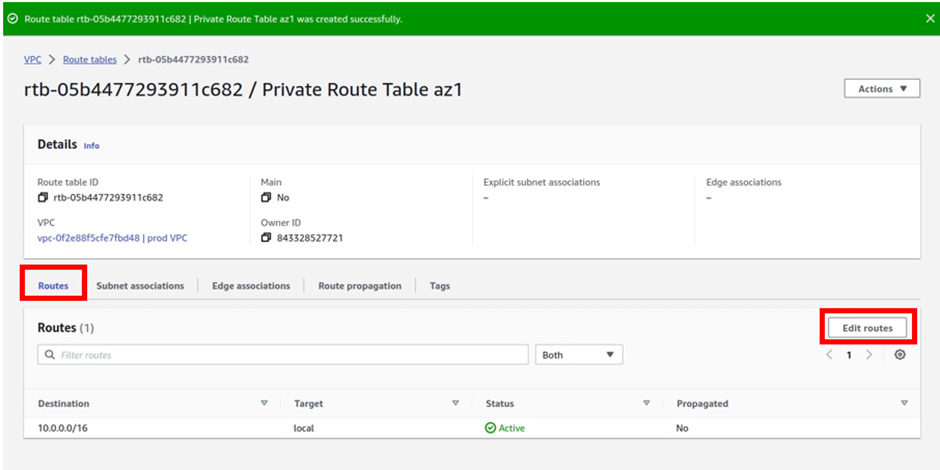
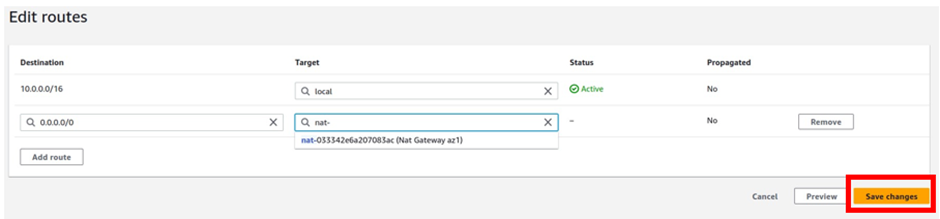
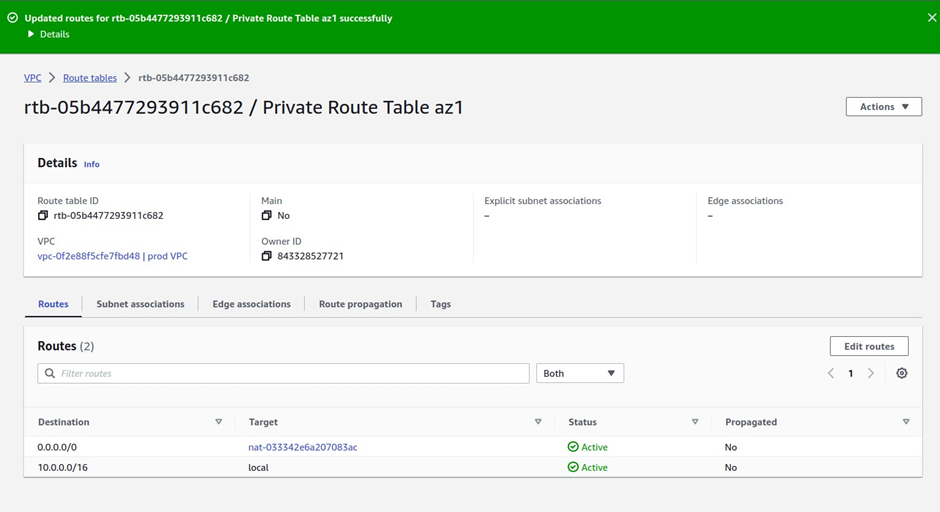
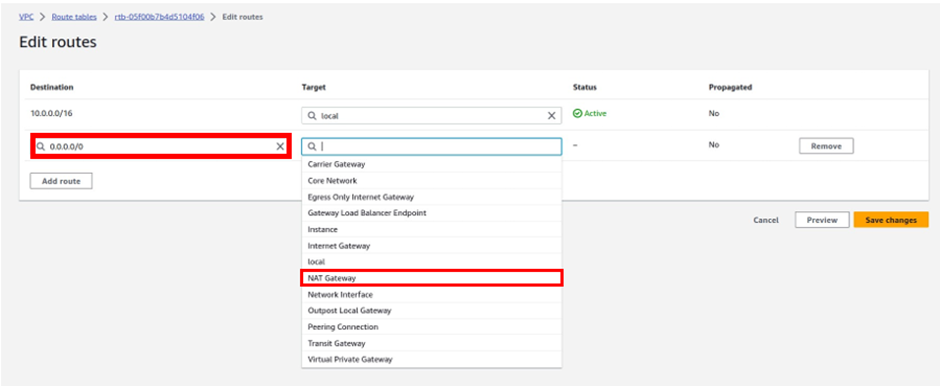
Next, we will add a route to the private route table az1 to route traffic to the internet through the Nat gateway in the public subnet az1.
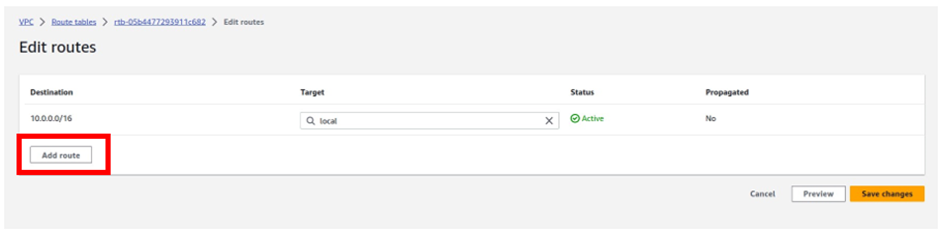
To add a route to this route table, navigate to the routes tab, select edit routes then click Add route
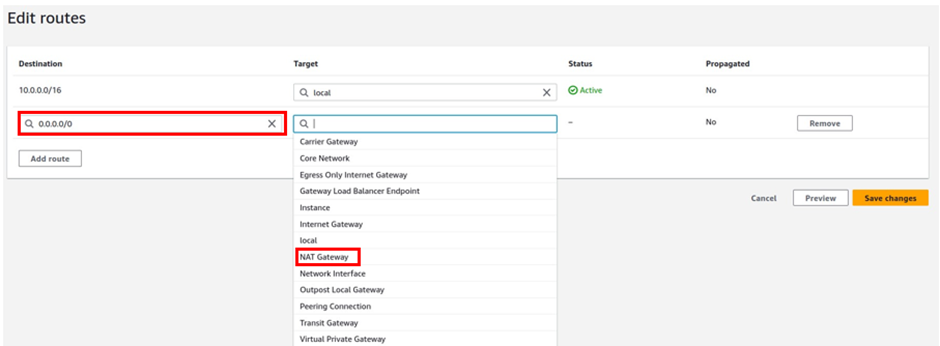
For the destination remember internet traffic is always 0.0.0.0/0 so under destination type in this value.
Then under target, the target is going to be our Nat gateway in the public subnet az1, so click in the search box, then select Nat gateway. Make sure you select Nat Gateway and not Internet Gateway. You should see the Nat gateway in the public subnet az1, it is the Nat gateway we call Nat gateway az1. Select it then click Save Changes.
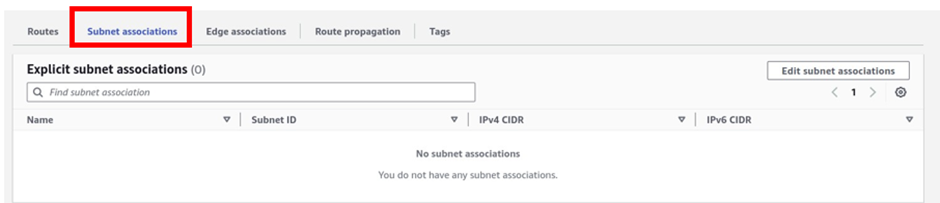
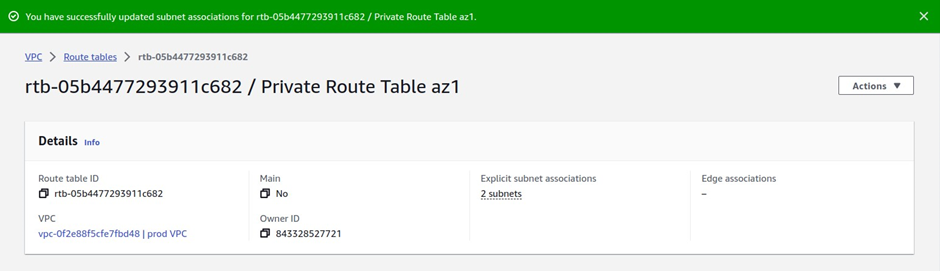
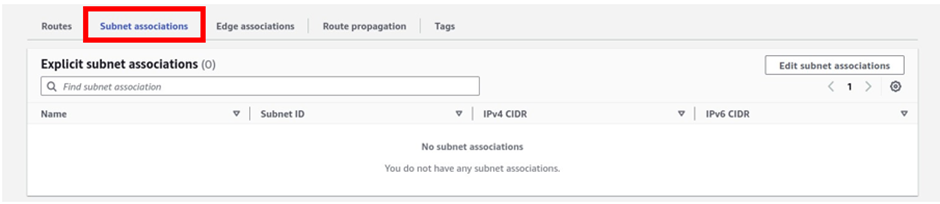
Next, we will associate this route table with private app subnet az1 and private data subnet az1.
To associate this route table with our subnets, click subnet associations, then click edit subnet associations.
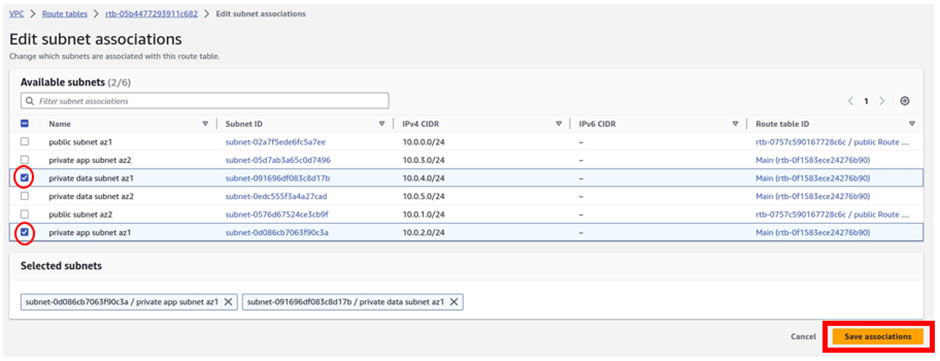
In the edit subnet associations dashboard, under the available subnets, select private app subnet az1, and private data subnet az1. Once you’ve selected the two subnets, click Save Associations.
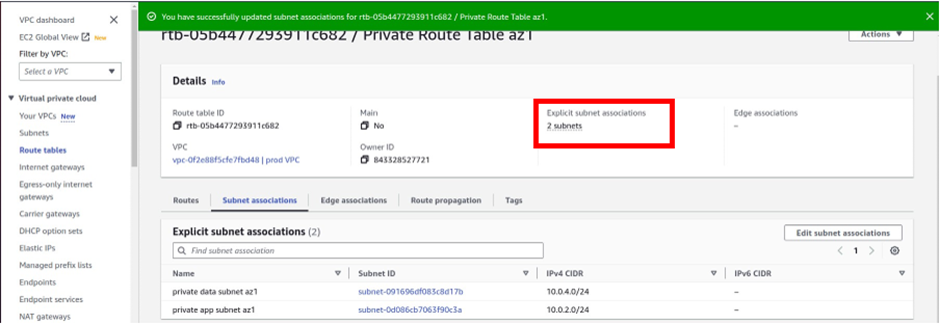
And you can see that information, under explicit subnet associations, we have two subnets there.
If you click on the subnet’s association tab a gain, you will see that the private app subnet az1 and private data subnet az1 are associated with the route table.
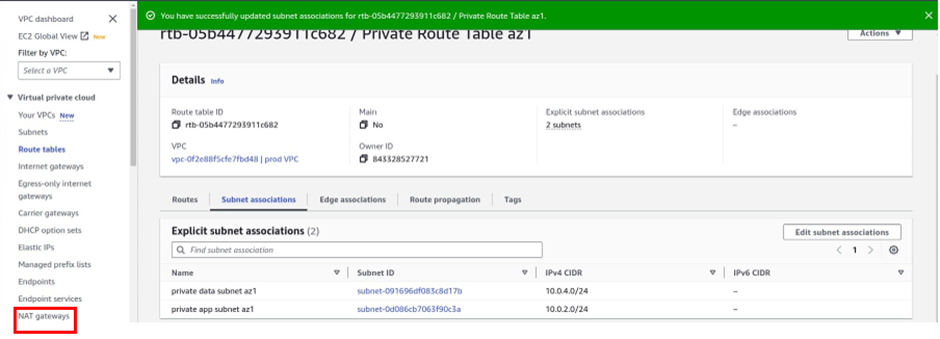
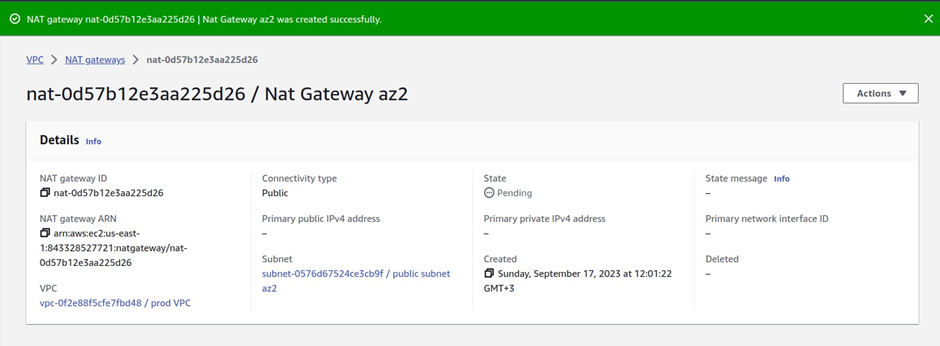
Next, we will create the second Nat gateway in the public subnet az2. On the left side of the VPC dashboard select Nat gateway. then click Create Nat gateway.
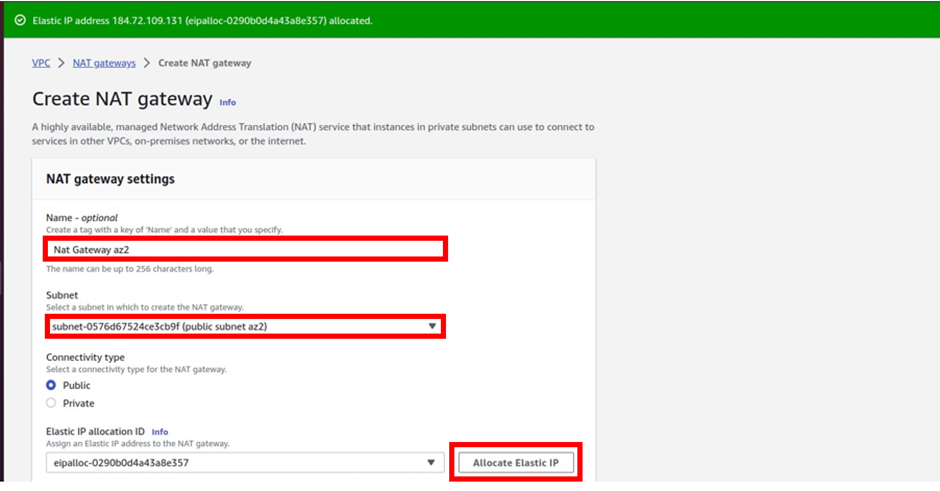
Under Nat gateway settings give the Nat gateway a name, call it Nat gateway az2. Then select the subnet you want to put the NAT gateway in. Under subnets, select the drop-down and select public subnet az2. For connectivity type leave it on the default public because we are creating a public Nat gateway. Under elastic IP allocation ID, click the allocate elastic IP button, this will allocate an elastic IP for you.
Scroll down and click Create Nat gateway.
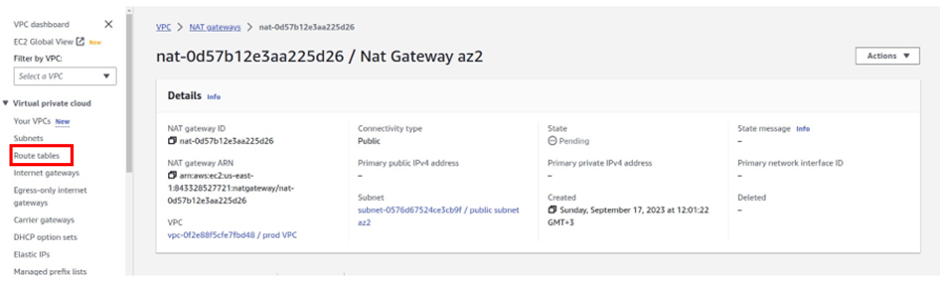
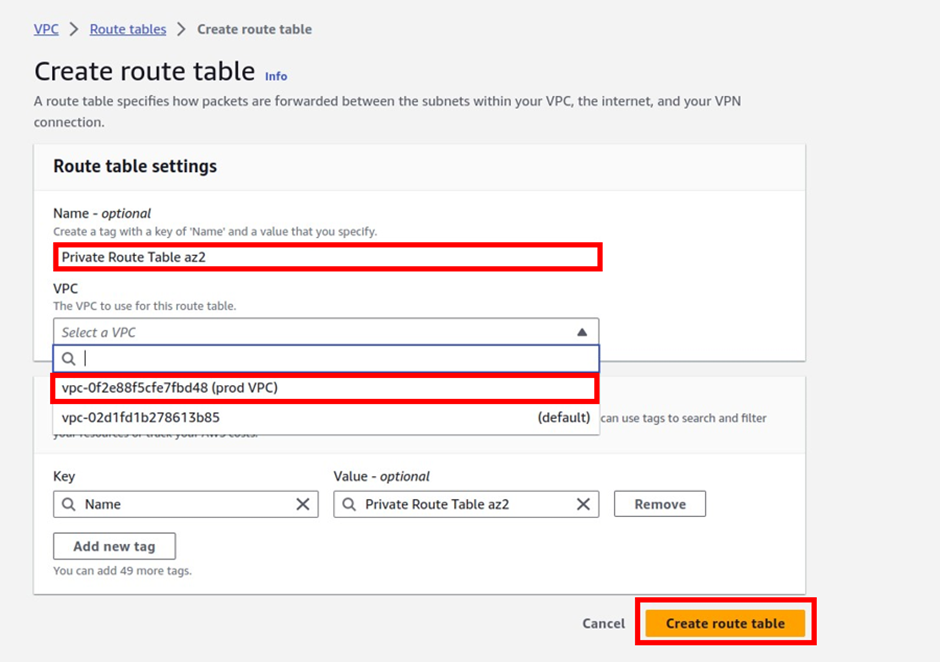
The next thing we will do is to create another route table and call it private route table az2.
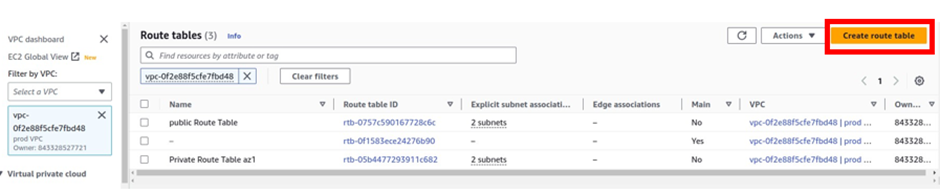
On the left side, select the route table. then click Create Route Table.
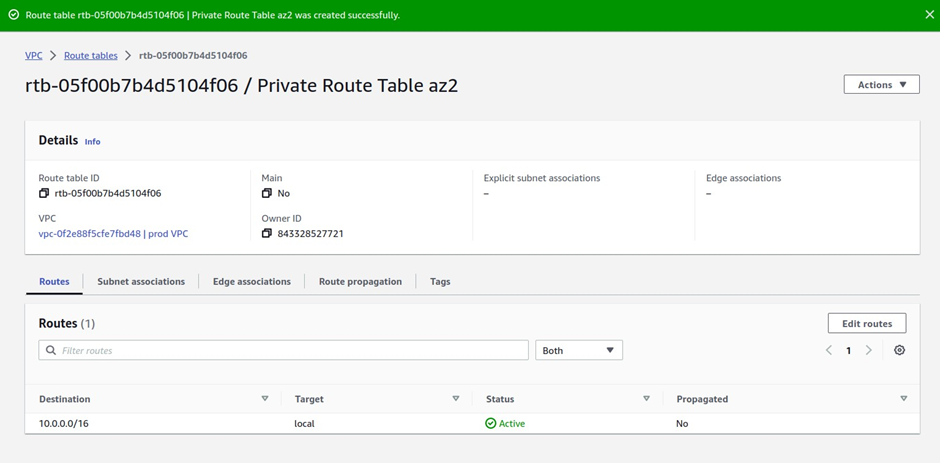
Under name give your route table a name, call it private route table az2. Once you’ve given your route table a name then, select the VPC you want to put your route table in, so under VPC, select the drop-down and select your prod VPC. These are the only settings we need to create this route table, click create route table.
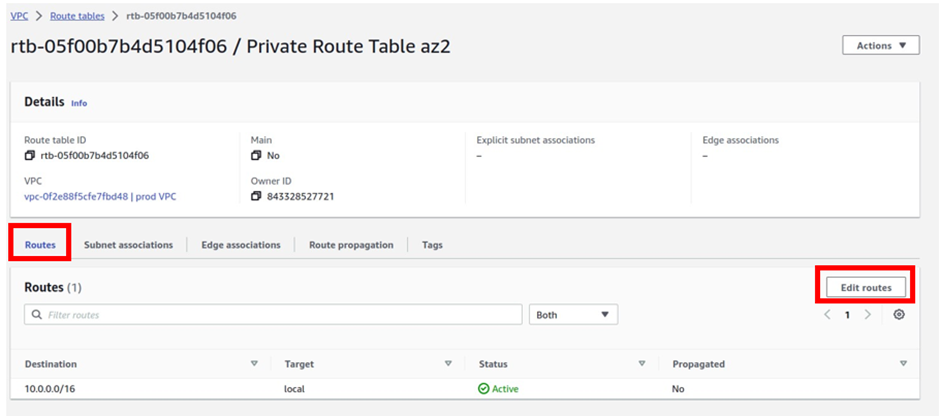
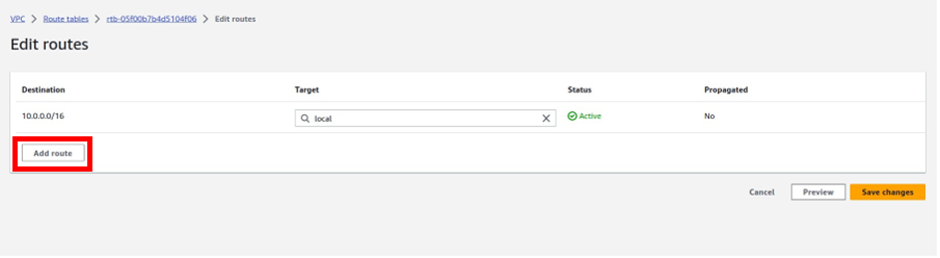
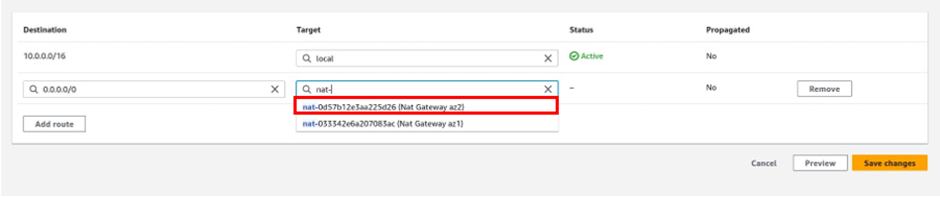
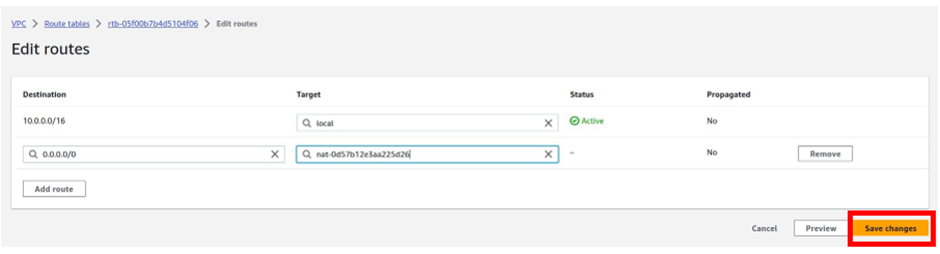
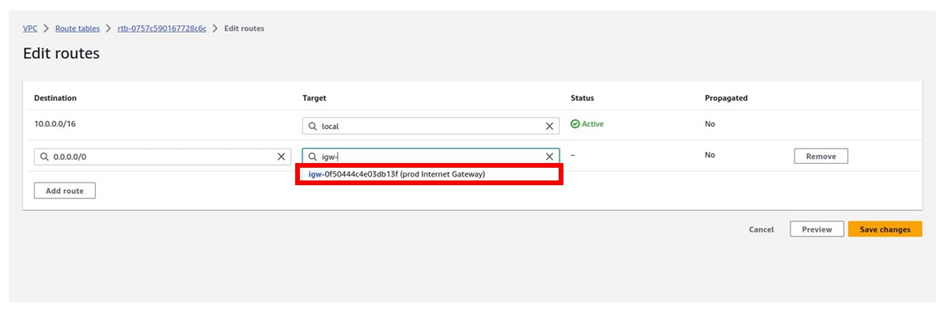
In the edit routes dashboard click Add route
Under destination remember traffic going to the internet is always 0.0.0.0/0 so type it in there and select it.
Then under targets, we will select our Nat gateway, so select the search box, and select Nat gateway.
And this time make sure you select Nat gateway az2. Then click save changes.
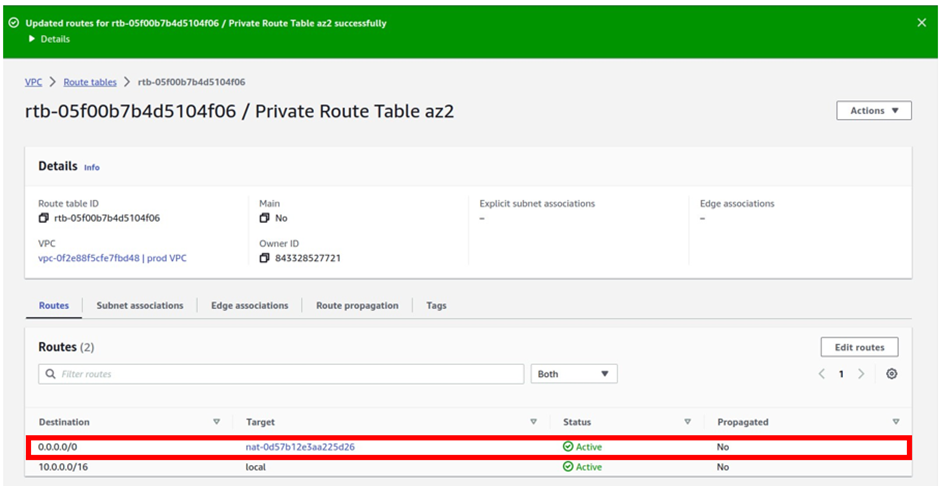
We have successfully added a route to this route table to route traffic to the internet through the Nat gateway in the public subnet az2.
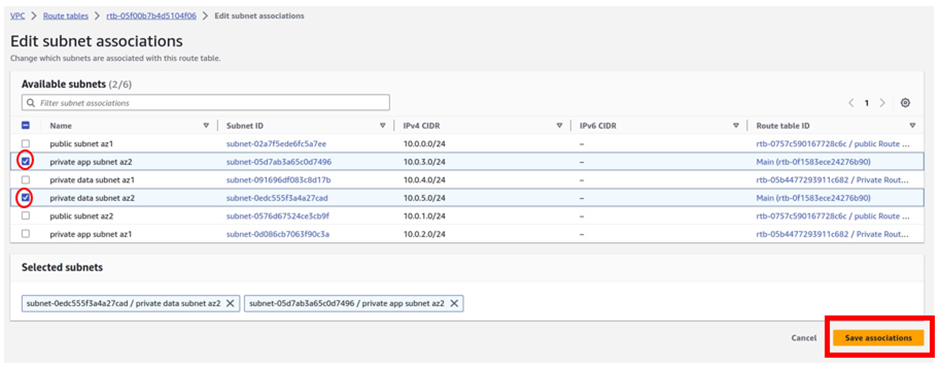
The last thing we will do is associate this route table with private app subnet az2, and private data subnet az2
To associate this route table with our subnets, go to the subnets associations tab, select it then click edit subnet associations.
Under available subnets, we will select the private app subnet az2 and private data subnet az2. Once you’ve selected the subnets, click Save Associations.
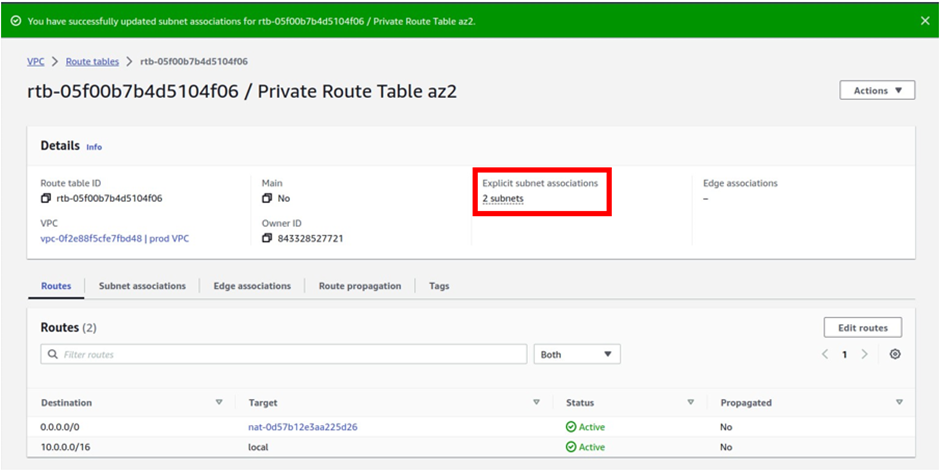
We have successfully associated our private app subnet az2, and private data subnet az2 with the private route table az2.
To see that, we can see that we have two subnets under explicit subnet associations.
and if you click on the subnet’s associations tab, you will see that our private app subnet az2, and private data subnet az2 are associated with this route table.
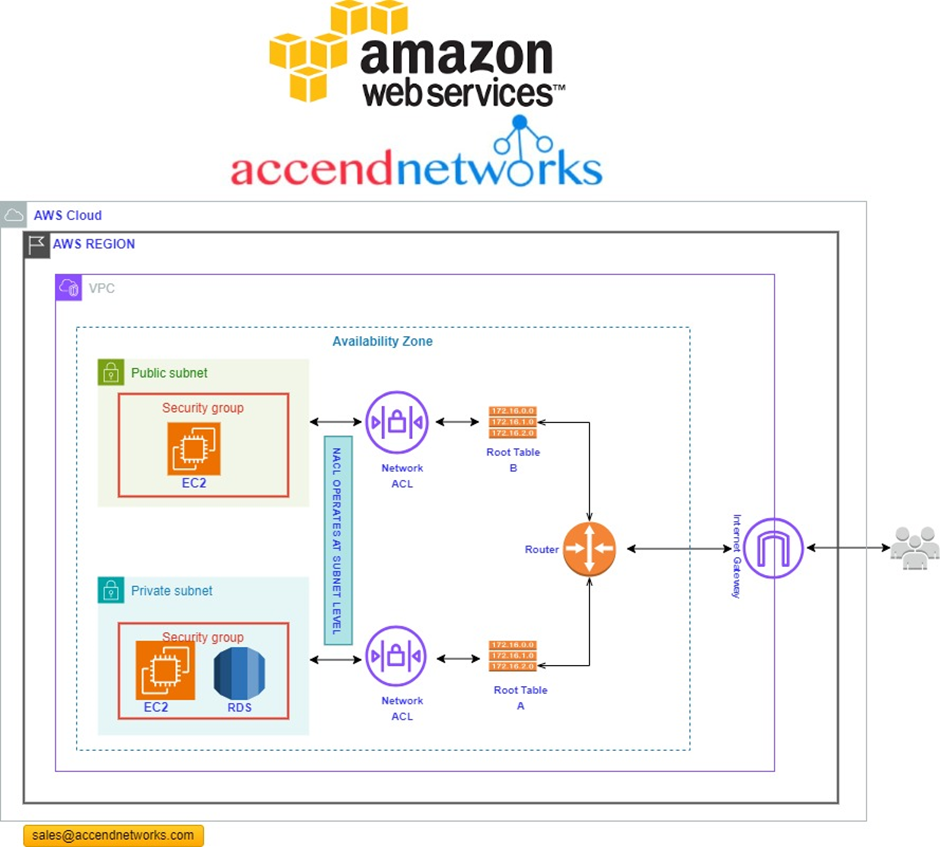
Network traffic flow in AWS
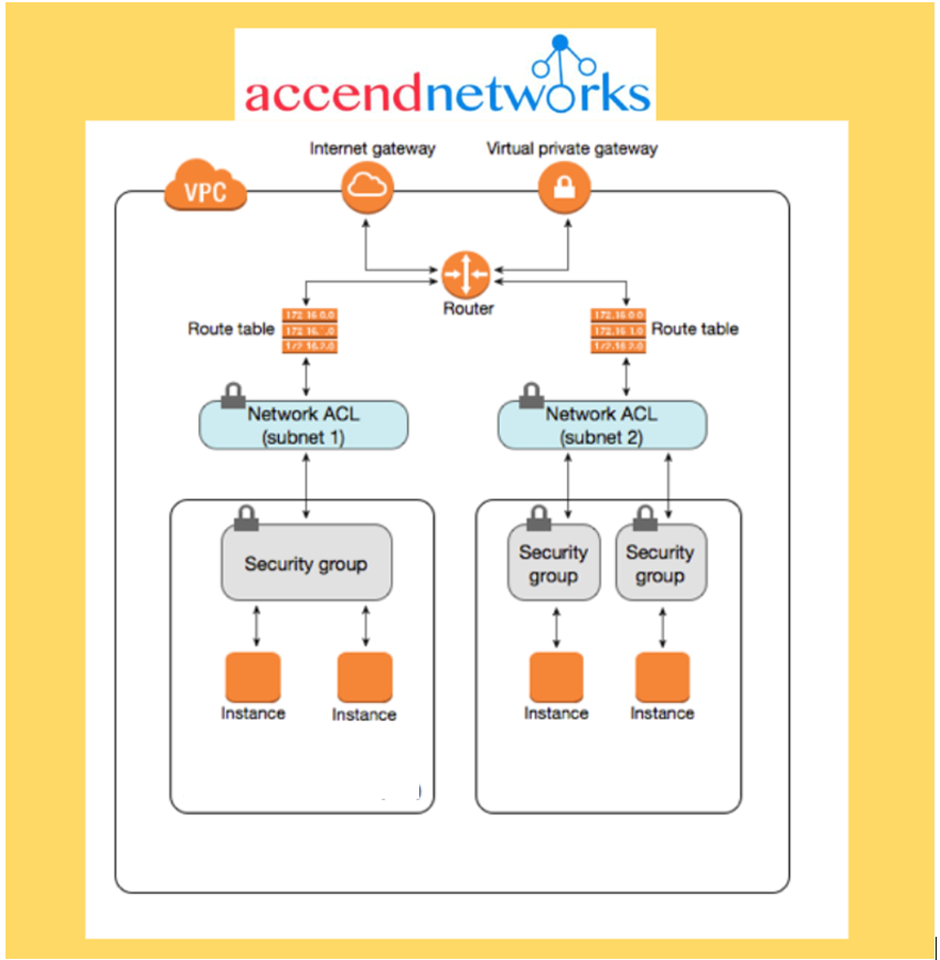
Before starting, let’s see how network traffics move among the resources. Traffics come from the internet to the internet gateway and then, according to the routes defined in the route tables, are directed to the virtual private cloud (VPC) subnets based on the rules defined through AWS ACL (Access Control Lists).
What is an AWS ACL?
In Amazon Web Services (AWS), NACL stands for Network Access Control List. An AWS ACL (Access Control Lists) is a stateless, rule-based system that acts as a virtual firewall for controlling inbound and outbound traffic at the subnet level in a Virtual Private Cloud (VPC). An AWS ACL (Access Control Lists) allow or deny specific inbound or outbound traffic at the subnet level while the security group controls the qualified traffic to reach and leave the resources.
The ACL resides in front of the VPC subnets, and the security Groups protect the AWS resources, such as EC2 instances. It is one of the most critical differences between Network ACL and Security Group.
Network Access Control lists (NACL’s) are used to manage traffic at the network layer. Hence the name Network access control list. Picture it as the first line of defence for your cloud infrastructure, filtering traffic based on rules you set. ACLs are stateless and filter traffic based on rules defined for inbound and outbound traffic at the subnet level.
When you create a Virtual Private Cloud (VPC), it automatically associates a default NACL that permits all inbound and outbound traffic.
NACL’s are a powerful tool that can be used to improve the security of your AWS VPC. However, it is important to note that NACL’s are just one component of a comprehensive security strategy. To protect your AWS resources, you should also use other security features, such as security groups, IAM roles, and WAF rules.
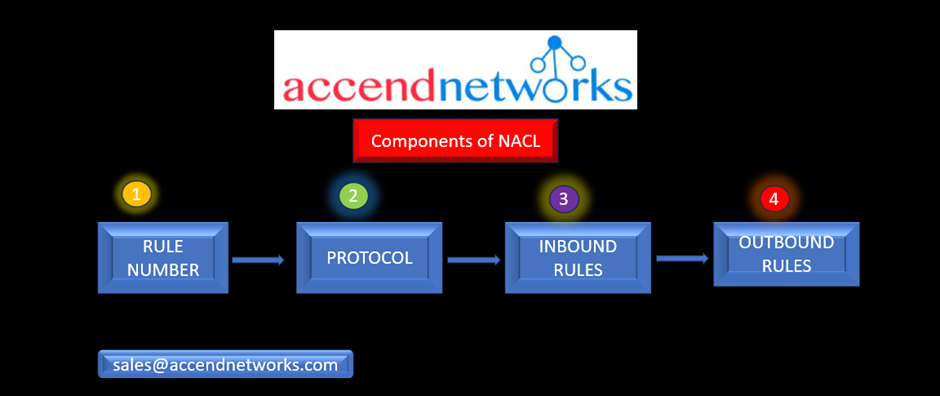
Rule Number: Each rule is assigned a unique number, and they are evaluated in ascending order. Once a rule matches incoming or outgoing traffic, it is immediately applied, even if higher-numbered rules contradict it.
Protocol: You have the flexibility to define any standard protocol, such as HTTP, HTTPS, ICMP, SSH, etc. when configuring rules for the ACL.
Inbound Rules: Inbound rules determine the source of incoming traffic and the destination port it is allowed to reach.
Outbound Rules: Outbound rules specify the destination for outgoing traffic and the destination port it can access.
The default network ACL permits unrestricted traffic to enter or exit the associated subnet. Additionally, every network ACL includes a rule marked with an asterisk rule number, responsible for denying traffic that doesn’t match any numbered rules. This particular rule is immutable and cannot be altered or deleted.
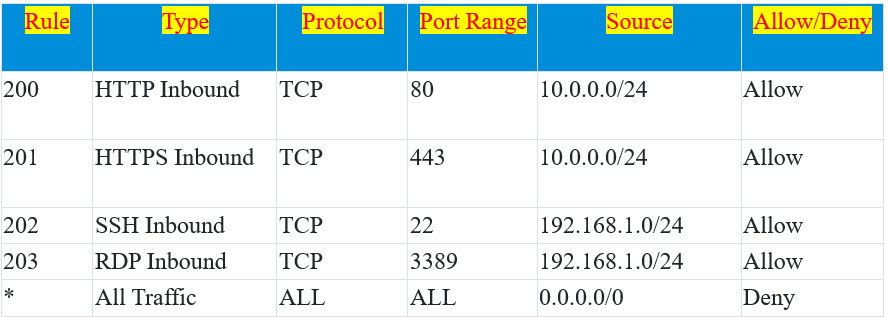
In this example, the above table is a default Network ACL table, which is associated with a subnet.
Rule 200 allows incoming HTTP traffic (port 80) from the source IP range 10.0.0.0/24.
Rule 201 allows incoming HTTPS traffic (port 443) from the same source IP range 10.0.0.0/24.
Rule 202 permits SSH traffic (port 22) from the source IP range 192.168.1.0/24.
Rule 203 allows RDP traffic (port 3389) from the same source IP range 192.168.1.0/24.
The wildcard rule (*) at the bottom denies all other incoming and outgoing traffic, providing a default security posture that allows only specific types of traffic from specified source IP ranges while denying all other traffic.
This user-defined access control list lets you customize your network security policies.
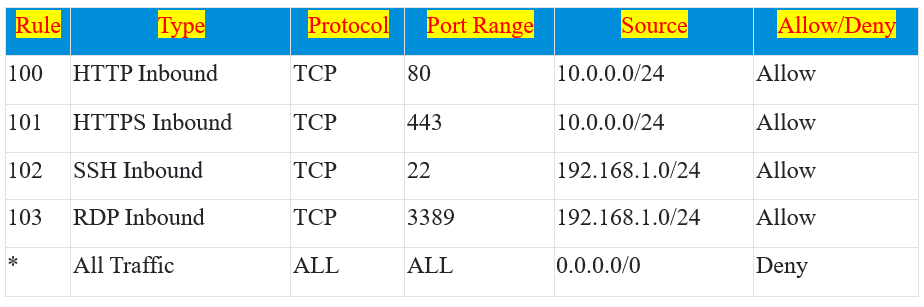
In this example:
Rule 100 allows incoming HTTP traffic (port 80) from the source IP range 10.0.0.0/24.
Rule 101 permits incoming HTTPS traffic (port 443) from the same source IP range 10.0.0.0/24.
Rule 102 allows SSH traffic (port 22) from the source IP range 192.168.1.0/24.
Rule 103 permits RDP traffic (port 3389) from the same source IP range 192.168.1.0/24.
The wildcard rule (*) at the end serves as a catch-all, denying all incoming and outgoing traffic, and providing a default security posture that allows only specific types of traffic from specified source IP ranges while blocking everything else. This custom Network ACL offers fine-grained control over traffic, allowing or denying access based on defined rules.
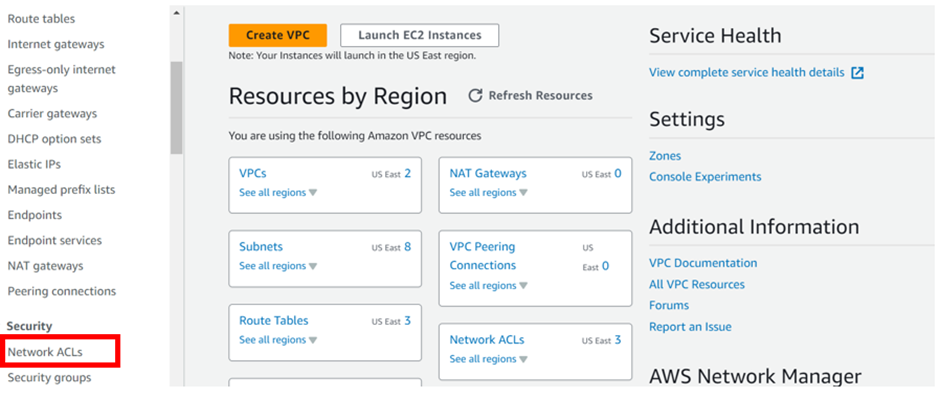
Log in to the AWS Management Console. Then in the search box, type VPC, then select VPC under services.
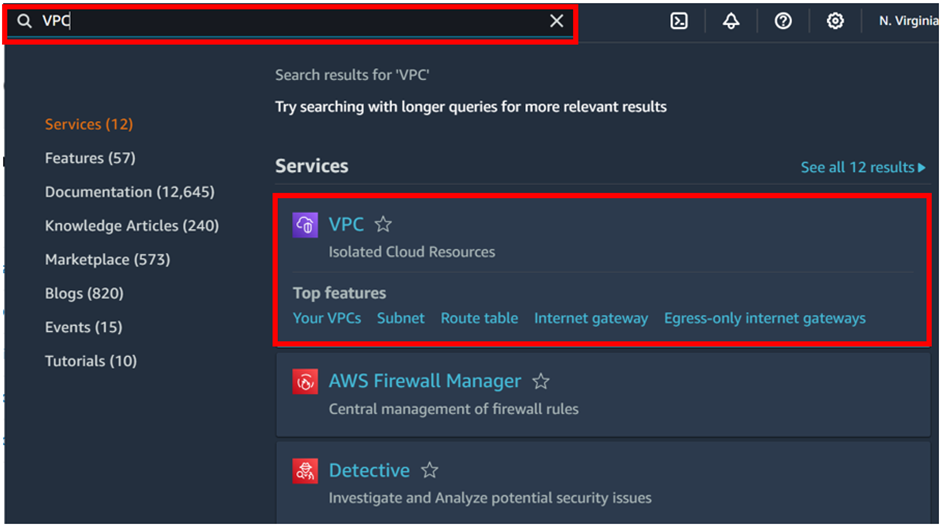
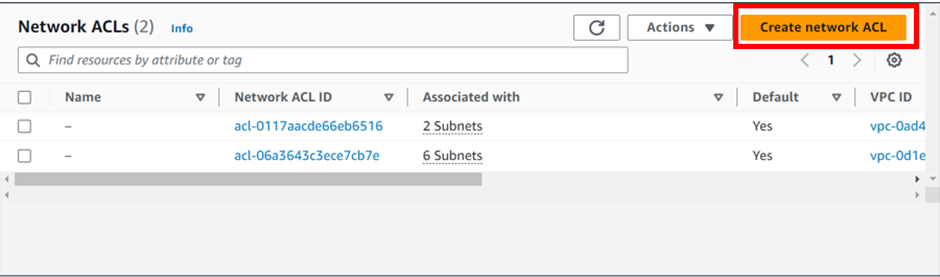
In the VPC dashboard on the left side of the navigation pane under security, select “Network ACLs.” Then click “Create Network ACL.”
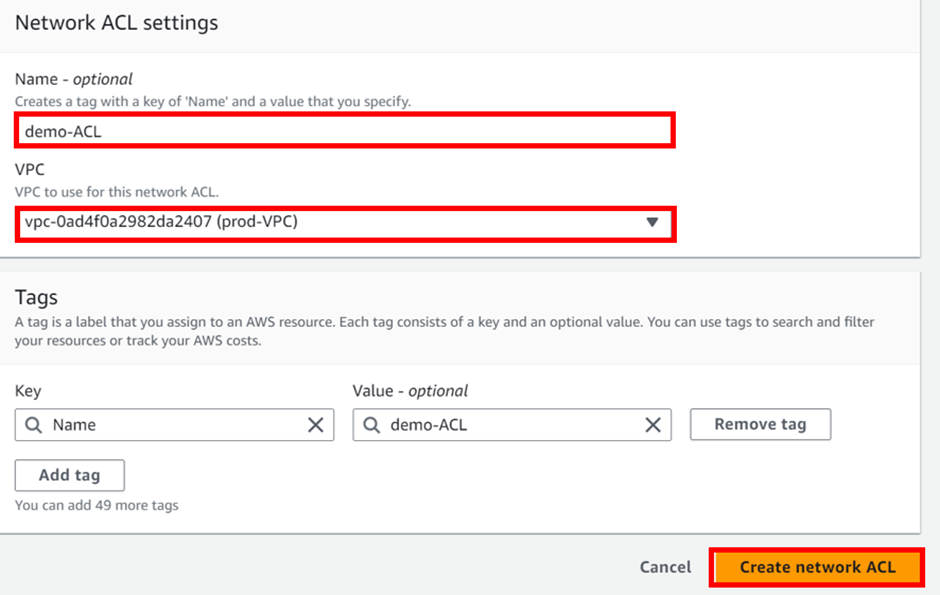
In the Create Network Access Control list dashboard, Provide the necessary information to create a Network ACL. Under the name, provide a name, for my case I will call it demo-ACL
Then under VPC, select the drop-down button and select your VPC, I created the prod-VPC so I will select it.
These are the only necessary settings to create NACL, leave tags as optional then scroll down and click create network ACL.
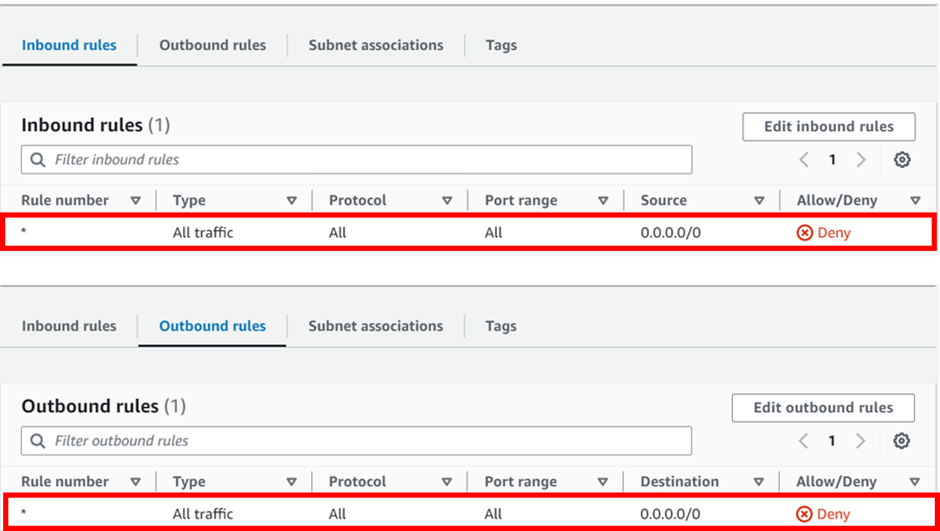
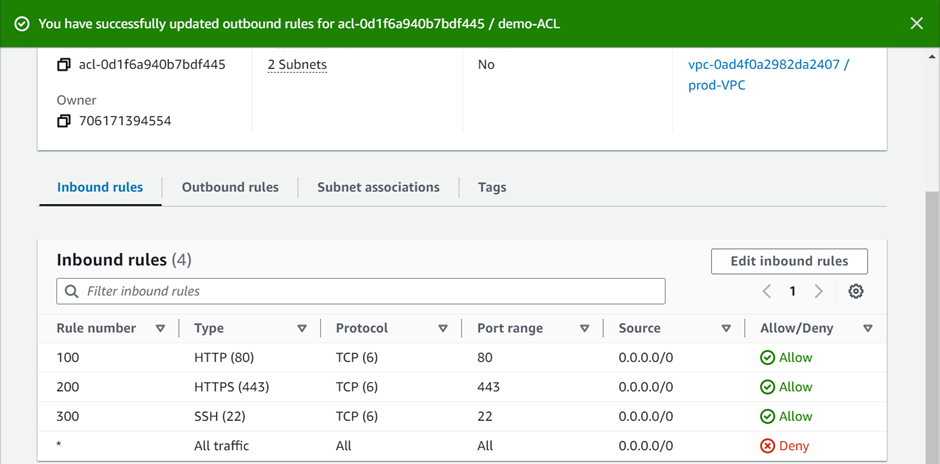
Success our NACL has been successfully created.

Note: By default, all inbound and outbound rules deny all traffic for newly created Network ACL as shown below.
Associate Subnet to Network ACL
Note: You can associate a network ACL with multiple subnets. but a subnet can be associated with only one network ACL at a time.
To associate subnets, move to the subnet association tab, then click Edit subnet associations.
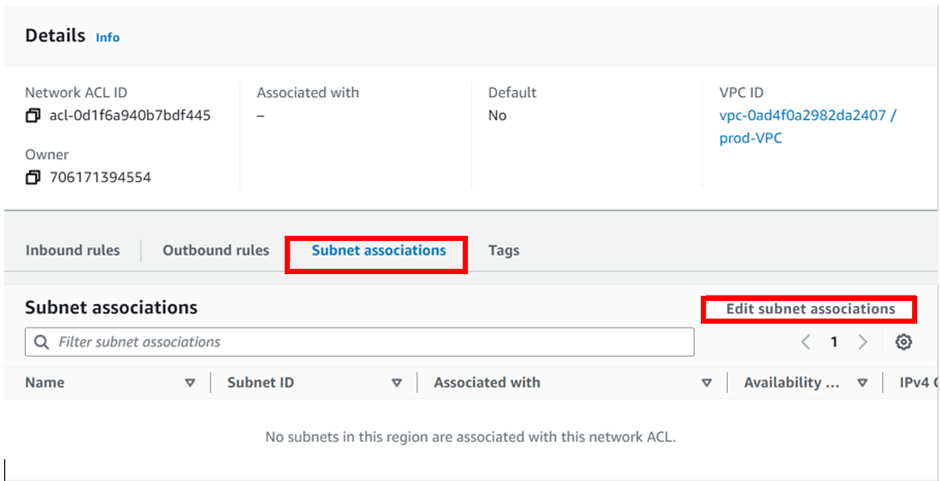
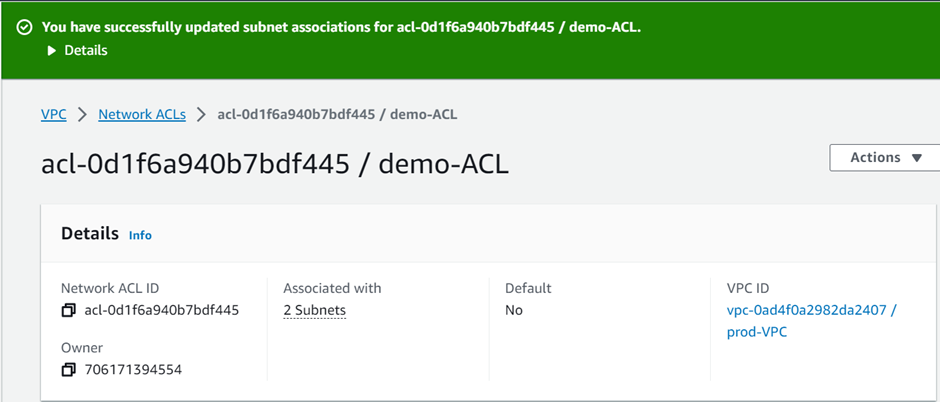
In the edit subnet association dashboard, select your subnets by ticking the boxes, under the name, then click save changes.

We have successfully associated our subnets with the created NACL.
Configure Inbound and Outbound rules:
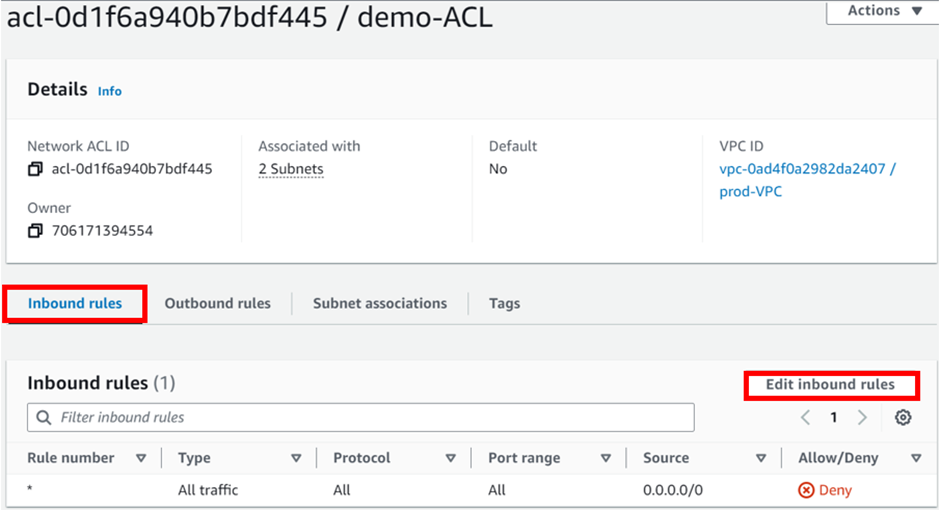
First, launch an instance in the subnets associated with the NACL, then try to access your Public/Application server. It should not be accessible, due to no inbound and outbound rules configured yet. Now, Edit and add a new inbound and outbound rule.
Select the NACL ID then click it, in the ACL dashboard, move to the Inbound rules tab then select Edit Inbound rules
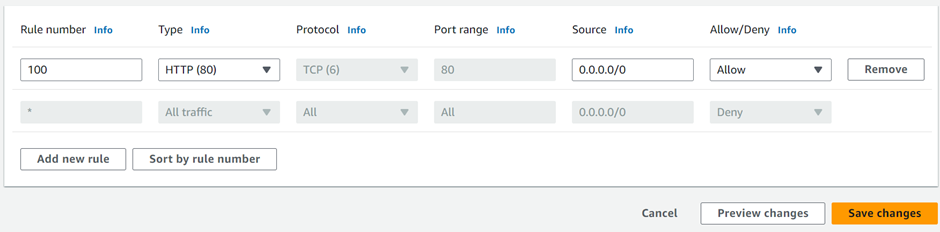
In the edit inbound rule dashboard, click Add new rule.
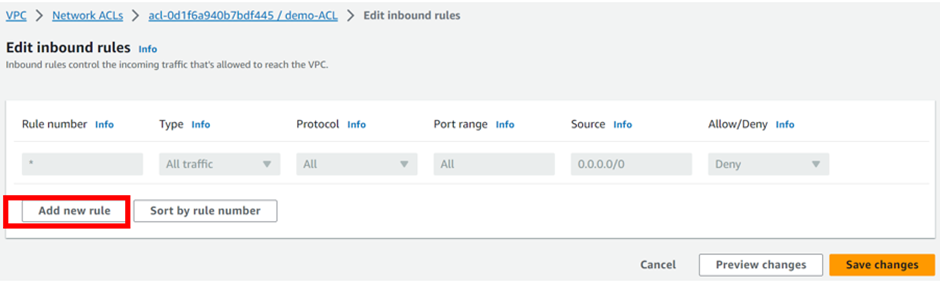
Remember the rules are added in ascending numbers.
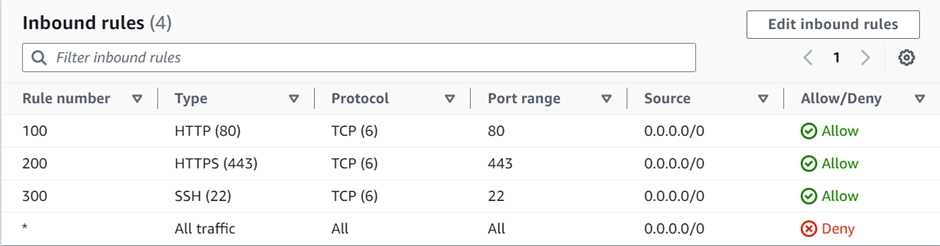
The first rule we will add is HTTP port 80, under rule number enter 100, then under custom TCP select the drop-down and select HTTP. Repeat the same process for HTTPS, and SSH then click save changes.
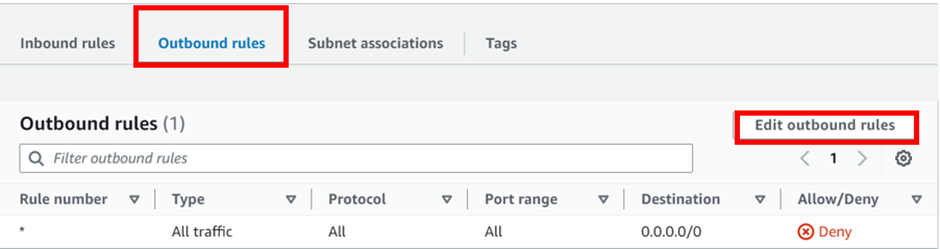
Then move to the outbound rules tab then, click edit outbound rules.
Add the first rule number. we will add rule 100, then under custom TCP select HTTP port 80, repeat the same, and add rule numbers 200, and 300 for HTTPS and SSH respectively then click save changes.
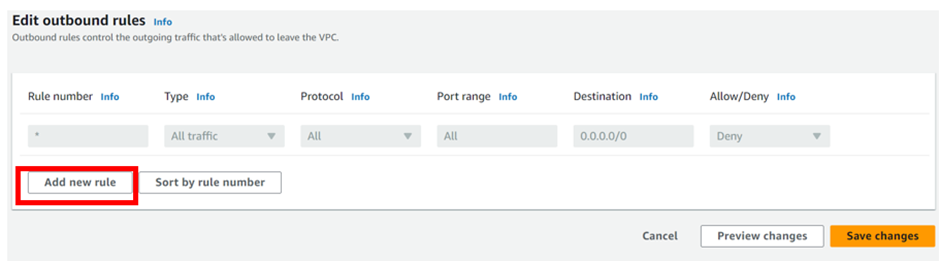
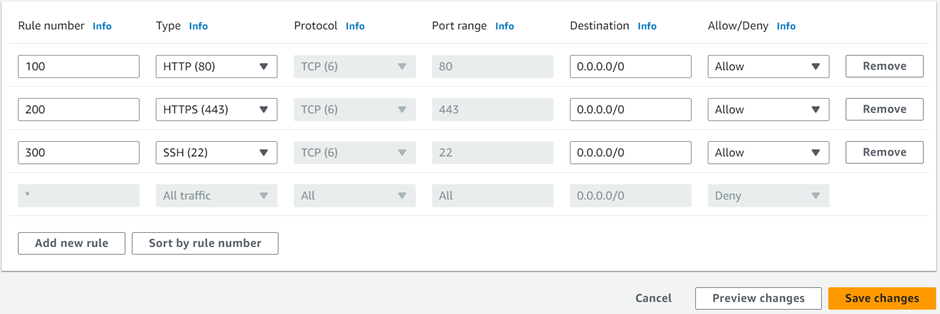
We have successfully added outbound rules.
Note: Rules are evaluated starting with the lowest numbered rule. As soon as a rule matches traffic, it gets executed regardless of any higher-numbered rule that might contradict it. For example, if rule 100 allows port 80, and rule 90 denies port 80, finally, port 80 will be denied as rule 90 is evaluated before 100.
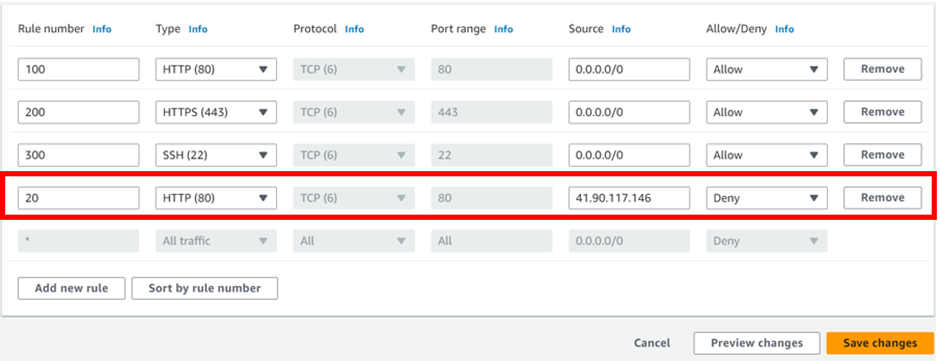
Block IP address
Block IP address: Edit the inbound rule and try to block your own IP, after that, you should not be able to access your public/Application server.
This brings us to the end of this demo; always ensure you clean up resources.
Conclusion
NACL’s are important for AWS network security. They work with security groups, which handle different security aspects. NACL’s control traffic at the subnet level, using IP addresses and rules. Security groups manage access at the instance level, based on group memberships. These tools work together to defend against cyber threats.
Thanks for your attention and stay tuned for more.
If you have any questions concerning this article or have an AWS project that requires our assistance, please reach out to us by leaving a comment below or email us at. sales@accendnetworks.com
Thank you!
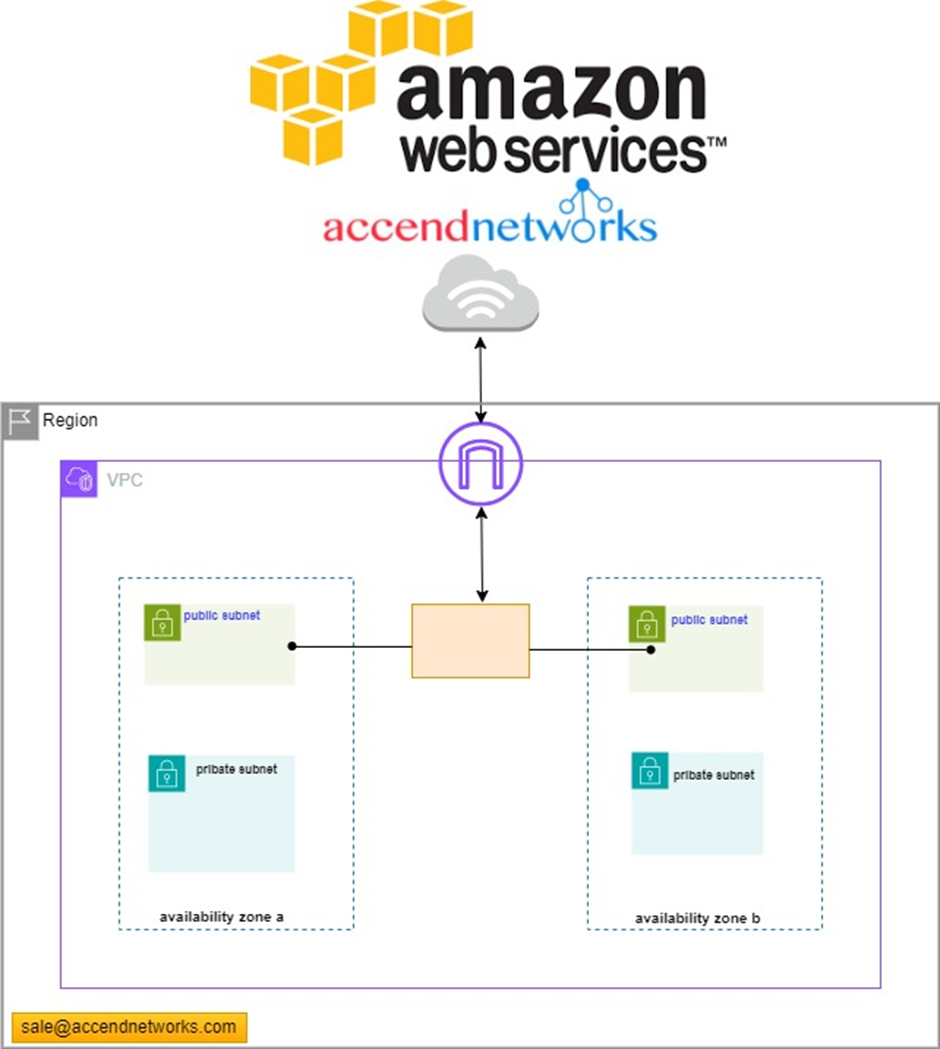
With Amazon Virtual Private Cloud (Amazon VPC), you can launch AWS resources in a logically isolated virtual network that you’ve defined.
A VPC, virtual private cloud is a virtual network dedicated to your AWS account. It is logically isolated from other virtual networks in the AWS Cloud. You can specify an IP address range for the VPC, add subnets, add gateways, and associate security groups.
Subnets
Allow you to partition your network inside your VPC. It’s a range of IP addresses in your VPC. You launch AWS resources, such as Amazon EC2 instances, into your subnets. Subnets are at the Availability Zone level.
You can connect a subnet to the internet, other VPC’s, and your own data Centers, and route traffic to and from your subnets using route tables.
A public subnet is a subnet that is accessible from the internet
A private subnet is a subnet that is not accessible from the interne
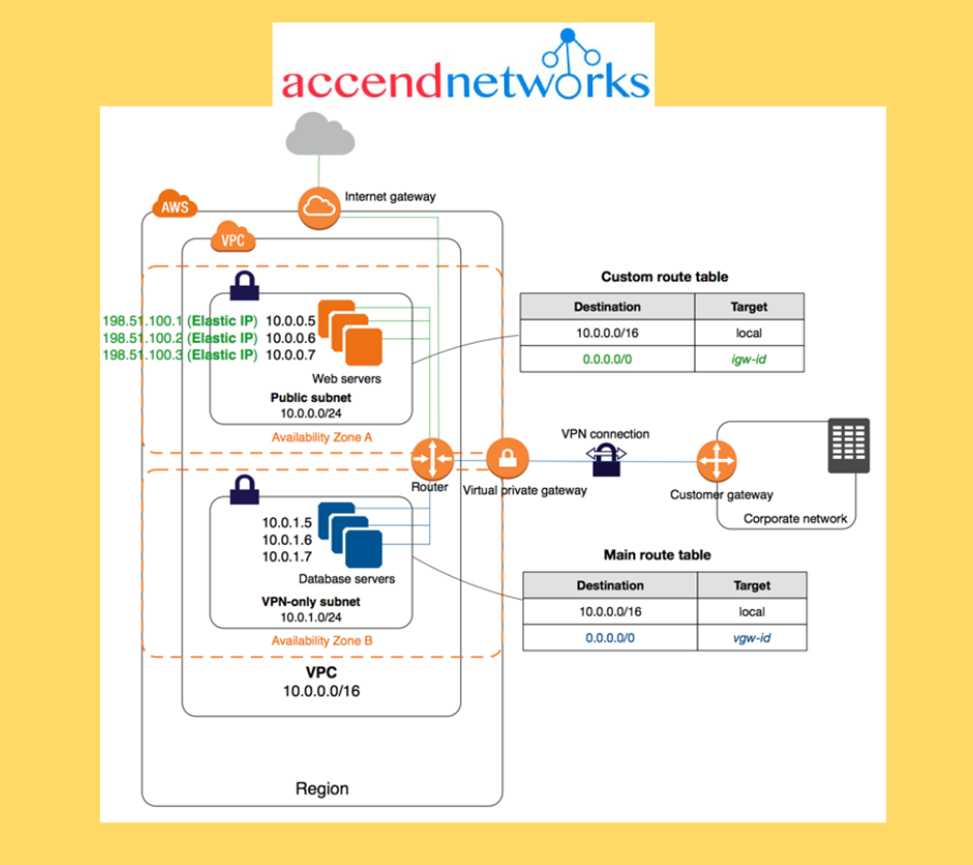
To define access to the internet and between subnets, we use Route Tables.
Route tables
A route table contains a set of rules, called routes, that are used to determine where network traffic from your VPC is directed. You can explicitly associate a subnet with a particular route table. Otherwise, the subnet is implicitly associated with the main route table.
Each route in a route table specifies the range of IP addresses where you want the traffic to go (the destination) and the gateway, network interface, or connection through which to send the traffic (the target).
Access the internet
You control how the instances that you launch into a VPC access resource outside the VPC.
Internet Gateway and NAT Gateways
Internet Gateways help our VPC instances connect to the internet
Public subnet has a route to the internet gateway
NAT Gateways (AWS managed) and NAT Instances (self-managed) allow your instances in your Private Subnets to access the internet while remaining private.
NAT Gateways allow an instance in your VPC to initiate outbound connections to the internet but prevent unsolicited inbound connections from the internet. NAT maps multiple private IPv4 addresses to a single public IPv4 address. You can configure the NAT device with an Elastic IP address and connect it to the internet through an internet gateway. This makes it possible for an instance in a private subnet to connect to the internet through the NAT device, routing traffic from the instance to the internet gateway and any responses to the instance.
A default VPC includes an internet gateway, and each default subnet is a public subnet. Each instance that you launch into a default subnet has a private IPv4 address and a public IPv4 address. These instances can communicate with the internet through the internet gateway. An internet gateway enables your instances to connect to the internet through the Amazon EC2 network edge.
By default, each instance that you launch into a nondefault subnet has a private IPv4 address, but no public IPv4 address, unless you specifically assign one at launch, or you modify the subnet’s public IP address attribute. These instances can communicate with each other, but can’t access the internet.
You can enable internet access for an instance launched into a nondefault subnet by attaching an internet gateway to its VPC.
If you associate an IPv6 CIDR block with your VPC and assign IPv6 addresses to your instances, instances can connect to the internet over IPv6 through an internet gateway. Alternatively, instances can initiate outbound connections to the internet over IPv6 using an egress-only internet gateway.
IPv6 traffic is separate from IPv4 traffic; your route tables must include separate routes for IPv6 traffic.
NACL (Network ACL)
A firewall that controls the traffic from and to the subnet (i.e., the first mechanism of defence of our public subnet)
Can have ALLOW and DENY rules
Are attached at the Subnet level
Rules only include IP addresses
To establish internet connectivity inside a subnet:
The network ACLs associated with the subnet must have rules to allow inbound and outbound traffic — The network access control lists (ACLs) that are associated with the subnet must have rules to allow inbound and outbound traffic on port 80 (for HTTP traffic) and port 443 (for HTTPS traffic). This is a necessary condition for Internet Gateway connectivity
Security Groups
A firewall that controls the traffic to and from an Elastic network interface (ENI) or an EC2 Instance (i.e., a second mechanism of defense)
Can only have ALLOW rules
Rules can include IP addresses as well as other security groups.
Egress-Only Internet Gateways
VPC component that allows outbound communication over IPv6 from instances in your VPC to the Internet, and prevents the Internet from initiating an IPv6 connection with your instances.
You cannot associate a security group with an egress-only Internet gateway.
You can use a network ACL to control the traffic to and from the subnet for which the egress-only Internet gateway routes traffic.
VPC Flow Logs
Capture information about network traffic: VPC Flow Logs, Subnet Flow Logs & Elastic Network Interface Flow Logs
DHCP Options Sets
Dynamic Host Configuration Protocol (DHCP) provides a standard for passing configuration information to hosts on a TCP/IP network.
You can assign your own domain name to your instances, and use up to four of your own DNS servers by specifying a special set of DHCP options to use with the VPC.
Creating a VPC automatically creates a set of DHCP options, which are domain-name-servers=AmazonProvidedDNS, and domain-name=domain-name-for-your-region, and associates them with the VPC.
DNS
AWS provides instances launched in a default VPC with public and private DNS hostnames that correspond to the public IPv4 and private IPv4 addresses for the instance.
AWS provides instances launched in a non-default VPC with a private DNS hostname and possibly a public DNS hostname, depending on the DNS attributes you specify for the VPC and if your instance has a public IPv4 address.
From the Settings, click on “Create Volume.”
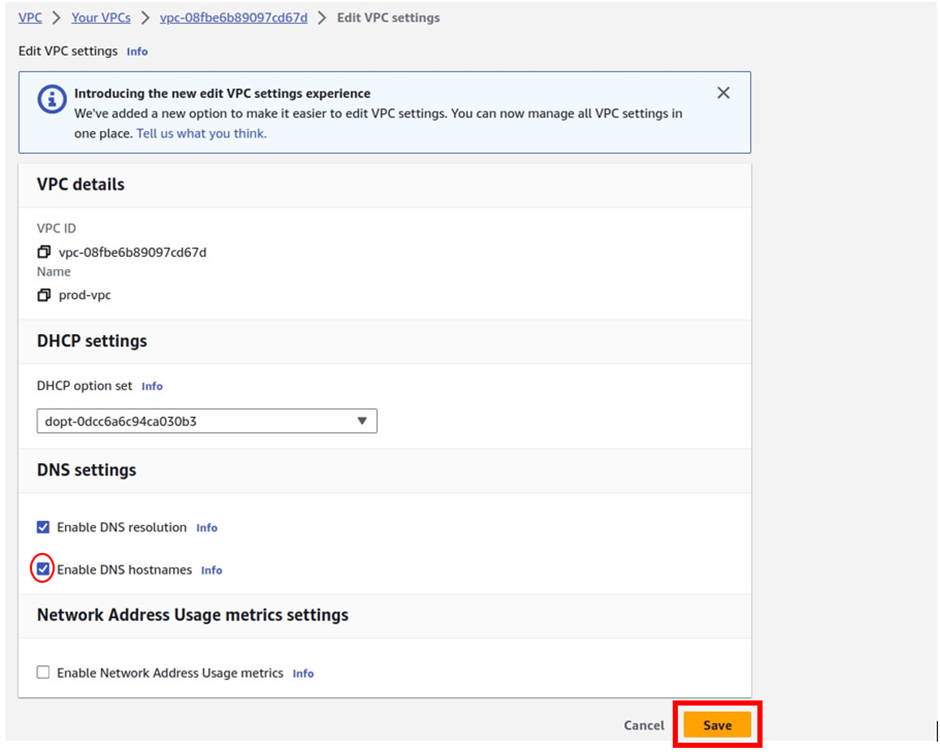
Set VPC attributes enableDnsHostnames and enableDnsSupport to true so that your instances receive a public DNS hostname and the Amazon-provided DNS server can resolve Amazon-provided private DNS hostnames.
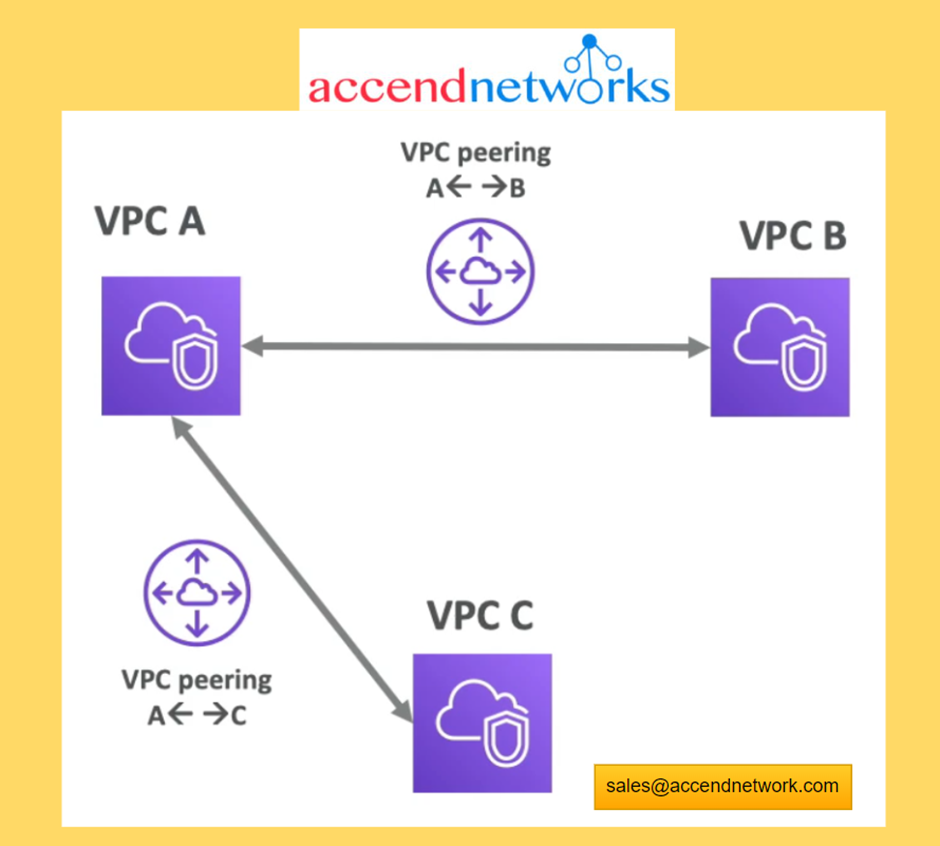
VPC Peering
Connect two VPC’s privately using the AWS network
Make them behave as if the two VPC’s are in the same network.
We do this by setting up a VPC peering connection between them.
The two VPC’s must not have overlapping CIDR (IP address range)
VPC Peering is not transitive. If we have a peering connection between (VPC A and VPC B) and (VPC A and VPC C) this does not mean that VPC C can communicate with VPC B (this means there is no transitivity)
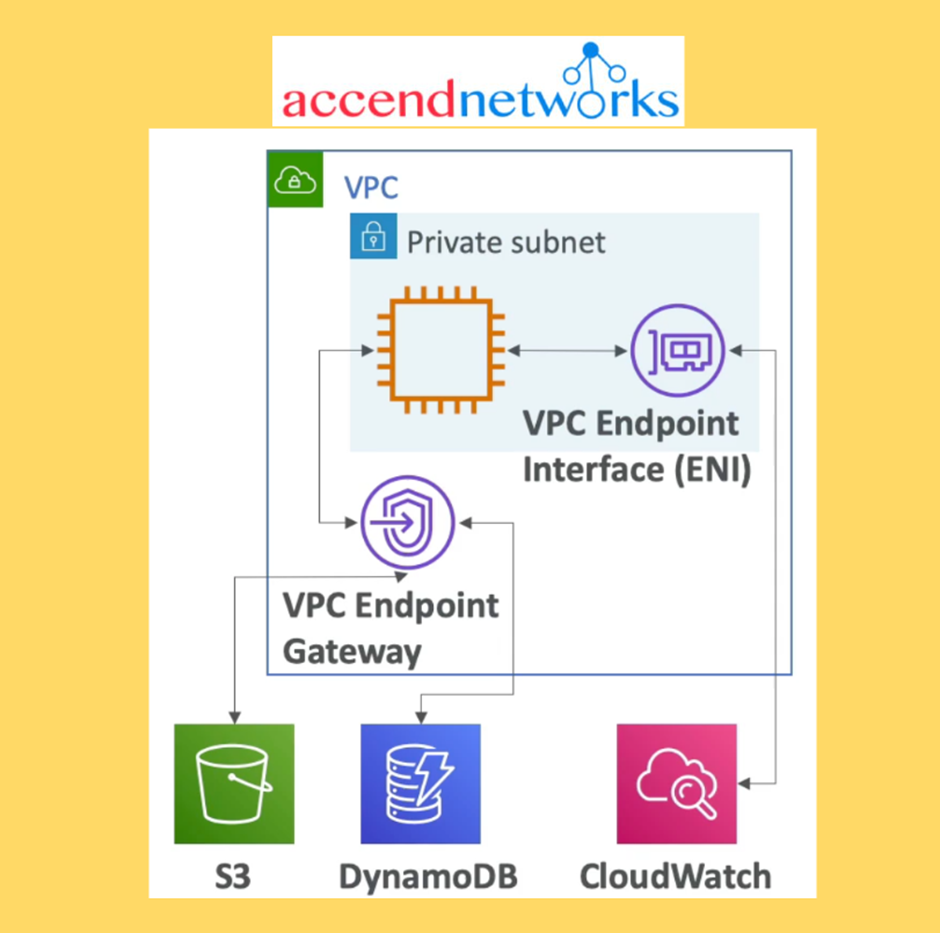
VPC Endpoints
Use when you need private access from within your VPC to an AWS services
Endpoints allow you to connect to AWS services using a private network instead of the public network.
This gives you increased security and lower latency to access AWS services
Use VPC Endpoint Gateway for S3 and DynamoDB. Only these two services have a VPC Gateway Endpoint (remember all the other ones have an Interface endpoint (powered by Private Link — means a private IP).
Use VPC Endpoint Interface for the rest of the services
Site to Site VPN & Direct Connect
Site-to-Site VPN: On-premise VPN to AWS over the public internet. The connection is automatically encrypted
Direct Connect (DX): Establish a private secure and fast physical connection between on-premise and AWS
Stay tuned for more.
If you have any questions concerning this article or have an AWS project that requires our assistance, please reach out to us by leaving a comment below or email us at. sales@accendnetworks.com
Thank you!
In the ever-evolving landscape of data-driven applications, performance is a critical factor that can make or break user experiences. Database management plays a pivotal role in this scenario, and one effective strategy for enhancing performance is the use of read replicas. If your database server goes down or is incredibly choked due to high volume and starts grinding to a halt, it doesn’t really matter if your application servers are still up — they wouldn’t be able to do useful things for your user without talking to the database server.
The Cloud gives us a really easy way to scale database compute capacity and resilience: the Read Replica!
A read replica is a read-only copy of a DB instance. You can reduce the load on your primary DB instance by routing queries from your applications to the read replica. In this way, you can elastically scale out beyond the capacity constraints of a single DB instance for read-heavy database workloads.

In AWS, Amazon Relational Database Service (RDS) allows you to create read replicas of your primary DB instance with basically zero effort. RDS uses asynchronous replication to keep the read replicas up-to-date with the master. The specific replication technology used varies, depending on what database engine your primary DB uses (e.g., MySQL, Oracle, PostgreSQL, etc)
Read replicas have distinct endpoints, different from the primary DB instance. Your application will have to be configured to connect to the correct endpoint (primary vs read replica), depending on what it needs to do. That means read-write workloads are directed to the primary DB endpoint, while your read-only workloads (e.g., dashboards and report generation) are directed to the read replica.
Read replicas are not free — they are priced just like a primary instance. If your read replica is the same size as your primary instance, then it would cost the same. If it is larger or smaller (read replicas don’t need to be exactly the same size as the primary DB instance), then the pricing adjusts as you would expect.
OK, So What’s a Read Replica Good For?
The primary benefit of a read replica is making your database more performant. Since a read replica is effectively a duplicate server, you get that extra compute capacity for your database needs.
And it’s not just that you get twice the computing power — it’s how you get it.
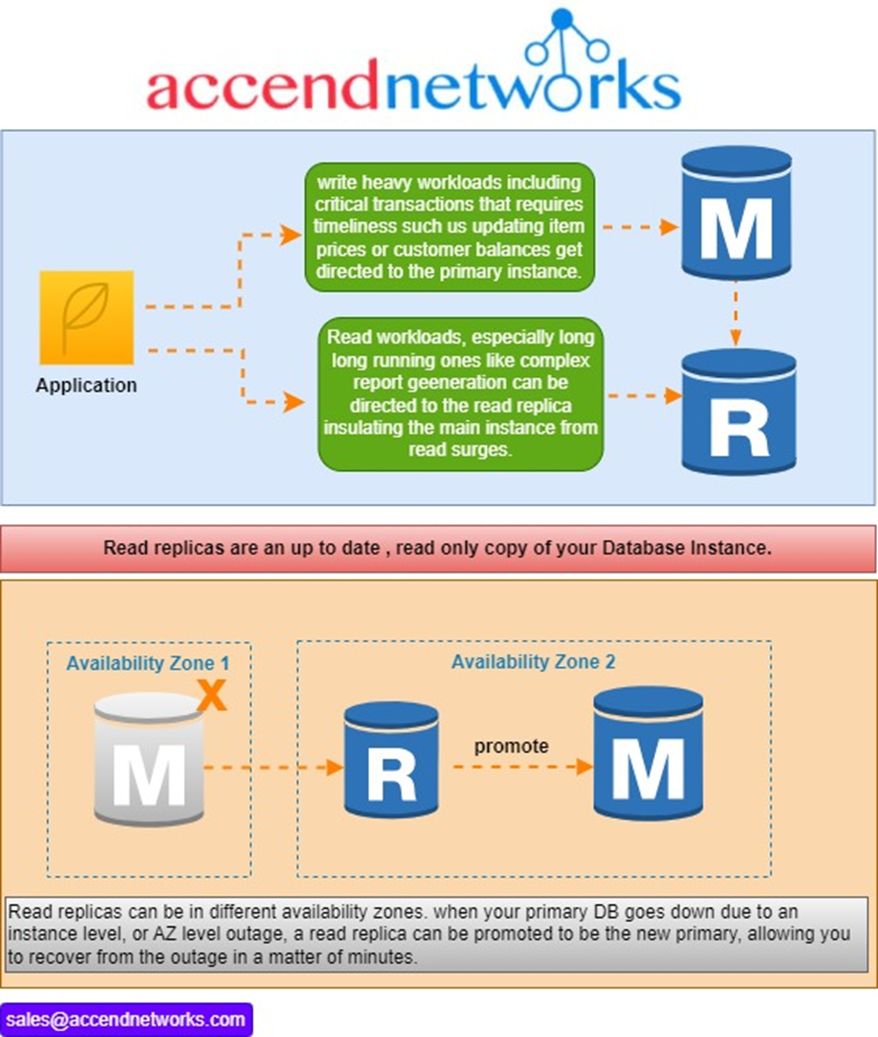
If you doubled the size of your primary DB instance, instead of adding a read replica to it, sure, you’d get equivalent total specs. But with the read replica setup, you can effectively partition your workloads so that heavy read processing can’t bog down your critical transaction processing. If you merely doubled the size of the primary DB instance, a surge of heavy report generation and dashboarding could suddenly slow down the entire DB instance and affect other areas of your application.
And that’s not all! Read replicas also give you an availability improvement. If you wanted Availability Zone (AZ)-level high availability, you could place your read replica in a different AZ from your primary DB instance. When your primary DB goes down, whether just an instance problem or a legitimate AZ-level service disruption, your read replica can be promoted to be a standalone DB, becoming the new primary DB instance. This takes only minutes — a lot faster than if you had to manually create a new primary DB instance from scratch using a backup.
When you create a read replica, you first specify an existing DB instance as the source. Then Amazon RDS takes a snapshot of the source instance and creates a read-only instance from the snapshot. Amazon RDS then uses the asynchronous replication method for the DB engine to update the read replica whenever there is a change to the primary DB instance.
The read replica operates as a DB instance that allows only read-only connections. An exception is the RDS for the Oracle DB engine, which supports replica databases in mounted mode. A mounted replica doesn’t accept user connections and so can’t serve a read-only workload. The primary use for mounted replicas is cross-region disaster recovery. For more information, see Working with Read Replicas for Amazon RDS for Oracle.
Applications connect to a read replica just as they do to any DB instance. Amazon RDS replicates all databases from the source DB instance
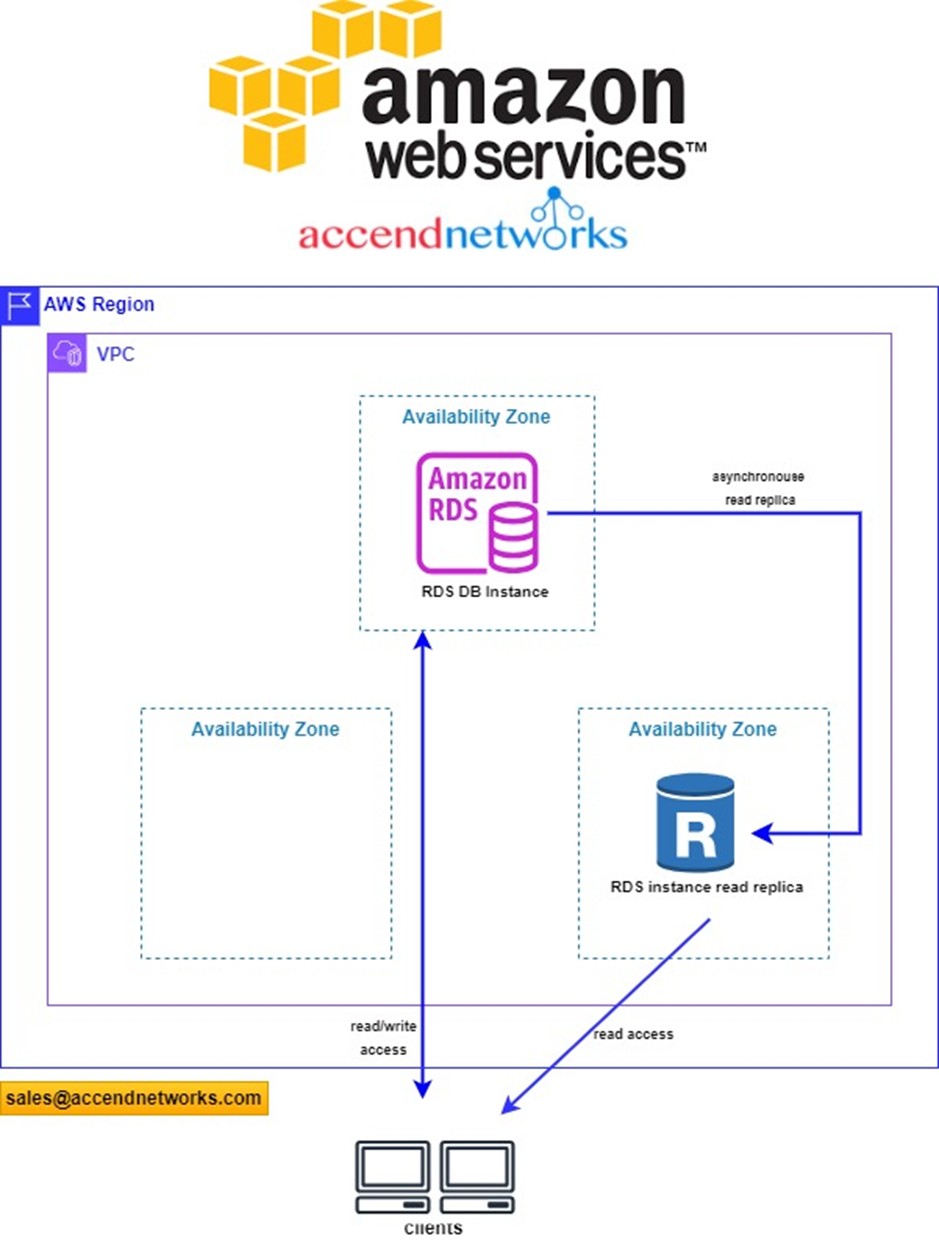
You can configure a read replica for a DB instance that also has a standby replica configured for high availability in a multi-AZ deployment. Replication with the standby replica is synchronous. Unlike a read replica, a standby replica can’t serve read traffic.
In the following scenario, clients have read/write access to a primary DB instance in one AZ. The primary instance copies update asynchronously to a read replica in a second AZ and also copies them synchronously to a standby replica in a third AZ. Clients have read access only to the read replica.
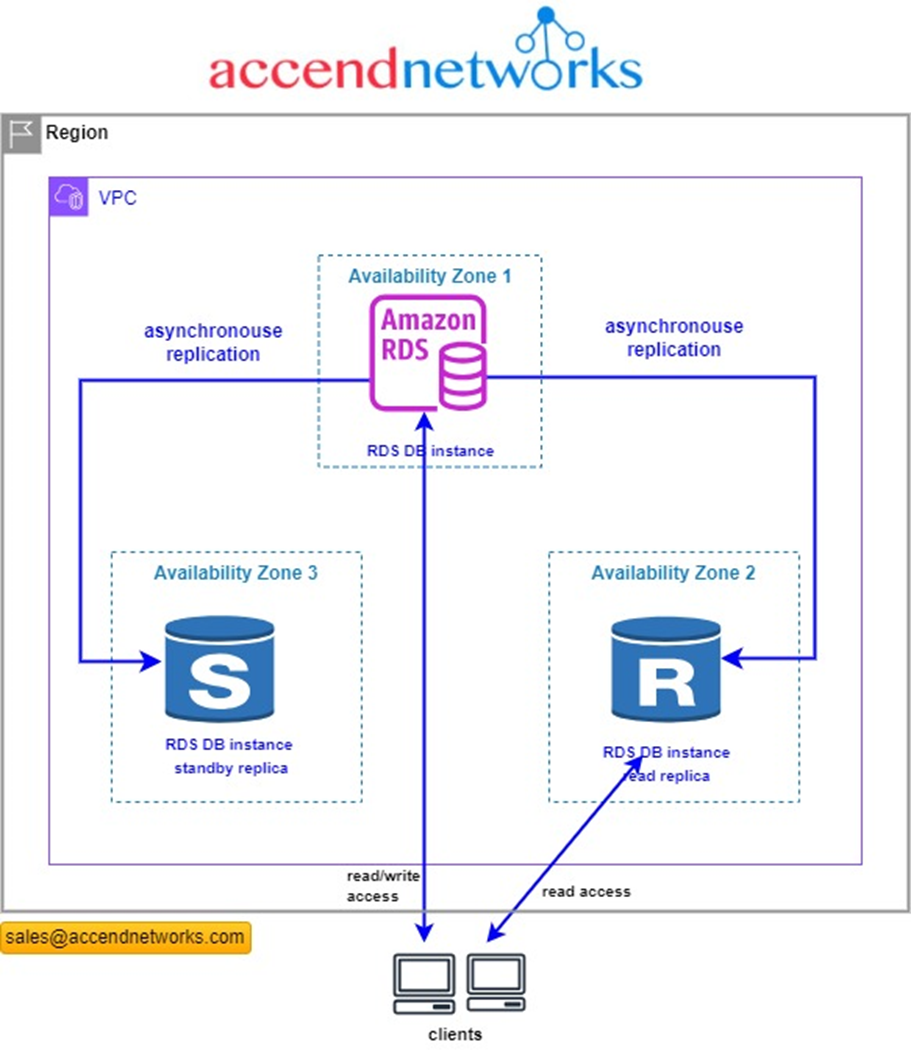
For more information about high availability and standby replicas, see Configuring and managing a Multi-AZ deployment.
In some cases, a read replica resides in a different AWS Region from its primary DB instance. In these cases, Amazon RDS sets up a secure communications channel between the primary DB instance and the read replica. Amazon RDS establishes any AWS security configurations needed to enable the secure channel, such as adding security group entries.
Some commendable features of the Read Replicas:
Let us go through the steps involved in creating a read replica.
Note: As we all know, the concept of replicas is useful for huge organizations as they have a large database to work with. Thus, AWS has not allotted this facility for free tier accounts as we individuals do not need this service.
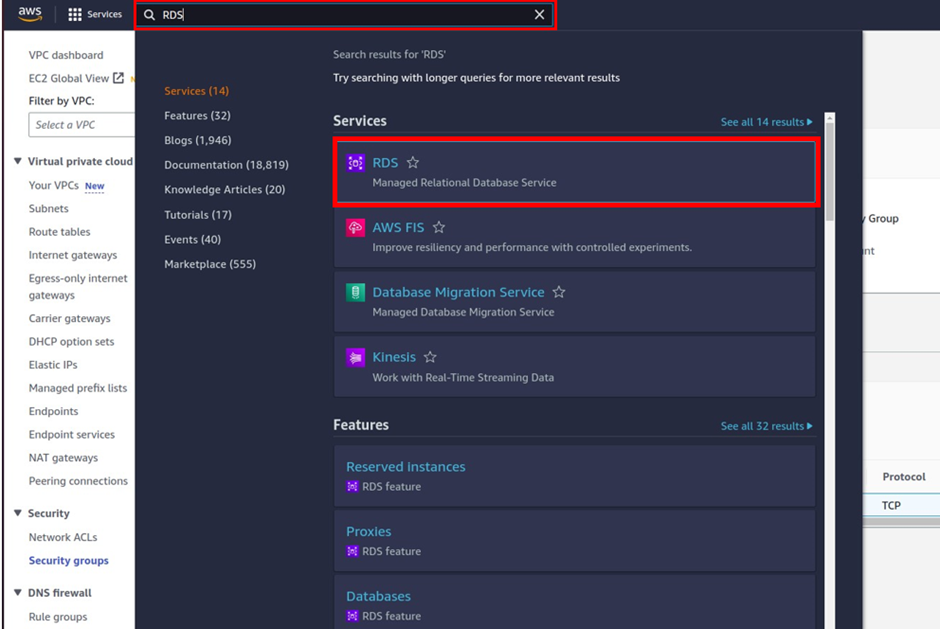
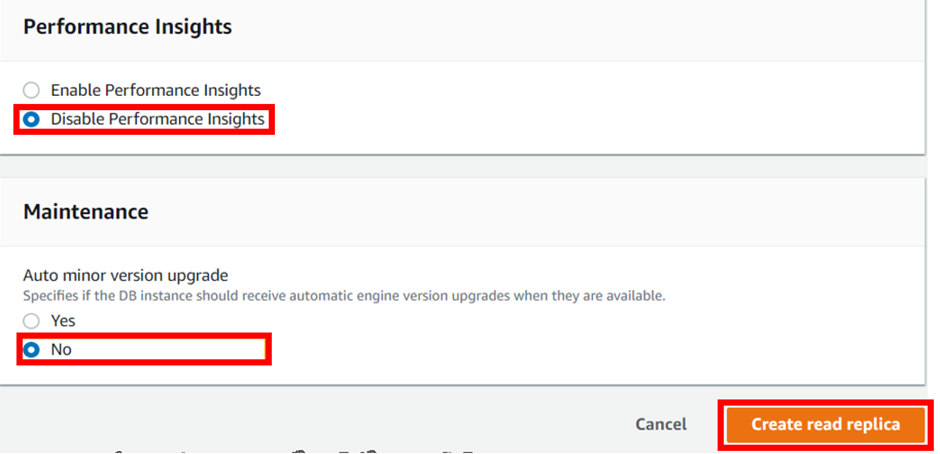
Login into your AWS account, in the search box type RDS then select RDS under service.
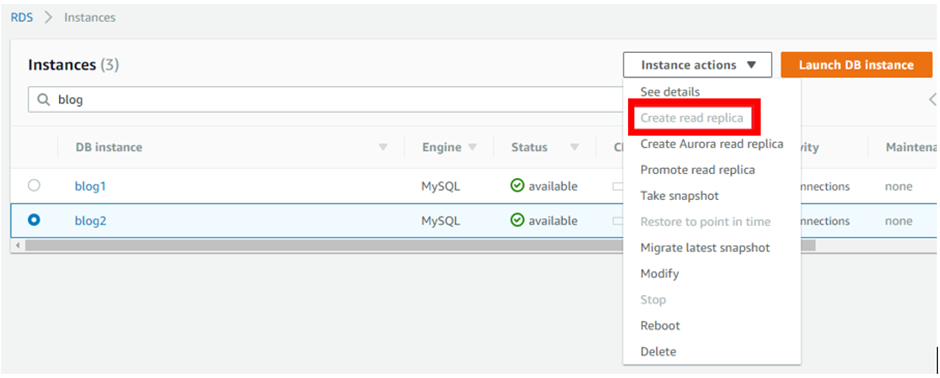
Select the database you want to make read replicas of. From “Actions” choose “Read Replicas”.
In the create-read replica DB instance dashboard, align all the configurations as per your requirements.
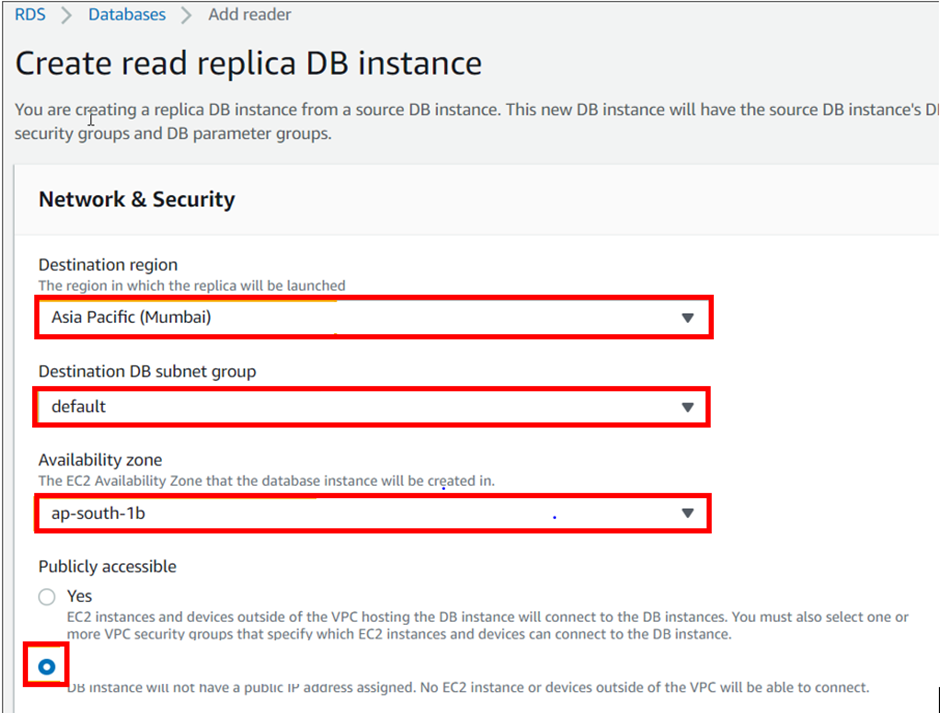
When you find everything appropriately configured as per the needs. Click on “Create Read Replica”.
Make sure to pull everything down, to avoid surprise bills.
If you have any questions concerning this article or have an AWS project that requires our assistance, please reach out to us by leaving a comment below or email us at. sales@accendnetworks.com
Thank you!
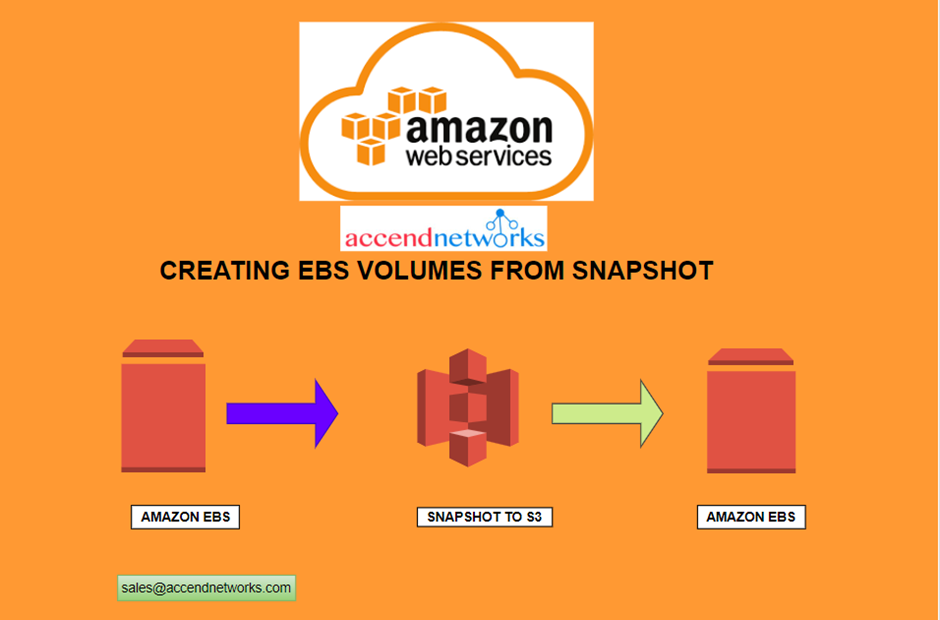
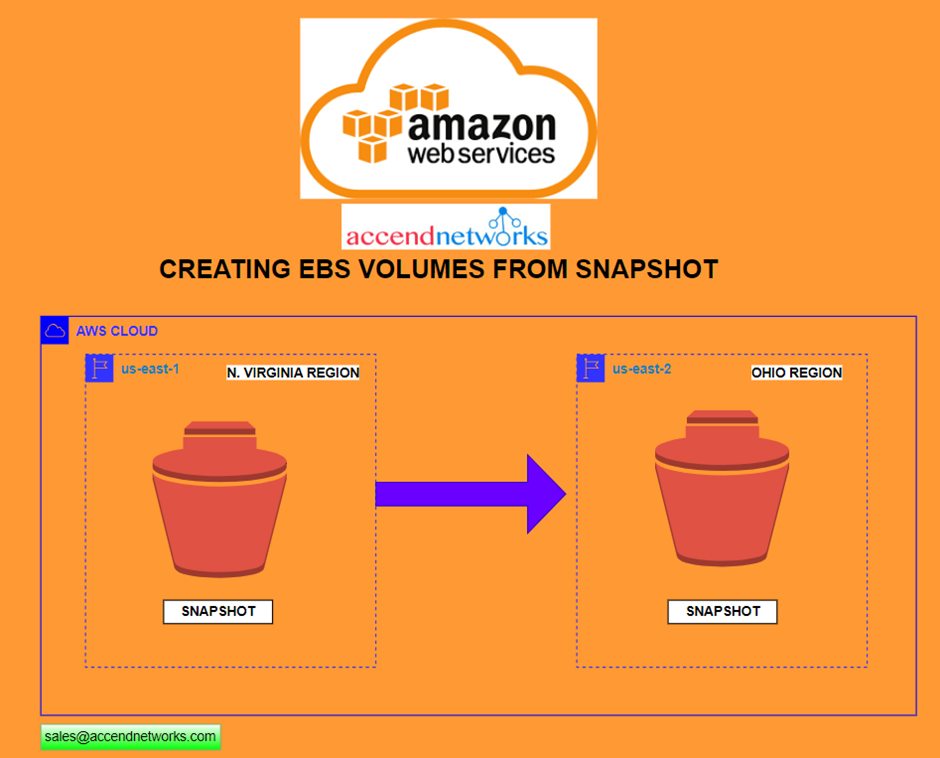
Embarking on a cloud-driven journey requires not only innovation but also the ability to seamlessly manage and transfer data across diverse landscapes. Today, we explore a pivotal aspect of this journey — the art of creating EBS volumes from snapshots and orchestrating the seamless transfer of snapshots between AWS regions.
To back up the data in your EBS volumes, Amazon has developed EBS snapshots. This disaster recovery solution works by copying your EBS volumes at specific points in time. Should disaster strike, you can restore your data from the latest snapshot.
EBS snapshots work as an incremental storage system that captures and stores each moment-in-time snapshot of your EBS volume. All snapshots are stored in Amazon Simple Storage Service (S3). The next time a snapshot is taken, only data that was not included in the previous snapshot will be stored.
EBS snapshots can thus be used to track how your EBS volumes have changed over time, whether a new volume was created or an old volume modified.
The main advantages of using AWS’ EBS snapshots are:
An EBS Snapshot is nothing more than a backup of an EBS Volume. It can’t be attached to an instance, the user can’t read any data from it, and it’s not possible to utilize it for anything but creating other EBS Snapshots or EBS Volumes. Therefore, the key step in this equation is creating an EBS Volume from an EBS Snapshot. This is what we’re going to cover in this blog.
Prerequisites
A basic knowledge of EBS Volumes. You can follow our previous post on EBS volumes.
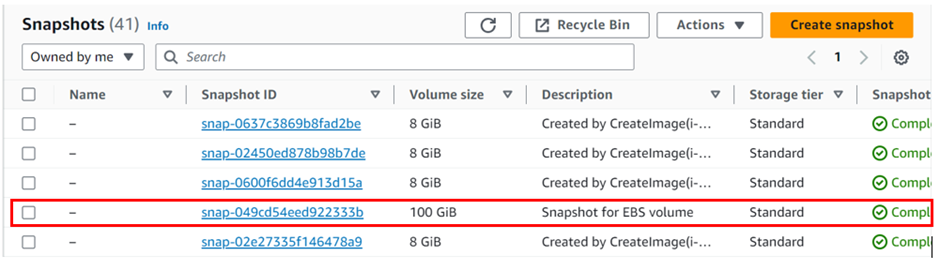
Select an EBS Snapshot and create a Volume
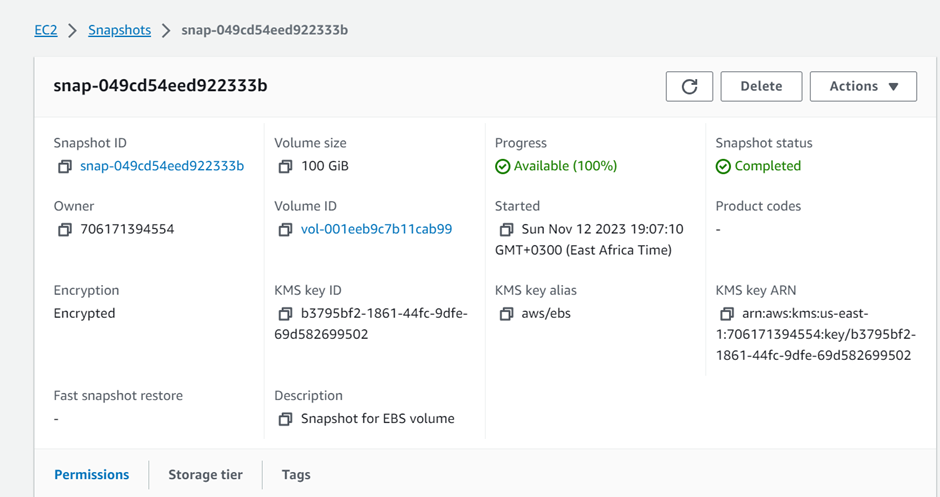
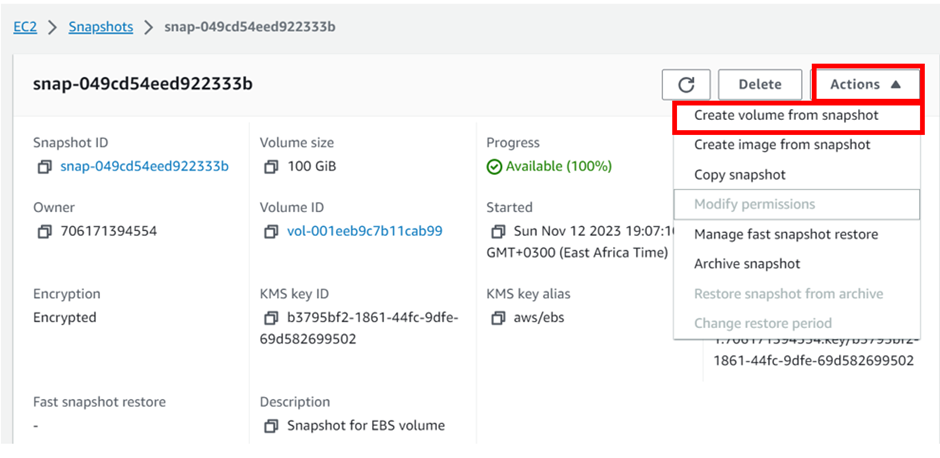
From the EC2 Dashboard, click on “Snapshots.” From the list of EBS Snapshots, choose the desired snapshot, click on
From the top menu, click on “Actions.” then click Create volume from snapshot.
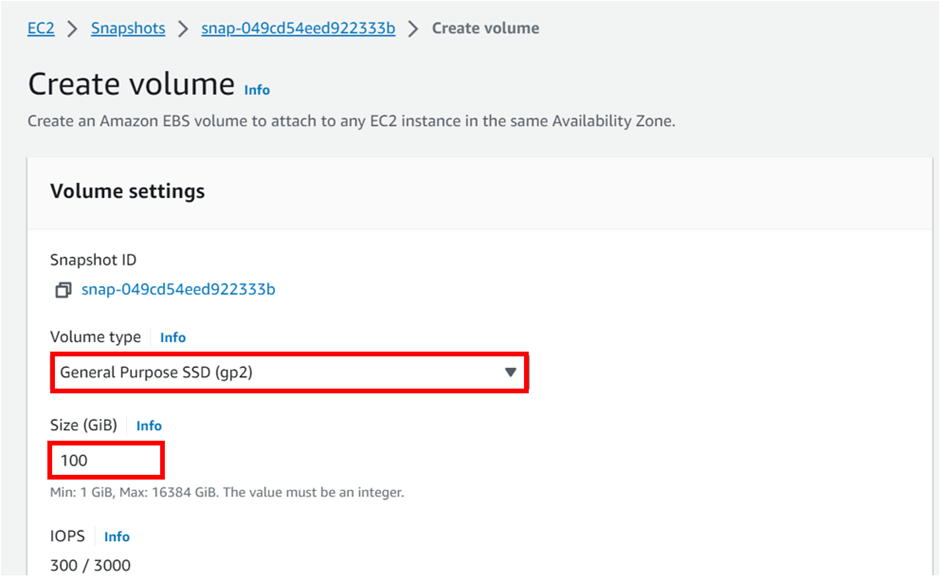
You will be brought to a new page to confirm the parameters of the new volume.
Confirm EBS Volume Parameters & Confirm Deployment
Note that during the volume creation process, you’ll encounter the same parameters we’ve covered in the main EBS — Elastic Block blog. If you’re uncertain about any of them, make sure to refer to that page.
From the Settings, confirm the “Snapshot ID.”
From the Settings, select the “Volume type.”
From the Settings, input the “Size.”
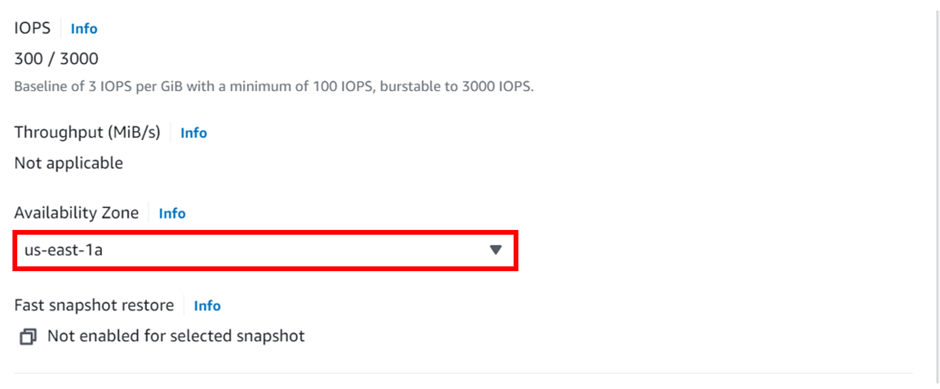
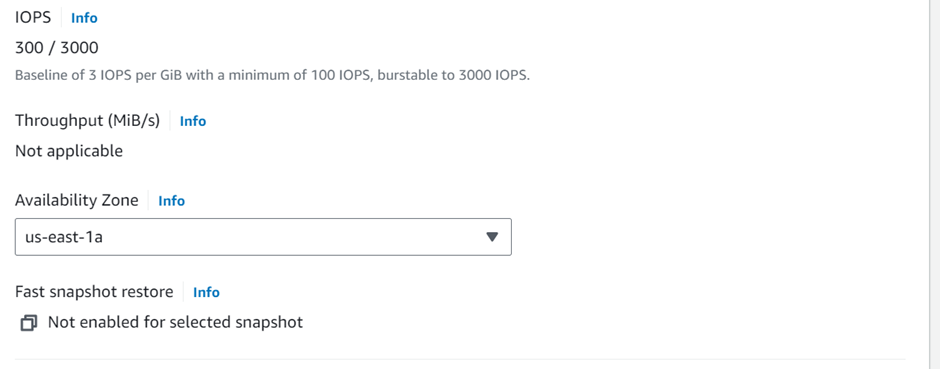
2.4 — From the Settings, select the “IOPS.”
Note: depending on the “Volume type,” this option may not be available, as shown in the example.
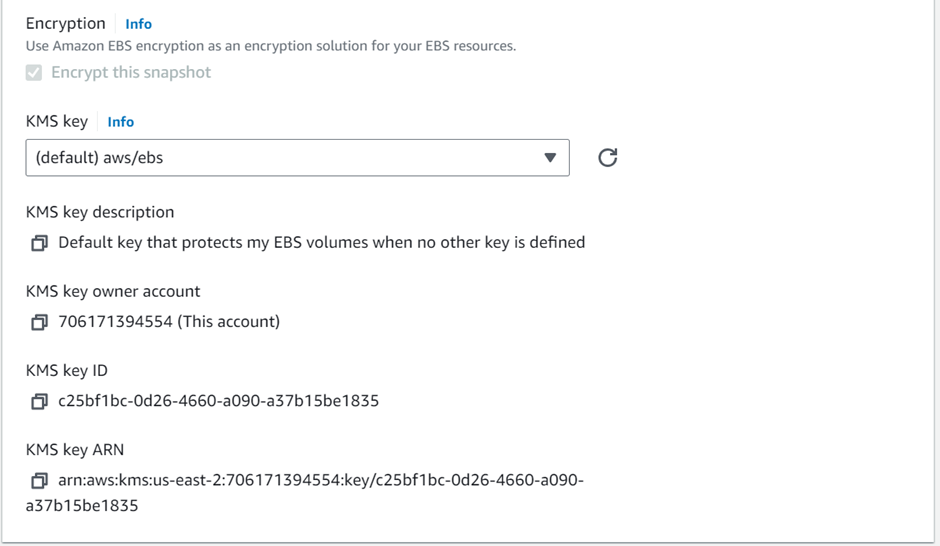
Remember our snapshot was encrypted with the default encryption, so our volume from the snapshot will be automatically encrypted.
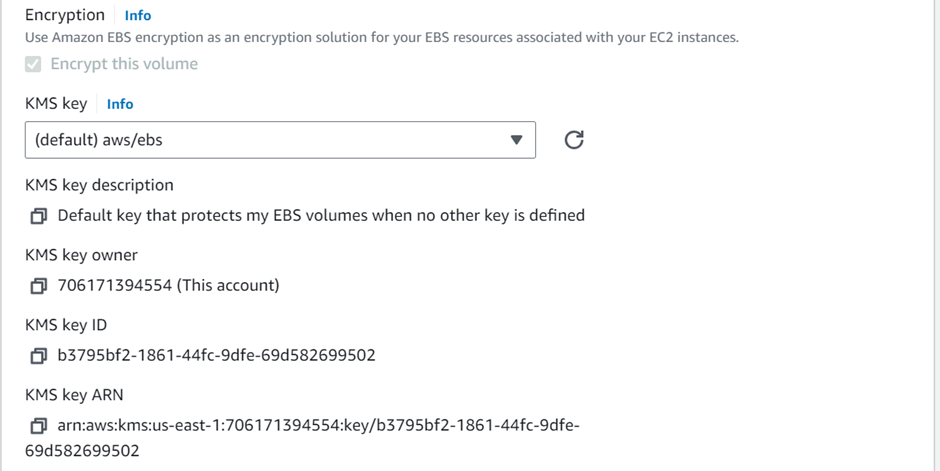
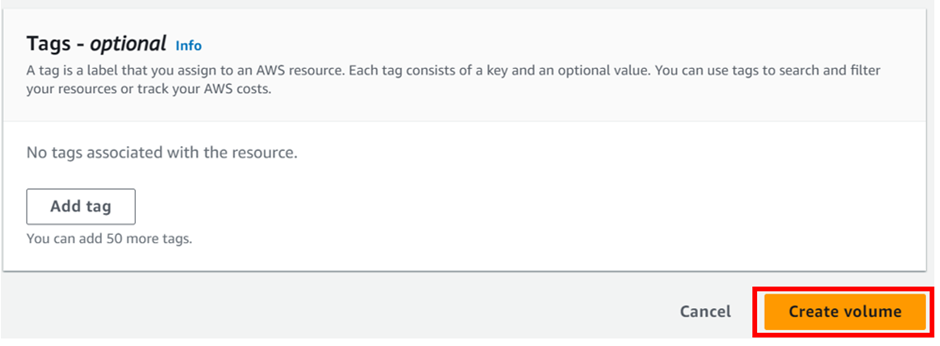
From the Settings, click on “Create Volume.”
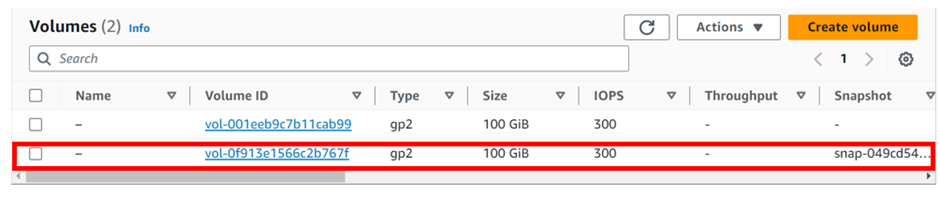
You’ll receive a confirmation that a volume has been created. If you navigate to the EBS > Volumes tab, you’ll notice that you now have a volume that is tagged with the ID of the snapshot we’ve just utilized.
The snapshot can’t be utilized by any application or service. To attach the data/storage to an EC2 instance, it must be in the form of an EBS Volume. In this article, we’ve taken a snapshot and walked through the steps of creating an EBS Volume from it.
Remember we have created this EBS volume in the same availability zone, but on the same note we would create this EBS volume from the snapshot in a different availability zone, this is very simple, under availability zone you would simply select the availability zone where you would want to create the snapshot.
EBS Volumes are created inside of a specific AZ. It isn’t possible to move an EBS Volume from one AZ to another directly. An EBS Snapshot will create a backup of an EBS Volume at the time of inception.
An EBS Snapshot can be used to create an EBS Volume in a different Availability Zone.
Initial State
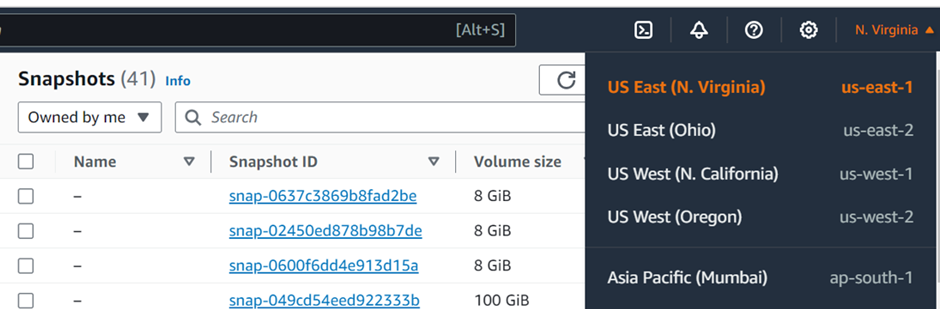
we’re looking at the EBS Snapshots page in the US-east-1 region — we can clearly see that we have EBS Snapshot in this region.
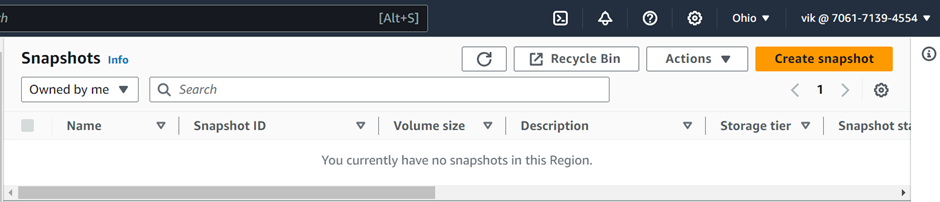
When we come to the Ohio region, Us-eat-2 we can see we have no snapshots there.
Creating a Copy of an EBS Snapshot into a Different Availability Zone
Select an EBS Snapshot & Copy
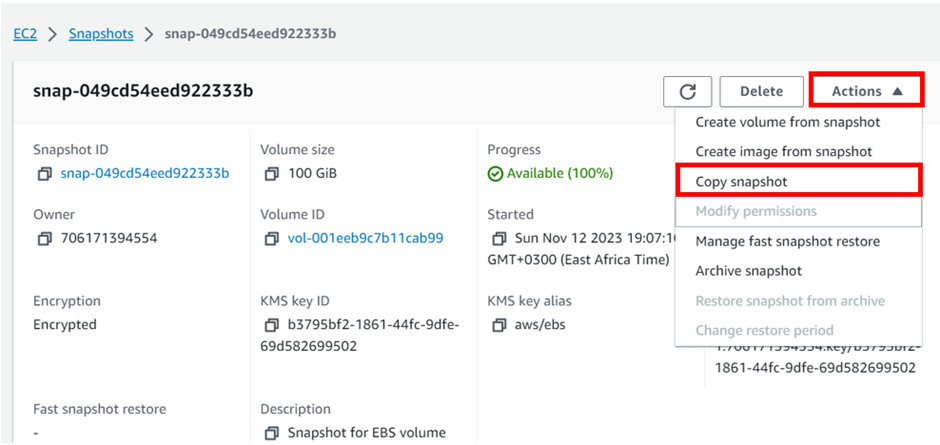
From the list of EBS Snapshots, choose the desired snapshot, I will choose the snapshot I just created. click on it.
From the top menu, click on “Actions.”
From the drop-down menu, click on “Copy snapshot.”
You will be brought to a new page to confirm the parameters of the new snapshot.
Configure Snapshot & Confirm Copy
From the Settings, choose the desired Availability Zone, for this tutorial, we’re using us-east-2.
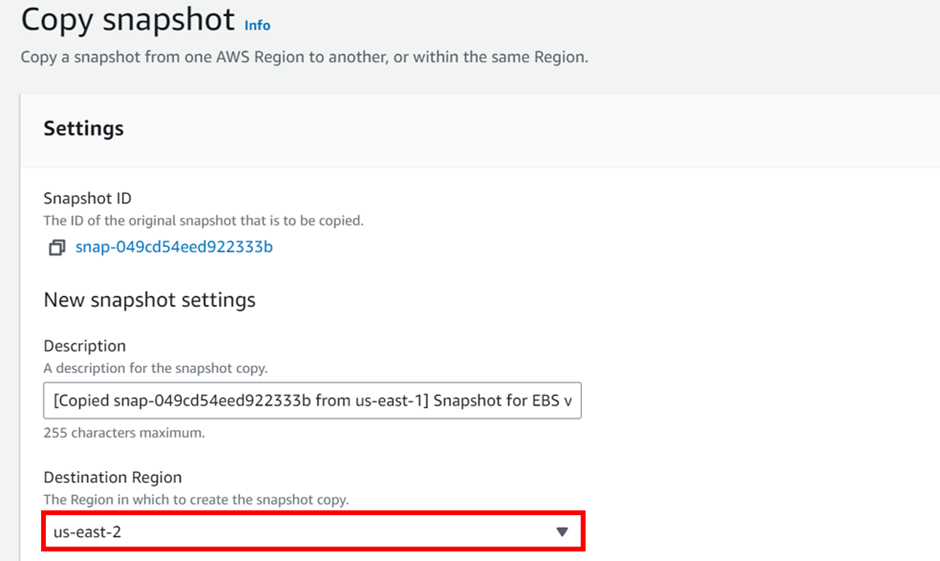
On the bottom of the page, click on “Copy snapshot.”
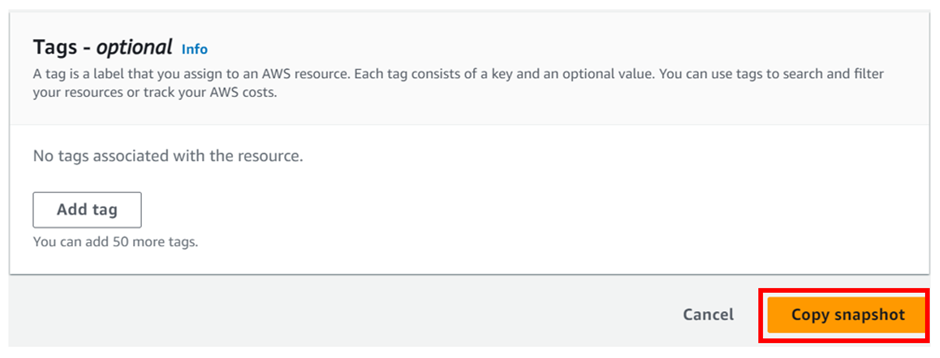
You’ll receive a confirmation that a snapshot has been created. If you navigate to the target region (In this case us-east-2) you’ll see that there’s a new entry with the snapshot
Conclusion on Copying EBS Snapshots between Availability Zones
In this blog, we’ve covered why you might want to copy an EBS Snapshot from one Availability Zone to another. We’ve also covered the exact steps to take and showcased a move from us-east-1 to us-east-2.
Pull down and stay tuned for more.
If you have any questions concerning this article or have an AWS project that requires our assistance, please reach out to us by leaving a comment below or email us at. sales@accendnetworks.com
Thank you!