Accend Networks San Francisco Bay Area Full Service IT Consulting Company

Categories
Blogs

Deployment of SDDC using VMware Cloud on AWS Services
Deployment of SDDC using VMware Cloud on AWS Services

VMware Cloud on AWS brings VMware’s enterprise-class Software-Defined Data Center (SDDC) software to the AWS Cloud and enables customers to run production applications across VMware vSphere-based private, public, and hybrid cloud environments with optimized access to AWS.

Benefits of VMware Cloud on AWS

Often enterprises are given a binary choice between private and public cloud as their deployment options. In these cases, many enterprises have a hybrid environment where two different teams manage two separate hosting platforms. VMware Cloud on AWS offers a hybrid platform where IT organizations have access to both public and private while retaining the ability to shift workloads seamlessly between them. Being able to live migrate and extend into a virtual machine without having to reconfigure an application provides a much more flexible environment.

VMware Cloud on AWS allows access to the range of AWS services as an extension of an existing VMware solution. IT organizations can rent a VMware SDDC using some of the latest technologies with the flexibility of the pay-as-you-go model. Companies can quickly add capacity to a new project or move workloads hosted on dedicated hardware to the cloud.

Prerequisites and Limitations for VMWare Cloud on AWS

The following are some prerequisites that you will need to consider before deploying VMware Cloud on AWS:

MyVMware Account: This profile will need to be completely filled out before you can even start your initial deployment.

AWS Account: This account needs to have administrative privileges for some of the reasons in deployment.

Activation Link: This link will be sent to the email address correlated with your MyVMware profile.

VMC on AWS offers many capabilities that have some limitations at maximum and minimum levels, and these limits are considered hard limits (can’t be changed) unless otherwise indicated.

The Architecture of VMware Cloud on AWS

VMware Cloud on AWS is based on VMware software stack such as vSphere, vCenter, vSAN, NSX-T, designed to run on AWS bare-metal dedicated infrastructure. It enables businesses to manage VMware-based resources and tools on AWS with seamless integration with other Amazon services such as Amazon EC2, Amazon S3, Amazon Redshift, Amazon Direct Connect, Amazon RDS, and Amazon DynamoDB.
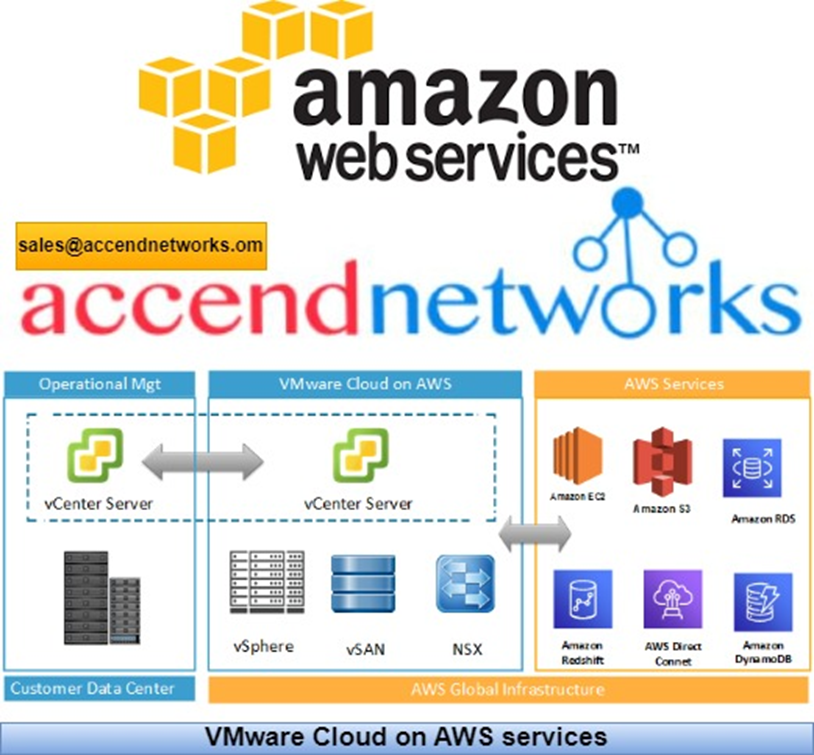
VMware Cloud on AWS allows you to create vSphere data centers on Amazon Web Services. These vSphere data centers include vCenter Server for managing your data center, vSAN for storage, and VMware NSX for networking. Using Hybrid Linked Mode, you can connect an on-premises data center to your cloud SDDC and manage both from a single vSphere Client interface. With your connected AWS account, you can access AWS services such as EC2 and S3 from virtual machines in your SDDC.

Organizations that adopt VMware Cloud on AWS will see these benefits:

· A broad set of AWS services and infrastructure elasticity for VMware SDDC environments.

· Flexibility to strategically choose where to run applications based on business needs.

· Proven capabilities of VMware SDDC software and AWS Cloud to deliver customer value.

· Seamless, fast, and bi-directional workload portability between private and public clouds.
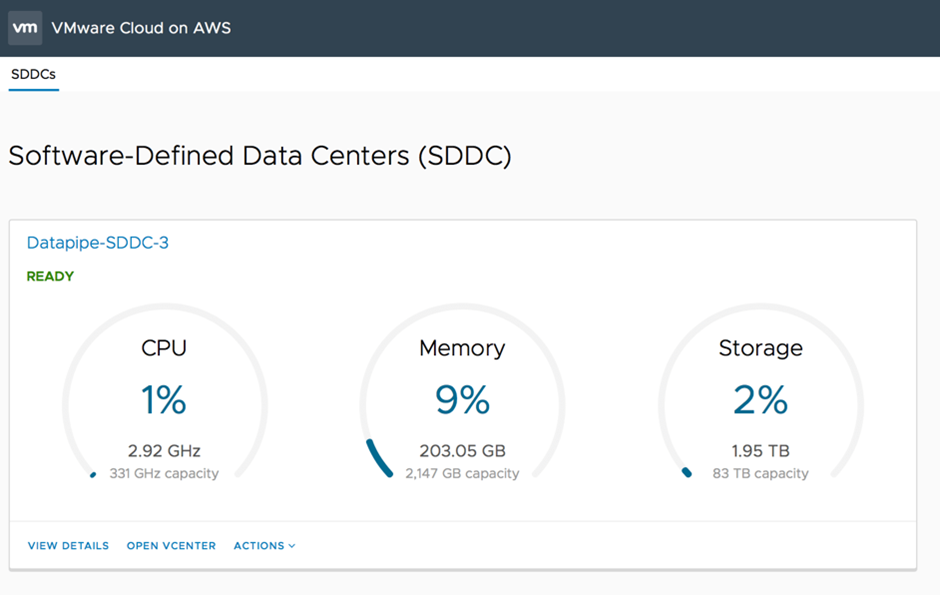
When you deploy an SDDC on VMware Cloud on AWS, it’s created within an AWS account and VPC dedicated to your organization. The Management Gateway is an NSX Edge Security gateway that provides connectivity to the vCenter Server and NSX Manager running in the SDDC. The internet-facing IP address is assigned from a pool of AWS public IP addresses during SDDC creation. The Compute Gateway provides connectivity for VMs, and VMware Cloud on AWS creates a logical network to provide networking capability for these VMs. A connection to an AWS account is required, and you need to select a VPC and subnet within that account. You can only connect an SDDC to a single Amazon VPC, and an SDDC has a minimum of four hosts.

Steps before SDDC Deployment in VMware Cloud on AWS

Creating a New VPC

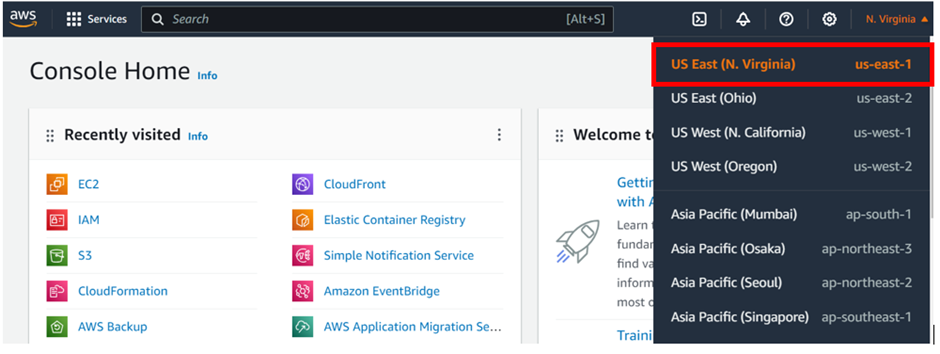
Choose the correct region to deploy your VMware Cloud on AWS SDDC.
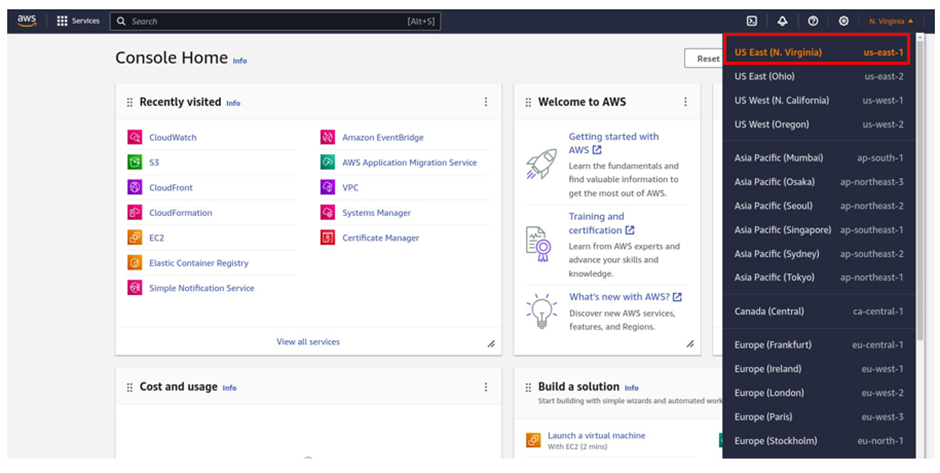
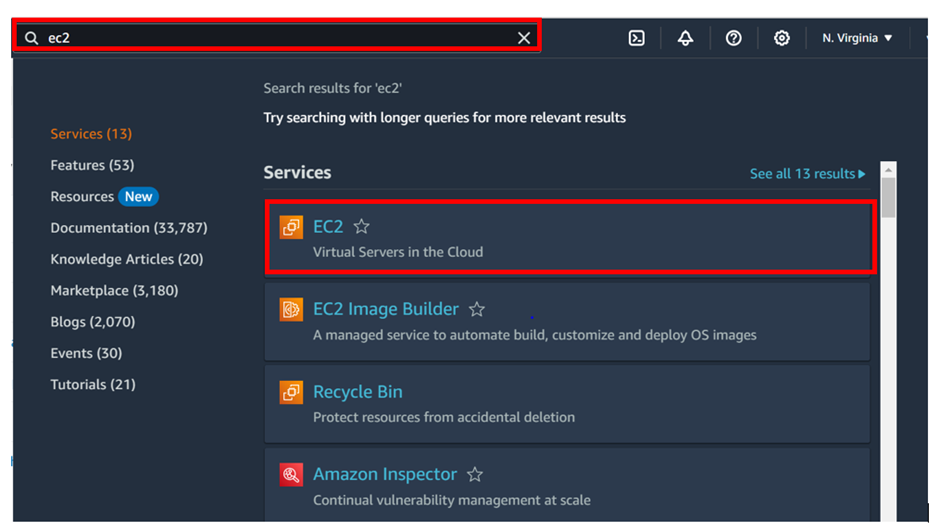
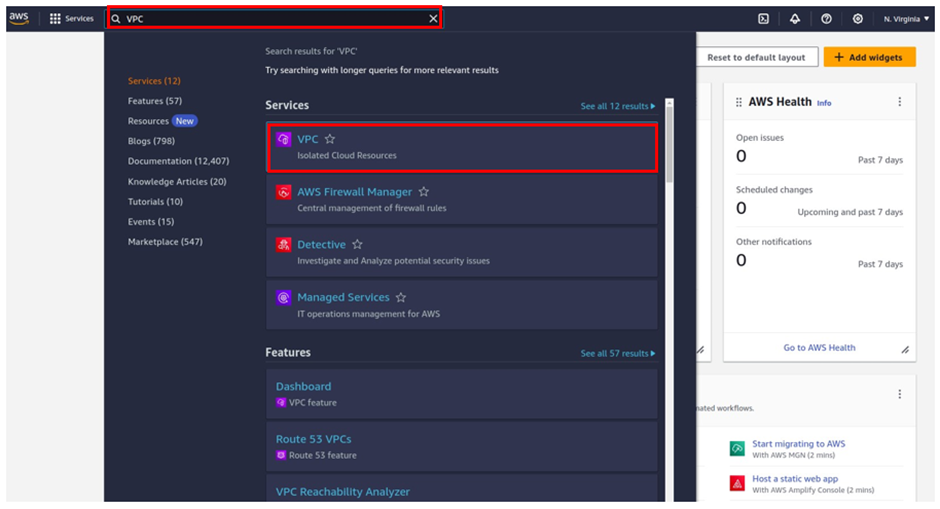
Straight away in the search box type VPC, then select VPC under services.
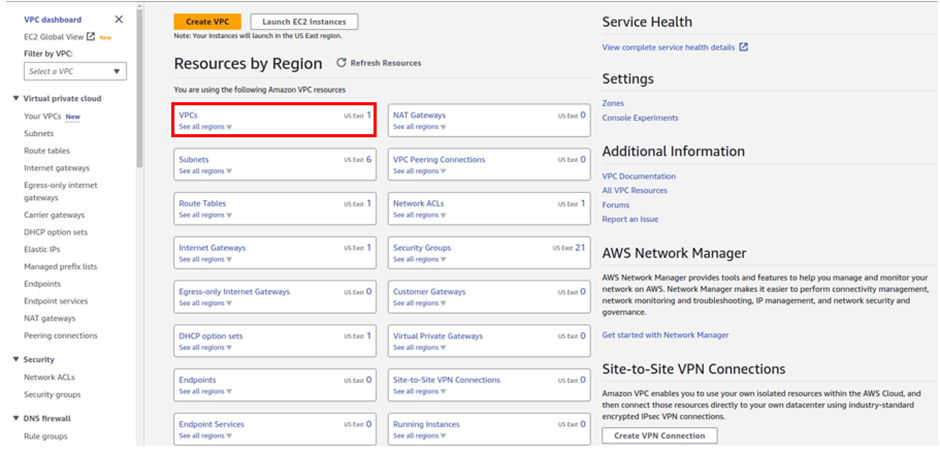
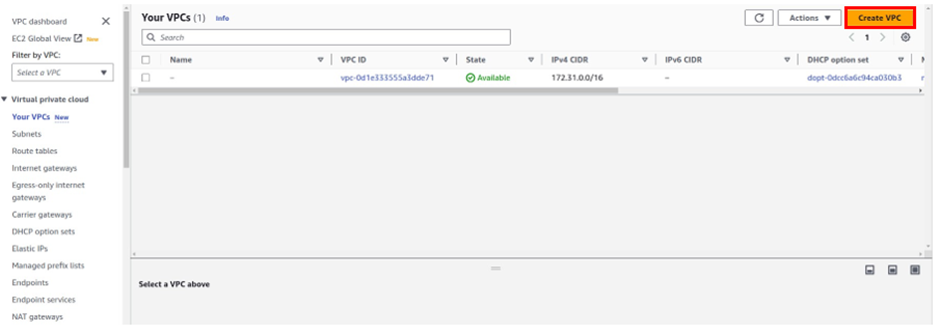
once in the VPC dashboard, select VPC’s then click Create VPC.
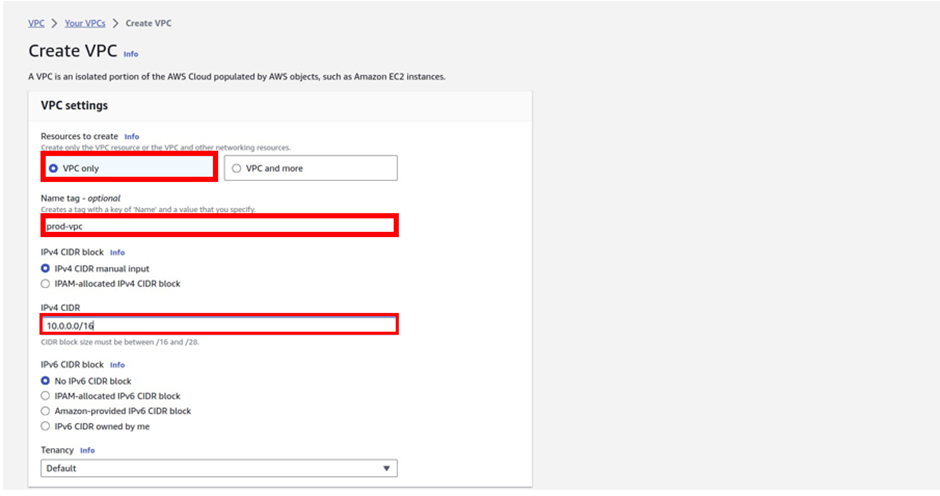
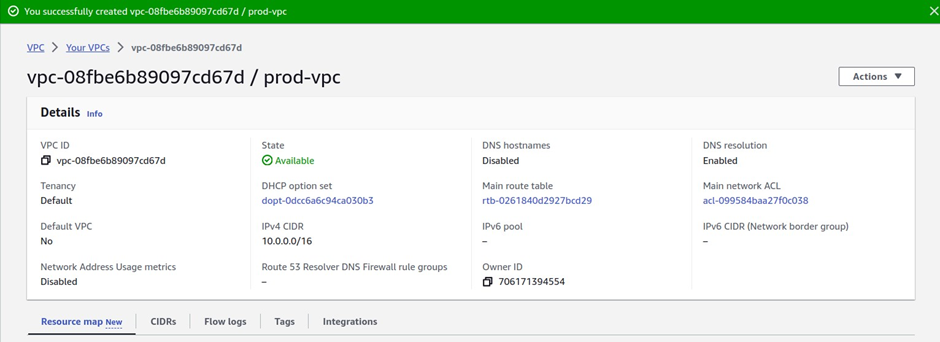
Enter the VPC details such as Name tag, IPv4 CIDR block, Tenancy as Default, and click Create.
There we go, we have successfully created VPC, click close.
Creating a Private Subnet

You will now create a private subnet

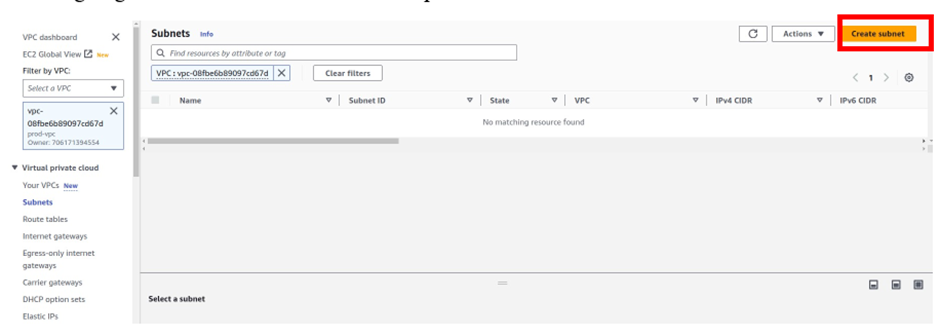
Open the Amazon VPC console, and select Subnets.

Select Create Subnet.
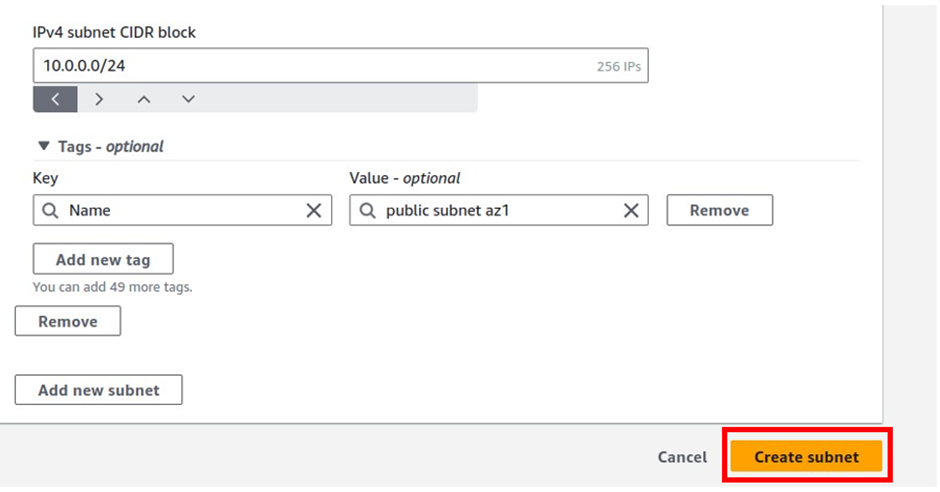
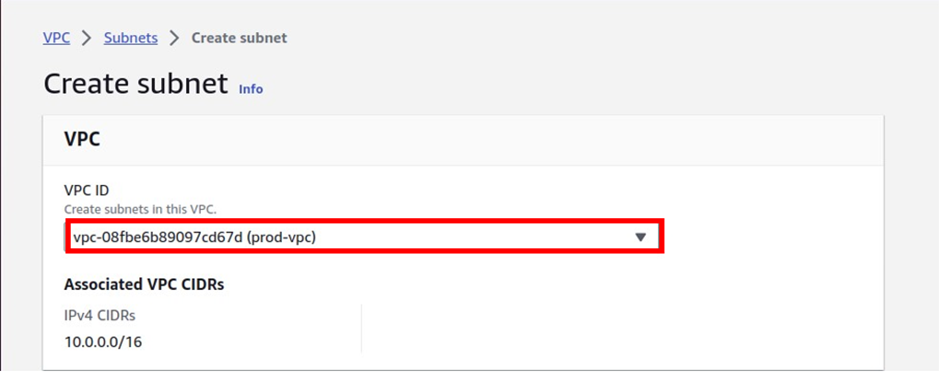
In the Create Subnet dashboard, select the VPC to create the subnet then provide, a Name tag, select the desired Availability Zone, IPv4 CIDR block, and click on Create.
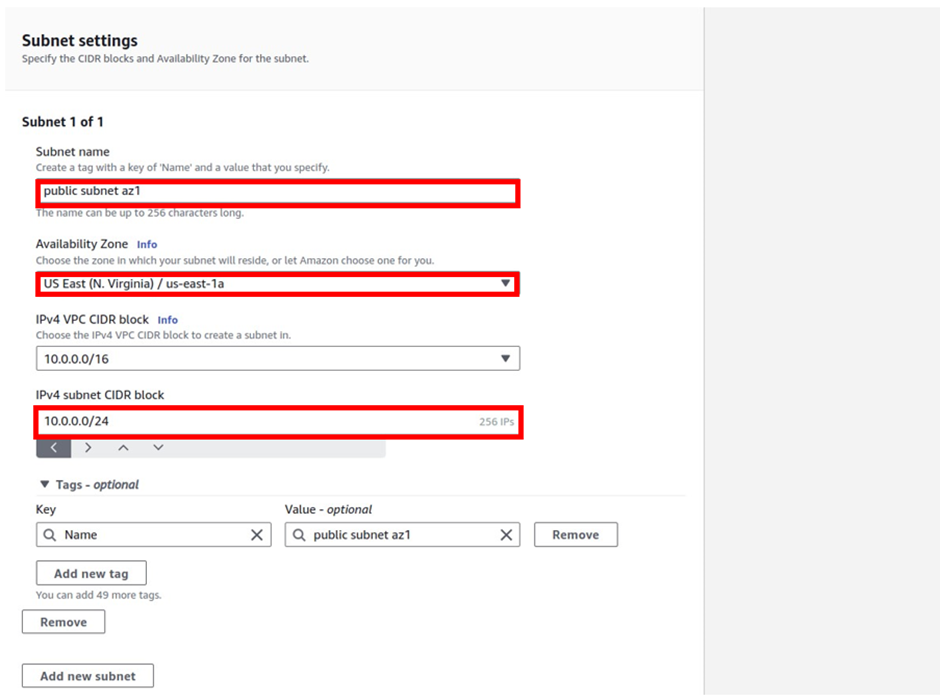
Repeat steps to create desired subnets for each remaining Availability Zone in the region and click Close.

Activate VMware Cloud on AWS Service

You can now activate your VMware Cloud on AWS service. When the purchase is processed, AWS sends a welcome email to the specified email address and starts the process using the following steps:

  • Select the Activate Service link after receiving the Welcome email from AWS.
  • Log in with MyVMware credentials.
  • Review the terms and conditions for the use of services, and select the check box to accept.
  • Select Next to complete the account activation process successfully, and you will be redirected to the VMware Cloud on AWS console.
  • Create an organization that is linked to the MyVMware account.
  • Enter the Organization Name and Address for logical distinction.
  • Select Create Organization to complete the process.

Identity and Access Management (IAM)

Assign privileged access to specific users to access the Cloud Services and SDDC console, SDDC, and NSX components. There are two types of Organization Roles; Organization Owner and Organization Member available.

The Organization Role with Organization Owner can add, modify, and remove users and access to VMware Cloud Services. The Organization Role with Organization Member can access Cloud Services but not add, remove, or modify users.

Deployment of SDDC on VMware Cloud on AWS

Sign in to Cloud Services Portal (CSP) to start the deployment of SDDC on VMC on AWS. Log in to the VMC Console.

Select VMware Cloud on AWS Service from the available services.

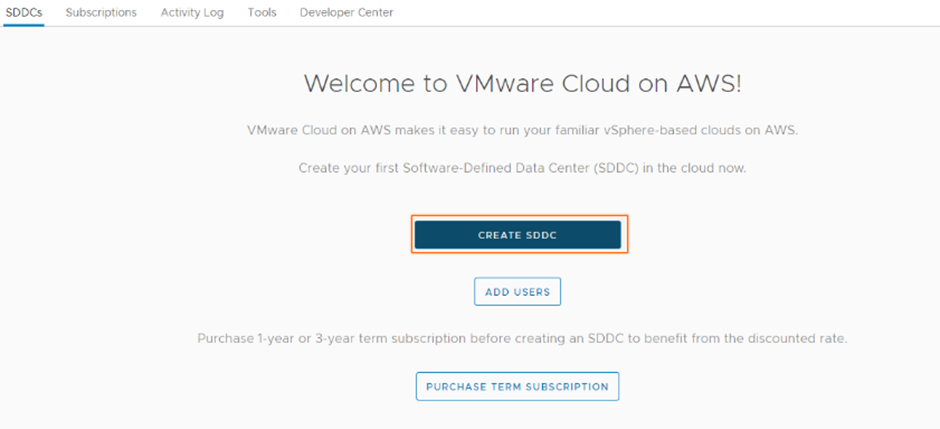
Select Create SDDC.
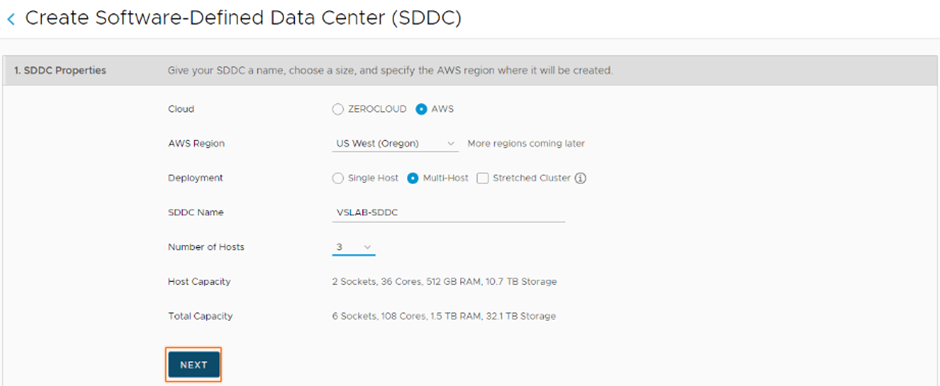
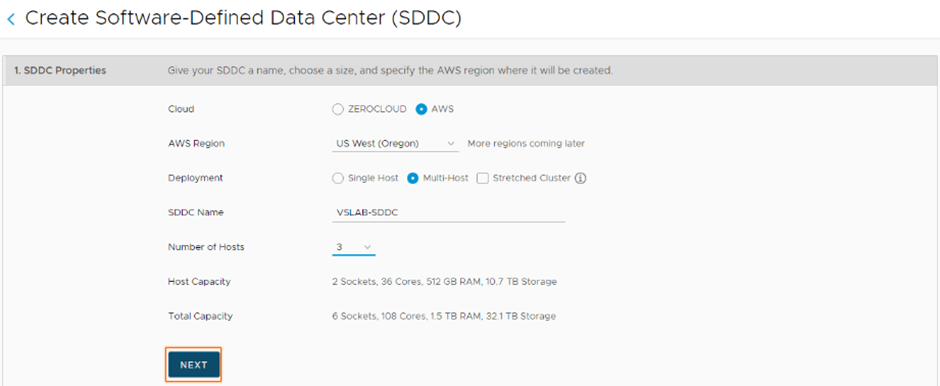
Enter the SDDC properties such as AWS Region, Deployment (either Single Host, Multi-Host, or Stretched Cluster), Host Type, SDDC Name, Number of Hosts, Host Capacity, and Total Capacity, and click Next.
Connect to a new AWS account, and click NEXT.

Select your previously configured VPC and subnet, and NEXT.

Enter the Management Subnet CIDR block for the SDDC, and click NEXT.

Click the two checkboxes to acknowledge to take responsibility for the costs, and click DEPLOY SDDC.
You’ll be charged when you click on DEPLOY SDDC and can’t pause or cancel the deployment process once it starts and will take some time to complete.

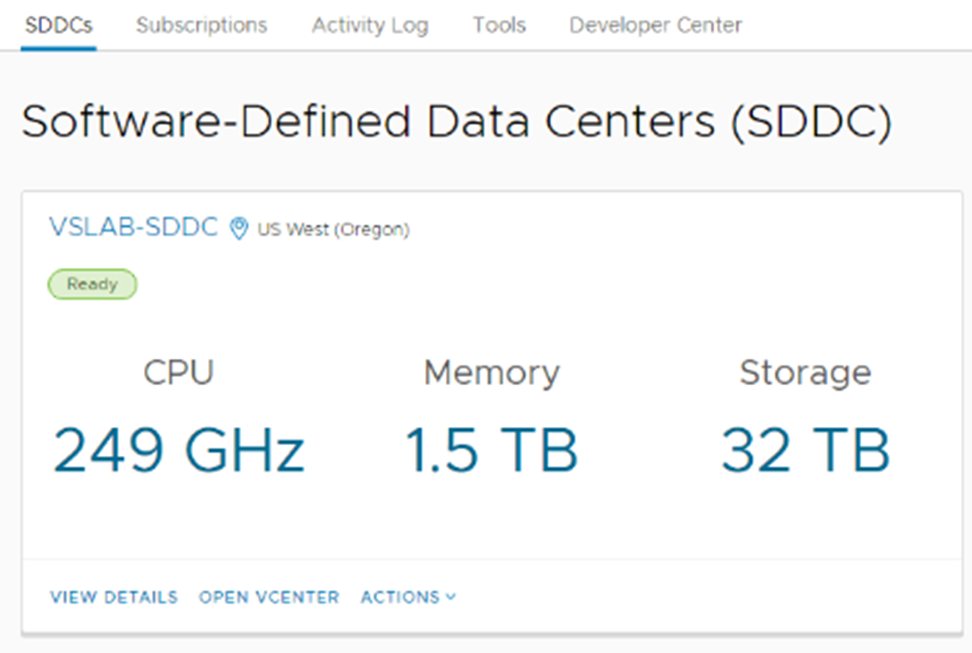
Your VMware-based is ready on AWS.
Stay tuned for more.

If you have any questions concerning this article or have an AWS project that requires our assistance, please reach out to us by leaving a comment below or email us at. sales@accendnetworks.com

Thank you!

Categories
Blogs

Unlocking the Power of AWS EBS Volumes: A Comprehensive Introduction

Unlocking the Power of AWS EBS Volumes: A Comprehensive Introduction.

EBS is a popular cloud-based storage service offered by Amazon Web Services (AWS).

EBS, called Elastic Block Store, is a block storage system used to store data. Designed for mission-critical systems, EBS provides easy scalability to petabytes of data.

What Is EBS?

Elastic Block Store (EBS) is a block storage service based in the AWS cloud. EBS stores huge amounts of data in blocks, which work like hard drives (called volumes). You can use it to store any type of data, including file systems, transactional data, NoSQL and relational databases, backup instances, containers, and applications.

EBS volumes are virtual disk drives that can be attached to Amazon EC2 instances, providing durable block-level storage.

What Is an EBS Volume?

It’s a Network drive attached to one EC2 instance at a time and works like a hard drive.
 An EBS Volume is a network drive (not a physical drive) you can attach to EC2 instances while they run.

This means to communicate between EC2 instance and EBS volume it will be using the network.

EBS volume because of their network drive, can be detached from one EC2 instance and attached to another one quickly.
 It allows EC2 instances to persist (continue to exist) data, even after the instance is terminated.
 EBS volumes can be mounted to one instance at a time (at the CCP level).
 EBS volumes are bound up/ linked/ tied to specific AZ’s. An EBS volume in us-east-1a cannot be attached to us-east-1b. But if we do a snapshot then we are able to move an EBS volume across different availability zones.

common use cases for EBS volumes:

Frequent updates — storage of data that needs frequent updates. For example: database applications, and instances’ system drives.

Throughput-intensive applications — that need to perform continuous disk scans.

EC2 instances — once you attach an EBS volume to an EC2 instance, the EBS volume serves the function of a physical hard drive.

Types of EBS Volumes

The performance and pricing of your EBS storage will be determined by the type of volumes you choose. Amazon EBS offers four types of volumes, which serve different functions.

Solid State Drives (SSD)-based volumes

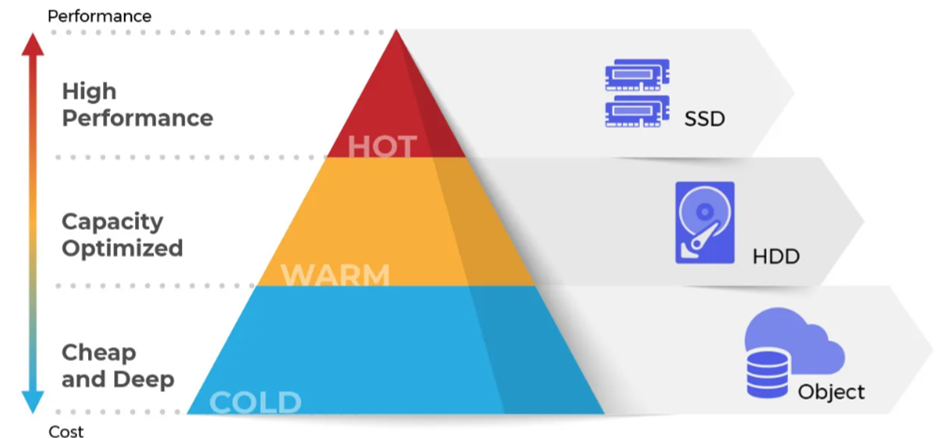
General Purpose SSD (gp2) — the default EBS volume, configured to provide the highest possible performance for the lowest price. Recommended for low-latency interactive apps, and dev and test operations.

Provisioned IOPS SSD (io1) — configured to provide high performance for mission-critical applications. Ideal for NoSQL databases, I/O-intensive relational loads, and application workloads.

What is IOPS?

IOPS, which stands for Input/Output Operations Per Second, is a measure of the performance or speed of an EBS (Elastic Block Store) volume in Amazon Web Services (AWS). In simple terms, it represents how quickly data can be read from or written to the volume.

Think of IOPS as the number of tasks the EBS volume can handle simultaneously. The higher the IOPS, the more tasks it can handle at once, resulting in faster data transfers. It is particularly important for applications that require a lot of data access, such as databases or applications that deal with large amounts of data.

Hard Disk Drives (HDD)-based volumes

Throughput Optimized HDD (st1) — provides low-cost magnetic storage. Recommended for large, sequential workloads that define performance in throughput.

Cold HDD (sc1) — uses a burst model to adjust capacity, thus offering the cheapest magnetic storage. Ideal for cold large sequential workloads.

The Beginner’s Guide to Creating EBS Volumes Prerequisite: an AWS account.

If you don’t have an AWS account, you can follow the steps explained here.

How to Create a New (Empty) EBS Volume via the Amazon EC2 Console

Go to the Amazon EC2 console.

Locate the navigation bar, then select a Region. Region selection is critical. An EBS volume is restricted to its Availability Zone (AZ). That means you won’t be able to move the volume or attach it to an instance from another AZ. Additionally, each region is priced differently. So do this wisely, and choose in advance prior to initiating the volume.

In the console, type EC2 in the search box and select EC2 under services.

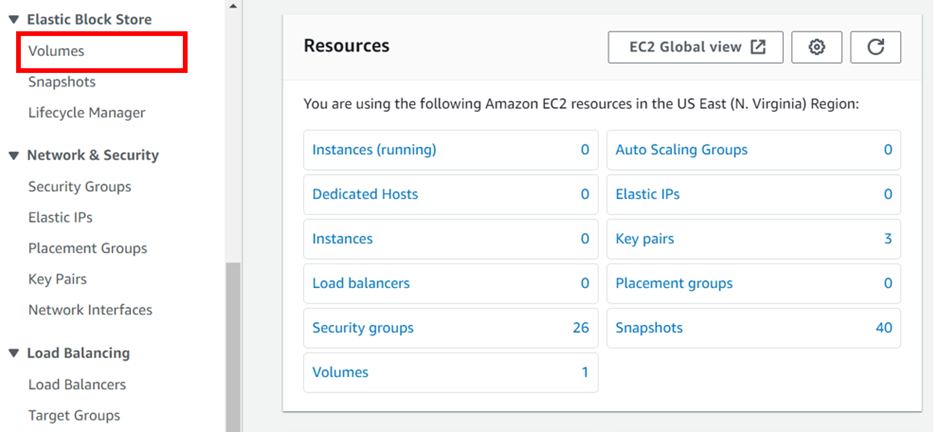
In the EC2 dashboard on the left side under Elastic block store, select volumes then click create volume.

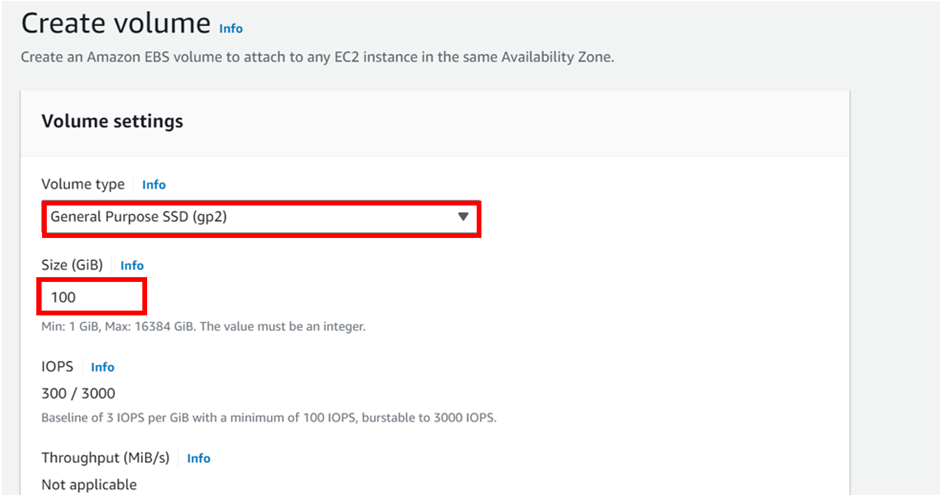
Choose the volume type. If you know what you’re doing, and you know which volume you need, this is where you can choose the volume type of your choice. If you’re not sure what type you need, or if you’re just experimenting, go with the default option (which is set to gp2)

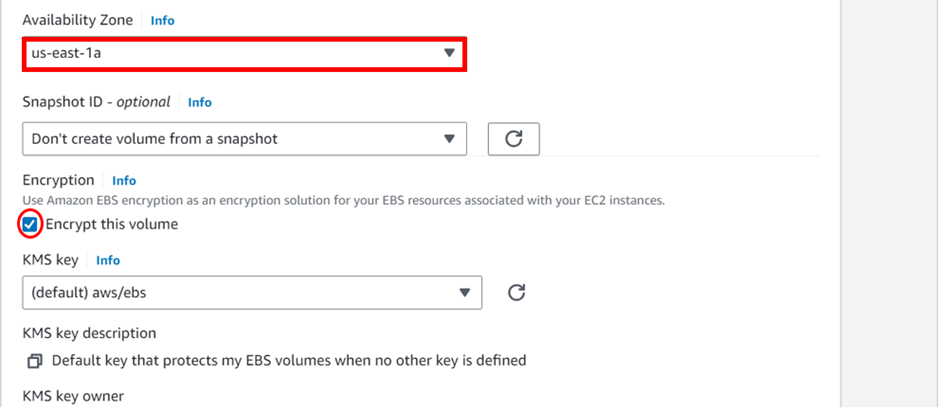
Under availability zone, select the dropdown and choose your availability zone, keep in mind that you can attach EBS volumes only to EC2 instances located in the same AZ. I will move with us-east-1a

EBS volumes are not encrypted automatically. If you want to do that, now is the time.

For EBS encryption, tick the box, for Encrypt this volume, then choose default CMK for EBS encryption. This type of encryption is offered at no additional cost.

For customized encryption, choose Encrypt this volume, then choose a different CMK from Master Key. Note that this is a paid service and you’ll be charged with additional costs.

Tag your volume. This is not a must, and you’ll be able to initiate your EBS volume without tagging it. We will leave this section as optional.

Choose Create Volume.

Success you now have a new empty EBS volume. You can now use it to store data or attach the volume to an EC2 instance.


Conclusion:

Amazon EBS volumes are a fundamental component of the AWS ecosystem, providing scalable and durable block storage for a wide range of applications. By understanding the features, use cases, and best practices associated with EBS volumes, users can make informed decisions to meet their specific storage needs in the AWS cloud environment.

Pull down and stay tuned for more.

If you have any questions concerning this article or have an AWS project that requires our assistance, please reach out to us by leaving a comment below or email us at. sales@accendnetworks.com

Thank you!
Categories
Blogs

A Comprehensive Guide to Creating and Managing Security Groups for Your Amazon EC2 Instances

A Comprehensive Guide to Creating and Managing Security Groups for Your Amazon EC2 Instances

Security-group-for-amazon

Introduction:

In the ever-evolving landscape of cloud computing, Amazon Elastic Compute Cloud (EC2) has emerged as a cornerstone for hosting web applications, running virtual servers, and managing various workloads in a scalable and cost-effective manner. As EC2 instances play a pivotal role in your AWS infrastructure, it’s essential to ensure that they are not only readily available but also well-protected from unauthorized access. This is where Amazon EC2 Security Groups come into the picture. In this comprehensive guide, we will provide you with a step-by-step approach to creating and managing security groups effectively.

Understanding Amazon EC2 Security Groups

Security Groups in AWS are essentially virtual firewalls that allow you to define inbound and outbound traffic rules for your EC2 instances. With security groups, you can establish fine-grained control over your EC2 instances’ network traffic, ensuring they are protected and compliant with your organization’s security policies

Let’s dive into the process of creating your first security group for an EC2 instance:

In the previous article on creating a new EC2 instance, we created our EC2 instance using the launch wizard security group that opened port 22 and source was from anywhere from the internet.

We will now configure the security group for our EC2 instance.

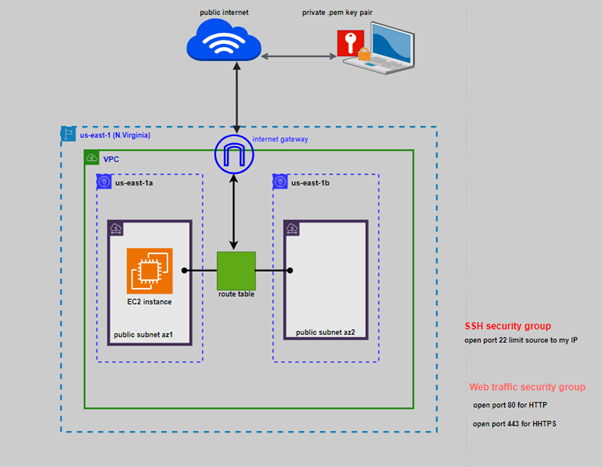
We will modify our SSH security group and only limit the source traffic to my IP address.

Again, we will open port 80 for HTTP and source is going to come from anywhere from the internet. we will also open port 443 for HTTPS and the source of this web traffic is also going to come from anywhere from the internet.

We will then go to our EC2 instance already launched and add these security group.

Log in to your AWS Management Console

Navigate to the EC2 Dashboard.

In the EC2 dashboard on the left side of the navigation pane under Network and security select security groups. Then click create security group

amazon-ec2
create-security-group

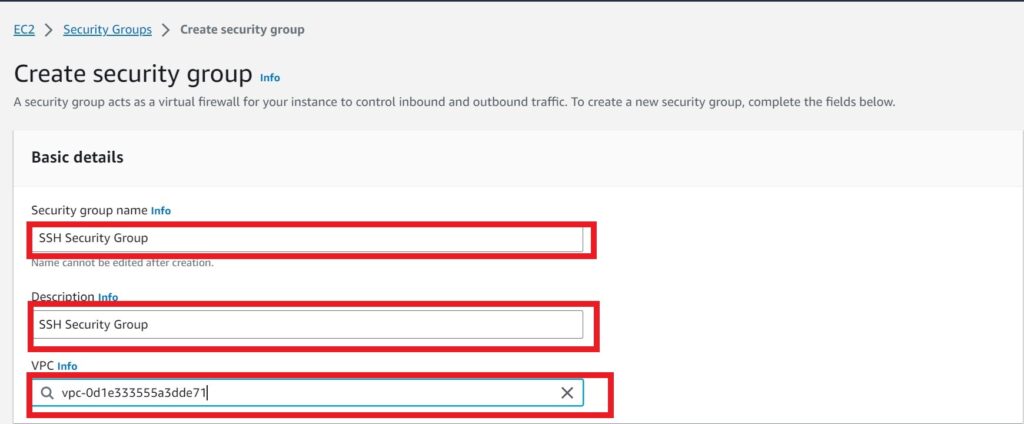
In the security group dashboard, give your security group a name, call it SSH security Group.

Use the same name as the description.

Under VPC, select your VPC click in the search box and select the default VPC.

Scroll down.

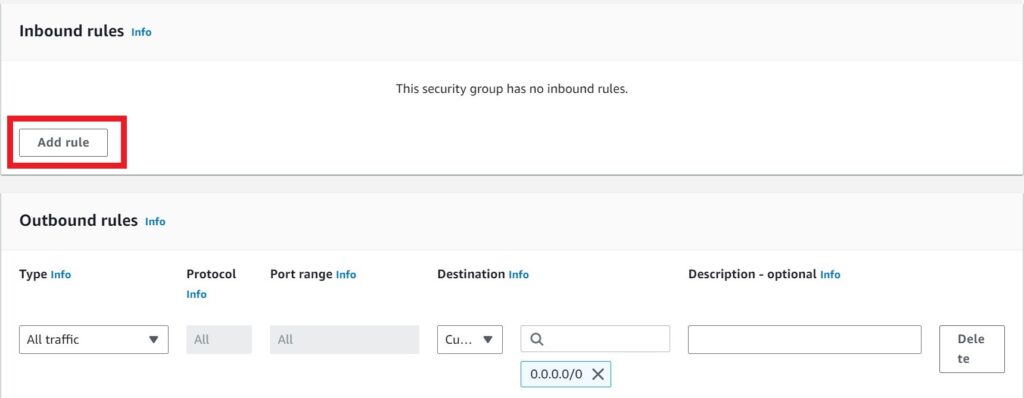
Under inbound rule click add rule.

Under type select the drop down and look for SSH, then select it. Under source select the drop down and select my IP, this will select the IP address of your local machine.

inbound-rules-info

Scroll down and click create security group.

create-security-group-tag

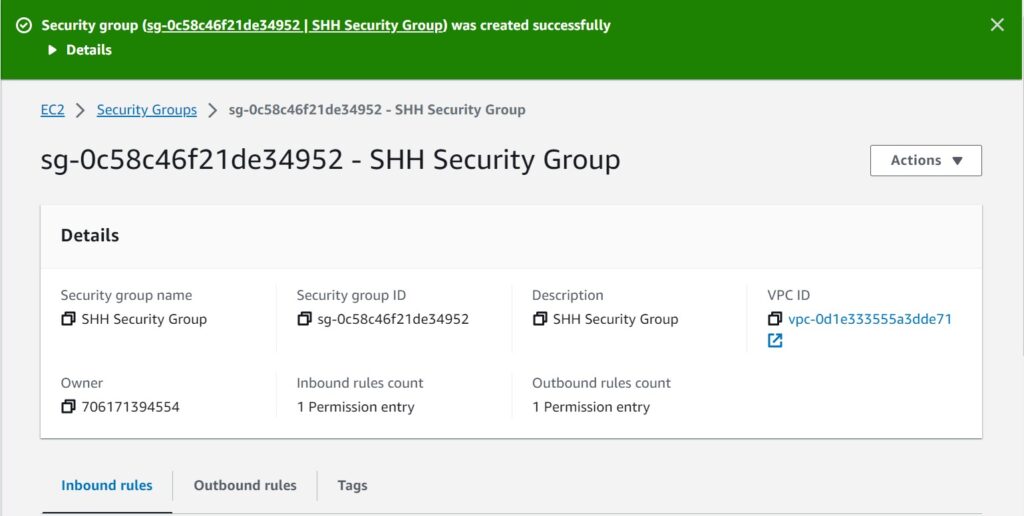
We have successfully created the SSH security group, and limited the source of traffic to our IP address. This is always a security best practice. This means that its only my IP address that can SSH into my EC2 instance through port 22.

shh-security-group

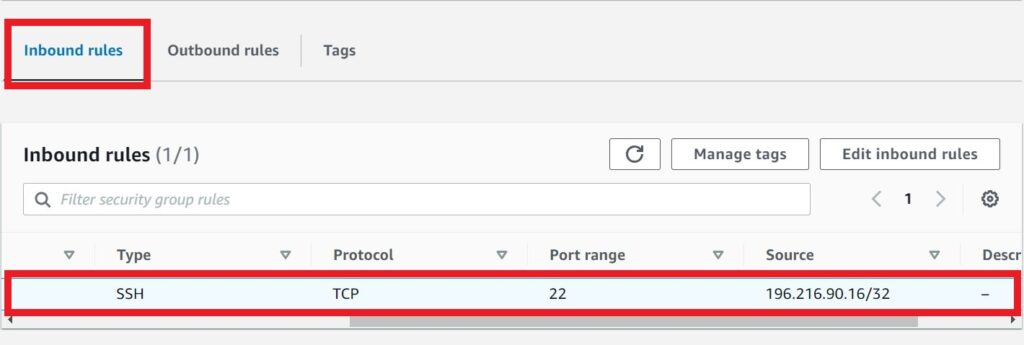
if you look at inbound rules tab under type, its SSH and under protocol is TCP, port range is 22 and source we can see my IP address 196.216.90.16/32

Next we will proceed and create our Web traffic security group, so click create security group a gain.

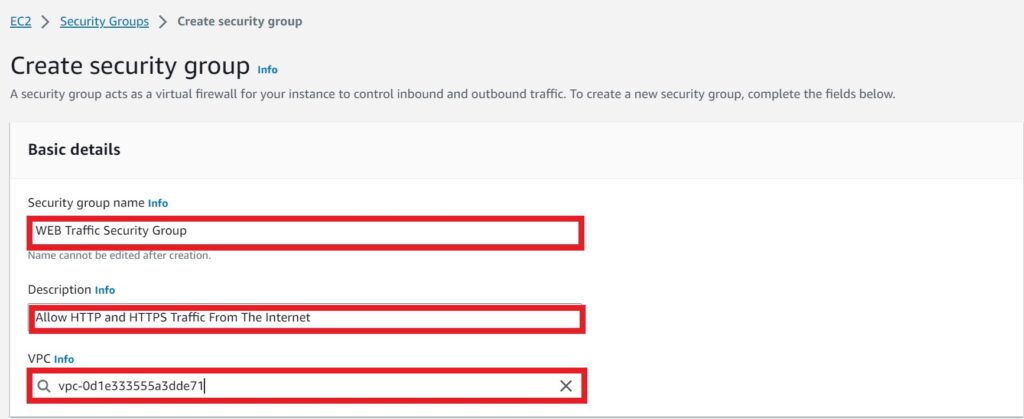
Under basic details, give your security group a name, call it web traffic security group. Under description I will give it a description. Type in allow HTTP and HTTPS traffic from the internet. Under VPC, select the default one.

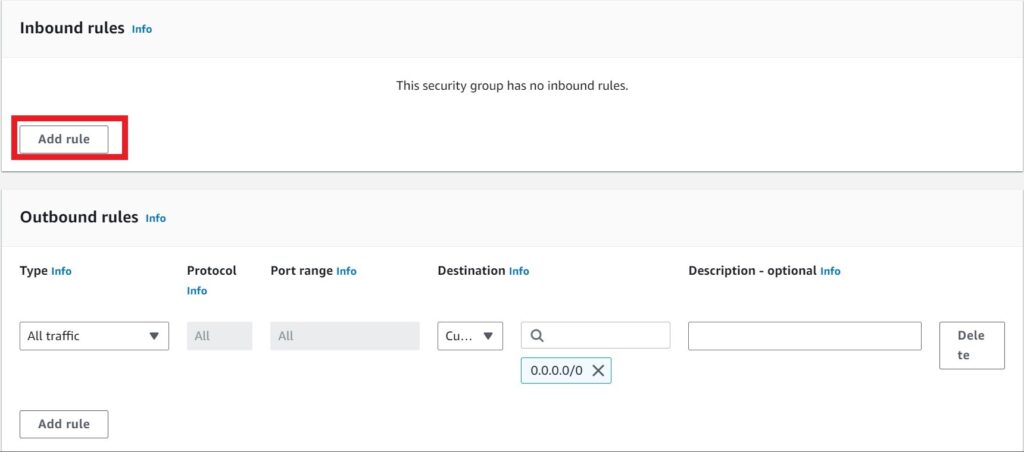
Scroll down, under inbound rule, click add rule.

add-rules

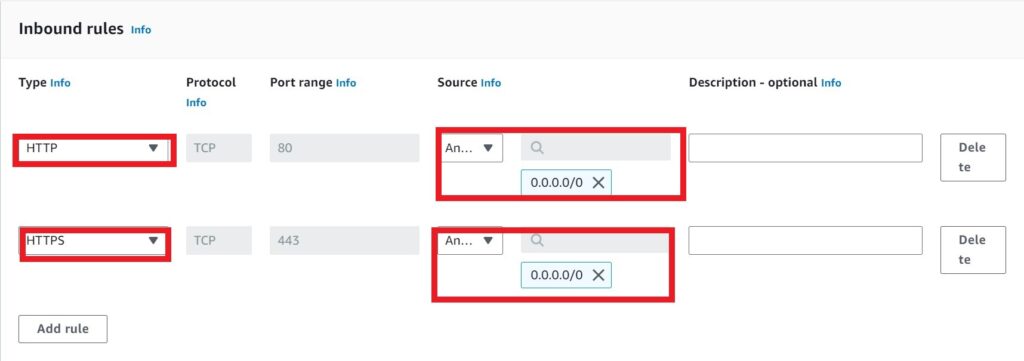
Under type, select the drop down look for HTTP then select it. Under destination, click the drop and select anywhere for IPv4 addresses.

This will open port 80 for HTTP traffic if you look under port range, you will see the value 80.

Click add rule again then under source select the drop down and look for HTTPS then select it. Under destination, click the drop and select anywhere for IPV4 addresses.

Again, this will open port 443 for HTTPS traffic if you look under port range, you will see the value 443.

http-rules-info

Scroll down and click create security group.

create-security-group-tag

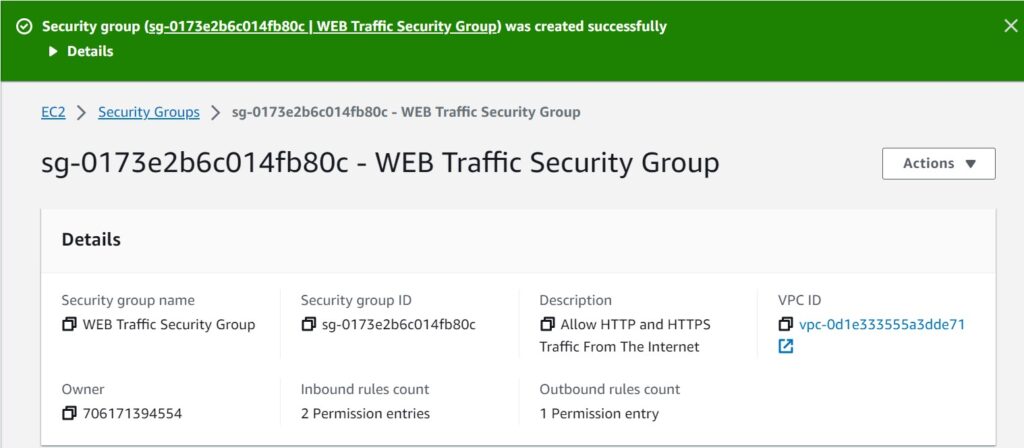
There we go; we have successfully created the web traffic security group and opened port 80 for HTTP and port 443 for HTTPS and our destination is anywhere in the internet.

web-traffic-security-group

If you look under inbound rules tab, we can see our IP version is IPv4, type is HTTPS and HTTP and port range is 80 and 443.

Next, we will now associate our security groups we’ve created to our EC2 instance.

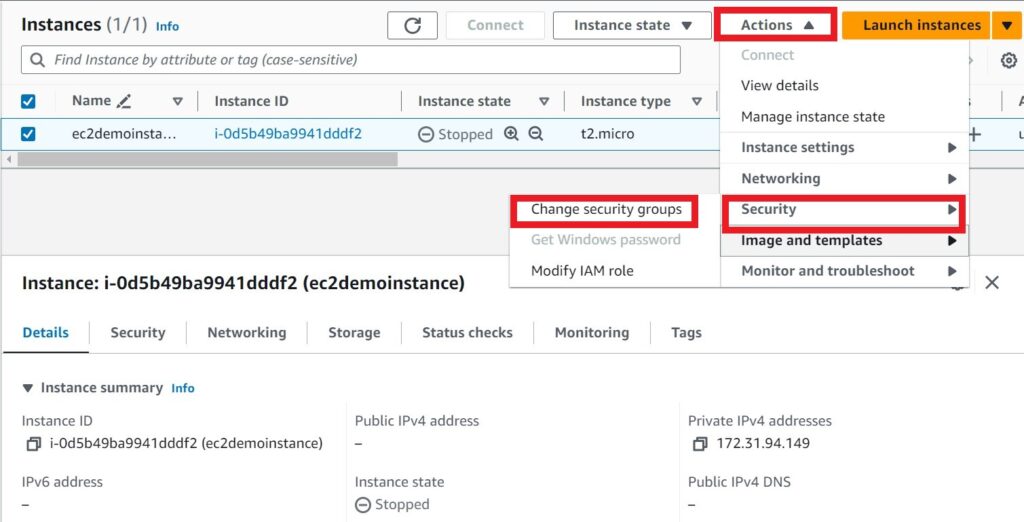
Select your instance, click action drop down button, select security tab then click change security groups.

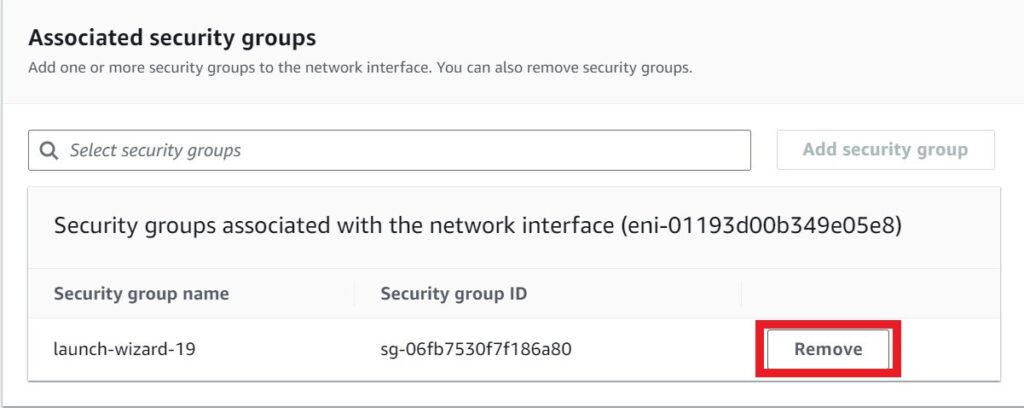
In the change security group tab, under associated security groups, click remove launch wizard security group.

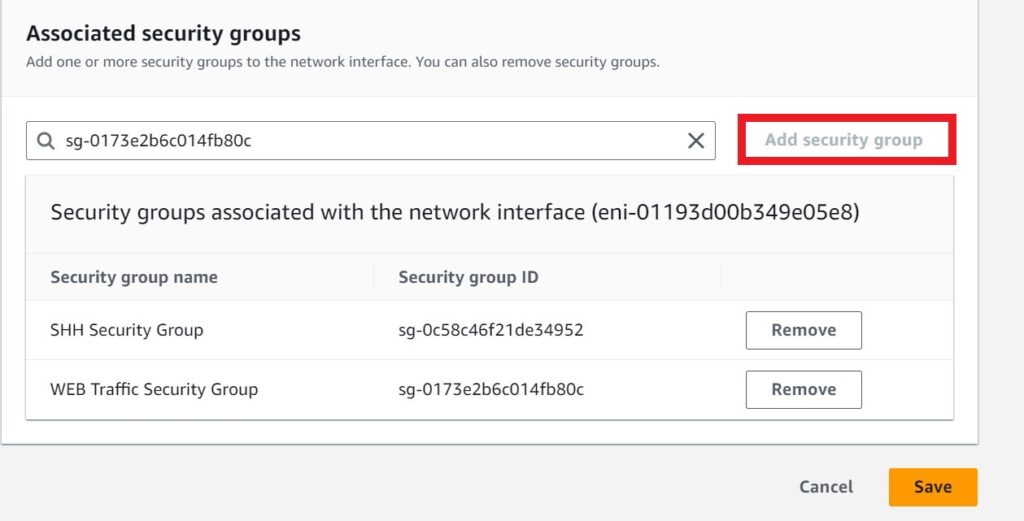
Click add security group then click the search box for add security group, select the two security groups we’ve just created. The SSH and the web traffic security groups then click save.

associated-security-groups-add

We have successfully changed the security group settings for our EC2 instance.

security-groups-changed-successfully-1

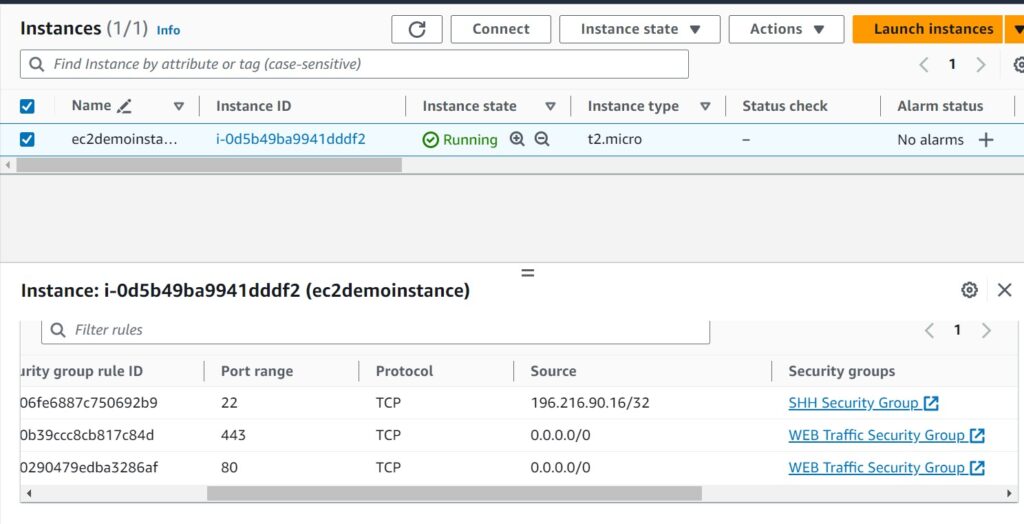
Click instance ID, then navigate to the security tab, you will see the three security groups, one on port 22, port 80 and port 443.

instances-demo
instances-demo

This brings us to the end of this blog. Thanks for your time.

Pull everything down to avoid surprise bills.

Please leave us a comment or any questions if you have concerning this article below. Thank you!