Accend Networks San Francisco Bay Area Full Service IT Consulting Company

Categories
Blogs

SSM Session Manager

Go Bastion-less: Unleashing the power of SSM Session Manager

SSM Session Manager

In the sphere of cloud infrastructure management, the move towards a Bastion-less environment has emerged as a transformative strategy. Central to this paradigm shift is the Systems Manager Session Manager, a tool that revolutionizes remote access, security, and operational efficiency.

Understanding Bastion-less Architecture

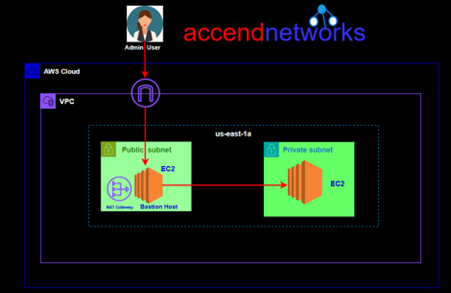
Traditionally, a Bastion Host stands as an intermediary gateway for accessing and managing resources within a private subnet in a VPC. While Bastion Host (jump server) provided a layer of security, it also introduced complexity, management overhead, and additional costs.

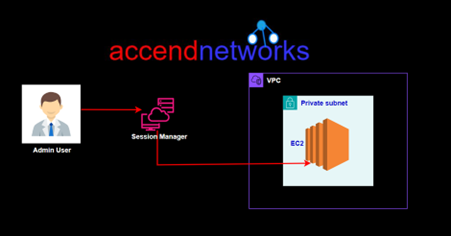
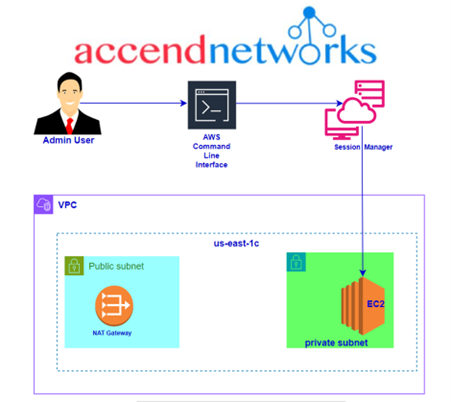
On the contrary, a Baston-less, architecture eliminates the need for a dedicated Bastion Host. Instead, access to instances in the private subnets is managed by secure tools like SSM Session Manager streamlining remote access workflows and bolstering security workflow.

In this blog article, we’ll showcase a streamlined approach to accessing your EC2 instance in a private subnet without the need for a key pair or Bastion Host, all thanks to AWS Systems Manager’s Session Manager. You’ll discover how to leverage a new browser-based interactive shell alongside the command-line interface (CLI) for efficient management of both Windows and Linux instances. With the Session Manager options offered by AWS System Manager, this can be achieved through a simplified configuration, making remote access and management a simple task.

Configuration with Bastion Host

Drawbacks of Bastion Host and Key-pair

Security: It requires SSH access firstly to reach itself and then to reach other instances. This is not secure as if someone has opened unauthorized access, it can lead to destruction depending on the level of access a user gains.

Access: To access the Bastion Host and other instances using the key-pair method, you require a sensitive file that should have limited access. However, securely storing and sharing this file, especially within a team, poses a security challenge.

Cost: It’s an additional machine that incurs extra costs.

Manageability: Securing key pairs and maintaining regular bastion patching requires additional management overhead.

Now all the above issues are mostly eliminated with the session manager approach and hence you get the following for a good reason:

Security: Session Manager communicates securely with instances through the SSM Agent using an encrypted tunnel that originates from the instance. eliminating the need for a bastion host. This means you don’t have to manually configure SSH keys or open inbound ports.

Controlled Access: You use IAM policies and users to control access to your instances and don’t need to distribute SSH keys.

Auditability: Command and response logs can be directed to Amazon CloudWatch and an S3 bucket. Additionally, you can configure SNS notifications to alert you when a new session begins.

Session Manager in Action

To allow Session Manager access to our instance will need to attach the following IAM role: AmazonSSMManagedInstanceCore. This policy grants instances the permissions needed for core Systems Manager functionality.

Session Manager in Action

For demo purpose, we will launch an EC2 instance without a key pair. For the security group, we will not open port 22 for SSH. Let’s proceed as follows.

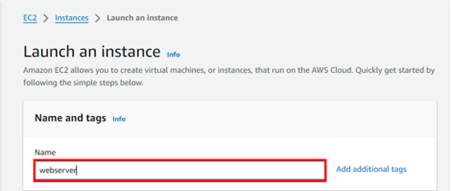
Log in to the management console navigate to the EC2 console then click Launch Instance and under name give your Instance a name.

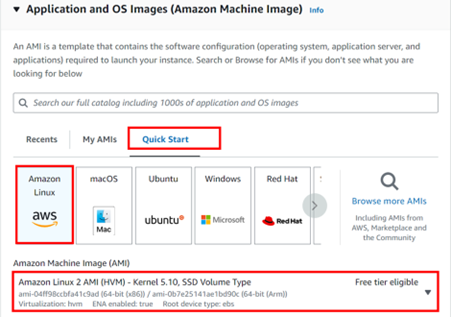
For application and OS images, select the QuickStart tab then select Amazon Linux2 AMI since it comes with the SSM agent already installed. Scroll down.

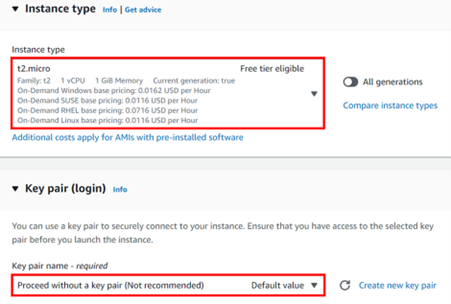
For instance, move within the free tier by selecting t2. Micro. For key-pair, select the drop-down button and select move without key pair. Remember we don’t need a key pair since we will be using a session manager.

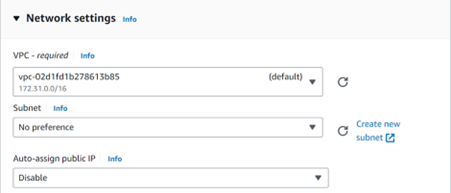
Under Networking, select edit. Move with the default VPC then for Auto-assign-Public IP, select the drop-down button then select disable. We will not assign a public IP address to this Instance. Scroll down.

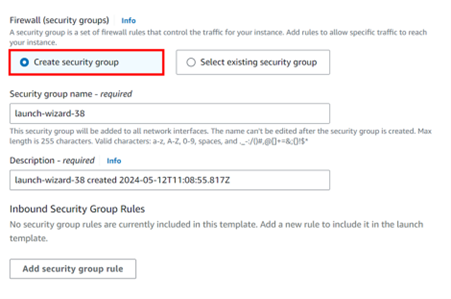
Under the firewall and security group, we will not open port 22. So, click create security group then uncheck port 22. Scroll down to Advanced settings then expand.

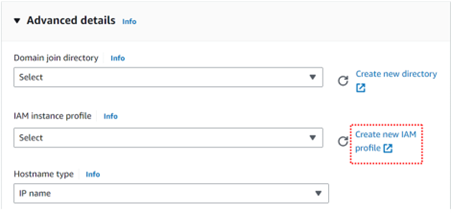
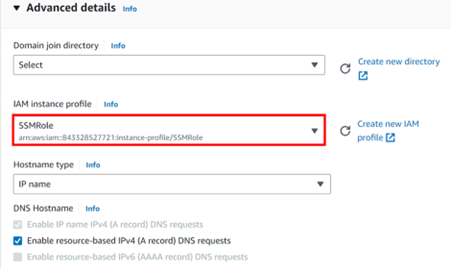
Under advanced settings, under the I AM instance profile, click Create New IAM profile.

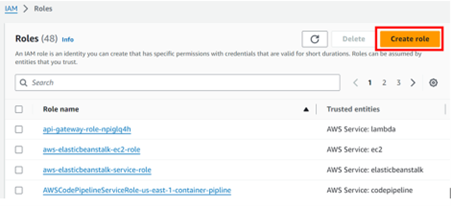
You will be brought to the I AM console then click Create Role.

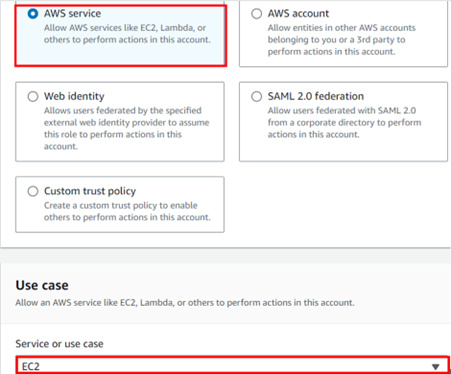
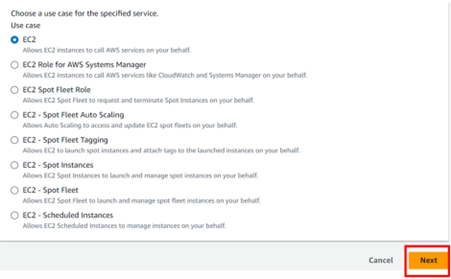
Select AWS service then EC2. Click next.

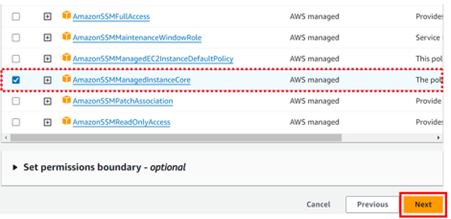
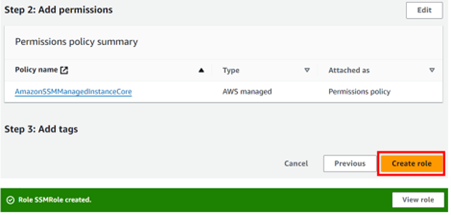
Select amazonssmManageginstancecore then click next.

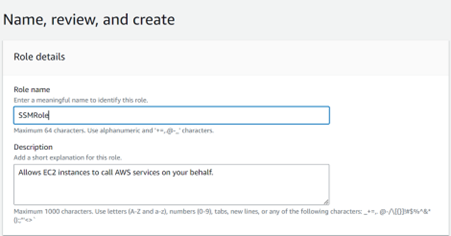
Give your role a name, then review and click Create.

This role has been created, go back to the EC2 console and select it.

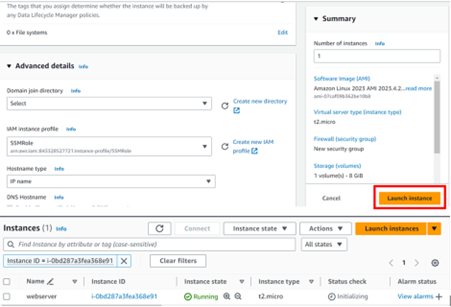
These are the only settings we need, scroll down and click Launch instance.

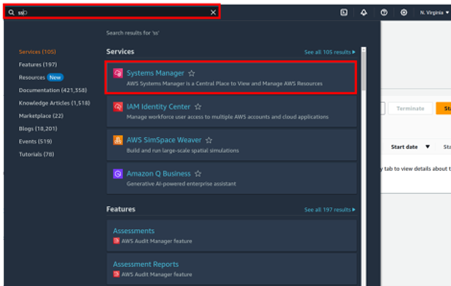
Once the instance has been launched, go to the Systems Manager console by typing SSM in the search box then select Systems Manager.

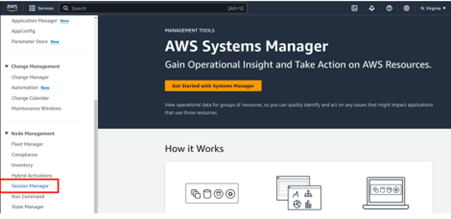
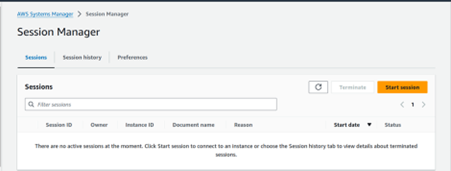
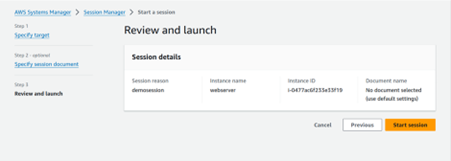
In the Systems Manager console on the left side of the panel select Session Manager then click Start Session.

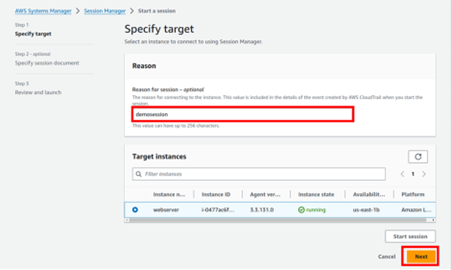
Give your session a name, then under Target instances, your instance will appear. Select it then select next.

Leave all default settings and click start session.

There we go, we have logged into our instance.

Remember we didn’t open port 22 and did not allocate any key pair to our Instance.

This brings us to the end of this blog, thanks for reading, and stay tuned for more.

If you have any questions concerning this article or have an AWS project that requires our assistance, please reach out to us by leaving a comment below or email us at sales@accendnetworks.com.

Thank you!

Categories
Blogs

AWS Systems Manager

Unveiling the Power of AWS Systems Manager: Simplifying Management and Automation.

AWS Systems Manager

Managing and maintaining a fleet of virtual machines and services in the error of cloud computing can be a daunting task. This is where AWS systems manager comes in as a powerful suit of tools designed to simplifying operational tasks, automate workflows and enhance security a cross your AWS infrastructure. In this blog article, we will delve into the capabilities and benefits of AWS Systems Manager.

What is AWS Systems Manager

According to AWS documentation, AWS Systems Manager is the operations hub for your AWS applications and resources and a secure end-to-end management solution for hybrid and multicloud environments that enables secure operations at scale. AWS Systems Manager (SSM) is an agent-based service for managing servers on any infrastructure: AWS, on-premise and other clouds.

SSM Agent

The AWS Systems Manager Agent (SSM Agent) is Amazon software that operates on Amazon EC2 instances, edge devices, and on-premises servers and virtual computers (VMs). Systems Manager may update, manage, and configure these resources using the SSM Agent. The agent receives requests from the AWS Cloud’s Systems Manager service and executes them as stated in the request. The SSM Agent then uses the Amazon Message Delivery Service to deliver status and execution information back to the Systems Manager service.

AWS Systems Manager Features Automation

With SSM automation we have something called a document which defines an action to perform and it’s written in YAML or JSON. For instance, we can have a document that creates a snapshot of an RDS database. The documents are fed into the SSM automation which will then automate the IT operations and management tasks across the AWS resources.

Run Commands

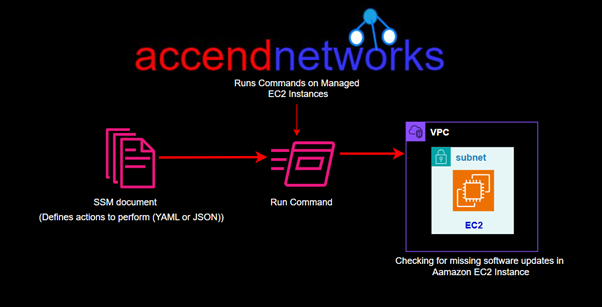
The run command is also very similar, it also has documents. They include things such us commands, automation and packages. For example, we have run command that lists missing Microsoft windows updates, find out what they are and be able to patch them.

Inventory

This quit gives you an inventory of resources that you are managing. Once the information is collected, we can gather all that data, visualize it then drill down into the various components of the inventory.

Patch Manager

Helps you select and deploy operating systems and software patches across large groups of Amazon EC2 and on-premises instances.

We have something called patch baselines where we can set rules to auto approve select categories of patches to be installed, specify a group of patches that override these rules and are automatically approved or rejected.

We can also specify maintenance windows for patches so that they are only specified during predefined times.

Patch manager helps to ensure that your software systems are up to date and meets your compliance policies you might have in your organisation.

SSM helps you scan your managed instances for patch compliance as well as configuration inconsistencies.

Session Manager

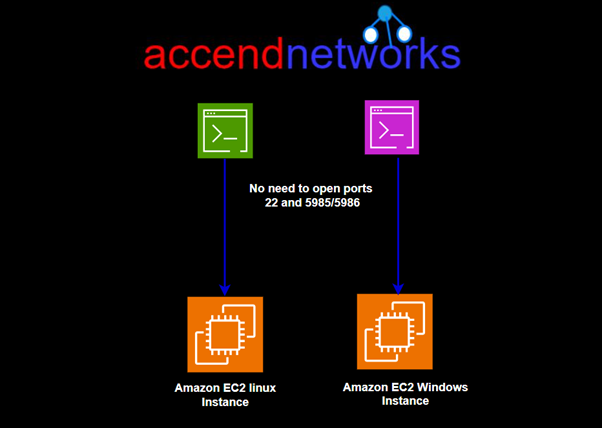
Allows you to connect to the command lines on your instances enabling secure management of instances at scale without logging into your servers. It replaces the needs for Bastion hosts, SSH or Remote PowerShell.

This means you don’t open ports you typically need for these protocols. It also integrates with I AM for granular permissions and all the actions that are taken can be seen in AWS cloud Trail. You can store your session logs in AWS S3 and have outputs go to Amazon CloudWatch logs as well.

To enable this to work you need I AM permissions for EC2 instance to access SSM, S3 and CloudWatch logs.

Parameter Store

This is a service that allows you to store configuration data and secretes. You can store data such us passwords, database strings and licence codes. Data can be stored in plain text, or cyphertext.

How does Systems Manager work?

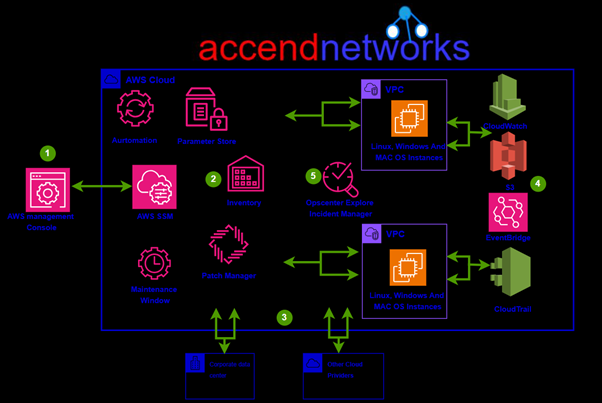
Let’s understand with a general example of a systems Manager process flow.

  1. Access Systems Manager– The AWS Console provides access to the Systems Manager. You can use the AWS Command Line Interface, AWS Tools for Windows PowerShell, or the AWS SDK to manage resources programmatically. You may use Systems Manager to configure, schedule, automate, and execute operations on your AWS resources and managed nodes.
  2. Choose a systems Manager capability – More than two dozen functions are included in Systems Manager to assist you in performing activities on your resources. Only a handful of the features that administrators employ to configure and manage their resources are shown in the illustration.
  3. Verification and processing – Systems Manager verifies configurations, including permissions, and makes requests to the AWS Systems Manager agent (SSM Agent) running on your hybrid environment’s instances, edge devices, or servers and VMs. The configuration changes given by SSM Agent are implemented.
  4. Reporting– SSM Agent notifies the user, Systems Manager in the AWS Cloud, Systems Manager operations management capabilities, and various AWS services, if configured, about the status of the configuration changes and actions.
  5. Systems Manager operations management capabilities– In reaction to events or issues with your resources, Systems Manager operations management features such as Explorer OpsCenter and Incident Manager aggregate operations data or create artifacts such as operational work items (Ops Items) and incidents if enabled. These features might assist you in investigating and troubleshooting issues.

This brings us to the end of this blog, thanks for reading and stay tuned for more.

If you have any questions concerning this article or have an AWS project that requires our assistance, please reach out to us by leaving a comment below or email us at sales@accendnetworks.com.

Thank you!
Categories
Blogs

AWS Firewall Manager

Securing Your Cloud with AWS Firewall Manager

Secure Your Cloud

Introduction

In the rapidly evolving cloud computing landscape, security remains top priorities for businesses of all sizes. With the continuous rise of sophisticated cyber threats and complex network architectures, organizations need robust solutions to safeguard their cloud Environments. One such solutions offered by AWS is the AWS Firewall Manager (or AWS Network Firewall). Which is a tool designed to simplify firewall management and enhance overall security posture.

What Is Firewall Manager?

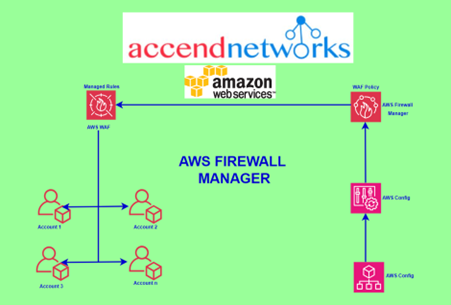
Firewall Manager is a centralized security management service that allows you to set and administer firewall rules across all of your accounts and applications from a single location. It provides a unified approach to firewall management. Think of AWS firewall Manager as the central command centre of your cloud security. It lets you manage and enforce consistent security policies across multiple AWS accounts and resources, including WAF, Network Firewalls, VPC security groups, and others.

Benefits of AWS Firewall Manager

Simplify management of firewall rules across your accounts: AWS Firewall Manager is linked with AWS Organizations, allowing you to manage your Amazon VPC’s AWS WAF rules, AWS Shield Advanced protections, security groups, AWS Network Firewall rules, and Amazon Route 53 Resolver DNS Firewall rules from a single location.

Ensure compliance of existing and new applications: AWS Firewall Manager applies the mandatory security policies you establish across existing and newly generated resources automatically.

Easily deploy managed rules across accounts: With just a few clicks in the interface, you can select a Managed Rule from an AWS Marketplace Seller and deploy it uniformly throughout your Application Load Balancer, API Gateway, and Amazon CloudFront architecture.

Centrally deploy protections for your VPCs: Security administrators can use Firewall Manager to establish a baseline set of VPC security group rules in Amazon VPCs for EC2 instances, Application Load Balancers (ALBs), and Elastic Network Interfaces (ENIs).

Ensure compliance of existing and new applications: AWS Firewall Manager (AWS Network Firewall) automatically enforces mandatory security policies that you define across and newly created resources.

AWS Firewall Manager Prerequisites

Your account must be a member of AWS Organizations.

Your AWS account must be a member of an organization in the AWS Organizations service, and the organization must have all features enabled.

Your account must be the AWS Firewall Manager administrator

To configure Firewall Manager policies, your account must be set as the AWS Firewall Manager administrator account, in the Settings pane.

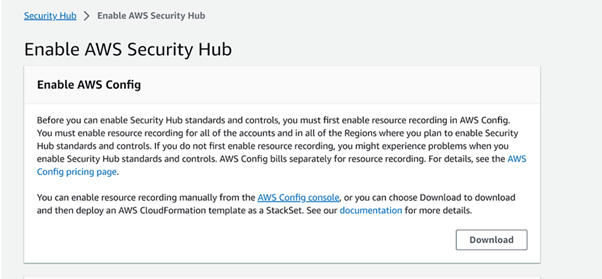
You must have AWS Config enabled for your accounts and Regions

You must enable AWS Config for each of your AWS Organizations member accounts and for each AWS Region that contains resources that you want to protect using AWS Firewall Manager.

To manage AWS Network Firewall or Route 53 resolver DNS Firewall, the AWS Organizations management account must enable AWS Resource Access Manager (AWS RAM).

The AWS Organizations management account must enable AWS RAM for all member accounts in your organization.

To use the third-party firewall, subscribe in the AWS Marketplace.

To use the third-party firewall with AWS Firewall Manager, you must first subscribe to the third-party firewall Pay-As-You-Go service in the AWS Marketplace.

AWS Organizations: Your AWS account must be a member of an organization in the AWS Organizations service, and the organization must have all features enabled.

Your account must be the AWS Firewall Manager administrator: To configure Firewall Manager policies, your account must be set as the AWS Firewall Manager administrator.

The Firewall Manager administrator account is the account you use to connect to the Firewall Manager.

AWS Config: You must enable AWS Config for each of your AWS Organizations member accounts and for each AWS Region that contains resources that you want to protect using AWS Firewall Manager.

To manage AWS Network Firewall or Route 53 resolver DNS Firewall, the AWS Organizations management account must enable AWS Resource Access Manager (AWS RAM): The AWS Organizations management account must enable AWS RAM for all member accounts in your organization.

To use the third-party firewall, subscribe in the AWS Marketplace: To use the third-party firewall with AWS Firewall Manager, you must first subscribe to the third-party firewall Pay-As-You-Go service in the AWS Marketplace.

How Firewall Manager works

You manage your Firewall Manager policies with your Firewall Manager administrator account.

Firewall Manager sets the Firewall Manager administrator account as the AWS Organizations Delegated Administrator for Firewall Manager when you create it.

This gives the Firewall Manager access to the organizational units (OUs) you use to define the scope of your Firewall Manager policies.

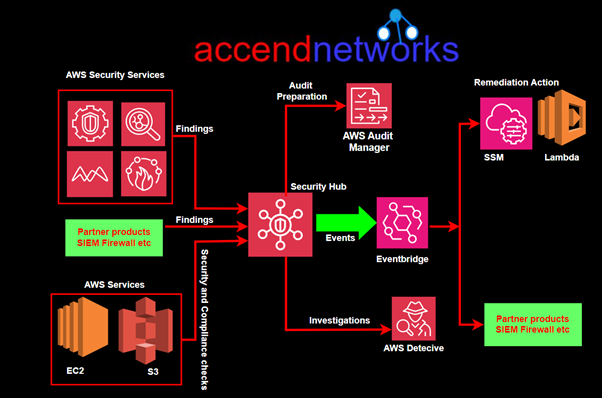
It generates findings for out-of-compliance resources and detects assaults, which it sends to AWS Security Hub.

Conclusion

AWS Firewall Manager stands out as a robust solution for organizations seeking to streamline and fortify their cloud security. By providing centralized management, automated rule deployment. This brings us to the end of this blog.

If you have any questions concerning this article or have an AWS project that requires our assistance, please reach out to us by leaving a comment below or email us at sales@accendnetworks.com.

Thank you!
Categories
Blogs

Automate Your EBS Backups

Automate Your EBS Backups: A Comprehensive Guide to Scheduled Snapshots and Effortless Restores.

Automate EBS Backups

Ensuring the safety and availability of your data is a critical element of managing any infrastructure in the cloud. Automating EBS backups can save time, lessen the risk of data loss, and ensure short recovery in the event of a failure. This guide will stroll you through the procedure of setting up automated EBS snapshots and how to restore them effortlessly.

AWS Backup

AWS Backup is a fully managed service that makes it easy to centralize and automate data protection across AWS services, in the cloud, and on-premises.

It simplifies the process of centralizing and automating backups using just a few clicks for data across various AWS services.


Now let’s jump into the hands-on.

Step 1: Set Up AWS Backup Service

Sign in to your AWS Management Console and navigate to the AWS backup service.

Click on “Create backup vault” to begin the process of creating a new backup vault, where all of your backups will be securely stored.

Provide a name, encryption keys, and tags for your backup vault. Finally, click on “Create backup vault”.

With our backup vault set up, it’s now ready to store backups of our resources.

Step 2: Create a Backup Plan

Navigate to the left-hand navigation pane and select “Backup plans” We notice that there are currently no backup plans available. To create one, simply click on “Create backup plan”.

You’ll find three startup options for backup plans: you can choose from predefined templates, or if you prefer, you can define a plan using JSON. For this demo, I will choose to build a new plan.

Provide a suitable name for your backup plan tags are optional.

Under backup rule configurations, assign a name to your backup rule. Choose the backup vault created in the previous step as the destination for your backups. Select your desired backup frequency.

For this demo, the frequency has been set to every 1 hour, meaning backups of your AWS resources will be taken and stored in the designated backup vault every hour.

Under the backup window, select the timeframe according to your business requirements for when you need to take backups. It’s crucial to set the backup window during low traffic times or off-business hours to minimize disruption.

Choose a time frame that aligns with your organization’s operational needs while ensuring minimal impact on regular activities.

Enable the Point-in-time recovery in case you want to restore your backups at a specific point-in-time.

For the backup lifecycle, Select the retention period for the backups.

For compliance and regulations, you can define the region to copy backups into a different region.

Optionally, provide tags to recovery points and enable Windows VSS if you want application-consistent backups.

Once the backup configuration is completed, click on “Create plan”.

Step 3: Assign Resources to Backup Plan

After creating the backup plan, click on “Assign resources” next to the plan you created. Provide a resource assignment name and select the IAM role.

Then, select the desired EBS volumes or any other resources to which you want to apply this backup plan, and click “Assign resources”.

A backup plan was successfully created and resources were assigned to it.

Now, let’s ensure that the backup jobs are executing successfully according to our schedule.

Step 4: Monitor Backup Execution

Select “Backup jobs” from the left-hand navigation pane to view the executed backup jobs according to your desired timeframe.

After a while, you will observe that your backup jobs have been executed successfully.

The AWS Backup service also provides the capability to generate a report for our backup jobs, which can be stored in CSV or JSON format in an S3 bucket.

Now that our backup jobs are successfully executed as per the defined timeframe of our backup plan, let’s proceed to explore how to restore our data from the created backup.

Step 5: Test Backup Restoration

Navigate to “Protected resources” from the left-hand navigation pane. Here, you can choose the specific resource (such as an EBS volume) that you wish to restore from the backup.

Click on the EBS resource ID and select the recovery point (snapshot) from which you want to restore. Then, proceed to fill out the required details for the volume to be restored.

Restore EBS backup

Initiate the restoration process and monitor its progress closely.

Once the status shows completed, you’re now ready to attach it to your EC2 instances and get your application back up and running, that’s it.

Thanks for reading, and stay tuned for more.

If you have any questions concerning this article or have an AWS project that requires our assistance, please reach out to us by leaving a comment below or email us at sales@accendnetworks.com.

Thank you!

Categories
Blogs

Introduction to Azure Blob Storage

Introduction to Azure Blob Storage

Azure Blob Storage is part of the Azure Storage services, which include Azure Files, Azure Queues, and Azure Tables. Blob stands for Binary Large Object, and Azure Blob Storage is designed to handle large files and datasets, making it ideal for a variety of use cases such as serving documents or media directly to browsers, storing data for backup and restore, disaster recovery, and archiving.

Mastering Azure Blob Storage Encryption: A Detailed Guide to Secure Your Data

In today’s digital age, data security is paramount. With increasing cyber threats, securing sensitive information stored in the cloud has become a critical task for organizations. Azure Blob Storage, a popular choice for scalable object storage, offers robust encryption features to protect your data. This article provides a detailed guide on how to implement encryption in Azure Blob Storage, ensuring your data remains secure and compliant with industry standards.

Understanding Blob Storage Encryption

Encryption at Rest

Encryption at rest refers to the encryption of data stored in the cloud to prevent unauthorized access. Azure Blob Storage automatically encrypts data at rest using Azure Storage Service Encryption (SSE). Key features include:

  • Automatic Encryption: All data written to Azure Blob Storage is encrypted by default. This includes block blobs, append blobs, and page blobs. The encryption process is transparent to the user, requiring no additional code or configuration.
  • 256-bit AES Encryption: Azure uses Advanced Encryption Standard (AES) with 256-bit keys, one of the strongest encryption standards available. This ensures that data is highly secure against brute-force attacks.
  • Key Management: Azure manages encryption keys through Azure Key Vault or allows users to manage their own keys using Customer-Managed Keys (CMK). This provides flexibility and control over the encryption process.
Azure Blob Storage

Encryption in Transit

Encryption in transit ensures that data is protected while being transferred between the client and the Azure Blob Storage service. Key features include:

  • HTTPS: Data is encrypted using HTTPS, which ensures that data cannot be intercepted or tampered with during transmission. Azure Blob Storage requires HTTPS for secure data transfer.
  • Client-Side Encryption: Azure Blob Storage also supports client-side encryption, where data is encrypted by the client before being sent to Azure. This allows for end-to-end encryption, ensuring that data remains encrypted throughout its journey.

Benefits of Encrypting Azure Blob Storage

  1. Data Security: Protects sensitive data from unauthorized access.
  2. Compliance: Helps meet regulatory and industry standards.
  3. Managed Keys: Offers options to manage encryption keys.
  4. Performance: Minimal impact on storage performance.

Step-by-Step Guide to Implementing Encryption in Azure Blob Storage

Step 1: Create an Azure Storage Account

  1. Sign in to the Azure Portal: Open Azure Portal and sign in with your credentials.
  2. Create a Storage Account:
  • Navigate to “Create a resource”“Storage”“Storage account – blob, file, table, queue”.
  • Fill in the required details such as Subscription, Resource group, Storage account name, and Region.
  • Click “Review + create” and then “Create”.

Step 2: Enable Encryption at Rest

  1. Navigate to the Storage Account:
  • Go to “Storage accounts” ➔ Select your storage account.
  1. Encryption Settings:
  • Under “Settings”, click on “Encryption”.
  • Ensure “Blob service” is selected.
  • By default, Microsoft-managed keys are used for encryption. To use your own keys, select “Customer-managed keys (CMK)”.

Step 3: Configure Customer-Managed Keys (Optional)

  1. Set Up Azure Key Vault:
  • If you choose to use customer-managed keys, you need an Azure Key Vault.
  • Navigate to “Create a resource”“Security + Identity”“Key Vault”.
  • Fill in the required details and click “Create”.
  1. Generate or Import Keys:
  • In the Key Vault, navigate to “Keys”“Generate/Import”.
  • Create a new key or import an existing key.
  1. Assign Key to Storage Account:
  • Go back to the storage account’s “Encryption”
  • Select “Customer-managed keys”“Select a key vault and key”.
  • Choose the Key Vault and the key you created.

Step 4: Verify Encryption

  1. Check Encryption Status:
  • In the storage account’s “Encryption” settings, verify that the encryption is enabled.
  • Ensure the correct key is being used if you opted for customer-managed keys.

Step 5: Monitor and Manage Encryption

Best Practices for Azure Blob Storage Encryption

  1. Use Customer-Managed Keys for Greater Control: While Microsoft-managed keys are convenient, customer-managed keys offer more control over encryption processes.
  2. Regularly Rotate Keys: Regular key rotation reduces the risk of key compromise.
  3. Implement Access Controls: Use Azure’s role-based access control (RBAC) to restrict access to the storage account and key vault.
  4. Enable Logging and Monitoring: Use Azure’s monitoring tools to keep track of access and changes to your storage account.

Conclusion

Implementing encryption in Azure Blob Storage is a vital step in safeguarding your data against unauthorized access and ensuring compliance with industry standards. By following this detailed guide, you can master the encryption features of Azure Blob Storage, providing robust protection for your valuable data. Take advantage of Azure’s powerful tools and best practices to maintain the highest level of data security while being mindful of associated costs.

Stay tuned for more valuable insights.

If you have any questions concerning this article or have an AWS project that requires our assistance, please reach out to us by leaving a comment below or email us at sales@accendnetworks.com.


Thank you!